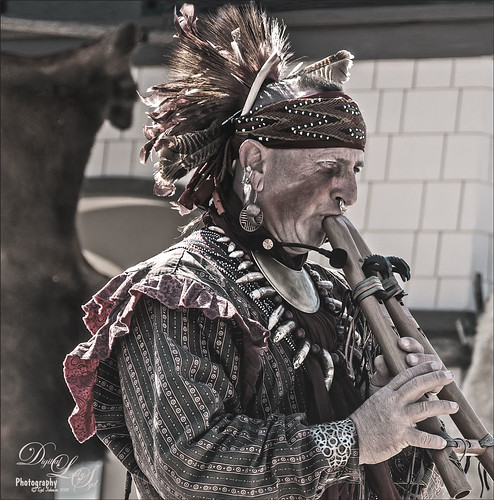
Anything Photoshop or Photography

Latest

Deserted Beach on Spanish Cay

Image of a deserted beach on Spanish Cay in the Bahamas
This image of a very deserted beach on Spanish Cay in the Bahamas was post-processed using the new On1 Photo Raw 2019 (see sidebar for website link). The software has had a major update and is much better. First of all, it is even faster loading your images . The next big improvement is that you can quickly switch between the Develop, Effects, Portrait (a new module) and Local tabs when accessed from Photoshop. This image used the Dynamic Contrast filter set to Natural, Glow Filter using Softlight Strong and painting out the dead trees, and Color Adjustment Filter changing the blue color a little. All the filters were set to an Opacity of 65. Then back in PS, a blue Solid Color Adjustment Layer was set to Hard Mix blend mode, layer Opacity 100%, and Fill set to 8%. Nik Viveza 2 was applied to add just a little warmth to the foreground water area. A spotlight effect was added to the wood and the edges were darkened down a little for a slight vignette effect. Last step was a Curves Adjustment Layer to add a little contrast. I will be learning more about this software soon and pass any tips along. I really like what I am seeing with the new On1 software!…..Digital Lady Syd

Colorful Queen Emma Lily

Image of a colorful Queen Emma Lily
Enjoyed post-processing this Queen Emma Lily growing in my front yard (they bloom all year long). I was mainly experimenting more with Topaz (see sidebar for website link) Studio AI ReMix. This time used the Neon Rise Style set to Linear Light blend mode and added Impression’s default settings except for Paint Opacity at 0.05 and Precision Detail. Back in Photoshop, added Nik Viveza 2 to sharpen up the center of the flower for focus and that was it. I just love the colorful results! For more on AI ReMix, check out my Topaz ReMix – Update and Better than Ever! blog for more information.

First Snow of the Season

Image of a Wintry Scene in Belarus
Decided to try using Serge Ramelli tutorial in KelbyOne’s Lightroom 30 Magazine on how to “Transform a Day Photo into a Night Photo.” It would probably be better if a street scene was chosen, but after fiddling around with the Radial Filters in Lightroom a bit, the results turned out pretty nice. Then the image was taken into Photoshop and I decided to add this wonderful, fairly new plug-in for us Windows users, called Luminar 2018 (see sidebar for website link). Several filters were added to get just the correct light to dark ratio (Accent AI Filter, Saturation/Vibrance, Dehaze, Brilliance/Warmth, and LUT Mapping using Color Punch Hot preset). On a second layer in the plugin Joel Grimes Indian Summer preset was applied which really sharpened up the church details. Then I decided I wanted a little snow effect so a couple layers were created using Glyn Dewis’s Dirt Debris Snow brush (created in his How to make a Dirt, Debris and Snow Brush in Photoshop video). A little snow was piled up on the sidewalk and roofs with a few specialty brushes I had created. I really liked the overall effect using a really bright image……Digital Lady Syd

The Ant and the Plant

Image of an ant in a Bird of Paradise bloom
This image was taken of my Bird of Paradise bloom in my yard and it had this busy, busy ant clamoring all over it. Not sure what an ant like from the plant, but he definitely was not too concerned about me taking him image. My 60 mm Nikkor macro lens was used at F/11 and 1/350 sec. A Bower 0.5 x High Resolution Digital Lens with Macro was added to the lens. Very little was actually done to this image. Just used a close crop, a little clean up on the plant, and a spotlight effect placed on the ant. It was a lot of fun to watch this little guy…..Digital Lady Syd

Color of the Wind

Digital Painting done in Photoshop
Once again just had some fun – this time painting with Grut’s Ink Brushes and paper. Decided to try and create an image somewhat like an Andrew Wyeth. (Right, like I could paint like Andrew Wyeth – I would be in heaven!) He is one of my favorite painters. It also gave me a chance to go through all the wonderful Ink Brush Nicolai has created at his Grut Brush site. There were so many I wanted to use but stayed instead to these brushes: Gone Coral, Coven Sloth, Pensive Linny, Bed Kelp, Bone Soak, Holy Slips, Go Folly, Raggedy Tag, and Wain Pip. (These were all placed into a brush Group named SJ Grut Ink Brush Favs – and backed up in the Preset Manager.) I also used his Oil Impasto Chip Gimble brush for ground cover. All these were used on separate layers so they could be adjusted and the opacity set correctly. Nicolai also has some marvelous papers – this one started with SP Espaloaf which gave the beautiful overall texture. To finish up, Topaz ReStyle was opened up and the Peppermint Gray preset applied for a very cool feeling to the image. Last step was to use Nik Viveza 2 to bring in the focus to the main tree. If you like ink brushes I suggest you check the Grut Brush Site – lots to choose from and for a low price, you can get all his brushes including these ink brushes. And the best deal is he gives away a free brush each week under his Freebies tab – all different kinds. I can’t tell you how many brushes I have gotten from this free downloads. …..Digital Lady Syd

Happy Halloween!

Halloween Holiday image
Happy Halloween! Had to do my annual post – they are so much fun to create! And had to do a post to thank all the various people who take the effort to create these wonderful Halloween objects. I would never be able to do these images without them!

So the create this image the base image is from a Creative Market Mysterious Forest Halloween Pack-01. The zombies are vector elements from Ben Blogged Zombieai – even though they are vectors, they will opened in PS – were copied over into the image on their own layers. The cats are all different: I love the foreground scary cat – he is a Halloween_Cat__s_Brush_by_altergromit, the cat in the tree is from a shape set of Halloween items, and the little cat way in the background is a brush from pureanodyne halloween-ciruelo cabral blackcat. Several cobweb and bat layers from the same set were also created. More spider and web layers, and a witch layer, were created using Obsidian Dawn’s Halloween brushes. The ghost was from Creative Market’s Halloween Illustrations – an Inner Glow layer style was used to give the transparent look. Two 2 Lil’ Owls Studio (see sidebar for website link) textures were used: Crackle 13 set to Hard Light at 81% layer opacity and texture 4 from the Artisan Collection Big Set 2, which was set to Linear Burn blend mode and 23% layer opacity. PS’s Foggy Night Color Lookup preset was set to 74% layer opacity to further darken down the image. The eye is one of I created in Photoshop. On another layer Function Subtle Grunge 6 brush by Liam McKay was added. The font is Trajan Pro 3, always a favorite. That was it. Lots of fun and lots of references – thanks creators for sharing!…..Digital Lady Syd

White Abstract Flowers

Abstract Painting of White Hawaiian Flowers
Love the results of this abstract applied to a rather ordinary grouping of white flowers. Applied a basic Topaz (see sidebar for website link) Impression Abstract preset to the flowers to remove the details. Then took the image into Corel Painter to paint in more of the flowers. Saved as a PSD file and opened up in Photoshop to further paint in details with Mixer Brushes. To get the interesting texture effect, added a rather light edged painted border in white and in the layer style, set the Bevel & Emboss to one created by John Derry. At this point I could not find a link where these can be purchased (I got them several years ago) but try playing around with this layer style effect. The opacity of this layer was set to 44% and the Fill amount set to 5% to get the interesting painting look. Used Nik Viveza 2 and added some color for lighting effect……Digital Lady Syd

The Beautiful Comet 67P

Image from the Rosetta Mission of Comet 67P
Totally enjoy downloading different images from the NASA and ESO websites and trying out different colors on them. (See my Colorizing NASA Photos Using Topaz Studio (And Check Out Updated Detail) blog for one with Saturn’s rings.) This is not a recent image (from November 13, 2009 and posted July 29, 2015) on the ESA’s website – check out all their images that can be downloaded. Added an image of the Rosetta Spacecraft Model from Wikipedia. Just played around with different fonts and colors and this is what I got!…..Digital Lady Syd

Posing for a Portrait

Painted image of a Red Crested Cardinal
This guy is a Red Crested Cardinal and is not related to the beautiful red cardinals in the US. Although not native to Hawaii either (his image was taken at a park in Oahu), they are quite common. He was not very large in my image so the image was cropped in closely and run through my new favorite program, Topaz (see sidebar for website link) AI Gigapixel. Then I had a great image to work with. In Photoshop the same basic steps were followed that I did with my Wolf and Fox images completed recently. (See my Learning to Draw a Wolf! blog and Introducing the Beautiful Fox blog.) Since the image could be used as a guideline, I first started by sketching on a New Layer called Rough Drawing. Local Color, Shadows, Highlights, and Detail layers were added before working on the  fur, textures, and overall lighting effects. Lots of layers, brushes, and time. Need to check out Aaron Blaise’s videos (links in Wolf blog) to learn the workflow. Anyway, I find it very relaxing to paint my bird buddies…..Digital Lady Syd

Viewing the Moon from a Scary Place

Digital Art composite of the earth and the moon
Just having fun with this crazy image of a guy hanging from the moon. Got part of the idea from Chris Spooner’s tutorial called How to Create 80’s Style Retrowave in Adobe Photoshop. Added several objects and blended in them using blend modes and opacity. Items included: Milky Way background image, White and Black Mountain image, Wireframe Vectors 30 by Designer Candies, Valentine by Julie Mead Valentine Gift6 to add some background fog, Wikimedia Commons Full Moon 2010, LifeLine by Gamarai Urb Brushes for the person and cityscape, Obsidian Dawn’s Space brushes for the comets, galaxy, and dust. The font is called Clip. After this just added a few adjustment layers: Darken Curve, Lighten Curve, and Color Balance. That was it. Sometimes it is just fun to create something different!…..Digital Lady Syd