
Dancing Maiden

Had a lot of fun just being creative with this one. First ran a Grok AI Image Generator character using the prompt “create vector black and white full length sketch of a young lady dancing gracefully” to get the pretty maiden dancing. Then decided to put her in a free file called Scribble Portrait Effect by Deeezy. Also downloaded Deal Jumbo’s 500 Free Photoshop Brushes and added a couple to the image along with the scribble border (use Free Transform to get the brush stroke to fit the image). An old Melissa Gallo impasto texture was added at the bottom. After making all the changes, put a stamped image into an old filter by Topaz called ReStyle to get the pretty frozen look. Added in some snow and free text also from Deeezy is Fladeo inline grunge. That was it!….Digital Lady Syd
Smiling Wolf
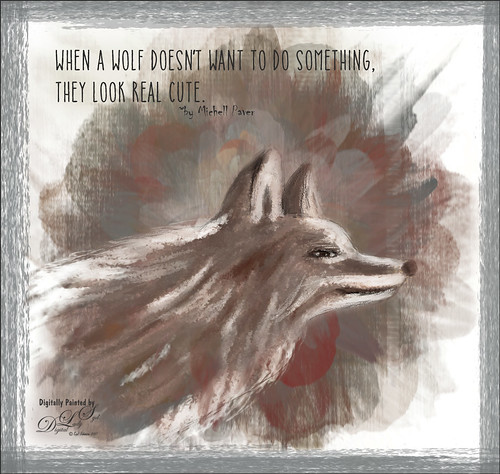
This is my attempt at drawing a wolf. It actually looks a lot like a dog so I am not sure what I was really drawing here. Used a tutorial in the Digital Painting Techniques book on Painting Fur by Richard Tilbury. First a thin black brush was used to the original sketch of the wolf on it own layer to begin the drawing. On layers underneath, the wolf was painted using the Pastel Scratchy Photoshop brush from Corel Painter Master Melissa Gallo’s Painting with Photoshop class to paint the hair. (Her class and PS brushes are terrific even though it is a few years old.) A couple of Fay Sirkis’s (another great painter and Corel Painter Master) Pet PS brushes were also used but they are hard to run down now – these are still some of the best around. (KelbyOne has her very good Four Seasons PS Painting tutorials with brushes to download if you are a member.) Topaz (see sidebar for website link) Impressions was opened and a preset created using the steps in a great video by Topaz Labs called RAW to Envisioned with Bobbie Goodrich (third example). The main text is Catalina Anacapa Sans from Creative Market and by Kimmy Design – a really nice clean font. The small text is in called Chiller. The last step was creating a border using a my Pencil Thin Vertical Lines brush (pencil lines were scanned and a brush was created – then in Brush Panel set the Angle to 90 degrees and Roundness to 12%) by changing the Angle and adding around the edges in a brown color. I will be practicing more animal drawings so look out!…..Digital Lady Syd
A Fish Playground
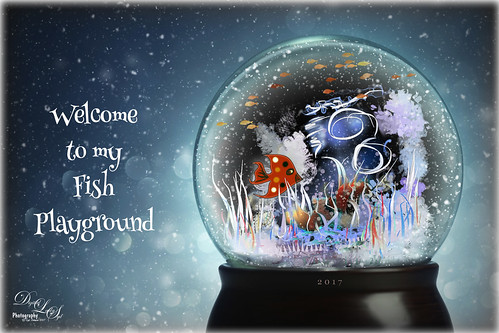
Recently Photobacks Photo and Design Resources sent out this free beautiful snow globe template for the Holidays. The actual template had Christmas text but since it is a little past the season, I used the globe to place some pretty crazy looking plants created in Paintstorm Studio in the place of the photo. I love to doodle around in Paintstorm! The top layer of the template explains how to position your objects in the image. The image was clipped to the Photo Mask layer and adjusted using the Free Transform Tool (CTRL+T). Then I added my orange fish brush from Summer Sails Brush Pack by pixelsandicecream. Had to paint the fish details as it is just a black silhouette as a brush. Also on another layer added Fish Brush 2 by loswl for the little fish in top of globe. A Pattern Fill Adjustment Layer was clipped (ALT+click between layers) to the fish using a yellow-gold watercolor pattern. Next my text layer was added using a font called Henny Penny. The last step added a layer style using the Inner Shadow set to Screen Blend Mode and White color and to a Distance of 7, Choke 12, and Size 68; and an Inner Shadow set to Saturation Blend Mode, white color, Opacity 100, and Size 250. All the layers in this template can be adjusted to add or removed items or change the color. That’s it! It does look like a party going on!…..Digital Lady Syd
A Guilded Age Bathroom
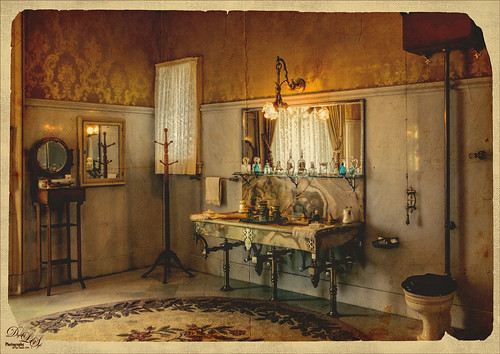
This image was taken at the Flagler Museum (Whitehall) in West Palm Beach, Florida. The image was actually post-processed without the border or vintage effect. Topaz (see sidebar for website link) Clarity, Lucis Pro (no longer available), Topaz ReStyle and Topaz Lens Effects were used to begin the process. I was actually really happy with the results, and then Adobe came out with Photoshop CC2017. If you open a New Document, now a New Document Dialog box opens – select the Photo tab at top and Templates is one of the choices. I scrolled down to Vintage Photo Effects which was downloaded and my image was placed on top. In the template I changed the background layer color and added a grunge overlay set to 47% layer opacity. I also clipped (ALT+click between the layers) a second texture under the Vintage Photo Paper. The Vintage paper texture was set to 47% layer opacity. Last step was to open up the now free Nik Viveza 2 to sharpen up the bottles and detail throughout the pix. The lighting was a little difficult to handle in this image due to the mirrors and the light coming in through a bright window off to the left. Try out Adobe’s free templates if you want a little different look……Digital Lady Syd
Just a Frame Flower
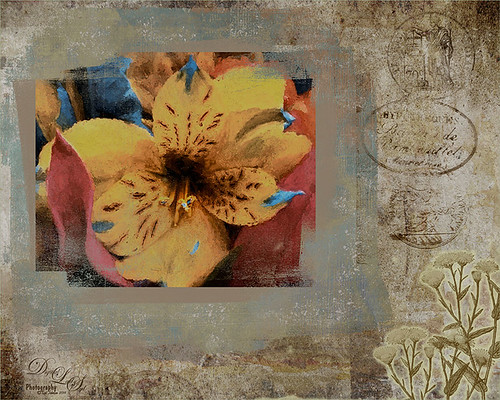
Another example of photo masks that French Kiss Collections (see sidebar for website link) sells. These block masks really make for interesting results when stacked and different textures and colors are added. I like the vintage feel of this image. Check out my Fun Photoshop Blog called How To Use a Photo Frame Mask to learn more about how to apply this cool effect. Since the process is pretty much the same as in my other blog, I will not bore you with the steps. The flowers were processed using Topaz (see sidebar for website link) Impression using a preset I created from Watercolor II. Two of French Kiss’s Brayered Blocks were used, one with a texture clipped to it and the other with a Pattern Fill Adjustment Layer clipped to it. Then just an old stamp effect and flowers were added. Not too difficult and the results are really unique!…..Digital Lady Syd
Painting Away in Photoshop!
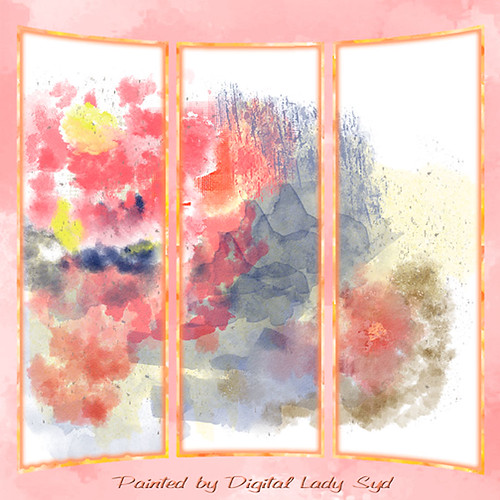
Can you believe this started out as a scratch pad for the new brushes I made for my How to Easily Create a Photoshop Brush for Painting blog, and came up with this? That’s how much fun it can be playing around with brushes in Photoshop. Five New Layers were created with different colors and brush strokes on each – I was just dabbing away trying to get some nice results when creating my brushes. Noticed immediately when done that these were some of my favorite colors. Hum… Anyway, on one of the Facebook groups I follow, someone started talking about these triptych actions they bought and it started me thinking that this might look kind of cool with that effect. I have no idea where I got this particular triptych but it was created in 2007 and I downloaded it in 2011. Here is a link to Gavin Hoey’s (one of my favorite British Photoshop gurus) free Instant Tryptych Action and the set he has for sale. Anyway, the basic steps included adding a layer style to both the original image and the triptych using Pattern Overlays in both cases. Oh well, hope you enjoy the results – keep experimenting with those brushes – never know what you will get!…..Digital Lady Syd
Discumbuberated!

This little pink gerbera flower that is trying desperately to get herself straightened out was taken on my back porch. Very little processing on this image in Lightroom – just some cropping, basic slider adjustments, and Dave Delnea’s custom tone 002 preset. Topaz (see sidebar for website link) DeNoise 5 – the best noise reduction plug-in around – was applied (Overall at 0.19 and Shadows at 0.39). Painted Textures new October Sky texture was applied at Normal blend mode at 64% layer opacity. In a Layer Mask, the flower was gently painted black with a soft low opacity black brush. The font is Marcelle Script from DaFont. The border is one I created in my More Border Fun! blog with a cream Color Fill Layer clipped to the frame (ALT+click between the layer to clip). That was all. I love Melissa Gallo’s new texture effect on this image!…..Digital Lady Syd
Light on the Plant

This is an image of the Canna MACtro flowers that grows in my crazy front yard – always has healthy blooms for me! It was mainly processed in Lightroom. The image in Lightroom was first turned to black and white by going to the HSL Saturation panel and setting all the colors to -100. Then the colored sliders were adjusted until I got a pleasing color balance. With an Adjustment Brush, the flowers were sharpened. I used a preset I made from David duChemin older Refining Your Vision in Adobe Photoshop Lightroom book (still a great read) that I call duChemin Classic India preset. Dave Delnea’s Backlight Horizontal Left preset was applied to light up the flowers and last free Matt Kloskowski’s Vignette (Strong) was applied. The image was now ready for Photoshop where Nik Viveza 2 was opened and control points placed on the flowers to sharpen a bit more, and on the background areas to further darken the distractions. My free SJ B&W Border Style was applied and the Inner Glow changed from white to a sampled color in the image. That was it!…..Digital Lady Syd
Digital Lady Syd Related Blogs:
How to Pop a Picture in Lightroom 5
How to Use Adobe Camera Raw (ACR) or Lightroom 4 Quickly
I Didn’t Know That! Converting Lightroom Preset to Adobe Camera Raw Preset
Soft Painterly Effect

This pretty Red Chinese Hibiscus Flower was basking in the sun one morning when I decided to snap it. This was a very simple image to post-process – just used Alien Skin’s Snap Art 3 and the Factory Default – no changes. A Color Balance Adjustment Layer was added to get the color right – only the Yellow to Blue slider was adjusted in all three Tone areas. A Curves Adjustment Layer was used to adjust a little shadow tone. The Frame is one that I created following one of Dave Cross’s Kelby Training Photoshop CS5 Finishing Touches for Photographers videos. That was it! Very simple, but very pretty!…..Digital Lady Syd
Snap Art and Simplify – Now That’s Painterly!

Just a pretty tulip that cannot decide if it wants to be open or closed. (This link shows some of these beauties in their glory!) This image was converted to a Smart Object and taken into Alien Skin Snap Art 3 and the Oil Paint (dry brush) preset was applied with some adjustments. A stamped layer (CTRL+ALT+SHIFT+E) was created on top and the layer was opened up in Topaz (see sidebar for website link) Simplify 4 and the Oil Painting Toned IV preset applied. Back in Photoshop a black layer mask was added (ALT+click on layer mask icon to make it black), and just the forward leaves were painted back to add the Simplify filter effect. A Curves Adjustment Layer was added to increase contrast and my SJ Painter Oil Frame was added to give it a canvas feel. You can CTRL+T the frame to get just the amount of brushed effect to add. That was it. Fun to do!…..Digital Lady Syd
A Vintage Landscape Look on a Scottish Monument

I loved the way this image turned out – never expected it to be this pretty considering it was an image I snapped while standing on the street in front of our hotel. It is Nelson Monument (in center) and Acropolis (aka National Monument of Scotland on left corner) on Calton Hill – I did not get to visit this site but wish I had. This was not difficult to process once I got going. After cleaning up a rather boring image, Topaz (see sidebar for website link) Simplify 4 was opened and a preset I call the John Barclay BuzSim Setting preset was used, (The settings are: Simplify: Colorspace RGB, Simplify Size 0.19, Details Boost 1.00, and Details Size 0.20; Adjust: Brightness 0.01, Contrast 1.08, Saturation 1.03, Saturation Boost 1.15, Structure 1.00, and Structure Boost 1.00; and Edges: Edge Type – Color Edge Normal, Edge Strength 0.00, Simplify Edge 0.30, Reduce Weak 10.00, Reduce Small 0.20 and Flatten Edge 0.00.) I listened to one of John’s excellent videos on Topaz Labs and created this preset which has a very subtle result. Next I added 2 lil Owls (see sidebar for website link) Workshop 6 – Texture 1 which has the beautiful turquoise and light yellow sky color – the layer was set to Overlay Blend Mode. The beautiful text was supplied by my favorite Shadowhouse Creations – his Text Brush 5. I actually clipped a bright green Color Fill Adjustment Layer to the text (to clip just ALT+click between the two layers and the color fill adjustment layer will only affect the layer below) – then the text layer was set to 55% opacity. Another 2 Lil’ Owls Texture – texture 4 was used as an overlay frame (follow the steps in my blog How To Make Frames or Borders – scroll down to the section called “To save the frame you created as an overlay to use again”). A light yellow Color Fill Adjustment Layer was clipped to the texture file. A Curves Adjustment Layer where the red, green and blue channels were adjusted to get this slight vintage feel. The last thing done was to add a Color Fill Adjustment Layer to the whole image using a soft cream color (#c6c3bd) and then Nelson Monument was painted out in the layer mask so the eye is drawn to that area of the image. Had a lot of fun as usual – never get tired of this!…..Digital Lady Syd
More Border Fun!
 Creating the Border: Completed this border using a tutorial I learned from PhotoshopLayers.com called Photographic Edges in Photoshop. It is basically a very simple process and uses the Photoshop Sprayed Strokes Brush Stroke Filter to create the border. I changed the settings and maxed out the Stroke Length to 20, the Spray Radius to 25, and Stroke Direction to Horizontal to get a more pronounced edge. Then the frame was saved down as png file. This was done using my the little known Script called Save Layers to File. (See my blog How To Make Frames or Borders on how to do this.) To use this new border easily on other pictures, just drag it into your document. Use a Solid Color Adjustment Layer to change the color of the frame. In this case, I changed it to a light pink, then used a Layer Style to add a soft gradient, a white texture, and Outer Glow. Using a Layer Style on borders can create a very subtle but nice effect.
Creating the Image: These Alestroemeria flowers were actually captured at the local grocery store with my little point-and-shoot Kodak camera. Not much processing was required. I followed the Lightroom processing steps from my blog How to Use Adobe Camera Raw (ACR) or Lightroom 4 Quickly. In Photoshop I applied OnOne Perfect Effects (see sidebar for website link) stacking Tonal Contrast, Rice Paper Light Texture, and Hollywood Glow at 50% opacity. A Curves Adjustment Layer was added to add back just a little overall contrast. A composite was created on top (CTRL+ALT+SHIFT+E) and duplicated. The top layer was set to Multiply Blend Mode and on a layer mask using a large soft black brush at 100% opacity, one dot was placed on where I wanted people to look first. Next the border .png was placed on top with a Solid Color Adjustment Layer set to light pink. Finally a Layer Style was added to the border using a light pink to pink Gradient Overlay (Blend Mode Normal, Opacity 48%, Linear Style, Angle 81 degrees, and Scale of 150%), Pattern Overlay (Blend Mode Normal, Opacity 66%, Pattern set to Normal Blend Mode, Opacity 66%, Pattern from Photoshop’s Watercolor Patterns – bockingford_rough at Scale 55%), and an Outer Glow set to its default settings.
Try creating this border – it really easy and fun to make!…..Digital Lady Syd


