
A Fish Playground
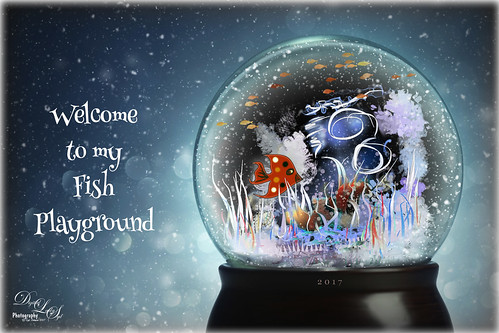
Recently Photobacks Photo and Design Resources sent out this free beautiful snow globe template for the Holidays. The actual template had Christmas text but since it is a little past the season, I used the globe to place some pretty crazy looking plants created in Paintstorm Studio in the place of the photo. I love to doodle around in Paintstorm! The top layer of the template explains how to position your objects in the image. The image was clipped to the Photo Mask layer and adjusted using the Free Transform Tool (CTRL+T). Then I added my orange fish brush from Summer Sails Brush Pack by pixelsandicecream. Had to paint the fish details as it is just a black silhouette as a brush. Also on another layer added Fish Brush 2 by loswl for the little fish in top of globe. A Pattern Fill Adjustment Layer was clipped (ALT+click between layers) to the fish using a yellow-gold watercolor pattern. Next my text layer was added using a font called Henny Penny. The last step added a layer style using the Inner Shadow set to Screen Blend Mode and White color and to a Distance of 7, Choke 12, and Size 68; and an Inner Shadow set to Saturation Blend Mode, white color, Opacity 100, and Size 250. All the layers in this template can be adjusted to add or removed items or change the color. That’s it! It does look like a party going on!…..Digital Lady Syd
Fantasy Flowers

This image was painted in both Paintstorm Studio and Photoshop. The flowers and part of the background was created using brushes on separate layers in Paintstorm Studio (see my Paintstorm Studio Fun! Fun Photoshop blog for more info on this inexpensive program). Then the PSD file was brought into Photoshop and more tweaking was done. Reflections in the water was made by creating a group of the flowers, duplicating and merging it, and then Free Transforming by dragging straight down. Then the opacity was lowered quite a bit. Used 2 Lil Owls (see sidebar for website link) After the Rain 41 texture set to 23% layer opacity and with a blue to white to blue Gradient Adjustment Layer on top. Used a painting layer to added some plant effects on the water and Obsidian Dawn’s Bird Grouping 2 was placed on top. The birds were selected using the Color Range Command and setting to Shadows – then applied the layer mask to get just the birds in the image. Next a Pattern Gradient Adjustment Layer and a Solid Color Adjustment Layer were clipped (ALT+Click between the layers) to give the birds the color. On a stamped layer (CTRL+ALT+SHIFT+E) Topaz (see sidebar for website link) Lens Effects was opened and the Diffusion filter applied. Back in PS, a black layer mask was added (ALT+click on layer mask icon at bottom of Layer Panel) and just the reflections were painted back – this is where I wanted a softer look. On another stamped layer Nik Viveza 2 was applied to drive the eye more to the focal point, the purple flowers. On a couple of new layers a little cross hatching was painted in the corners and some clean up on some of the flowers that were too bright. A splatter layer was created around the flowers – I just like the effect! The last step was to add a Curves Adjustment Layer. Just lots of fun to create!…..Digital Lady Syd
Just a Little Flower
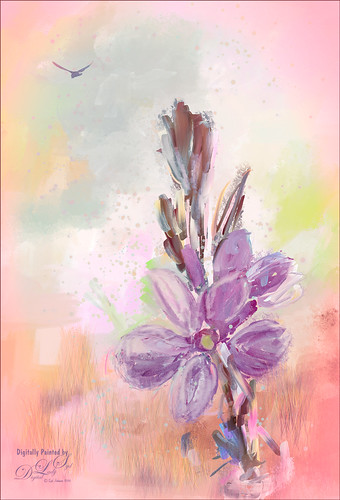
This image was created by painting over a flower taken at the Harry P. Leu Gardens in Orlando, Florida. The flower was actually selected from its background with Topaz (see sidebar for website link) ReMask 5 and saved as a PSD file to take into Paintstorm Studio. This program has some beautiful paint brushes at a very reasonable price. Several different layers were painted with different brushes including the watercolor spots before saving as a PSD and re-opened into PS. A bird was added and my Corel Painter Fresh Air texture was used behind the flower. Added a little grass using Frostbo Set 2 Grass 005 brush to add some ground. Used Kyle T. Webster’s free Animator Pencil to draw around the petals a little and the free Nik Viveza 2 to adjust the focal point. It was a lot of fun to paint!…..Digital Lady Syd
Spring Is in the Air!
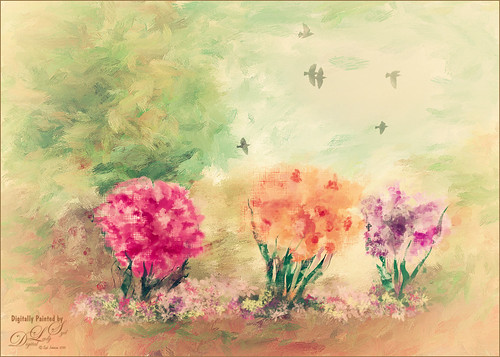
I really love painting flowers in Paintstorm Studio as the colors look so wonderful. Therefore the three pretty blossoms were painted using several Paintstorm brushes – a watercolor brush, a cross hatch brush, and two manga hair brushes for the leaves. Then in Photoshop a brush from Ruan Jia called Leaf 5 with some hatching texture added and color to create the flowers on the ground – scroll down to find download and check out all the other sources of some wonderful brushes. The birds are from a Lost & Taken set photo IMG 4721 set to Multiply blend mode at 33% layer opacity (not sure these are still available) and a Pattern Fill Adjustment Layer with a watercolor pattern was clipped to it to give a little texture to the birds. The background texture is one I created in Painter a while back. Topaz (see sidebar for website link) Lens Effects Graduated Neutral Density filter using 1 Stop Bottom preset. Finally Nik Color Efex Pro 4 (now free) was added using these filters: Darken/Lighten Center, Film Efex Vintage, White Neutralized, and Vignette Filter. That was it. I really like the results!…..Digital Lady Syd
Paintstorm Studio Purple Flowers
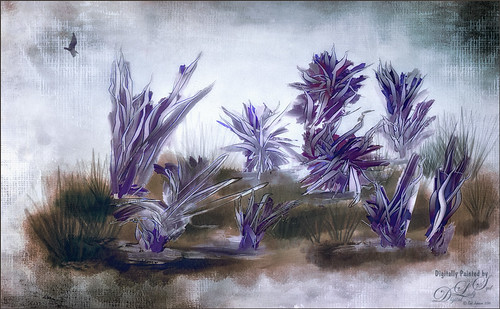
These flowers were painted in an inexpensive painting program I recently purchased called Paintstorm Studio. Just learning how to use all the various settings, but if you save down your images as a PSD file, you get nice layers with objects on them. That is how I created these flowers – just painted on a layer and saved down as a PSD file. This program has some incredible brushes and you can import PS brushes! Pretty cool! A couple textures were added in PS – 2 Lil’ Owls (see sidebar for website link) Mosaic Set’s Aveline set to Multiply blend mode and 56% layer opacity and Jai Johnson’s DT-Be My Valentine-12 set to Color Burn blend mode at 80% layer opacity. Topaz (see sidebar for website link) Restyle’s Lavender Gray preset was applied which make the image more purplish instead of pinkish. I tend to do a lot in pink so I liked the change here. Nik’s Color Efex Pro 4 was applied using the Warm Preset (Polarization, Sunlight, and Vignette Lens filters). Obsidian Dawn’s Birds Flying Single 3 brush was added to the image and a Pattern Fill was used to give the nice wing effect.


