
Watching the Sea
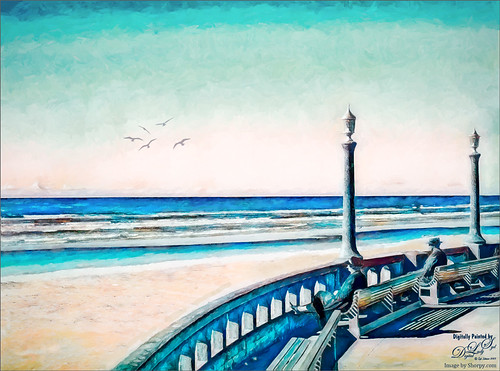
Had some fun revisiting this vintage image from Shorpy.com called By the Pacific Ocean, Seaside Oregon – September 1941. The date made me think maybe these people were thinking about their children or friends serving in World War II. Topaz Studio 2’s Impression filter was applied in my SJ BW to Painted Color preset: changed AI ReMix to Paper Frost swatch, turned on second AI Remix and used Eye of the Storm at 37% opacity. (For preset settings check out my blog called How to Convert Black and White Image to Colorful Paintings with Topaz Studio 2.) To clean up this image, used Kyle T. Webster’s Bowie Set (located in the Adobe Cloud-search for Bowie Toolkit) Heroes Heavy and Hunky brushes, and Kyle’s Megapack Drawing Box-Graphic Control 2 brush (good blender). Used them in the masks a lot also. Also used the Lasso Tool to pin point exact areas to paint in to even out colors around people. It is too bad that Topaz has stopped supporting it creative filters, especially Impression…..Digital Lady Syd
B-24E (Liberator) Bombers – 1943

I love Shorpy.com and whenever a really interesting image appears, I love to try and do something unique with it. This image is called Avenging Angels 1943 and is of the Assembly Plant that was in Michigan and it was a huge facility. I love seeing the woman looking at the engine and another in the front center window – very busy people in this place! Check out the comments for some really interesting information.
Since the original is a black and white image, First I ran the image through Lucis Pro to really sharped the edges of the image. I wanted to add a little color so a Gradient Map Adjustment Layer with purples and blues set Soft Light blend mode and a Color Lookup Table Adjustment Layer using my Sharply Dark LUT at 86% layer opacity. Painted in some lightening and darkening using Sam Peterson’s brush and technique (see my Fun Photoshop Blog – A Few Photoshop and Lightroom Tips and Tricks-Step 2). Last step was to add a Black and White Adjustment Layer set to Luminosity blend mode and setting the Blues and Cyans to get a good contrast. …..Digital Lady Syd
Before Walmart

Just enjoyed taking this image from Shorpy.com (click to see original B&W image) and converting it into a colorized image. Loved the sign that shows all the items offered, definitely a precursor to Walmart. Also loved the silhouette sitting outside the store. Had to straighten the image using the Camera Raw Filter’s Geometry panel. The wires were removed – I wanted to leave them in, but the original image did not show the wires strong enough to see them in the colorized image. In Topaz Studio 2 my “Look” for colorizing was used (for more information see on see How to Convert Black and White Images to Colorful Paintings with Topaz Studio 2 blog – links to other blogs on this site) and made a few changes to fit this image – this is where the real fun begins. Back in Photoshop a little clean up was done and a sky with the PS’s new Sky Replacement function was added – the clouds were taken from my backyard around noon. Finished off with Topaz (see sidebar for website link) ReStyle (using the Zambezi Zest preset) to get the right color grading effect to the image. Check out Shorpy’s for lots of fun pix to colorize…..Digital Lady Syd
Palm Court Cafe cc 1903

Had a fabulous time converting a beautiful black and white image of Hotel Gregorian’s cafe from Shorpy.com into a colorized image. I just used my original Topaz (see sidebar for website link) Studio 2 “Look” I created to do this sort of thing called SJ BW to Painted Color. It did not even require any adjusting which really surprised me. (For the Topaz settings, see my How to Convert Black and White Images to Colorful Paintings with Topaz Studio 2 blog with them all listed.) This layer was set to 77% layer opacity and then localized sharpening was done using a gray layer following Blake Rudis’s Sharpen Photos like a Pro! video. (I use this workflow so much I actually created an action for the High Pass technique.) A little clean up and that was about it. What a gorgeous image – I wish I could have breakfast there!…..Digital Lady Syd
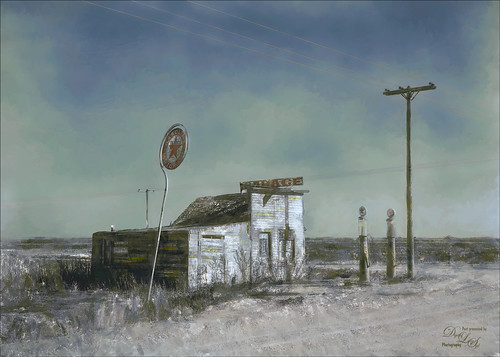
Vintage Hy-Red Gasoline Station
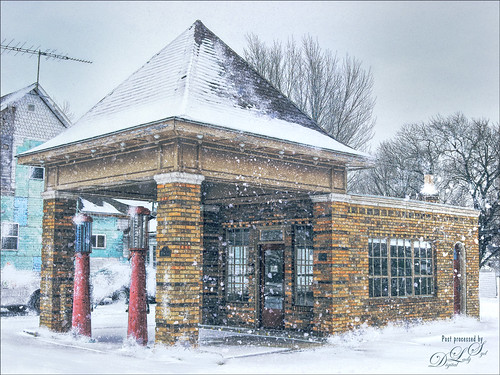
I saw this image posted on Facebook for my hometown and remembered driving by this old 1930 Hy-Red Gas Station in Greentown, Indiana, many times while growing up – apparently it is still standing and is on the National Register of Historic Places. Since Indiana is in the middle of a terrible cold spell right now, I thought I would add some more snow to it to really give this image a major wintry feel. It also gave me a chance to play with the free Snow Brushes that Serge Ramelli offered during the holidays (see under his video called How to Create Snow in Photoshop CC). I used a couple other splatter brushes to add solid snow build ups to the image (one by Melissa Gallo from a long time ago and one from Aaron Blaise). Topaz (see sidebar for website link) Studio’s AI Clear, Precision Detail and Precision Contrast Adjustments were used to really get a nice sharp effect to the image. On a stamped layer in PS, Topaz ReStyle’s Warm Steel Wash preset was applied to the image, then set to 50% layer opacity and Color blend mode – this gives it the vintage feel. Nik Viveza 2 was used to add just a soft blue color to the sky which was a total white – two control points were placed in the upper corners where the Brightness sliders were set to the negative side to add in the wintry sky color. I was really surprised how sharp the image turned out……Digital Lady Syd
Native American Playing a Flute
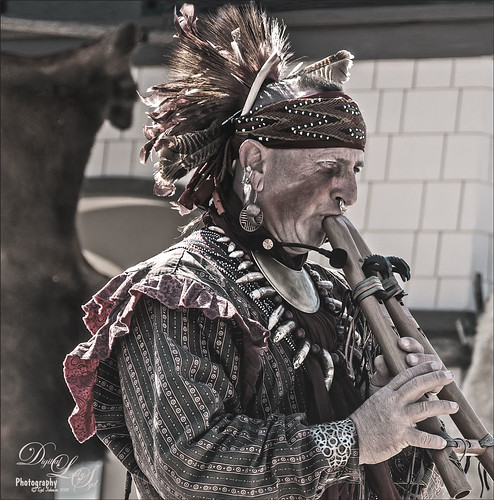
Happy Thanksgiving to everyone here in the States! Usually I put up a funny turkey, but this year I am posting image from the Native American Festival that occurs annually in Ormond Beach, Florida. The first Thanksgiving celebration theoretically occurred in October of 1621 after their first harvest in Plymouth and was attended by 90 Native Americans and 53 Pilgrims. I believe a Native American drone flute is being played. This image uses a technique learned from Adam Sheff of Photoshop Tutorials called Create a Powerful Emotional Effect for Your Portraits in 9 Easy Steps. First cropped the image quite a bit and then used Topaz (see sidebar for website link) Studio’s AI Clear to do a great overall sharpening and noise reduction (this little filter is amazing!). To finish, just followed the steps in the tutorial. Lots of fun to do. Everybody enjoy your day (I have got to go cook a turkey…..)…..Digital Lady Syd
Here is some info on the flute from Wikipedia that I thought was interesting: A double Native American flute is a type of double flute. It has two sound chambers that can be played simultaneously. The two chambers could have the same length or be different lengths. The secondary sound chamber can hold a fixed pitch, in which case the term “drone flute” is sometimes used. The fixed pitch could match the fingering of the main sound chamber with all the finger holes covered, or it could match some other pitch on the main sound chamber. Alternately, various configurations of finger holes on the two sound chambers can be used, in which case terms such as “harmony flute” or “harmonic flute” are sometimes used.
A Mermaid in the Mist of a Fountain
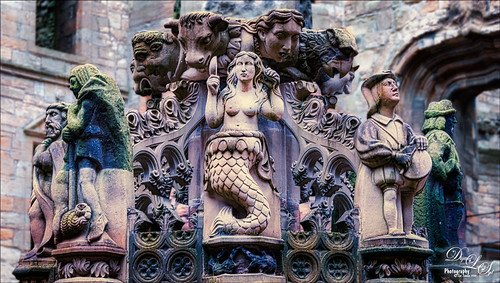
This is another image of part of the interesting Fountain at Linthlithgow Palace in Scotland (where Mary, Queen of Scots was born). The fountain was built in 1538 by James V – it has been known to flow with wine on a few occasions. These colors came from the image itself so I imagine at some time it was quite beautiful. I found the mermaid a rather interesting character in the mist of all the other statues. (See my previous Deer on a Fountain blog.) In Lightroom applied the new Artistic 04 profile that comes with LR/ACR, cropped the image, and did a few basic slider adjustments. In Photoshop duplicated the background layer and opened up Luminar 2018 (see sidebar for website link) where the AI Filter, Brilliance and Warmth, and Image Radiance filters were applied. The background was duplicated again and a Gaussian Blur set to 4.0 was applied to soften the stone in the palace which was very distracting behind the fountain. A layer mask was added to the Luminar layer and the background was painted out so the blur layer shows through. A 50% gray dodge and burn layer was also used to help emphasize the figures. A stamped layer was created and Nik Viveza 2 was used to direct attention to the mermaid. Last step involved adding a spotlight effect on the mermaid using a large white brush at 9% Flow on an Overlay blend mode layer. That was it. Would love to go back and take some more pics!…..Digital Lady Syd
Abandoned Texaco Station
I found this image of an abandoned gas station in 1937 on Highway No. 2 in western North Dakota at Shorpy’s Historic Photo Archive but downloaded the original as a tif file from the Library of Congress. Seemed like a perfect candidate for colorizing in the new Topaz (see sidebar for website link) Studio. When working with these vintage black and white images, you always need to first adjust the resolution and resize it in Photoshop by going to Image -> Image Size command – set to a resolution of 300 by unchecking the Resample button, inserting 300, then rechecking the button to change the size. Next duplicated the layer in PS and opened up Topaz (see sidebar for website link) Studio and selected my SJ Colorize Black and White Image preset (it is up on the Community Site). Then added: Reduce Noise Adjustment and painted out the foreground in a mask so it only affected the sky; Dehaze Adjustment set to a Strength of 0.39 and Suppress Artifacts to 0.82; and Impression Adjustment using the Default settings changing the Stroke type to Stroke 09 and set the Painting Progress slider to 0.27. Back in Photoshop just did my normal workflow although it took a little more work. Used Nik Viveza 2 to adjust the overall image and several painting layers to smooth out the sky. Lots of fun here!…..Digital Lady Syd
A Somber Effect for a Somber Image
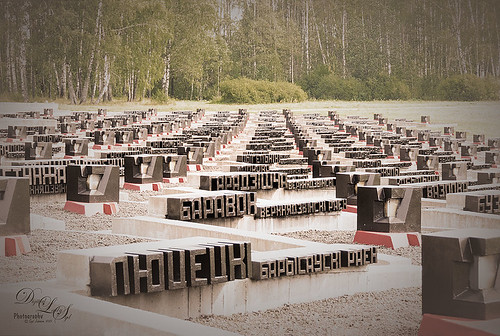
I thought this post-processing technique suited the somber image taken a few years ago portraying the Khatyn Memorial Complex in Belarus – a reminder of the devastation caused by the Nazi of the 5,295 settlements destroyed during WW2. The names in stone represent the settlements that were devastated. One of the most moving places I have ever seen.
This is a cinematic effect applied following Colin Smith’s technique in his Photoshop Secrets: Photographic Effects videos that are for CS5, but work fine in newer versions of PS. This effect looks good on architectural photos and landscapes. Mainly uses 3 adjustment layers and a gray layer that adds grain. Really liked this treatment for serious places…..Digital Lady Syd
Let’s Hear It for the Graphophone

This image of a Columbia Grand Graphophone built in 1901 in France was taken at the Lightner Museum in St. Augustine, Florida. Really catches you eye when at the museum. Sears was selling it for $50.00 – it used 5-inch cylinder records and could also be used as a recorder. Apparently it came with different horns depending upon what you were doing. Just had fun playing with this image. In Lightroom the basic sliders were adjusted and some pretty crazy spit toning applied where a really pink tone was created. In Photoshop applied Topaz (see sidebar for website link) ReStyle’s Cream and Plum preset (only changes were to Black Level -0.22, Midtones 0.11, and White Level -0.73; and Detail Structure 0.44 and Sharpness 0.75). A Levels Adjustment Layer was added and all the tabs were adjusted (Black 3/Midtone 0.70/White 196) which created quite a bit of clipping in the image. It seemed to help with the reflections of glass. A little clean up and that was it. I love working on the old items – the materials and color are so nice……Digital Lady Syd
Where Am I?
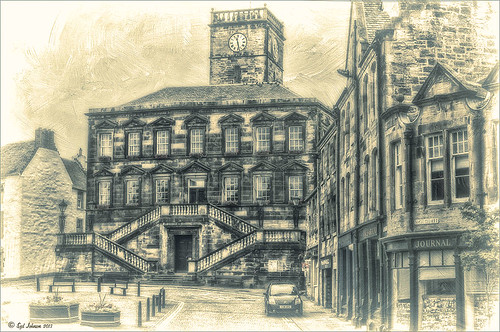
This is a tough one since this image is not of the main attraction in the area. This is the Burgh Hall Tourist Information Center (check out link for live webcams of area) that resides in the center of the town of Linlithgow, Scotland, just outside of Edinburgh. Linlithgow Palace (the birthplace of Mary Queen of Scots) ruins are just behind this building along with a beautiful old church, St. Michael’s Parish Church, next to it. If you are in Edinburgh, it is a wonderful day trip as it is only a half-hour train ride to get there.
The image was processed using Topaz (see sidebar for website link) Black and White Effects 2 three times! The first application used just the Traditional Collection Warm Tone preset set to an Overall Transparency of .90. Next, the same preset was selected, but the Diffusion Section with Softness slider set to .85, Diffusion to .65, and Diffusion Transition to .50, and the Overall Transparency set to 1.00 was applied. The the windows, steps and clock face were painted out using the Localized Adjustments section. The third time a Quad Tone preset I made was applied using Navy Blue, Green, Yellow and White tones . (Quad Tone settings are: Color 1 Region set to Red 1/Green 1/Blue 12 and slider set to 15.08, Color 2 Region Red 63/Green 78/Blue 84 and slider set to 143.9, Color 3 Region set to Red 216/Green 211/Blue 129 and slider set to 227.5, and Color 4 Region was set to white with slider set to 255.0.) Some Border Edging in white was added. French Kiss L’Artiste Dove Wings texture was added and the center of the image was lightly painted back in a white layer mask using a soft low opacity black brush. A Curves Adjustment Layer was added for contrast. Puppet Warp was used to slightly straighten out the buildings – this old building just did not have any straight lines! I totally love the slight diffused look on this image – definitely getting to be a favorite effect for me and I am seeing it a lot more in images now……Digital Lady Syd
Digital Lady Syd Related Blogs:
Straightening with Puppet Warp!
A Vintage Landscape Look on a Scottish Monument

I loved the way this image turned out – never expected it to be this pretty considering it was an image I snapped while standing on the street in front of our hotel. It is Nelson Monument (in center) and Acropolis (aka National Monument of Scotland on left corner) on Calton Hill – I did not get to visit this site but wish I had. This was not difficult to process once I got going. After cleaning up a rather boring image, Topaz (see sidebar for website link) Simplify 4 was opened and a preset I call the John Barclay BuzSim Setting preset was used, (The settings are: Simplify: Colorspace RGB, Simplify Size 0.19, Details Boost 1.00, and Details Size 0.20; Adjust: Brightness 0.01, Contrast 1.08, Saturation 1.03, Saturation Boost 1.15, Structure 1.00, and Structure Boost 1.00; and Edges: Edge Type – Color Edge Normal, Edge Strength 0.00, Simplify Edge 0.30, Reduce Weak 10.00, Reduce Small 0.20 and Flatten Edge 0.00.) I listened to one of John’s excellent videos on Topaz Labs and created this preset which has a very subtle result. Next I added 2 lil Owls (see sidebar for website link) Workshop 6 – Texture 1 which has the beautiful turquoise and light yellow sky color – the layer was set to Overlay Blend Mode. The beautiful text was supplied by my favorite Shadowhouse Creations – his Text Brush 5. I actually clipped a bright green Color Fill Adjustment Layer to the text (to clip just ALT+click between the two layers and the color fill adjustment layer will only affect the layer below) – then the text layer was set to 55% opacity. Another 2 Lil’ Owls Texture – texture 4 was used as an overlay frame (follow the steps in my blog How To Make Frames or Borders – scroll down to the section called “To save the frame you created as an overlay to use again”). A light yellow Color Fill Adjustment Layer was clipped to the texture file. A Curves Adjustment Layer where the red, green and blue channels were adjusted to get this slight vintage feel. The last thing done was to add a Color Fill Adjustment Layer to the whole image using a soft cream color (#c6c3bd) and then Nelson Monument was painted out in the layer mask so the eye is drawn to that area of the image. Had a lot of fun as usual – never get tired of this!…..Digital Lady Syd
Where Am I?

May have figured this out already since I have posted very similar photos – but this is at Fortunato Park in Ormond Beach, Florida – and is one of my favorite places. The above is the rooftop cupola from the old Hotel Ormond – the only remaining part from a beautiful old hotel that was torn down in 1992. It was in such a bad condition that it could be restored – what a shame!
Okay – I am a huge Photoshop plug-in fan – I love to be able to do something with a photo that I could not do just in Photoshop or Lightroom alone. Nik plug-ins really made this image! Basically Nik’s Viveza 2 (my very FAVORITE plug-in – can’t beat it for fixing any problem in an image) was applied to the image to add detail and contrast to localized areas of the image (detail in the orange roof, saturation and color to sky in middle of cupola, and detail to the interesting lines on the building). That in itself added a huge improvement to the image. Next Nik’s Color Efex Pro 4 was added and three filters stacked: Bleach Bypass, Detail Extractor, and Film Efex Vintage using Method 14 and setting the Overall Opacity slider to 52% – did not want to overdo the vintage feel. I use the Film Efex Vintage often – lots of versatility in just this one filter! (See related blog links below for other examples.) Next Shadowhouse Creations Scratch Box frame layer was applied – this is from the Scratch & Frame Box Overlay.PSD file he supplies. (Check these out – some great borders just in the PSD file!) I created a PNG file of just the frame by following the steps in my blog How To Make Frames or Borders – scroll down to the section called “To save the frame you created as an overlay to use again” and follow steps. I used an off white color sampled from the image in a Color Adjustment Layer clipped (ALT+click between layers) for the frame. That was all I did and I love the slightly vintage effect – goes nice with historic buildings. Next time I will show you a totally different look for this same image (see A Fairytale Gazebo)……Digital Lady Syd
Digital Lady Syd Related Blogs:
Digital Lady Syd Reviews Nik HDR Efex Pro 2
Little Red Corvette
Yellow Dogface Butterfly in her Glory!
The New Film Efex-Vintage Filter From NIK CEP 4
Young Golfer of Long Ago

Since I am a golf fan and this weekend is the Ryder Cup, I thought I would post a golf picture I just found in my Scotland pictures. The image is of the monument at St. Andrews Cathedral of Young Tom (Tommy) Morris, who won four Open Championships (now called the British Open) in 1868-72, all before he was 22 years old. He also has the first recorded tournament “hole-in-one” and scored a course low of 77 on the Old Course at St. Andrews in 1868. Check out the link above for more interesting notes on his life. This image was processed in Photoshop using Nik Color Efex Pro 4 filters stacking: Detail Extractor at 88% opacity (otherwise it looked too grainy), Darken/Lighten Center, Brilliance/Warmth, Vignette, and Image Borders – simple black using Type 13. I love the way the Darken/Lighten Center can be used to direct the eye in an image. A Curves Adjustment Layer and some noise removal was applied – pretty much my basic workflow!…..Digital Lady Syd
Digital Lady Syd Related Blogs:
Where Am I?
The Old Course at St. Andrews
Same Image – Different Look!
Digital Lady Syd’s Rule No. 7: Check Out Your Local History

Just because you don’t get to go on that exotic vacation this year, it can be very satisfying to visit some of the local historical places near you. I have been cutting out of the newspaper little articles of unknown treasures in the area and keeping them in a file for a day when I need something new to shoot. The image above is from the center living area of the beautiful old home known as The Casements (circa 1900), and purchased as John D. Rockefeller’s winter home in 1918. It was located across the street from the old (now non-existent Hotel Ormond). I have driven by this local landmark a hundred times and never stopped, but a few weeks ago I did. Not that large a place but really fun to explore.
A tonemapped Tiff file was created using 5 images and taking them into Nik’s new version of HDR Efex Pro 2. In Photoshop it was processed using Topaz (see sidebar for website link) photoFXlab using the Plugins tab and opening Black and White Effects. A Cyanotype Collection preset called Cerulean Tea Rose Dynamics was selected and adding the Color Filter with Hue set to 329.9 and Strength 0.84, and Overall Transparency set to 1.00. Back in photoFXlab in the Adjustment tab, the Dynamics slider was increased slightly. The Detail Brush was used at full strength and the door, lights, flowers and rugs were painted over to sharpen.
I hope to continue exploring locally this year and find some more close-by treasures. So don’t get discouraged – just pick up the local newspaper or surf on the internet for historical places in your area. Then do not forget to download your images and play in Photoshop – the best entertainment there is!…..Digital Lady Syd
Digital Lady Syd Related Blogs:
Digital Lady Syd Reviews Nik HDR Efex Pro 2
Black and White Effects on Outside Art
Digital Lady Syd’s Review of Topaz photoFXlab v1.1
InstaTone in photoFXlabs – Great Fun and Great Results!
Pseudo HDR Using an Old Image

I am not in the habit of using other peoples images but I just had to try a little “pseudo HDR” on this image from a junkyard in 1942. Shorpy Historical Photo Archive – Vintage Fine Art Prints has the best historical images you will ever see, including this recent one. They obtain most of their images from the Library of Congress (I searched for salvage depot and found other interesting images like the above). Shorpy’s website is on my list to visit on a daily basis. Most of his older images are not in color, but they are always interesting.
For this example the low res jpg image was used. Nik’s Color Efex Pro 4 with these filters were stacked: Detail Extractor, Film Efex Nostalgic Film Type 4 at 68% strength, Midnight using the Neutral Color Set and Blur at 4% and Overall Strength set to 50%, Vignette, and Image Borders. This image does not have any restrictions for use according to the Library of Congress so I feel comfortable showing it. It was fun trying different effects on this image. Go to either resource and see what you can find!…..Digital Lady Syd
Digital Lady Syd Related Blogs:
Little Green Frog’s Makeover Using Nik’s Color Efex Pro 4!
White Daisies! Using Color Efex Pro Midnight Filter
The Art Corner: Poetry and Music by Clodion

This Carrara marble artwork is found in the East Sculpture Hall of the National Gallery of Art in Washington, DC, and was sculpted in 1774-1778 in Paris by Clodion. Metal Chris, a great local DC concert photographer and founder of the DC Heavy Metal website, took all these these images for me recently as I missed it on my last trip to the National Gallery. What I love about this sculpture is that by viewing it from the different angles, which Chris did, you get a very different expression and feel of the art. Poetry definitely takes on a very different look depending on the view.


The Gallery’s site says “Clodion prepared a terracotta model for Poetry and Music, which is in the National Gallery and frequently on view in the ground-floor sculpture galleries. It provides a rare chance to compare an artist’s model with the final version in stone. In this case, Clodion modified the figure of poetry, “correcting” it to adhere to traditional representations: the terracotta figure had rested his head in his hand, but here he holds a writing stylus.” I will try to find this on my next trip to the Gallery – I think it would be fun to see. This is one of four sculptures that were meant to bring to life the abstract concepts of the arts and sciences. I did a previous blog called The Art Corner: Painting and Sculpture by Tassaert if you are interested in more information on both sculpture pieces. The last two pieces, Geometry and Architecture by Jean-Jacques Caffieri created in 1776 and Astronomy and Geography by Felix Lecomte created in 1778 are located at the National Trust, Waddesdon Manor, Buckinghamshire, England.
The first image was processed using Russell Brown’s Paper Texture Panel (see Russell Brown’s Paper Texture Panel Updated! blog to download) and Flypaper Textures Creme Anglais Taster set to Overlay Blend Mode at 93% Opacity and Touchstone Taster set to Overlay Blend Mode at 100% Opacity. Layer masks were added to clean up the faces and shadows a little and a large shadow on the wall was removed as it was very distracting. What really made this image so beautiful was OnOne PhotoFrame (see sidebar for website link) Maivre Background set to Overlay Blend Mode at 80% Opacity while still in the plug-in. It was actually just like adding another layer of texture. Once back in Photoshop, a layer mask was added to softly clear the face area of the texture. The left image of Poetry was converted to a black and white using Nik’s Silver Efex Pro 2 starting with the High Contrast preset. A little localized sharpening was done to the his face using the LAB sharpening method (see my Fun Photoshop blog Unsharp Mask Filter in LAB Mode) and some noise was removed from his body using Imagenomics Noiseware that I am trying out. The right image was hardly touched (only slight noise removal due to the dark lighting effect) – just a beautiful image and very much how the sculpture looks at the Gallery.
If you get a chance to go to this wonderful Art Gallery in DC, you will should try to see one of these beautiful sculptures…..Digital Lady Syd
Some Beach Fun!

Thought I would put up an image I created a couple years ago of Ormond Beach, Florida, where Granada Boulevard runs into the Atlantic Ocean – it is a beautiful stretch of beach if you are in the area. The old Hotel Ormond, a large 300-bed hotel that was built in 1887, was located near this beach. This was one of my first attempts at adding a texture to an image – not sure what texture this is, but it definitely is a watercolor texture that goes from a yellow tone on top to blues on the bottom – the layer was set to a Color Dodge Blend Mode at 30% opacity.
The image below is also of the same stretch of beach but from 1903 – there were beautiful houses instead of high-rises overlooking the ocean. In this winter image, the sails helped move the bikes on the hard sand beach coasting at up to speeds of 20-25 mph. The image is from Shorpy Historical Photo Archive – a great site to follow on a daily basis if you love American history like me as they post a new image every day from the past. To see this image in high resolution on their site, just click on it – and click here for a similar lower resolution shot of the same bikes racing a car. This beach is where the first official automobile race was held in 1903 and the town of Ormond Beach is still known as the “Birthplace of Speed.”

I hope to shoot more local images in the near future – it is fun to live in an area that has some great local historical interest. In the meantime, try out some textures to add a little interest and fun to your own images……Digital Lady Syd
Digital Lady Syd’s Related Blogs:
Where Am I?
Getting That Vintage Look!
Russell Brown’s Paper Texture Panel Updated!
Cafe Alcazar and Vintage Topaz Adjust

Here is an image of the Cafe Alcazar that is located in the old swimming pool area of the current Lightner Museum (old Hotel Alcazar) in St. Augustine, Florida – one of the best places to grab lunch if you are in the city. I did very little to this image but apply a Topaz Adjust preset called Daylight to Tungsten II which gave the browns the rich tones, sharpened using my LAB sharpening method and added a Curves Adjustment Layer to increase contrast. Topaz Labs did a nice video on their Film and Vintage Effects with Adjust, B&W Effects and Lens Effects that does a good job of explaining how to get this look. I really love the feel of this image – gives a little of that vintage effect the historic location instills……Digital Lady Syd
Digital Lady Syd Related Blogs:
Where Am I? (Cafe Alcazar)
Unsharp Mask Filter In LAB Mode
I Didn’t Know That! Curves Adjustment Layers
Quad Tones in Topaz Black and White Effects Plug-in
Lunchtime atop a Skyscraper – What a Story!
Recently the Daytona News Journal ran an article on Charlie Ebbets (no link since the article is now archived and there is a charge to read it now), the photographer who took the very famous photo called “Lunchtime atop a Skyscraper” which was taken on the 69th floor during construction of the old RCA Building in 1932. His wife, Joyce Ebbets, still lives in the Ormond Beach area. It was not discovered until 2003 that Ebbets had photographed this image. Apparently a movie is being considered based around this image that will follow some of the people on the beam and how the depression had hit New York City back in 1930’s. His daughter has a wonderful website on his life at Ebbets Photo-Graphics with slideshows and images from throughout his life. When he died in 1978, he had more than 300 published photographs.
To see several of the photos he took during the construction of this part of Rockefeller Center, see the short U-Tube video called “In the Heights – Tribute to Charles Ebbets.” There are some other great photos from Mr. Ebbets collection and a quote from La Fototeca: History of Photography on the Mr. Ebbets life: “Ebbets was born in 1905 Gadsden, Alabama. He bought his first camera at the age of eight by charging it to his mother’s account at a local drugstore. By the 1930s Ebbets was a well known photographer and had work published in the major newspapers across the nation including the New York Times. In 1932, he was appointed photographic director for the Rockefeller Center, which was under construction in New York. In September of that year, he would take the photo which would later define his work, Lunchtime atop a Skyscraper. In 1933 Ebbets moved back to Florida where he was to live and work for the rest of his life. In 1935, Ebbets became the first official Associated Press photographer in the state. During this era, he also founded the Miami Press Photographers Association and was its first President.”
One of my personal favorite images is called “Tee Time” since I love golf. I had never heard of this image before and that is amazing with all the golf paraphernalia everywhere…..Digital Lady Syd
Problems for Big Ben
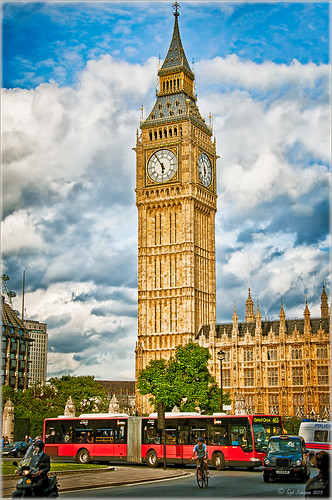 |
It is funny that I had just completed this image of Big Ben a few days ago and then it comes out that is has some tilting issues, 0.26 degrees NW or 18 inches off center at the top of the 314-foot tower. It will be thousands of years before Britain’s iconic landmark that houses the clock gets as bad as the Leaning Tower of Pisa in Italy. The rumor is Members of Parliament are meeting to discuss what to do including these two options: 1) Do costly repairs to both the Parliament Building and Big Ben, or 2) sell the entire complex to a rich foreign developer. Hum! For more information on this, check out The National Post article.
I tried to find an old famous painting of Big Ben but could not find one – can’t believe no one painted this gorgeous landmark in the 1800’s so my search is still on. In the meantime, I did find a site selling some very interesting Big Ben posters at Art.Com that I found very inspirational – give it a look to see some of the creative work others are doing (and for profit!).
How I processed this image? Believe it or not, this is just another pseudo HDR processed just like I do all my pseudo HDR’s. Used my SJ-Vivid Drawing Look preset in Lightroom 3 (download here if using Adobe Camera Raw) (note: change file extension to .xmp in zip folder to get file to work) and adjusted the Exposure, Blacks, Red Saturation (-45), Blue Saturation (+61), and Green Luminance (+3) sliders to make the image colors pop correctly. In fact the red bus was overpowering the image so the red saturation had to be reduced quite a bit. (Hover over image to see how it looked coming out of Lightroom.) I must say there was an amazing sky that day! Some clean up in Photoshop was done and the image was taken into Nik Color Efex Pro 4. All I did was add the SJ Pseudo HDR1 recipe (NOTE: This download link is broken if you click the Download button, but by right clicking on the button and choosing “Save Link As,” the file will download correctly.”) – I had to tone down the Detail Extractor and Contrast a little and change the Effect Radius to Large to get rid of the over-exaggerated HDR look. In Nik’s Viveza 2 I added a point on the clockface to make it really sharp but this could easily have been done with the Sharpen Tool in Photoshop. The last step was to add a Curves Adjustment Layer to brighten the whole image just a little. I was surprised how much detail came in from only applying the Lightroom preset without the Photoshop plug-ins. You could actually see the people riding inside the bus! It’s great when it all comes together with the light and composition to create a great shot!…..Digital Lady Syd
Digital Lady Syd Related Blogs:
Pseudo HDR Using NIK Color Efex Pro 4
Another Pseudo HDR Image with NIK CEP4 – Got to Love the Effect!
Where Am I?
Getting That Vintage Look!

I had not done an HDR image or post in a long time so I pulled out NIK’s HDR Efex Pro, which usually gives me the look I want. Personally, I think it is a little harder to use than Photomatix Pro and Photoshop CS5’s Merge to HDR, but the results can be spectacular if done correctly. This image is of an Ice Cream Shop on St. George Street in St. Augustine, Florida. This is a great example of the typical Spanish home that was built back in the early 1800’s. The texture in the building came out really nice. What I like about this program is on the right side of the program, there is a drop-down menu called HDR Method where a lot of different looks can be tried out. The basic global adjustment sliders and the U-Point controls are still available so control points can be placed where needed and the strength adjusted to fit the location. In this case, the Fresco method was chosen at 70% strength. I did bring the image into Photoshop to clean up some of the distracting items and to sharpen the lettering in the signage with the Sharpen Tool. The edges were treated with OnOne’s PhotoFrame Taufer Texture 12 in dark black (see sidebar for link to website). Overall it gives a pretty convincing vintage look.
Another great program from NIK!…..Digital Lady Syd
Digital Lady Syd Related Posts:
Different Images-Same Look Using HDR!
Where Am I?
The Art Corner: Little Girl Knitting – A Mystery Sculpture!

I recently was visiting the Lightner Museum located in the old Alcazar Hotel in St. Augustine, Florida, and found this beautiful sculpture of a little girl sitting on a big pedestal in the corner. I think it turned out to be my favorite piece in the museum and the gorgeous antique mirror next to her is perfect for the setting. The sculpture is by Ella Pollock Bidwell of which very little known. The art was signed by the artist with Florence 1889, Carrera Marble was the medium used, and listed on a separate line “American(?).”
The Museum’s information sign by the work states “Despite the fact that this is a highly executed work of are, no concrete information has come to light on Ella Pollock Bidwell. Whether she actually sculpted this from marble herself or only did a clay maquette to be copied by others is left for us to speculate. There is some possibility that Ella Pollock Bidwell may have been an American working in Italy as many American Artists of the 19th Century were want to do. Alas we have no proof to offer of this either. Although the Artist is unknown to us today, her legacy remains with us in this charming and beautifully crafted work of art.” While searching on-line, the Bidwell Family Crest and History came up and listed that in 1892, a woman by the name of Ella P. Bidwell came through Ellis Island from London at the age of 30. Can’t help but wonder if this is the same woman who did this beautiful sculpture. You also have to wonder if this woman made more beautiful sculptures during her lifetime – what a shame we do not know!
The image was processed mainly in Lightroom. I created the tinted preset from reading David duChemin’s book “Vision & Voice – Refining Your Vision in Adobe Photoshop Lightroom.” See my blog “Inexpensive Gifts for the Photoshop Lover on Your List” No. 2. This book is a great read if you use Lightroom – he teaches you how to make some very beautiful presets. I use them all the time. The one applied to this image I named Maasai Chocolate split-tone & vignette to use as a starting point, but ended up changing several of the settings in the Black & White Mix. The image was also cropped to bring the mirror and the girl into closer view. In Photoshop a Curves Adjustment Layer was added and the Sharpen Tool was used on its own layer to locally sharpen parts of her features. Finally her face was Dodged just a small amount. I really loved the results of this preset on the sculpture…..Digital Lady Syd
Topaz Adjust 5 Is Here! First Look!
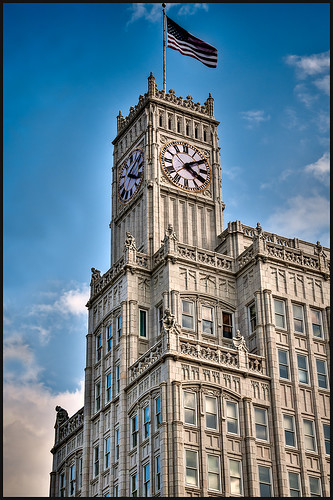 |
Topaz Adjust 5 was just released and here is my first attempt at using it. Hover over the image to see the original HDR image. (Click on sidebar Topaz 4 to go to website.) The interface has been greatly expanded to look like their very popular new plug-in Topaz Black and White Effects. This is a big improvement and I really enjoyed working with the new version of the plug-in. If you own an earlier version of Topaz Adjust, you are entitled to a free upgrade. If not, try out the trial and see what you think. They have added over 100 new presets and also included all of the ones from Topaz Adjust 4. A histogram has been added along with a really nice new Local Adjustment brush called Brush Out where the effect can be removed and a small mask shows how much is being removed (similar to Adobe Camera Raw or Lightroom’s Adjustment Brush). In the image above, it was created as a Photomatix 4 HDR using 3 images, then brought into Photoshop and processed in Topaz Adjust 5. Just a subtle sunlight feel was placed on the building. (See my blog “Quad Tones in Topaz Black and White Effects Plug-in” for colors used to create the soft sunlight effect in the Tone section.) There are so many choices and the image could be made to look more vivid and moody.
The image above is of the Lamar Life Insurance Building tower with beautiful gargoyles all around it in Jackson, Mississippi. It is a very striking looking building even in this day and age and the clock tower can be seen almost everywhere in the city. Below is a copy of a postcard from 1924 when it was built showing this beautiful building, thanks to Bill Badzo’s Flickr site. He states this about the building “…a close observation reveals it as nothing less than a scaled-down version of New York City’s Woolworth Building.” Interesting observation!

Give this new plug-in a try when you get a chance – you will not be disappointed. Lots of fun ahead of you…..Digital Lady Syd
Digital Lady Syd’s Related Blogs:
Digital Lady Syd’s Review of Topaz Adjust 5!
Little Nighttime Fun from Topaz!
Why I Love Topaz Adjust!
Combining Plug-ins – Double the Effect!


