
Mickey Shopping on Main Street USA
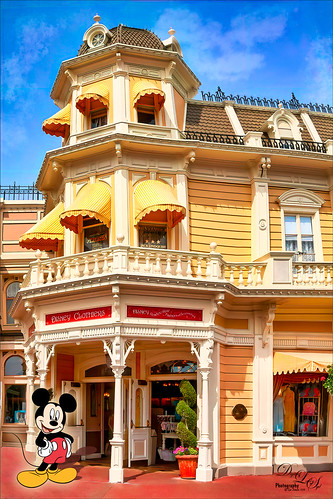
Had some fun working on this image. This image is of a shop on Main Street USA, Magic Kingdom in Orlando, Florida (click on link to see more info and other interesting buildings). I really love the color yellow so this shop always catches my attention. There was a lot of manipulation done to get rid of the people in front of parts of the image, straightening the building, and adding the Mickey Mouse cloud. Note that the top floors are not as high as the bottom floor – Disney does that on all the buildings to make them look bigger than they are. Just a few Basic panel changes done in LR before going into PS. Next the people were removed in front using the new Content Aware-Fill command and little more clean up. Next the Adaptive Wide Angle filter was used to straighten up the columns and the image was cropped (see my How to Use the Adaptive Wide Angle Filter blog). Next on a Composite layer (CTRL+ALT+SHIFT+E) , Topaz (see sidebar for website link) Studio’s AI Clear Adjustment and HSL Color Tuning Adjustment were used. Back in PS on a New Layer on top, Grut’s FX Cloud Kernel Hi brush (these Cloud Brushes are the best around) was used to paint in the Mickey Mouse cloud face. Then Grut’s Cloud Lumens Hi and Sparco HI brushes were used on other sky areas. Another composite layer was created and taken into Skylum’s Luminar 2018 (see sidebar for website link). This used their wonderful new AI Sky Enhancer which really popped the sky. (Settings: On bottom layer used Accent AI Filter Boost 67; AI Sky Enhancer Amount 38; Tone: Exposure 0, Contrast 4, Smart Tone 66, Highlights 31, Shadows -6, Whites 92, and Blacks -80; and Golden Hour Amount 17 and Sat -62. On top layer used my SJ Matt Look preset – Sun Rays which contains Matt Look (Amount 47, Fade 20, Contrast 20, Vividness -44, Toning 7, Hue 256, and Sat 46; and Sunrays – placed the sun down halfway on right side of house (X104/&55) with center off the side of the image, and the rest of the settings: Amount 30, Look 31, Number 23, Length 65, Warmth 67, Radius 63, Glow Radius 69, Glow Amount 66, Warmth 72, Penetration 78, and Randomize 8.) The last step involved adding a Mickey Mouse vector object from Shutter Stock (noted that an .eps file from Illustrator can be opened in PS – to see it first, find file in Adobe Bridge and place into your image) and created shadow for him. I love the color and how sharp the image is!…..Digital Lady Syd
First Snow of the Season
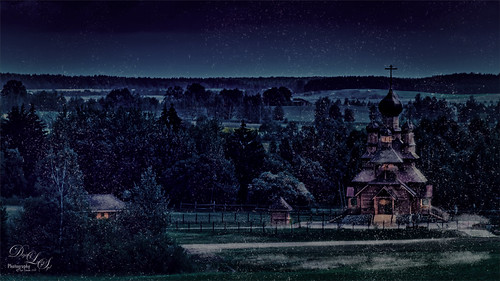
Decided to try using Serge Ramelli tutorial in KelbyOne’s Lightroom 30 Magazine on how to “Transform a Day Photo into a Night Photo.” It would probably be better if a street scene was chosen, but after fiddling around with the Radial Filters in Lightroom a bit, the results turned out pretty nice. Then the image was taken into Photoshop and I decided to add this wonderful, fairly new plug-in for us Windows users, called Luminar 2018 (see sidebar for website link). Several filters were added to get just the correct light to dark ratio (Accent AI Filter, Saturation/Vibrance, Dehaze, Brilliance/Warmth, and LUT Mapping using Color Punch Hot preset). On a second layer in the plugin Joel Grimes Indian Summer preset was applied which really sharpened up the church details. Then I decided I wanted a little snow effect so a couple layers were created using Glyn Dewis’s Dirt Debris Snow brush (created in his How to make a Dirt, Debris and Snow Brush in Photoshop video). A little snow was piled up on the sidewalk and roofs with a few specialty brushes I had created. I really liked the overall effect using a really bright image……Digital Lady Syd
Emily the Pig
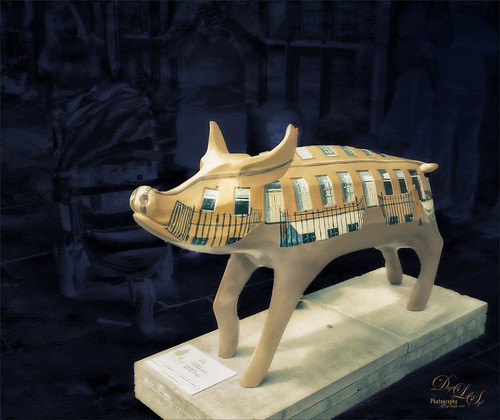
This little pig has the same story as another pig image I took way back in 2008 when the Town of Bath in England was having a public art event to celebrate Bath’s origins and artists. (See my King Bladud’s Pig blog.) King Bladud’s (cc 863 BC) pig, named Emily and painted by Charlotte Moore, is one of 106 pigs that were on display all over the city (I only saw a few) and they were sold at auction to raise money for the benefit of Bath’s Two Tunnels Project. Not a lot was done with this image. The pig was selected and a texture was placed behind her and set to Difference blend mode – that is why you can see the people behind her but not real clearly. Then Luminar was opened and one of my favorite presets by Joel Grimes was applied (Soft and Desaturated) – these preset can still be downloaded from Luminar for free from inside the program. Back in Photoshop a New Layer was opened and just a bit of black was added to darken the bright areas a little more. Last step used Nik Viveza 2 to emphasis the focal point a little more. That was it!…..Digital Lady Syd
Trafalgar Square Fun!
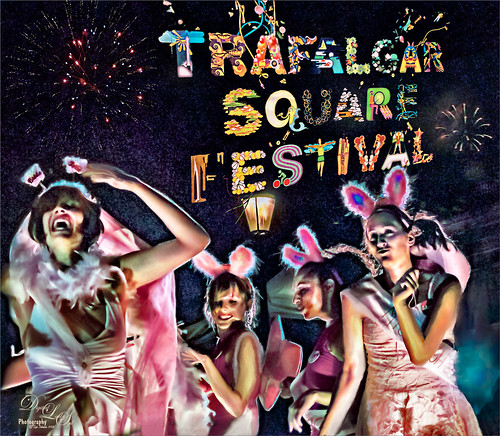
I am not sure why I did this image except that it was just fun to put together some older images I liked but were not that great to post as is. This is a composite using some of the girls that were in a nighttime show called Fashion Bus on the Square Show (a comedy fashion and dance show) at Trafalgar Square in London where it was pretty dark and crowded. The lettering was a banner at Trafalgar Square and the fireworks were added separately from my own sources. It ended up being a high-key image that looks pretty much how it did at the time of the event. The girl image was taken into Luminar 2018 (see sidebar for website link) where Joel Grimes Portrait Pop the Blues preset was applied (check to see if they are still available as a free preset from Luminar when in the software). Then it was mainly just a major clean up effort using clone stamps and mixer brushes. It was fun to try something kind of different. …..Digital Lady Syd
Camachee Cove Yacht Harbor
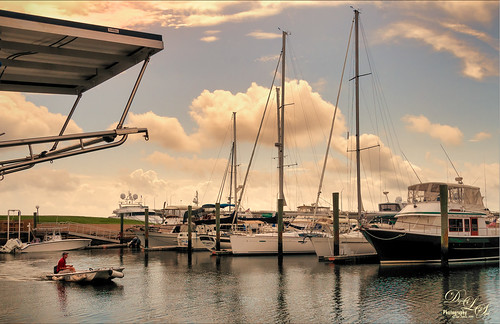
One of my favorite places to visit and take photos is at Camachee Cove Yacht Harbor in St. Augustine, Florida. If you’re a sailor, this is one of the best places to keep your boat along the whole East Coast of the U.S. Anyway, just wanted to prove that you can take a good image even in really bright light. This image was taken at around 11:00 AM and it was just fine. I know, it does not happen all the time, but it does happen! Not a lot needed to be done to it either. In Lightroom a Crisp Warm Soft profile was used from the free Matt Kloskowski Profile Sampler (same settings as the LUT file in Photoshop). Then just the same Basic slider changes. In Photoshop, Luminar 2018 (see sidebar for website link) was applied using just the AI Filter and the Brilliance/Warmth Filter – that was all and it looked incredible! Next my favorite Nik Viveza 2 was opened and the focal point was sharpened a bit – the guy in the boat and back of the boats. There was a blown out spot that was colored (yes you can do this in Viveza) to color in the effect. The last step was a Curves Adjustment Layer where just a small S-curve was used. That was it. What a beautiful day it was!…..Digital Lady Syd
Fireworks at Epcot
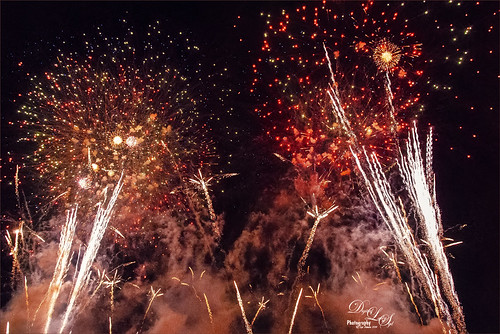
Did not get to a fireworks celebration this past July 4th, but still always enjoy my images from an Epcot nightly fireworks event at Disney World, Orlando, Florida. Not sure if they still are using real fireworks as this shot was taken a while back. In ACR used Adobe Vivid profile and made a few basic adjustments. On a duplicate rasterized layer, Luminar 2018 was opened and two filters were applied: Structure and AI Filter. Some Noise Removal was done due to the smoke noise created by the fireworks in the dark background areas only. Last step used the Color Lookup Adjustment Layer and set to Foggy Night preset at 24% layer opacity. Pretty simple – even though this is not the traditional fireworks image, it really reminds me of all the craziness going on at the fireworks!…..Digital Lady Syd
Little Hidden Tree
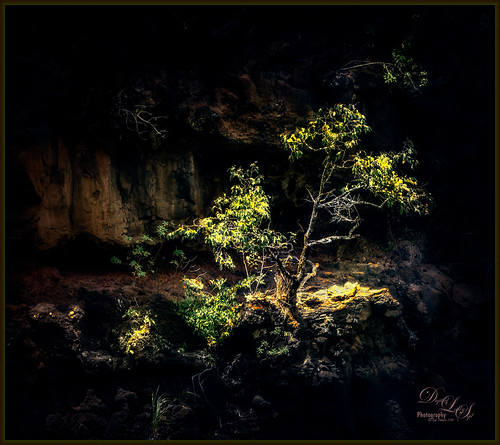
This little tree was growing on the side of the hill almost right behind the waterfall at Waimea Falls in Oahu, Hawaii. Lovely place to visit! Had lots of fun just trying out the different Photoshop plug-ins: Used On1 Photo Raw 2018 Effects to sharpen with the Dynamic Contrast filter, Luminar 2018 using their Golden Hour, Adjustable Gradient, Image Radiance and Dodge & Burn filters, and Topaz ReStyle’s Regal Blue Shades preset. See sidebar for links to all three plug-ins. Added a Black and White Adjustment Layer to fine tune the colors (See How to Use a Black & White Adjustment Layer to See Contrast in an Image blog) and a spotlight effect on the yellow leaves (see How to Add a Spot of Light blog). That was about it!…..Digital Lady Syd
Blue Herons Nesting
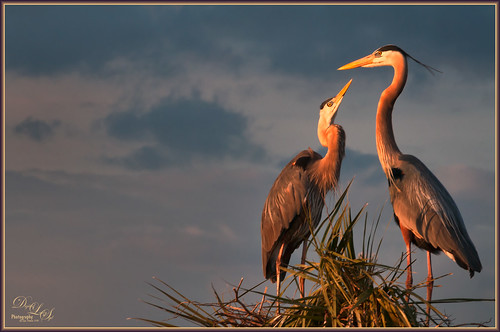
These two beautiful Blue Herons were nesting at the Viera Wetlands (also know as the Richard Grissom Memorial Wetlands) in Brevard County, Florida, a while back – I had not post-processed the image as I just could not get a great result. Now that Luminar 2018 (see sidebar for website link) is available for we Windows people, it really made the image pop! After doing some basic editing in Lightroom, it was then actually edited in Luminar (these filters were used: Accent-AI, Polarizing, Clarity, Golden Hour, Orton Effect, Details Enhancer, and Top & Bottom Lighting). Once image came back int LR as a TIFF file, Photoshop was opened for some quick clean up, applying Nik Viveza 2 to highlight the birds’ heads a little more, and a Curve Adjustment Layer for contrast. The frame was created using a Stroke Layer Style and setting it to Fill Type Gradient instead of Color – then sampled colors from the image to create the gradient. I love Herons!…..Digital Lady Syd
A Mermaid in the Mist of a Fountain
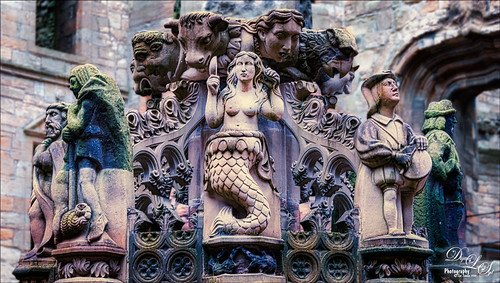
This is another image of part of the interesting Fountain at Linthlithgow Palace in Scotland (where Mary, Queen of Scots was born). The fountain was built in 1538 by James V – it has been known to flow with wine on a few occasions. These colors came from the image itself so I imagine at some time it was quite beautiful. I found the mermaid a rather interesting character in the mist of all the other statues. (See my previous Deer on a Fountain blog.) In Lightroom applied the new Artistic 04 profile that comes with LR/ACR, cropped the image, and did a few basic slider adjustments. In Photoshop duplicated the background layer and opened up Luminar 2018 (see sidebar for website link) where the AI Filter, Brilliance and Warmth, and Image Radiance filters were applied. The background was duplicated again and a Gaussian Blur set to 4.0 was applied to soften the stone in the palace which was very distracting behind the fountain. A layer mask was added to the Luminar layer and the background was painted out so the blur layer shows through. A 50% gray dodge and burn layer was also used to help emphasize the figures. A stamped layer was created and Nik Viveza 2 was used to direct attention to the mermaid. Last step involved adding a spotlight effect on the mermaid using a large white brush at 9% Flow on an Overlay blend mode layer. That was it. Would love to go back and take some more pics!…..Digital Lady Syd
Happy Valentines Day
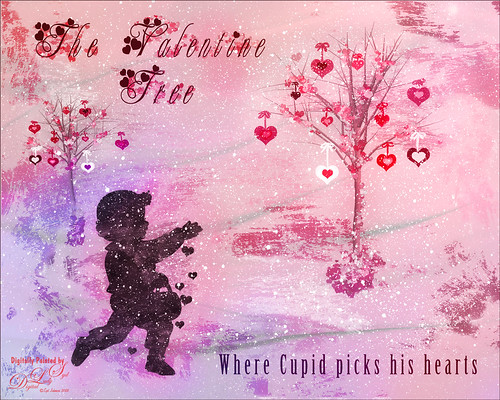
Just another Valentine – love to create them. These are my Valentine Trees created using the Render Tree filter (see my How to Create a Photoshop Artistic Tree blog) in Photoshop by selecting the Foliage Plant with no leaves. Some hearts were brushed on to hang from the tree using the shape brush created in my Happy Valentines Day (with a Few Tips!) blog. The little scattered valentines were added to the branches and used to create some valentine flowers at the bottom. Paint Swipes (White) by People Love Process is a freebie called Design and Illustration Textures from Design Cuts if you sign up with them – this is a wonderful pack of PNG and PSD files. Different shades of pink were used to paint in the paint swipes. And their Spatter Spray (White) was applied for the snowing looking background. The cupid is one of the brushes I created using Julie Mead at E-scape & Scrap set also from my Valentine blog tips. The image was taken into Luminar 2018 (see sidebar for website link) and the Accent Filter, Image Radiance, Sun Rays very lightly applied to brighten the trees, and the Darken & Lighten filters were used. In PS the layer was set to 57% layer opacity. A pink and blue overlay set to Hue blend mode at 82% was applied to add a little more color in the background. The fonts used were MC Sweetie Hearts and Birch Standard. The last step was adding a Red Channel Luminosity Curves Adjustment Layer. Hope everyone has a Happy Valentines Day!…..Digital Lady Syd
Orange Daisies
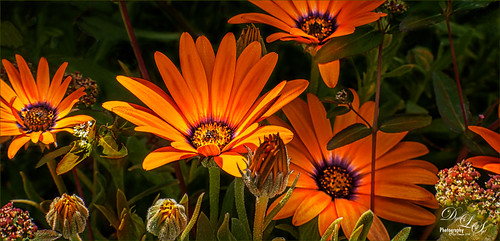
Found this image of some orange daisies from my yard taken a while back. It was a macro shot using a 60 mm lens with a Bower 0.5 x High Res Lens at F16. In PS Luminar 2018 (see sidebar for website link) was opened and the Details Enhancer filter, Structure filter, and the Top & Bottom Lighting filter were used. Then in PS just did a little clean up on the petals and the background, and added several layers to lightly spotlight various parts of the image. Finished up using Matt Kloskowski’s vignette (see my How to Create a Subtle Vignette blog). These flowers were so pretty to photograph!…..Digital Lady Syd
Festive Water Lilies

These water lilies were shot at the Philip Hulitar Sculpture Garden in Palm Beach, Florida. I decided to add a little color to them so this is how I did it. First did just the basic adjustments and a little highlighting on the leaves in Lightroom. In Photoshop, Luminar 2018 (see sidebar for website link) was opened on a duplicate layer and the Silver Fade preset was selected. (These settings were then changed: Color Temp: Temp 49, Tint 42; Tone: Contrast 11; Smart Tone 35, Highlights -41, Shadows 20, White -13, Blacks 20; Sat/Vibrance: Sat -30, Vibrance 58; HSL – Hue Yellow -21 and Green -20/Sat Red 7, orange 4, Yellow -25, Green -25, Aqua 16, Blue 5, Magenta -7; Lum Red 7, orange 7, Yellow -2, and Blue 5; Filters Amount 61.) A New Layer was created in Luminar and the Details Enhancer filter was added (Small Details 44, Medium Details 42, and Large Details 27). On another New Layer in Luminar, the Dodge and Burn Brush Filter was selected (Amount 100; used the Darken brush at 50% and then 16% to paint in dark areas within the whole image; used Lighten at 16% Strength to paint in the light parts of the pin flowers). Thought I would give you the detailed info so you can see that Luminar 2018 can build up some interesting effects by using different filters on different layers within their own software interface. Back in PS, the Luminar layer was set to Overlay blend mode at 50% layer opacity. On a stamped layer (CTRL+ALT+SHIFT+E), Topaz (see sidebar for website link) ReStyle was used to give the beautiful overall color scheme – it was from one of the presets I had created a long time ago so I am not sure what original preset was used. On another stamped layer, applied Nik Viveza 2 which really lit up all the colors. One of my free Double Edged Frames – Photoshop Layer Styles was used to finish up – the frame colors were sampled from the image.
Me and My Shadow
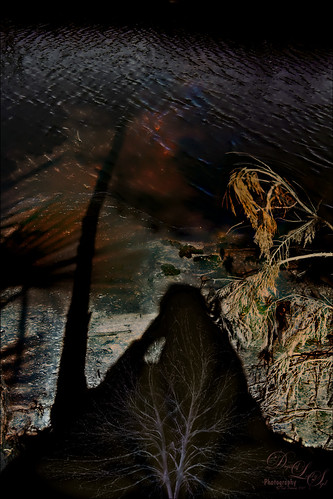
This image represents to me a contemplative mood – a connection with the Fall season and nature, and the nature of man with nature. It was a lot of fun to create. A tree from Pixelsquid was added into the shadow. Some of the colors are from using Lucis Pro. Topaz (see sidebar for website link) ReStyle’s Single Fawn was applied to the image. This image was taken into Luminar 2018 (see sidebar for website link) and the Adjustable Gradient Filter was added to the whole photo and the Sun Rays filter was added to just the foreground tree by using a layer mask. Loved how the tree turned out. PS Liquify filter was used to stretch the foreground tree where I wanted it. Some clean up layers and that was it. Love the whole concept of this image…..Digital Lady Syd


