
Digital Lady Syd’s Rule No. 13: Paint Something Everyday
Have not done a rule in a long time, but if you are learning to paint, many of the really good digital painters are saying to “paint something everyday.” This will definitely help you improve your painting technique, and if you already have a technique, it will keep your skill level at a high level.
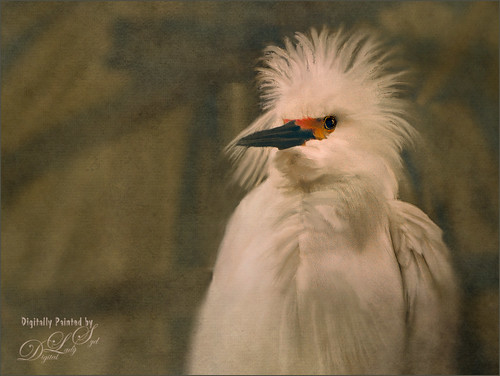
This guy was totally into looking around at the happenings at the St. Augustine Alligator Farm Rookery on this very busy day. When mating and building nests, the birds just do not even know you are there – it is truly amazing! For some reason, I just do not get tired of painting these guys! Just using the same Mixer Brushes that work with my style of painting. Still loving Fay Sirkis‘s (the Corel Master who makes fabulous Photoshop brushes also) Precious Oil Diamond Blender brush and a Pete Collins Portrait Smeary Mixer for the background (from KelbyOne Mixer Brush training by Pete). Used an Exposure Adjustment Layer for the eyes (see my How To Do a Quick Eye Sharpening in Photoshop ), a Color Lookup Adjustment Layer Gold Blue Abstract preset and Lighten layer blend mode, add Jai Johnson Brown-Gray canvas texture, and Nik Viveza 2 on stamped layer on top to emphasize his face. Is this guy awesome or what!…..Digital Lady Syd
Digital Lady Syd’s Rule No. 12: Try a New Tutorial and Experiment
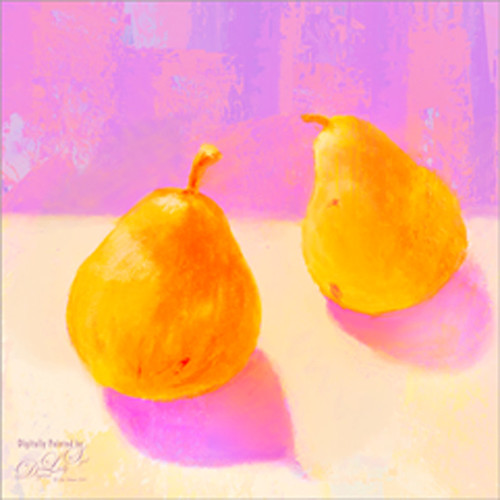
I have not done a Digital Lady Syd Rules (okay it s not Photoshop but the concept fits when doing Photoshop also) in a while. This image is just of some pears I sketched and painted in Corel Painter – I was informed that this is something first graders do but it was fun to relearn how to draw pears. I followed a tutorial posted at Peachpit Press by Corel Master Cher Threinen-Pendarvis called Blending and Feathering with Pastels in Painter-2015 – and once again I feel a bit like I was doing a Bob Ross painting. On the other hand, I learned a couple things while doing her tutorial: One is that I can sketch a little bit, and two is that I really like pastel brushes! So this was definitely worth my time to try. I finished up by using one of Melissa Gallo’s beautiful textures called August Copper, and I could not have done this tutorial justice if I had not taken her workshop and studio course on Painter. This was so much fun and I got a couple new brushes to play with at the same time!…..Digital Lady Syd
Digital Lady Syd’s Rule No. 11: Keep Practicing!

Just wanted to practice a little more painting so I found this image taken with my phone at the local grocery store recently. I have found that if I do not keep practicing on images, I lose some of my creative ability. That’s because I have to keep looking up how to do so things I forgot how to do! So this image was just one I decided to practice using my Photoshop skills to add a lovely painterly look to these flowers. Used Topaz (see sidebar for website link) Detail 3 to sharpen the total image a little – I wanted the center of the flower, the focal point, to be as sharp as I could get it. I added a texture I created in Corel Painter using three brushes including a nice chalk brush to get some interesting texture. Added a New Layer on top and used in Blur’s Good Brush 5.1 Pro set (a wonderful huge free download of all kinds of Photoshop brushes including several really nice Mixer brushes!) Circles 混凝土 – 1 brush. On another New Layer added some color into the image using a Pastel Mixer Brush – be sure you are set to add color in your options bar to get this to work. Next the Sharpen Tool was used in another layer. The last step was adding a Color Balance Adjustment Layer and a Levels Adjustment Layer. I just love painting in Photoshop and I do not even mind practicing this!…..Digital Lady Syd
Digital Lady Syd’s Rule No. 10: Use What You Know!

Just thought I would remind everyone that you do not have to keep changing every workflow to incorporate that new technique into it. Sometimes it is better and faster to use what you know, especially if you are just doing a little processing of an image. That is exactly what I did on this image. I like this image of the Tower of London because you can a little boy peaking out at the sidewalk and the Thames River. There is also part of another little boy in the guard house. So much going on in London!
I really wanted to do a black and white, and it looked good with a slight sepia tone on it, but when I took this image into Topaz (see sidebar for website link) Black & White Effects 2, my Sunny preset brought out the colors the way I liked them. In Lightroom there was just the regular slider adjustments going on (see my How to Use Adobe Camera Raw (ACR) or Lightroom 4 Quickly blog) and the Upright Adjustment was also used to straighten the image out (see my Lightroom 5′s New Upright Adjustments Section blog). Once in Photoshop, I went into Black & White Effects and just applied my preset, that’s all – for all the settings for this preset, see my Sunny Preset for Topaz Black and White Effects blog. (This is one of my favorite presets for the program.) Did some clean up on a New Layer. Then created two New Layers, a Darken and a Lighten layer, set to Overlay for dodging and burning (see my The Best Dodging and Burning Technique! blog link). That was it.
As you can see, I really do use the techniques I present. Everything in this blog is what I normally look at when post-processing an image. Hope it gives you ideas on how to do your images too!…..Digital Lady Syd
Digital Lady Syd’s Rule No. 9: Get the Shot!

I took this beautiful little rose at Lowe’s with my inexpensive Kodak C1450 14-mp point-and-shoot camera and it turned out very nice! These little cameras really do a great job for those unexpected shots! Since most people have decent cameras on their phones (mine is still a 2 megapixel so I carry this camera), there really is no reason not to get the shot. It just may not be quite as sharp or colorful as your good camera, but at least you get the shot, the memory, and something you can work with in Photoshop. That is what I did with this rose – it was a little soft except where it was focused, but the colors were still beautiful and overall, not that bad an image.
One of the issues I had with this image is that it is a JPG and there was a lot of Chromatic Aberration in the image – I tried to remove it in Lightroom, but it still looked rather bad so I treated it with a soft texture treatment to blend in the petals where the bleeding was bad. Some noiseware was also applied. Two gorgeous textures were stacked from French Kiss Textures – Artiste Fantasie at 80% opacity and Artiste LaDanse set to 68% opacity and her Spatter Brushes were used over the rose. Following Dave Cross’s path tutorial from his Photoshop CS5 Finishing Touches for Photographers class at Kelby Training (but it is also in his really good Photoshop Finishing Touches book), I created a fancy edge around the flower. Dave’s book was published a while back, but most of the tutorials work fine in CS6.
So get the shot, even if you do not have your best equipment with you – it may be a great image anyway!…..Digital Lady Syd
Digital Lady Syd’s Rule No. 8: Get Textures From Objects Inside Your Home!

This image is of the area above an entryway onto a courtyard at Flagler College (it actually was the ladies entryway to the courtyard at the old Ponce de Leon Hotel) in St. Augustine, Florida. In Photoshop I added a texture created from a shot of the corner of a large oil painting of a beautiful white cat in my living room to use on this image. (It can be downloaded here.) It is medium gray with lots of paint stroke texture that I find I am using quite often. Try going around your home to see if you have some interesting textures that could spice up an image. I took some of the lace in my dining room curtains and even my living room couch material. The kitchen countertop also made a nice dark texture.
The bricks throughout the college are colored that beautiful brick red-orange tone. This image definitely needed to be put into a sepia tone to see the detail so it was converted into black and white using Nik’s Silver Efex Pro 2 and the High Structure (Harsh) preset used as a starting point. Back in Photoshop my Cat Painting Canvas texture was applied and the layer set to Color Burn blend mode at 50% opacity. Next a Hue/Saturation Adjustment Layer was added and clipped to the texture (CTRL+Click between the layers to do this) so changes only apply to the texture and not the whole image. Colorize was checked and the Saturation set to 10 which gave a little more of a deep red sepia feel. Next a New Layer was added on top and Nakatoni’s Amazing Texture 2 brush (does not appear to be available anymore but any smooth grunge brush would do) was selected to paint with a dark brown color sampled from the image. By filling this layer with grungy strokes, and then setting the layer to Subtract blend mode at 90% opacity, the bluish almost duotone feel was created and also more texture was added. By double-clicking on the middle of the layer, the Layer Style dialog was opened and the Blend If Gray – This Layer white tab was split (ALT+click and drag to get a smooth transition) and set to 56/89 and the Blend If Red – This Layer white tab was split and set to 91/211 that really changed the red tone. It surprised me how nice it looked! A Curves Adjustment Layer was applied to add a little more blue by adjusting the Blue channel curve. A composite (CTRL+ALT+SHIFT+E) was created on top, and my Thin Double Edge Frame layer style was used (can download here), keeping the default colors. Once again, this produced a totally different image and I created the textures myself very quickly and inexpensively! Have fun exploring!…..Digital Lady Syd
Digital Lady Syd’s Rule No. 7: Check Out Your Local History

Just because you don’t get to go on that exotic vacation this year, it can be very satisfying to visit some of the local historical places near you. I have been cutting out of the newspaper little articles of unknown treasures in the area and keeping them in a file for a day when I need something new to shoot. The image above is from the center living area of the beautiful old home known as The Casements (circa 1900), and purchased as John D. Rockefeller’s winter home in 1918. It was located across the street from the old (now non-existent Hotel Ormond). I have driven by this local landmark a hundred times and never stopped, but a few weeks ago I did. Not that large a place but really fun to explore.
A tonemapped Tiff file was created using 5 images and taking them into Nik’s new version of HDR Efex Pro 2. In Photoshop it was processed using Topaz (see sidebar for website link) photoFXlab using the Plugins tab and opening Black and White Effects. A Cyanotype Collection preset called Cerulean Tea Rose Dynamics was selected and adding the Color Filter with Hue set to 329.9 and Strength 0.84, and Overall Transparency set to 1.00. Back in photoFXlab in the Adjustment tab, the Dynamics slider was increased slightly. The Detail Brush was used at full strength and the door, lights, flowers and rugs were painted over to sharpen.
I hope to continue exploring locally this year and find some more close-by treasures. So don’t get discouraged – just pick up the local newspaper or surf on the internet for historical places in your area. Then do not forget to download your images and play in Photoshop – the best entertainment there is!…..Digital Lady Syd
Digital Lady Syd Related Blogs:
Digital Lady Syd Reviews Nik HDR Efex Pro 2
Black and White Effects on Outside Art
Digital Lady Syd’s Review of Topaz photoFXlab v1.1
InstaTone in photoFXlabs – Great Fun and Great Results!
Digital Lady Syd’s Rule No. 6: Try Something New!

I have not done a Digital Lady Syd’s Rule recently so here is one – Try something new! This is my first attempt at creating a Monet impressionistic type painting. I used a photo from my trip to the Big Island and really cropped it down since I am still learning all the strokes and blending needed for a larger image. I followed a couple tutorials by Fay Sirkis that are now available on the NAPP website (see Painting With Your Camera and A Stroke of Genius-Photoshop Art Studio with Fay Sirkis under the Webinar link). If you want to try to paint like the famous painters of past generations, Fay Sirkis is the one who teaches it best. Can’t say enough good things about Fay – she is a great teacher, fun to listen to, and very knowledgeable about all the techniques of many famous artists. The nice thing about Fay is she provides you with all the Photoshop brushes, mainly Mixer brushes, to create the painter’s style you want to try. Therefore, when trying to do a Monet painting, you have Monet Impressionist brushes for blending, adding highlights, underpainting, etc., at your disposal, and she teaches you how she made them and how to use them. This article from Professional Photographer is a good example of her teaching method – Fay Sirkis: Painting Magic, Adobe Photoshop CS5. She also teaches classes at Photoshop World and on Kelby Training, and is one of the Corel Painter Masters.
I may not be Monet but this image was definitely a lot of fun to do – I have never tried anything like this, and it has given me a new appreciation for the type of art that Monet and the Impressionists created. I hope to try some other Master’s styles and brushes from Fay soon. So do like me and try something new!…..Digital Lady Syd
For my other Rules, click on sidebar entry called Digital Lady Syd’s Photoshop Rules.
Digital Lady Syd’s Rule No. 5: Just Step Outside and Look Around!

If you find yourself bored because you have not taken any interesting images recently, just step outside and take a look around. I was feeling just this way this past week – with the holidays there just was not much time to go out and take some interesting pictures. So on Christmas Day, I decided to walk around outside just on the off chance there was something interesting. It was warmer than usual outside and there was this beautiful unexpected Monarch butterfly in my Purple Queen flowers. He seemed a little aggravated that I was taking his picture, but hey, I wasn’t really bothering him. (You can tell the butterfly is a male because of the black spot on his mid-hind wings in the vein.)
The image was shot with a Nikon D300 using my 18-200mm zoom lens at 200 mm, f/9.5, 1/90 sec, ISO 400 – did not have time to change to a macro lens or I would have missed the shot. I shot in burst mode and several of the shots were blurry as he was moving his wings so fast! Not used to taking pictures of butterflies! This image was processed using NIK Color Efex Pro 4 with the Detail Extractor Filter, Vignette Blur to get ride of distracting leaves and ground in the image, and a regular Vignette. Used the Sharpen Tool on another layer and a Curves Adjustment Layer to finish off.
It was fun to take more of a macro shot for a change I always love taking pictures of flowers. Great change of pace and it got me interested in working on my flower photos for a few days while the weather is pretty bad. In the meantime, take a look around outside your house and maybe you will find something interesting, like I did, that you had not noticed before!….Digital Lady Syd
Digital Lady Syd’s Rule No. 4: See What Others are Doing
I have found that if I do not keep looking for new ways of doing Photoshop and graphics, I get into a real rut. Check out my Digital Lady Syd’s Favs page for some excellent reference books (here is an image of one of my reference bookshelves) and websites/blogs I follow. There is a lot of inspiration out there – you just have to find it!

So take some time every now and then and see what is happening. You might see something that will really inspire you and help with your digital darkroom skills…..Digital Lady Syd
Digital Lady Syd’s Rule No. 3: Look Back at What You Have Done

This week I was working on my Fun Photoshop Blog (Getting to the Art of the Matter) which entailed adding 38 images into a template. I wanted a certain feel to the images I was going to add so I decided to go back and review some of my older work. I discovered there were many techniques I have used quite effectively in the past and had totally forgotten about – it added a whole new perspective to what I have been working on recently. And some of the effects I did not think were that great a few years ago, I now think turned out quite nice.
The image above is one of these cases when I was just learning about how to apply textures. This image involved just adding Matt’s Old Texture as a layer, set to Multiply blend mode, lower the opacity, and with a layer mask, paint out where the texture should not be. Pretty quick and uncomplicated but the results were really nice.
Guess it is just good to see where you have been so you can see where you are going. Next time you are stuck, take a few minutes and go back to see what was going on when you were first working on images. You might get a new inspiration that will help get you back on track (like I did)!…..Digital Lady Syd
Digital Lady Syd’s Rule No. 2: Take the Time to Have Fun!
Well, I am not sure if this is really my first rule or second since experimenting and having fun are both important elements as to why I love Photoshop.
If you are not having fun, I can’t see that it’s worth taking the time to do – I would go do something else I really have fun doing!
That said, here is an example of something I did when I was first learning how to have fun in Photoshop and I still love this effect.

In case you are wondering what I was doing (as I am), I was big into making selections from my images to combine with clip art I had bought. Wish I could remember how I got that great outline from my beautiful Tamora Rose image. If I figure it out again, I will let everyone know.
Digital Lady Syd’s Rule No. 2: Have FUN!
Now go have some fun!…….Digital Lady Syd
Digital Lady Syd’s Rule No. 1: Take the Time to Experiment!
For my first blog “tidbit,” I thought I would show an example of using in Photoshop the Plugin Galaxy Instant Mirror effect. Sometimes you get some really interesting results using this filter on an image that did not look like much originally.

See my entry on Photoshop Fun blog called “Instant Mirror and Quick Mirror for Photoshop.”
Digital Lady Syd’s Photoshop Rule No. 1:
When stuck and not sure where to go next in Photoshop, EXPERIMENT.


