
Blue Jay

Just playing around with this beautiful image that Chat GPT AI created when I was working on my Trying Out Different AI Programs Fun Photoshop Blog. (Check out the blog to do this.) I put in a wrong prompt and this is the image I got so it was downloaded since it looked kind of nice. I have a Blue Jay family living in my backyard right now, so it seemed very appropriate. A glitter look was created on the leaves using a blue glitter texture clipped to a New Layer and painting on it with a regular old Photoshop spatter brush set to 45 pixels. Can actually use any glitter color and add a Hue/Saturation Adjustment Layer clipped on top of texture and the blank layer for painting – just move the sliders to get the color you want. For some nice free gold glitter textures, check out Gold Sparkle Texture Images like the one used on this image. The difference on how it looks is from the brushes you apply. The gold glitter texture was clipped to a new layer for the gold effect this time. A small 15-pixel heavily textured brush was selected to paint in the tiny leaf veins, berries, and bird feathers. Used a Daily Texture called Tranquil Start 5 on top set to Darker Color blend mode at 69% opacity. On a layer mask, the bird was lightly painted back in his face and breast. A highlight layer was created by setting top layer to Overlay at 15% opacity – just painted using soft round brush with white on just the breast, a few feathers, and face to drive the focus. That was it. It was so much fun to do!…..Digital Lady Syd
Silver Star

This image of a silver Christmas Ornament was originally very out of focus (even after using Topaz Sharpen) with a lot of background distractions. I decided to give the image more of an outdoor night feel, but only after spending a lot of time trying to get it to look good in color. 14 different mainly snow type brushes were used. One of my tricks to keeping the brushes straight is to create a new group in the Brushes Panel and name it for the image, in this case Christmas Silver Star. Then the brushes being used are dragged into the new group (don’t save their original groups, just delete them and reload later if needed). If a brush’s settings are changed, need to create a New Brush and drag it into the Star group. This way you can get back to them very quickly. On a New Layer a Pattern Stamp Scatter Brush (with a turquoise glitter pattern) was used to get the foreground effect and on a separate layer, and with the same brush an evergreen pattern was painted where the tree color would be in the background. Good start but not near enough. (Here is a link for Free Glitter Patterns & Styles that should help you out here – once loaded into the Patterns Panel, they can be added to the Pattern Stamp brush by clicking on the drop-down Pattern Picker arrow in the Options Bar.) Selecting the Star, a silver glitter Pattern Stamp brush added more glitter to it. A regular fog brush was used to fill in the mid-area behind the star. A Smudge Tool set to 76% Strength was used to get rid of any distractions that were still apparent. A greenery regular brush was used to stamp down some edge branch effects. The bottom left was larger branches Set to Overlay blend more with bits of snow added to the tips of the branches. A Magic Dust brush by Pretty Actions added the snow effect. Last step involved converting to black and white with Silver Efex Pro – lots of tweaking to get it just right, but that was it. Took a pretty bad image and converted it into something rather fancy!…..Digital Lady Syd
Lady at the beach

Was not sure what to name the image – Lady at the beach or Feeling Breezy. Generated this image in PS using Adobe Firefly back in 2024. As you can see, it is pretty basic from what Firefly does a year later, but I still liked the overall feel of the generation. There was a lot of manipulation done to the image after it was created. Many layers of painted areas using different brushes. One thing that was selected was an old legacy filter from Topaz called Lens Effects – it created a rather soft lovely yellow vignette around the image. I just downloaded this nice font from Creative Market called Bellisa Script – it has many glyph choices which makes it fun. At least it feels like I put a bit of myself into the image…..Digital Lady Syd
Gigantic Wave

I created this image while working on my Fun Photoshop Blog called Mixing It Up with Legacy Bristle Brushes in Photoshop-Mixer Refresher. The initial wave was created using the an AI prompt “Large wave for surfing” in Photoshop. Ended up flipping it, changing the color of it, and adding the Mixer bristle brush strokes on top of it. Most of the brushes used here were created by Fay Sirkis (brushes are no long available except on Kelby One). In the image above the beautiful blender strokes that were created for the wave are quite noticeable. And the foreground utilized some very small regular Mixer brushes that added color for the details. In other words, just by looking at many of the provided Photoshop bristle brushes, the paint strokes for the image could be figured out. Tips on how to work with these brushes are in the referenced blog. It was a lot of fun to see if I could get that frothy look into the top of the wave. ….. Digital Lady Syd
More Adobe Photoshop Firefly AI Fun!

Practicing using Adobe Firefly AI so that it does not overrun my creative expression. Image was created by drawing the lady’s head on a layer using a David Belliveau curly hair brush and one of Grut‘s pencil brushes for the skin and details on the face. Duplicated this layer and turned off the original for backup. On this layer the Contextual Taskbar was used to Generate the rest of the image using the prompt “Watercolor background of beach and add female body to woman” showing different poses with a white bathing suit on the body connected to her head. Pretty cool! The chosen variation was turned into a new layer (see my Fun Photoshop Blog called Placing Any Photoshop Generative Fill Variation on a Layer Easily to do this) and the other variations layer was turned off in case other parts would be needed later. Placed a New Layer under the newly created body variation layer (turned off at this point), a different AI background was generated the same way using the prompt: “Beach background in watercolor with pastel colors.” After selecting this new background variation and turning it into a regular layer, the original body AI layer was turned on above. With a layer mask, its background was painted out where not needed.
Painting Details: On separate layers, the face drawing was painted like I do with my Selfie AI images. The highlights and shadows on the body were created using Sam Peterson’s technique. (See my Fun Photoshop A Few Photoshop and Lightroom Tips and Tricks Blog-see #2 for this.) The skirt effect was created by following Carol Tayler’s Silk Texture short video for net brush settings, and the gold Scatter Brush added on top of the skirt was from Jessica Johnson’s video Creating Custom Photoshop Pattern Brushes (and Layer Styles) Inspired by High Couture: Rahul Mishra Muse on Behance. Lots of clean up especially on the body and several Adjustment Layers were added at this point – AI still is not perfect in Photoshop! Though I did enjoy trying out a different way to use it …..Digital Lady Syd
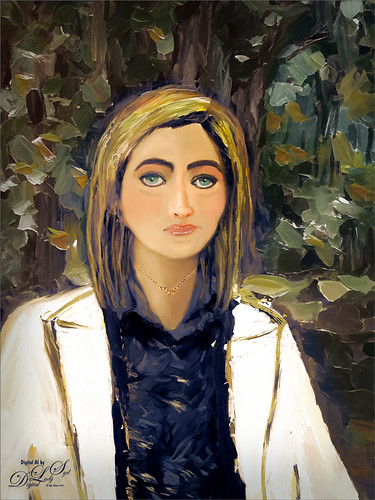
Native American Woman

Just had a lot of fun getting back to digitally painting portraits. Tried out the Grok 3 AI image generator and used as a prompt “Sketch of a Native American Portrait of a Younger Woman with jewelry.” Not exactly sure what kind of hocus-pocus occurred, but I was able to get a sketch somewhat similar to the one above. Lots was changed, and I noticed the exact facial proportions are not totally perfect, but overall it is a very pleasing image. Two backgrounds were used – one was my own Jaguar Texture and the other one was Melissa Gallo’s Summer Silk texture (not sure it is still available). Wanted an overall warm feeling to the image so the textures provided this. All the brushes used were ones discussed in numerous AI portrait images I painted in other blog entries – just in this and my Fun Photoshop Blog for more on this. Only the earrings and necklace had one of Jessica Johnson‘s lovely gold Pattern Stamp Brushes called Gold Leopard Exclusive from one of her Luxe sets. I decided I wanted the hair to look a little unkempt instead of perfect like a model. …… Digital Lady Syd
The Lioness

This drawing is one created by following the great Disney drawer Aaron Blaise’s tutorial on creating Lion Heads in his How to Draw Big Cats set. He provides a head skull drawing to use as a template to draw the actual structure of the head for eye, jaw, cheek, and ear placement. Fabulous technique! He also gives lots of tips about the actual animal and its traits. The background was created using three different textures: the bottom one was just a middle gray color; the one on top was one I had previously created in his Wildlife Painting Bundle – Lion Painting Tutorial (87% layer opacity); and the top used one of the free Japanese textures (to convert to pattern go to Edit -> Define a Pattern) from Resource Boy at DealJumbo (Pat 268 rev at 10.23 Angle and 297% Scale) – it was converted into a pattern. To get the pretty orange and turquoise colors in the background a Color Lookup Adjustment Layer using SparkleStock Clover 3DLUT file SS Sham Rocker 02.cube (link for the free ones but can’t fine direct line to the free Clover LUTs) with the Table Order set to RGB (was set to BGR), Lighter Color blend mode, and Layer Opacity of 88%. A couple other adjustment layers and a Camera Raw filter for a slight vignette were added to finish up. I totally love Aaron’s drawing tutorials and all the great tips he gives you!…..Digital Lady Syd
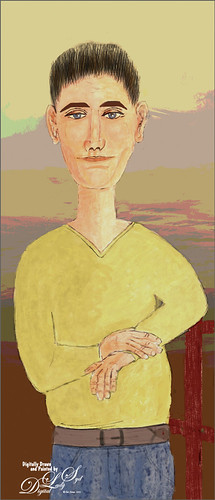
The Basketball Guy

Just had fun painting this guy since I have been watching so much college basketball recently. The background is of Mackey Arena at Purdue University – my alma mater – used Alien Skin’s Snap Art 4 with a Pastel preset on this. Decided to give him a light beard and mustache by using David Belliveau’s beard brush. The eye iris’s were created using Kristina Sherk’s striations brush (not sure when I got it) and Grut’s OI Chip Gimble brush for the speckles (watch for his free brush of the week-some great brushes at this site). The chalk brushes used are in most of my recent drawings for the skin and uniform. Just followed my regular workflow of doing a rough drawing, then a refined drawing, before adding color below. Next details, shadows and highlights were added…….Digital Lady Syd
Looking Forward

No AI – just drawing and painting. Another Mark English inspired image. Love using a Chalk Brush to paint these little portrait images. This one used the same brushes as in my short Tidbits Blog called How I Am Feeling ATM. Used one of my older Melissa Gallo textures – she used to sell the most beautiful textures and this is one of them. The netting and detail on the dress are all brushes by Jessica Johnson (need to get her E-mail as she gives away some really fun brushes). And to get this nice bright color feel, a little tip I learned using the Photo Filter Adjustment Layer. Try setting to Warming Filter 85 to start with and a Density of 85 – change layer blend mode to Multiply and reduce the layer opacity to taste. Instead for this image, the Filter was set to Red, Density to 52 with Preserve Luminosity on, Linear Burn blend mode, and 48% opacity. Can really adjust as you wish! ….. Digital Lady Syd
How I Am Feeling ATM

I like Mark English‘s work a lot and decided to try it again to get my creative vibe flowing. Not sure this is exactly a “self-portrait,” but I do think it represents my recent feelings. For info on how I discovered his art, check out my Masked Tidbits Blog with more info on this. No AI was used in this image – all digitally drawn and painted in Adobe Photoshop 2024. Just a couple things make this image unique for me – I created a brush to give a really heavy texture feel to the image. In a 50-pixel Chalk brush, I added a texture pattern from Jessica Johnson – she uses this pattern (TM-6) a lot in her brushes (see Texture section of brush to download-check the little + sign on right of pattern), but I did not use her Pattern Stamp brushes, just the texture. Since Transfer’s Flow Control Panel was set to Pen Pressure only, it can be painted over to get a more dense effect if needed. Used the same texture pattern in a layer style for the hair with the Pattern Overlay set to Opacity 17 and Scale 93 – layer was set to 46 Opacity and Fill 0, and just the hair was painted over on the layer. Otherwise just the same workflow for drawing. Lots of fun to create this…..Digital Lady Syd
Spanish Cay Lonesome Beach

Spanish Cay is on the northern edge of the Bahamas – in this image you can see the blue water from the Atlantic Ocean outside the little cover areas shown. There are plenty of small beach areas that look wild and secluded just like this beach. This image was post-processed using Photoshop’s Sky Replacement panel as the sky in the original photo was totally flat (the sky is from a company that is out of business now); On1 Effects 2023 using the AI brush to select different parts of the image – used Dynamic Contrast on the dead branches, foreground water, and fence (see Getting Started with On1 Effects 2023 by On1 and How to Reveal Stunning Detail in Your Water Photos by Scott Davenport); and Camera Raw Filter (see The Photo Editing Trick Every Photographer Should Know! by Mark Denney). It was fun trying out all these techniques. …..Digital Lady Syd
Being One with Nature
Above is another of my variations from my selfie image. These AI variations all turn out so different although in most cases the person is looking in the direction I was and the coat is somewhat similar, mine being light beige. I find that when having a problem with a face feature looking right, going back to the original selfie and copying that part onto it own layer. Then moving the layer above the variation layer and free transforming if needed works nice for getting a more accurate look – then blend into the face with a brush. My original nose is appearing in many of these AI images! In this case, the Liquify Tool was used along with Viveza and Topaz Lens Effects Reflector filter to lighten the left side of the image – it gaves the background some depth difference. For tree background, used Generative Fill prompt of “Oil painting outdoor background with trees.” Otherwise using all the same brushes as in my other blogs. It is fun to do these, and I am hoping I am getting better at drawing and painting faces!…..Digital Lady Syd
A Sophisticated Model

Thought I would put up another Photoshop Generative Fill variation from my selfie – this time a more sophisticated looking person selfie image (used Dave Kelly’s free Gen Fill Photo Painting Action set to GF Painting 40 before running Generative Fill). Had fun painting her as the Oil Painting prompt was too much for the overall image, but looked good in her hair. Used the same brushes that were used in my Fun Photoshop Placing any Photoshop Generative Fill Variation on a Layer Easily Blog. The main difference here is that Rebelle, a really nice and pretty inexpensive painting program, was used to smooth out the thick paint background and created a beautiful backdrop. Just took the PSD file into Rebelle and made some changes to the Oil & Acrylic Brushes -> Round -> Rough Oil Brush – changed the Loading to 100 and the Size to 50 – just sampled colors and painted softly around the subject. Pretty simple and easy to do. Oh yes, I didn’t like her nose so I copied my from the original selfie layer into the image and blended it in. It was in the right place at least!…..Digital Lady Syd
Older Woman of Another Generation

I recently read an interesting article Unveiling the Intriguing World of Face Cubism: Exploring the Artistic Journey on how to do a Basic Cubism Portrait so it seemed like a good idea to try it out in PS Beta AI. Using an image by Jude Infantini at Unsplash, it did not work well, but I did get an effect that I sort of liked. Actually it looked like a man with all this hair (because I used Dave Kelly’s Gen Fill Photo Painting Action set to 40% so the image will not look much like the original), but the overall image was quite striking. Added several New Layers on top and just started painting in the image the way I wanted it. Added in the necklace using AI – with the Lasso Tool selected where necklace should go, I ran Generative AI again (Prompt: Native American Necklace). Ended up using a Curves Adjustment Layer, the Sharpen Tool, and a Layer Style to finish off the image. I am currently reading The Travels of Marco Polo, and I think this rather older woman could possibly look like what a women of this region from back in the 13th Century. Anyway, it was fun to ponder…..Digital Lady Syd
A Halloween AI Party

I have always loved doing Halloween images so it was a lot of fun to create this one after this rather weird AI generated background from the Photoshop Beta software was produced. The prompt used on this one was “flowers and river oil painting” – see my AI Digital Oil Painting – How To Do This Fun Photoshop Blog for more on how this was done (used Method 2 by Brian Mataish called Photoshop Generative Fill AI Can Turn Photos into Paintings. This Tidbits Blog is on just the post-processing steps used after the AI background was created.
The original AI background had this pretty scary vampire looking guy on the right, so that felt very much like Halloween. A Halloween theme was created using a free Color Lookup Adjustment Layer called SS Vieru 02 for the basic color that I thought looked really good (to download click Sparkle Stock Canyon Film). On a New Layer the Vampire was painted in using my SJ-Pastel-3 Painting Brush (see my How to Create My Favorite Brush Fun Photoshop Blog for the settings) and some cloning was done on another layer. The Remove Tool/Spot Healing Brush layer was created to remove some bad looking areas – I am finding I do switch between them (see center of my Photoshop Beta AI with Fenced Zoo Images Fun Photoshop Blog for more on this). The Pot and Fire were both generated in two different generation layer prompts and read “Halloween black witches pot” and “flames” – then smoke was added on layer above using some really old smoke brushes. The bat was generated using “Halloween bat” in the prompt. The cat is from a Halloween Obsidian Dawn vectors set ($4 set) which had the cat brush, skeleton brush and the raven brush. The cat was painted with a Cheetah Fur brush that the great Aaron Blaise taught how to make (see How to Make a Digital Brush using a Photo) and the tail was flared out to look scary (used Coyote Mange Rough Tough brush for this – still the best animal fur brushes around!). The Dark Skin Cobra Attacking Pose Snake is from PixelSquid, the greatest object resource item around – hopefully even after AI – it is a pay-to-use site. (For more info on them, check out my Some Compositing Tips and Resources Fun Photoshop Blog halfway down.) A sampled light orange was used on a New Layer to add some Fog (used Grut-I Fixray brush – he has the best brushes around – and a free brush weekly!) and then on another New Layer used the same brush with a darker sampled color for a slight vignette effect. Two layers were added as Darken and Highlight layers using Sam Peterson’s brush and colors – see my A Few Photoshop and Lightroom Tips and Tricks Fun Photoshop Blog – Tip 2 – use this for pinpointing light and shadows on an object. A Black and White Adjustment Layer set to Luminosity (because it always looks good) was added next. Used Pratik Naik’s technique Tip 2 for lightening and darkening parts of image (on new layers above set to Overlay blend mode – use at least a 100 px soft round brush set to Airbrush in the Options Bar and Flow at 9% and use white or light color to lighten image or black or darker color to darken image – different colors give some great results – use layer opacity to lower effect). This enhanced the light at the top coming and the dark in areas for more of a cave feel. Last step involved adding a New Layer on top with a few little sprinklers to add some texture in the lighted areas. Phew! That was it – took a while to complete!…..Digital Lady Syd
Another AI Oil Painted Image of the Natural Bridge

The process used for this AI image is from Brian Mataish’s video called Photoshop Generative Fill AI Can Turn Photos into Paintings using the Quick Mask to set the partial opacity selection. Check out my blog at AI Digital Oil Painting – How To Do Fun Photoshop Blog for info on this technique. This blog is to show the post-processing after the Generative Fill was created to demonstrate what can be done with an AI generated image.
Had to use the Remove Tool/Spot Healing Brush on a layer first thing (see center of my Photoshop Beta AI with Fenced Zoo Images Fun Photoshop Blog for more on this). Then a Color Lookup Adjustment Layer using On1’s Heat Wave 7 preset (yep they work in PS too) was added. I was not happy with the results yet so this time Luminar’s Neo was opened and only my favorite filter called Mystical (a bit like the Orton Effect) was selected. It was masked so the foreground water mainly used it. A swan was added using Midnightstouch Swan Lake set brush #22 (the set is on DeviantArt) – just painted over it with my SJ Pastel-3 Painting brush (it is set to 67% opacity most of the time – see my How to Create My Favorite Brush Fun Photoshop Blog for the settings) and lowered the layer opacity to blend it in. I felt a focal point needed to be supplied. A bluish texture was applied using the Adobe Paper Texture Pro panel (Caspian) set to Saturation blend mode at 79% layer opacity, and used a Levels Adjustment Layer to fine tune the using only the color Channels (followed Aaron Nace’s video called Make Amazing Photoshop Composites Quickly-part 1 at the 22-minute point – really interesting technique). A Curves Adjustment Layer for tone was added (see Denny Tang’s site with a Tone Chart Photoshop Action to download for doing this – have been using this technique as an action for over 5 years – it’s the best way to do this and use it on almost every image). There was this ugly blob on the right side of the image which was supposed to be a tree. Selected the tree area – generated it and got what you see in this image which looks so much better. The color was off a little so a Curves Adjustment Layer was clipped to it to make it match – to clip use the first icon at the bottom. Some sparkly dots were added to add a texture interest on two different layers – one using light colors and one using darker ones. Last step used Pratik Naik’s technique (see How to Create a Fun Cartoon Tip 2 Fun Photoshop Blog – on a layer above set to Overlay blend mode – use at least a 100 px soft round brush set to Airbrush in the Options Bar and Flow at 9% and use white or light color to lighten image or black or darker – different colors give some great results – use layer opacity to lower effect) to draw the eye to the swan. Still using a pretty basic workflow!…..Digital Lady Syd
AI Painted Image of Natural Bridge

Here is another AI generated Oil painted image using the same Natural Bridge photo but has a totally different feel to it. To see how this was created and what the original image looked like, check out my AI Digital Oil Painting – How To Do This Fun Photoshop Blog. The post-processing for this image was pretty simple after the AI Generated Fill background was selected (used the prompt “river and flowers oil painting”).
Started with a Color Lookup Adjustment Layer with bluish tones in it and set to 79% layer opacity (see Sparkle Stock’s free Bleak – Trellick 01 preset); a Curves Adjustment Layer for tone (see Denny Tang’s site with a Tone Chart Photoshop Action to download for doing this – have been using this technique as an action for over 5 years – it’s the best way to do this and use it on almost every image); a Levels Adjustment Layer to adjust the Blue color (followed Aaron Nace’s video called Make Amazing Photoshop Composites Quickly-part 1 at the 22-minute point – really interesting technique); a Black and White Adjustment Layer set to Luminosity blend mode (because it always looks good – see my How to Use a Black & White Adjustment Layer to See Contrast in a Layer Fun Photoshop Blog); Lighten and Darken layers using Pratik Naik’s technique (see How to Create a Fun Cartoon Tip 2 Fun Photoshop Blog – on a layer above set to Overlay blend mode – use at least a 100 px soft round brush set to Airbrush in the Options Bar and Flow at 9% and use white or light color to lighten image or black or darker – different colors give some great results – use layer opacity to lower effect) which was used especially where the light is coming into the image; and finished with a Remove Tool layer for smoothing out a couple tiny water issues. In other words most of my basic workflow – now you know what I do! Quite a difference from the original image!…Digital Lady Syd
Same Natural Bridge with Different AI Oil Paint Results

This digital AI oil painting was created by following Marty at Blue Lightning’s steps in his video Photoshop AI Transform Photos into Oil Paintings and it created this interesting photo from my original Natural Bridge image. Can you see the frog? For more info on the AI was created, see my AI Digital Oil Painting – How To Do This Fun Photoshop Blog. The Generative Fill prompt said “very spring oil painting.”
This blog is giving all the particulars as to how this image was post-processed after the Photoshop Beta Generative Fill layer was created. A Color Lookup (PS’s Foggy Night preset at 52 % layer opacity) Adjustment Layer; two textures (still using the obsolete Adobe Texture Pro panel even in the Beta!-used Sakura Skies set to Overlay at 100% layer opacity and Masque set to Color Burn blend mode at 28% layer opacity) for the more pastel look; a Levels Adjustment Layer in the Blue and Red Channels (followed Aaron Nace’s video called Make Amazing Photoshop Composites Quickly-part 1 at the 22-minute point – really interesting technique); a Remove Tool layer for getting rid of some of the artifacts that Generative Fill seems to add sometimes; some painting to create the frog – the eyes were already there (used my SJ Pastel-3 Painting brush that I have used forever – it is set to 67% opacity most of the time – see my How to Create My Favorite Brush Fun Photoshop Blog for the settings); and some Darken and Highlight layers using Sam Peterson’s brush and colors – See my A Few Photoshop and Lightroom Tips and Tricks Fun Photoshop Blog – Tip 2. I really like the dreamy effect the AI digital oil created. …..Digital Lady Syd
Modigliana Guy
Totally had fun creating this sort of cowboy-looking guy while trying to do another Modigliana figure as in my recent Fun Photoshop Blog (A Few Photoshop Digital Painting Tricks You May Not Know). Been following some of the tips in Aaron Blaise’s class on Clear Expression to learn face object placement (watch for great sales on his various classes). The painting took a long time to do, but eventually it was drawn to get a Modigliana perspective. The background was created with one of my Painter backgrounds and setting 9 Levels in a Posterize Adjustment Layer. A Kyle T. Webster Tilty Pencil Variant (from Winter 2022 set) Mixer was converted to a regular brush (changed Erodible Tip to Small Round and 9 px Tip; added Shape Dynamics Size Jitter 11%; Texture Scale slider changed to 28%, Brightness 60, Contrast 10, and Texture Each Tip checked; and Transfer With Opacity Jitter also checked – use all other settings from the Mixer and it turns into a really nice sketch brush). Also Kyle’s the Hunky and Heroes Heavy brushes from the free Bowie Set (located in the Adobe Cloud-search for Bowie Toolkit) were used to paint his clothes. Aaron Blaise’s favorite brush was used for the face and skin. Used The Etherington Brothers various tips for the face and hands – lots of good information here. He may not be the best thing I have ever drawn, but I am learning a lot about drawing!…..Digital Lady Syd
Some Fancy Text
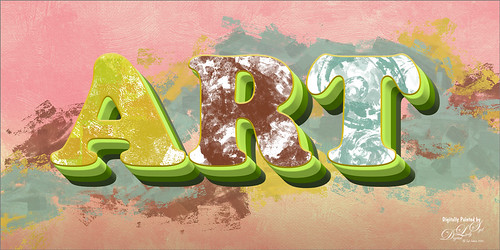
This is an example of a Sam Peterson Challenge from a few months ago called Fancy Text. It was a lot of fun to do. The painting effect was created using Brushes from Kyle T. Webster’s Fall 2021 brush set (these are all part of the PS collection of brushes that can be downloaded for free with a PS membership). The Boxit, Circlez, and Rippolo brushes were used to create the painted look on the letters. From his Summer 2020 set the Brix Brush was used for the splashed-paint background. Overall just a lot of fun to do. Check out Sam Peterson at the Adobe Creative Cloud site for more challenges. …..Digital Lady Syd
Just a Bird Buddy

This image was actually created while trying out some of the new Spring and Summer 2022 brushes by Kyle T. Webster (that come with PS). This bird was drawn from one of my camera pix taken at the Jacksonville Zoo of a Verreaux Eagle Owl. He was a pretty good size with huge eyes and appeared to be a rather calm kind of bird. I decided to have some fun and give him a different color palette and background. The rough and refined drawing brushes were created using one of Aaron Blaise‘s drawing tutorials (check out any of his YouTube tutorials to see how he does this – pretty easy). The underpainting effect used his Color Brush. The tree was created by making a selection of a tree with the Lasso Tool, then painting with Kyle’s Spring 2022 Woodchuck Joey brush over it using a couple different colors, and removing part of the right side of the tree using the Tilde (~) key (acts like an eraser but uses the brush currently selected). The skin texture was made from Kyle’s Summer 2022 Pellet CS brush with different colors. The little flowers used the Summer 2022 Soft Spat 1 brush also in different colors. The tree leaves were from Kyle’s Spring 2022 – Shrubbed brush. The rest just involved some lightening and darkening. The hardest part was painting the beak – this owl does have a very colorful beak. It was a lot fun just to try out new brushes!…..Digital Lady Syd
Turtle and Child Sculpture

This image was taken on the Big Island in Hawaii at a small shopping center near Waimea – I wish I knew who did the original piece of sculpture as it is quite striking and beautiful. The photo background was very busy so I decided to try some digital effects to the image. It really is a faux digital painted image as the background painted effect used Topaz Studio (AI Remix – 0.69 opacity and Normal mode, Velvet Abstract preset set to Style Strength High, Brightness 0, Contrast 1.00, Sat 0.75, Hue 0, Smooth Edge 0.20, Sharpness 0.47, and Suppress Artifacts 0; Impression – 1.00 opacity and Normal mode, Type 16 Stroke, Number of Strokes Med, Stroke Length 0.56, and Painting Progress 0.16 – painted out the turtle and child and Texture – and Background Type Original; and Precision Detail – 1.00 opacity and Normal mode, Overall Small 0.60, and Lighting Midtones -0.47). Then on various layers in PS, different parts were painted using PS brushes to add more defined strokes and to clean up some of the Studio stroke overlap. One brush used was Kyle’s Real Watercolor-80 Round brush set to Normal brush mode to paint the face and body of the child. Black & White, Curves, and Levels Adjustment Layers were added on top. The Sharpen Tool was used on a separate layer to sharpen up the eyes a little. A Color Lookup Adjustment Layer using On1’s Loyalty Reward for May 2022’s Fun in the Sun6 LUT was added and set to 27% – really brightened up the image. Last step involved adding darken and lighten layers using Sam Peterson’s colors and brush to draw attention to the boys face. (See my Fun Photoshop Blog A Few Photoshop and Lightroom Tips and Tricks – Step 2 for info on this – really easy to do and look great on images!) That was it – it was really fun and relaxing to do!…..Digital Lady Syd
The Lifeguard

Just downloaded this week’s free brush from GrutBrushes – each Monday he gives you a new one some of them are fabulous. He has some great brushes (I love his cloud set for starters!) This week’s brush is an ink brush called Citrose and I really like it! Everything painted or draw in this image used this brush. For example, just for sketching the brush was set to 13 pixels. The Color Tones were added with the brush set to 70 pixels which made a very smooth color. The water was set to 400 pixels, white splashes and birds were set at a very small size. The only extras were a Gradient Fill Adjustment Layer used on the background at 76% layer opacity, and a Texture layer using Pro Casanova from the Adobe Paper Panel (not sure it is available anymore but try this link if you are interested) set to Overlay blend mode. The font is one called Zahra Inline Grunge – has a stroke layer style added and set to the outside. I was not going to do an image with the brush, but it turned out to be such a nice brush so I started doodling and came up with this crazy image using it. …… Digital Lady Syd
Living in the Abstract

Just a short blog – I thought I would show you the results using this drawing I created of a lioness turned into a painted image using Kyle T. Webster’s Spring 2022 brush set. The drawing is one I did following Aaron Blaise’s Digital Painting for Photoshop – Getting Started-Sketching in Photoshop video. (See my recent Fun Photoshop A Little Aaron Blaise Digital Drawing Practice blog for more info on this.) I used one of Aaron’s resource images – it is not an exact representation but I felt he should get credit for the original drawing idea. Then, just following Kyle T. Webster’s YouTube called Illustration Masterclass: Draw Stylized Portraits with Custom Brushes to paint the lioness. This video used many of his newly released Spring 2022 brushes, which can be found in PS by clicking on the Hamburger icon in the top right corner of the Brushes Panel and clicking “Get More Brushes” – if you have any recent version of PS and are on a monthly plan, it will be listed at the top of the page, after logging if needed. There appear to be 37 brushes in this set. If you want to see how each works, watch his Brush Hour with Kyle T. Webster: Check Out the Spring 2022 Brush Set! video. This image mainly used his Woodchuck Joey, Pellets and Old Blue brushes with a few other ones thrown in. I actually changed the Pellets-Alt brush to a Spacing of 98 and a smaller size of 45 pixels to get a really nice texture effect when the stylus is pressed lightly and really smooth when pressed hard. To select the colors, a color palette layer was created by following Kyle’s video called Illustration Masterclass: Choosing the Right Colors for Your Digital Illustrations which is very helpful when trying to get colors that blend nicely. The splatter effect is a PNG overlay file that was downloaded from Creative Market in a set called 48 Subtle Grunge Textures Vector by Anastasia Autumn. It has PNGs, JPGs, ABRs PS brushes, and Vector AI files with the 48 textures in each file format. By adding a layer style to the PNG texture 01 layer and in Layer Styles selecting the Gradient Overlay, all these colors would be added (not sure which gradient, but it had a lot of horizontal gradient colors in it). It was set to 59% layer opacity. Major Cool! Viveza was used to fine tune the final image. Overall, this was just major fun to do!…..Digital Lady Syd


