
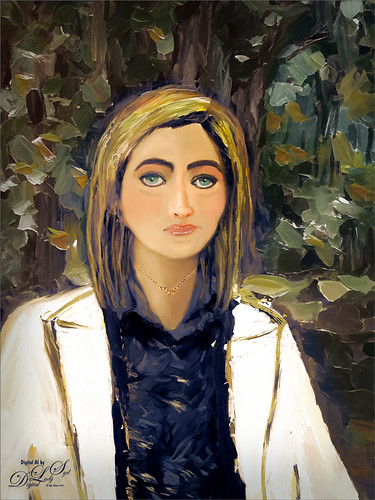
Native American Woman

Just had a lot of fun getting back to digitally painting portraits. Tried out the Grok 3 AI image generator and used as a prompt “Sketch of a Native American Portrait of a Younger Woman with jewelry.” Not exactly sure what kind of hocus-pocus occurred, but I was able to get a sketch somewhat similar to the one above. Lots was changed, and I noticed the exact facial proportions are not totally perfect, but overall it is a very pleasing image. Two backgrounds were used – one was my own Jaguar Texture and the other one was Melissa Gallo’s Summer Silk texture (not sure it is still available). Wanted an overall warm feeling to the image so the textures provided this. All the brushes used were ones discussed in numerous AI portrait images I painted in other blog entries – just in this and my Fun Photoshop Blog for more on this. Only the earrings and necklace had one of Jessica Johnson‘s lovely gold Pattern Stamp Brushes called Gold Leopard Exclusive from one of her Luxe sets. I decided I wanted the hair to look a little unkempt instead of perfect like a model. …… Digital Lady Syd
My Older Selfie

Will keep this short! On my original Selfie image, first ran Dave Kelly’s AI action at 70%. Then used the Quick Selection Tool to select just the background and hair from the whole selection created by Dave’s action. Last step was to invert selection to run Generative Fill Prompt: Digital oil paint glamor look. Chose a variation and selected the resulting layer mask. On Generative Fill panel clicked the Invert Selection so background and hair were selected and ran Generative Fill again with this prompt: Digital Oil painting with fancy hair and wintry background. From these results, created a stamped layer and duplicated it as a New Document with just this layer (right click on layer and choose Duplicate Layer – then in Document drop-down select New). This was the starting point of this image and how I usually work with these AI results. From here created different layers on top and painted over the face, hair, coat and background. Used these brushes – Kyle T. Webster’s Winter 2024 set Thinner Oil (see Skiing Selfie blog for settings used with it – definitely a New Favorite for painting especially skin) and Right Angled for the background, his Summer 2018 Ocean Brush (for hair), and Fay Sirkis’s Short Streaky Detail Blender (not sure it is still available anymore), but any small detail mixer brush would probably work for the little edges of the hair. Used Viveva to pull the whole look together….Digital Lady Syd
Skiing Selfie

Another one of my selfie AI-generated portraits – this time put me in a skiing background scene using the Generative Fill prompt “Oil Painting of Ski Slopes in Background” – it took several variations and had to use one background with trees and one with the skiers which was reduced in size and moved. Used the same generating process that I discussed in the last several blogs (see blog links below). Parts of the coat had splashy colors which I did not like. I found a great brush that covers without being too heavy with the paint in Kyle T. Webster’s new Winter 2024 set called Thinner Oil (this set is free to download with Adobe Photoshop subscription members – just go to the Brush Panel upper right hamburger icon’s drop down and click Get More Brushes – it is at the top). The brush Size was changed to 25 pixels and in the Dual Brush section changed the Size to 17 pixels – then saved the brush to use for painting. On a New Layer the snow was painted in using Snow Large & Heavy-use Motion Blur -70/33 brush, one of the 9 nice brushes of Serge Ramelli’s that he gives away in his How to Create Snow in Photoshop CC tutorial from several years ago. I like how the snow can be placed exactly where I want it and removed in a layer mask off parts of the face. Also added my Snow Overlay slight blur png – a black layer mask was added (ALT+click in added white layer mask) and just painted back in the smaller sized snow into the trees on the right and on the brown distant trees. To get the skin tone right, used a Gradient Fill Adjustment Layer set to Linear and white to gold to clear gradient. Added a layer mask to remove from the gold from the trees. Could go on and on – it does take a while. Each time I do one, I learn something else. Lots of fun…..Digital Lady Syd
Digital Lady Syd Additional Blogs:
Being One with Nature
Above is another of my variations from my selfie image. These AI variations all turn out so different although in most cases the person is looking in the direction I was and the coat is somewhat similar, mine being light beige. I find that when having a problem with a face feature looking right, going back to the original selfie and copying that part onto it own layer. Then moving the layer above the variation layer and free transforming if needed works nice for getting a more accurate look – then blend into the face with a brush. My original nose is appearing in many of these AI images! In this case, the Liquify Tool was used along with Viveza and Topaz Lens Effects Reflector filter to lighten the left side of the image – it gaves the background some depth difference. For tree background, used Generative Fill prompt of “Oil painting outdoor background with trees.” Otherwise using all the same brushes as in my other blogs. It is fun to do these, and I am hoping I am getting better at drawing and painting faces!…..Digital Lady Syd
The Worker Bee
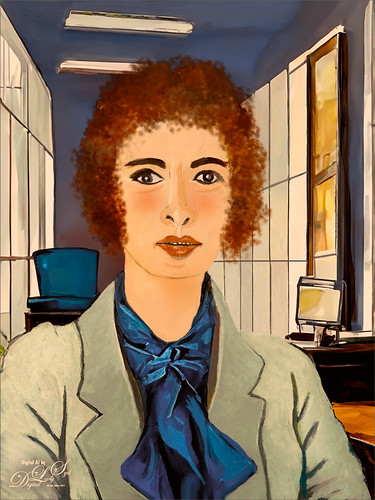
Here is another member of my Selfie Family – this time in a work environment. Tried out some new brushes and thought I would share what they are. To get the texture in her jacket, used Kyle’s Bruno Brush from his Spring 2022 set (go to Brush Settings pop-out at top right and select Get More Brushes and go to the set to download – double-click the file to load once downloaded). In the Brush Settings Panel, turned off the Scattering settings and set the Options Bar Opacity to 40% – but also liked it at 80%. The texture looks very painterly in this brush. For her face and cheek coloring, used an Airbrush (which means buildup is turned on either in the Brush Settings Panel or clicking on the Airbrush icon in the Options Bar). To make this brush, download Kyle’s Real Watercolor brushes from Photoshop (as discussed above – they are a separate group in this list). Choose Kyle’s Square Simple brush and in the Brush Settings Panel set Shape Dynamics to Size Jitter Control: Pen Pressure, Transfer to Opacity Jitter of 92% and Opacity Jitter Control to Pen Pressure, Buildup checked on, and Smoothing checked on. Put the Flow to 18% in the Options Bar. The hair was painted using Zummerfish Blending Brushes – Sampled Brush 43 2 for the curls. The last brush used was one I have mentioned before and really like – Kyle’s Fall 2023 (another set to download like above) Great Paint (changed Flow to 54% and Smoothing to 12% in the Options Bar) – used small size for detail brush and larger to paint in solid colors. Selected the background area and ran Generative Fill with prompt Acrylic office interior for this image – the Oil Painting Interior results did not look good. Also used my original selfie nose again, but this time ran another Generative Fill (Oil Painting Nose) to get a better result than from the total subject fill. That’s it – the new brushes actually worked out really well!…..Digital Lady Syd
A Sophisticated Model

Thought I would put up another Photoshop Generative Fill variation from my selfie – this time a more sophisticated looking person selfie image (used Dave Kelly’s free Gen Fill Photo Painting Action set to GF Painting 40 before running Generative Fill). Had fun painting her as the Oil Painting prompt was too much for the overall image, but looked good in her hair. Used the same brushes that were used in my Fun Photoshop Placing any Photoshop Generative Fill Variation on a Layer Easily Blog. The main difference here is that Rebelle, a really nice and pretty inexpensive painting program, was used to smooth out the thick paint background and created a beautiful backdrop. Just took the PSD file into Rebelle and made some changes to the Oil & Acrylic Brushes -> Round -> Rough Oil Brush – changed the Loading to 100 and the Size to 50 – just sampled colors and painted softly around the subject. Pretty simple and easy to do. Oh yes, I didn’t like her nose so I copied my from the original selfie layer into the image and blended it in. It was in the right place at least!…..Digital Lady Syd


