
My Bubble Office with my Creative Assistant

Yes Sophie, my sweet tailless feline, has come to my rescue this time and suggested we create this whimsical office that we both would love as a workspace. Note, she still can’t keep her eyes off the birds! So how was this image created? Using the Photoshop Beta version, an image was created with this text prompt “Office space in an office with windows high up in a building” using Special Effects Sketch and Watercolor. The variations that did not work were deleted keeping just a similar version as above. On a duplicated Smart Object Layer, the Parametric Filter (which are only available in Beta at the moment) Spherify was selected (set to Medium, Close Up, Size 1, Image Scale X:2.69 and Y3, Sphere Scale X:1.9 and Y:1.18, and Background Color White). On separate layers lots of clean up was done. Put some of my cartoon images on the computer screens. Sophie’s image is from a generic cat picture placed in Topaz Studio 2 – used the Impression filter to give her a painterly look. To get the soft sunny background effect, the cleaned up image was taken into Anthropics Smart Photo Editor and settings called Beach by InoculateIT were used. The final step was to add a few birds into the sky with a brush Bert Monroy teaches how to make. This was a lot of fun to do!…..Digital Lady Syd
Paris 1920

Just had fun with this one. Took a very blurry snapshot from an old colored short video of the streets of Paris. I actually wanted a copy of the dress one of the ladies was wearing in a different segment for drawing, and thought this interesting cafe image would be fun for try out. Just good ole’ Topaz plug-ins were used on this image. On a duplicate layer Topaz Studio 2 was opened and AI ReMix Crinkled Portrait preset was used changing some of the Brightness and Color sliders in the panel. Then on a New Layer above, Topaz ReStyle was opened to add the final effect using a preset called Midday Hay Fields. A Black & White, Color Balance, Levels and Selective Color Adjustment Layers were add and some text using the Broadway Engraved BT font. Enjoyed going back to my basic filters!…..Digital Lady Syd
Spring Colors for this Flower

Had some fun with this phone image of a beautiful spring flower. Not sure what type it is, but it is gorgeous. Actually post-processed a very normal image, but I decided to try an alternate version. In this case Topaz Studio 2 was opened and just a vignette and AI ReMix filters were applied. Remix was set to Abstract Swirl Style using only 0.17 opacity and Sat set 0.75 (other were default settings). It applied these beautiful brush effects to the petals which is what you see above. I am still mourning the fact this filter studio is no long available from Topaz. Some Gaussian Blur was added to the background as it was pretty busy. I used a new technique learned from PS Guru Corey Barker – instead of using a brush to even out the shadows, the Gradient Tool was selected with default black to white colors set in the color swatches. In the Options Bar, the gradient will now show black to clear – set to radial gradient at 48% opacity used on the petals. On a New Layer set to Overlay blend mode, drag a very small amount to get a very small black effect which can be pinpointed very closely to where it needs to be added. Really nice technique, and different colors can also be selected along with white. This flower was really fun to do!….Digital Lady Syd
Watching the Sea
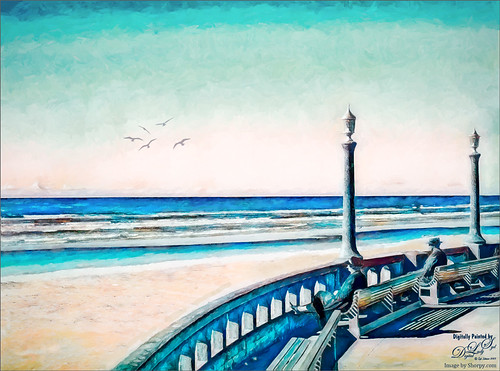
Had some fun revisiting this vintage image from Shorpy.com called By the Pacific Ocean, Seaside Oregon – September 1941. The date made me think maybe these people were thinking about their children or friends serving in World War II. Topaz Studio 2’s Impression filter was applied in my SJ BW to Painted Color preset: changed AI ReMix to Paper Frost swatch, turned on second AI Remix and used Eye of the Storm at 37% opacity. (For preset settings check out my blog called How to Convert Black and White Image to Colorful Paintings with Topaz Studio 2.) To clean up this image, used Kyle T. Webster’s Bowie Set (located in the Adobe Cloud-search for Bowie Toolkit) Heroes Heavy and Hunky brushes, and Kyle’s Megapack Drawing Box-Graphic Control 2 brush (good blender). Used them in the masks a lot also. Also used the Lasso Tool to pin point exact areas to paint in to even out colors around people. It is too bad that Topaz has stopped supporting it creative filters, especially Impression…..Digital Lady Syd
Queen Emma, Governing the Garden

The above was taken in my front yard – these lilies grow like crazy down here in Florida but I really like them. Just had fun using some of my favorite plug-ins that seem to be disappearing from the scene. It took awhile to remove the flower petals from the background – had to do a lot by hand with a hard round 4-pixel brush in the layer mask to get a good result. A solid color blue fill adjustment layer was placed under the masked layer. Topaz Studio 2 was then opened and the Impression filter Degas Dancers preset was applied as is. Unfortunately Topaz Studio 2 is no longer available for purchase for several months now. The products they do have are great – I love this company – but I am crushed that their creative products are no longer available, including the fabulous Impression. A couple Color Lookup adjustment layers were added (PS Futuristic Bleak preset set to Color blend mode and Scott Kelby’s Deep Blue preset set to Multiply blend mode and 19% layer opacity). A Hue/Saturation adjustment layer was added to tweak the colors a bit. Then a brush I made from FrenchKiss’s Tableaux Mirage was added at 3800 pixels and stamped on top using white – set layer opacity to 63%. (See my Texture Brush You Tube video on how to do this.) Last step involved adding the old Nik Viveza 2 plug in, which never lets me down……Digital Lady Syd
Turtle and Child Sculpture

This image was taken on the Big Island in Hawaii at a small shopping center near Waimea – I wish I knew who did the original piece of sculpture as it is quite striking and beautiful. The photo background was very busy so I decided to try some digital effects to the image. It really is a faux digital painted image as the background painted effect used Topaz Studio (AI Remix – 0.69 opacity and Normal mode, Velvet Abstract preset set to Style Strength High, Brightness 0, Contrast 1.00, Sat 0.75, Hue 0, Smooth Edge 0.20, Sharpness 0.47, and Suppress Artifacts 0; Impression – 1.00 opacity and Normal mode, Type 16 Stroke, Number of Strokes Med, Stroke Length 0.56, and Painting Progress 0.16 – painted out the turtle and child and Texture – and Background Type Original; and Precision Detail – 1.00 opacity and Normal mode, Overall Small 0.60, and Lighting Midtones -0.47). Then on various layers in PS, different parts were painted using PS brushes to add more defined strokes and to clean up some of the Studio stroke overlap. One brush used was Kyle’s Real Watercolor-80 Round brush set to Normal brush mode to paint the face and body of the child. Black & White, Curves, and Levels Adjustment Layers were added on top. The Sharpen Tool was used on a separate layer to sharpen up the eyes a little. A Color Lookup Adjustment Layer using On1’s Loyalty Reward for May 2022’s Fun in the Sun6 LUT was added and set to 27% – really brightened up the image. Last step involved adding darken and lighten layers using Sam Peterson’s colors and brush to draw attention to the boys face. (See my Fun Photoshop Blog A Few Photoshop and Lightroom Tips and Tricks – Step 2 for info on this – really easy to do and look great on images!) That was it – it was really fun and relaxing to do!…..Digital Lady Syd
Before Walmart

Just enjoyed taking this image from Shorpy.com (click to see original B&W image) and converting it into a colorized image. Loved the sign that shows all the items offered, definitely a precursor to Walmart. Also loved the silhouette sitting outside the store. Had to straighten the image using the Camera Raw Filter’s Geometry panel. The wires were removed – I wanted to leave them in, but the original image did not show the wires strong enough to see them in the colorized image. In Topaz Studio 2 my “Look” for colorizing was used (for more information see on see How to Convert Black and White Images to Colorful Paintings with Topaz Studio 2 blog – links to other blogs on this site) and made a few changes to fit this image – this is where the real fun begins. Back in Photoshop a little clean up was done and a sky with the PS’s new Sky Replacement function was added – the clouds were taken from my backyard around noon. Finished off with Topaz (see sidebar for website link) ReStyle (using the Zambezi Zest preset) to get the right color grading effect to the image. Check out Shorpy’s for lots of fun pix to colorize…..Digital Lady Syd
Valentine Mandala

Today I found this really cute element that I decided might make a nice mandala. I painted it will some colors, took it into Topaz (see sidebar for website link) Studio 2 and applied the Broken Bits Look. Then just followed the instructions that Leslie Nicole, of French Kiss textures fame, gave in her How to Create a 4 Way Mandala in Photoshop video she did for Design Cuts recently. This is a very simple process to follow. I actually flipped the design 45 degrees 4 times! Then painted in the hearts, add some heart background with a brush, some text, and two of my own textures underneath. For more examples, check out my Happy Valentines Day Fun Photoshop blog. Have a great day!…..Digital Lady Syd
Palm Court Cafe cc 1903

Had a fabulous time converting a beautiful black and white image of Hotel Gregorian’s cafe from Shorpy.com into a colorized image. I just used my original Topaz (see sidebar for website link) Studio 2 “Look” I created to do this sort of thing called SJ BW to Painted Color. It did not even require any adjusting which really surprised me. (For the Topaz settings, see my How to Convert Black and White Images to Colorful Paintings with Topaz Studio 2 blog with them all listed.) This layer was set to 77% layer opacity and then localized sharpening was done using a gray layer following Blake Rudis’s Sharpen Photos like a Pro! video. (I use this workflow so much I actually created an action for the High Pass technique.) A little clean up and that was about it. What a gorgeous image – I wish I could have breakfast there!…..Digital Lady Syd
Practice Makes Perfect

This image is from ISO Republic and is one of my favorites for practicing new Photoshop techniques. This time I decided use Topaz (see sidebar for website link) Studio 2 using some of the best filters from this program. I created a Studio Look a while back called “SJ BW to Painted Color Look” (for settings see my How to Convert Black and White Images to Colorful Paintings with Topaz Studio 2 blog) which was applied. On top the Color Theme filter was added and setting it to the Lighten blend mode and changing the third swatch to color #1c1c1e with Lightness set to 0.12. Color Theme filter is a great way to adjust one of the colors in the image without changing everything and one of the best filters in the Studio program. I also used Luminar 4 to add in the Sunray effect and a Color Lookup called Seattle. The font is called Garlic with both a regular and outline version stacked on top. Sure was fun to play in one of my favorite Photoshop plugins!…..Digital Lady Syd
Enjoying the Day

This is another example of an image that I colorized using the steps from my How to Convert Black and White Images to Colorful Paintings with Topaz Studio 2. I did use Topaz (see sidebar for website link) Sharpen AI and of course Topaz Studio 2 using the same preset as in the my original blog except the ReMix filter was set to Colored Marker for a style. Added a Color Theme filter to get the colors just right. To get a really nice effect, Topaz Lens Effect was applied for a bit of golden feel. That was about it. So fun to do these vintage images!…..Digital Lady Syd
Zooming Man a Ray

Just had some fun with this image. Used Topaz (see sidebar for website link) DeNoise AI Clear, Topaz Sharpen AI, and Topaz Studio Motion Blur. Other than that just had to draw in a few lines that were a bit too blurred from the motion. The font is modernline. A Color Lookup Adjustment Layer was applied and a spotlight effect was added just to his nose. ….. Digital Lady Syd
Fisherman’s Cabin

This image was created using one of Shorpy.com’s great images called Fisherman’s Cabin-Shore Road-Magnolia-Cloucester-Massachusetts, cc1905. This image was run through the Image Colorizer (see my How to Colorize Using Image Colorizer blog for info on this) first, then after some clean up in PS before taking the image into Topaz Studio 2 where Impression, Edges, and Color Theme filters were applied. Then the image was taken into Corel Painter and the image was painted over where the canned Impression program left stroke I did not like. Back in PS, the Mixer brushes were used to do the final clean up on the image. Lots of fun to do!…..Digital Lady Syd
Fishing in 1904

This image is a fabulous one from Shorpy.com, one of the best places to see great historical images. I decided to use one of my colorizing techniques since the image was so clear and interesting. Used my blog called How to Convert Black and White Images to Colorful Painting with Topaz Studio 2. The first step is very important as noted in the blog – make sure you have adjusted the resolution and size of the image before beginning to change the image. When opened in Topaz (see sidebar for website link) Studio 2, only AI ReMix was applied using Daylight Fade preset, High, Brightness 0.60, Contrast 1.00, Sat 0.75, Hue 0.15. From within Topaz Studio, Topaz Adjust AI was opened and set to Standard and Strength 0.71 – then mainly all the sliders were adjusted to get a really nice look. Back in PS, the skin color was painted in as for some reason it did not pick up color. The blue color came from Topaz ReStyle and Nik Viveza was used to even out the whole effect. This was the perfect image for this type of coloring…..Digital Lady Syd
Ready for a Snack

These Delicious Muscat Beauty Grapes really are quite delicious! I also loved the color and texture in the grapes themselves so I had to photograph them. Used my regular workflow in Lightroom. Then in Photoshop opened up Topaz Studio and applied the Impression filter’s default preset with a few tweaks, the Dehaze Filter, and the Precision Contrast filter. Back in Photoshop added Curves Adjustment Layer for additional contrast, smoothed out the background with a large blender mixer brush, and did a little edge softening by painting over the edges of some of the grapes at a low opacity. Used the Camera Raw filter to adjust the final color as it was too blue. Last step was to add a spotlight effect on some of the grapes to draw the eye. The font for the text is called Agatha. These grapes did really make a great snack!…..Digital Lady Syd
Bathing Beauties

These beauties were enjoying all the attention they got at the Jacksonville Zoo. I learned one thing about Flamingos – it is hard to get an image where they are all in a “descent” grouping. They are just like taking pictures of groups of people. For some reason I decided to give them a magical background by using one of 2 Lil’ Studios great textures set to 40% layer opacity – a mask was added to painted a bit of the middle. Also the birds were taken into Topaz (see sidebar for website link) Studio 2 and a basic dose of Impression was added to give them a bit of a painterly look. It was painted softly off their faces though. And yes, one of the Flamingos had to be brought in from another image because someone decided to show a not very interesting area of their bird body to the camera. Sort of like the “class clown!” A Color Lookup Adjustment Layer was added using the Foggy Night preset. That was it. This was a lot of fun to do!…..Digital Lady Syd
Keeping an Eye on the Gorilla in the Premises!

This is a Guereza Colobus Monkey that resides at the Jacksonville Zoo along with several Gorillas, in fact one was roaming around him while he was sitting there. He was definitely keeping an eye on the big guy. What gives this monkey such an interesting background is the Topaz (see sidebar for website link) Studio 2 ReMix filter that was applied. The Beige Sketch Style was used along with the Glow filter to add the interesting line texture. The Edge Filter was also used to do the same. Then a little painting had to be done on the image back in Photoshop just to clean up edges and lines. Also his face had to be painted in as it was lost in all the line work from Studio. Last step was to enhance the texture a little more with the now defunct Luminar Flex – still love the results it gives so I use it a lot. I have a similar image that contained Toucan birds – it is a fun look for kids!…..Digital Lady Syd
A Vintage Gas Station

Had a lot of fun colorizing this vintage image taken in 1941 in Minneapolis, Minnesota, using mostly the settings from my recent blog called How to Convert Black and White Images to Colorful Paintings with Topaz Studio 2. Click here to see the black and white photo at Shorpy.com. In the Look I settings I provided, the unchecked ReMix AI was turned on and the Eye of the Storm style set to a High strength and the Overlay blend mode (Brightness -0.41, Contrast 1.42 and Hue -1.00 sliders). The Quad Tone Filter was added on top and the Strength was set to 0.65 – this added a little color in the sky and reduces the color around the flags. Back in Photoshop Viveza 2 was added and the attendant was highlighted to emphasize him a little. On a stamped layer Topaz (see sidebar for website link) Restyle was added using the Butterfly Wings preset – the ReStyle Opacity was set to 30% and the blend mode to Multiply. Give this a try if you have Topaz Studio!…..Digital Lady Syd
A Happy Giant Otter

I love it when I go to a zoo and the animals seem happy. The Giant Otter exhibit at the Jacksonville Zoo is one area where the all the otters seems so happy and were totally enjoying themselves. A great place to relax and just watch them while at this Zoo. It is very hard to photograph these fast moving animals, but if you are persistent, a good image can be achieved. Not a lot was done on this image but there was a lot of reflective glare from the water spectral highlights. That is why I decided to use Topaz (see sidebar for website link) Studio 2’s Impression – applied a preset created by Jai Johnson (a fabulous wildlife photographer and texture creator) called Just Paint Hummingbird Scene. (Check out her Artistry Beyond the Camera Episode 1 video for settings – she uses Topaz photoFXlab software, but the Topaz Impression settings are the same.) I made a few changes to the strokes in the Impression filter. Back in Photoshop opened up Luminar Flex – like it to sharpen when Topaz Sharpen AI does not work. Their Detail, Clarity, Structure and Microstructure filters are terrific for this. (These are the same filters as Luminar 4 – see sidebar for website link.) A little line clean up and a free Rain Overlay (from Book Cover Mockup Rain Overlay by Design Cuts) was added at Screen blend mode at 56% layer opacity. A Levels Adjustment Layer was used to add contrast. That was it. What a cute little fellow!…..Digital Lady Syd
The Red Cedar Stump

Had fun with this great image from Shorpy’s – the historical photo archive site. This image was called Pacific Highway through a Washington Red Cedar Stump and was taken in 1920. Here is a link for info on this stump which is still standing in the State of Washington. Is this guy really looking at his phone????
Recently I did a Fun Photoshop blog called How to Convert Black and White Images to Colorful Paintings with Topaz Studio 2. This image followed this technique except a different Look that was created in Studio 1 a long time ago was applied. Three filters were in the Look: Color Themes, AI ReMix (used Wave of Color Style), and Precision Contrast. Also HSL Color Tuning and Details (with settings in the minus to give a painterly effect) filters were added. Back in Photoshop Viveza was used to balance it all out. Last step involved adding a bit of a vignette so car and man stood out. It was a nice image to colorize. ….. Digital Lady Syd
First View of Land

This was a pretty exciting moment when land is first seen after sailing across the Gulf Stream all night. There was a sailboat off in the distance in this image, but we did not see another one until Spanish Cay – the ocean is very empty around here. To post process the image, very little was done. The water was adjusted in Topaz (see sidebar for website link) Studio 2 by adding a little bit of the Impression filter set to the default to tone down all the white reflection on the water – it was masked off the sky. This is exactly how the clouds looked – totally incredible. A Color Lookup Adjustment Layer was added using the free SparkleStock’s Wedding LUT called Airy 01 set to 58% layer opacity. A Curves Adjustment Layer was added on top where the RGB curve was set to a little S curve for contrast and the Red Channel was used to lighten up the Cyan just a little. That was it. ….. Digital Lady Syd
Hiding in a Palm Tree

I think this is a little Eastern Bluebird female who was helping me while I cleaned up my flower beds in my front yard. Not much was done in Lightroom, and Photoshop added Viveza 2 filter to sharpen her up a bit. The light was really dark in the palm tree, but really bright behind her so it was hard to get that looking correct. A Curves Adjustment Layer was used for this. Just a slight painterly effect was added in Topaz (see sidebar for website link) Studio 2’s Impression filter. Then in PS on a few New Layers, mainly just painted in some lines in the foreground palm fronds as they were really blurred. The Camera Raw filter was used to further tweak the color in the HSL panel. Topaz Lens Effects’ Soft Olive Green Vignette preset was added. That was it!…..Digital Lady Syd
On Duty at the Zoo
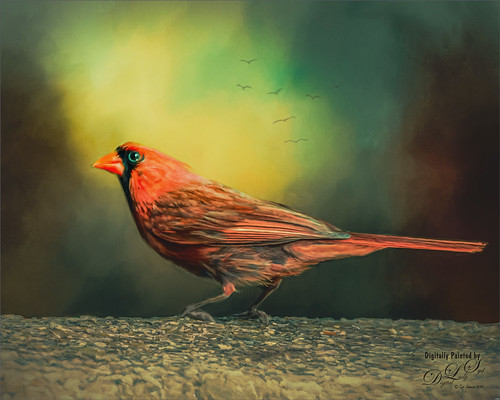
This beautiful male Northern Cardinal just sort popped in front of my while I was visiting the Lion exhibit at the Smithsonian National Zoo in Washington, DC recently. I decided to give him a better location as he was right in the middle of a bunch of us tourists. He was painted with mixer brushes and I believe an older Jai Johnson texture, with the colors and size of the texture changed to fit the scene. You do not have to keep a texture exactly the way it was when you got it. That is what makes it fun! Topaz (see sidebar for website link) Impression was used to paint in the foreground rocks – just the default settings with Brush 06 using the Graduated Filter to line it up on the front. The background birds are a brush from Jenteva Plant Brushes. Last step was a Curves Adjustment Layer. It is so relaxing to paint birds!…..Digital Lady Syd
Bird of Paradise Bark

Took this image of a Bird of Paradise tree growing in my front yard – it is huge and has some great textures in its bark. The little spike in the middle is the beginning of a flower. This image was taken in manual mode (200 mm, F/13, 1/160 sec, ISO 200, and 0.5 EV) and just Basic work was done in Lightroom before bringing it into Photoshop. Topaz AI Clear was used to remove a little noise and sharpen it up a bit. A Gradient Map using pink and blue tones was added and set to Soft Light blend mode at 88% opacity. More blue color was added into the image on a New Layer. On a stamped layer Viveza 2 was used to sharpen up the focal point before a Curves Adjustment Layer was used to add back contrast. Very simple. Lots of fun to work with colorful patterns!…..Digital Lady Syd


