
Bird of Paradise Bark

Took this image of a Bird of Paradise tree growing in my front yard – it is huge and has some great textures in its bark. The little spike in the middle is the beginning of a flower. This image was taken in manual mode (200 mm, F/13, 1/160 sec, ISO 200, and 0.5 EV) and just Basic work was done in Lightroom before bringing it into Photoshop. Topaz AI Clear was used to remove a little noise and sharpen it up a bit. A Gradient Map using pink and blue tones was added and set to Soft Light blend mode at 88% opacity. More blue color was added into the image on a New Layer. On a stamped layer Viveza 2 was used to sharpen up the focal point before a Curves Adjustment Layer was used to add back contrast. Very simple. Lots of fun to work with colorful patterns!…..Digital Lady Syd
The Lioness – Need I Say More?
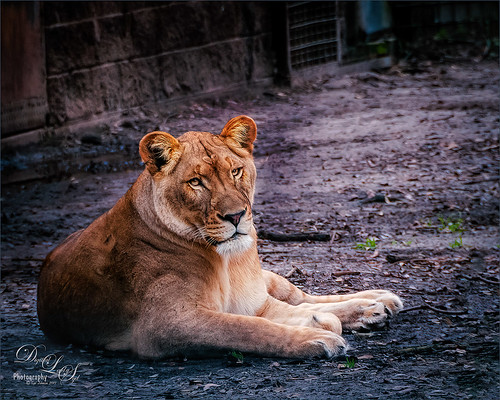
This beautiful lioness named Taum (I think) lives at the Jacksonville Zoo and looks totally regal while she watches over her domain. She was originally post-processed in Lightroom using Serge Ramelli’s Safari Animal Vignette Cold Medium (click for video to download link) and then made changes to fit this image. Overall it just gave a nice cool feel to the background. In Photoshop Topaz (see sidebar for website link) DeNoise AI was used and it just gave a very subtle effect. So the image was taken into Topaz Studio using the AI Clear Adjustment (Remove Noise Low, Enhance Sharpness High, Recover Details 0.33, Exposure -0.13, and Clarity 0.35), and the Precision Detail Adjustment (Subtle Sharp preset and in layer mask, inverted it and then painted back the lion face and end of foreground paw – middle paws were set to 0.50 and painted back just a little). This creates a very good combination for sharpness. Then just added in some contrast and a Lookup Table (Fuji Reala 500D Kodak 2393 preset) to give a moody feel to the image. That was it……Digital Lady Syd
Lantana Reaching for Air

These beautiful Lantana flowers (which was the largest plant I have seen – this is just a little part of it) was being totally smothered by several different kinds of palm plants along a golf course hole in Florida. It created sort of an intriguing image. Since this is an old Android phone photo, it was not the sharpest, even after running it through the marvelous Topaz (see sidebar for website link) AI JPG to RAW. So I had to improvise if I wanted to use the image. Therefore, I first ran it through Topaz Studio’s AI Clear which helped quite a bit (used High Sharpness, Recover Detail 0.39, Exposure -0.17, and Clarity 0.67). Also in Studio the Edges Adjustment was used and set to Dark Tones at a Strength of 0.37 and the Impression Adjustment using the default setting with an Opacity of 0.74. Back in PS a Color Lookup Adjustment Layer was applied and set to the Crisp Warm preset. A little painting, some Nik Viveza 2, some lighten and darken curves for dodging and burning, a Blur Tool layer, and a Sharpen Tool layer were also used. Topaz Sharpen AI set to Stabilize and a Remove Blur Amount of 0.80 was used. Last step was to add a slight vignette using Unmesh Dinda’s technique. I was surprised I could use all the AI programs on the image and get a decent effect. ….. Digital Lady Syd
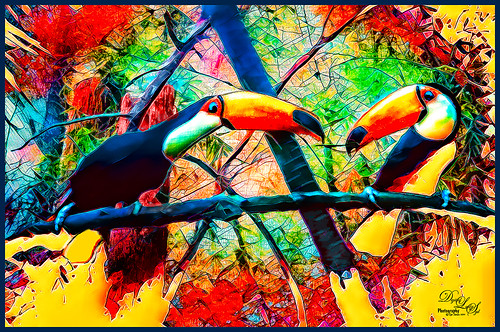
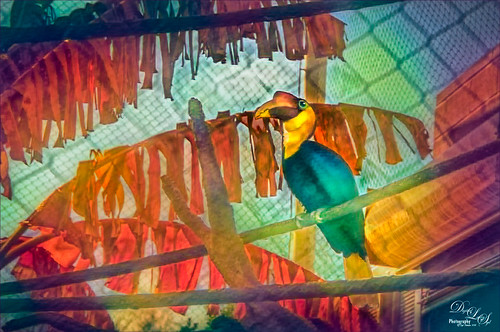
Living in a Jungle Painting
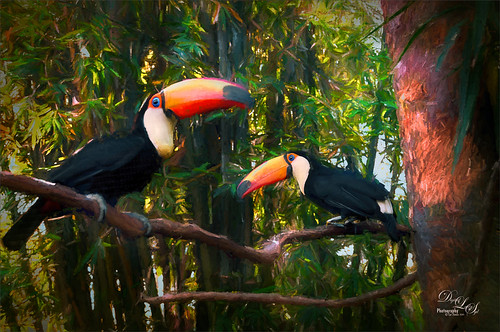
Yes, my friends at the St. Augustine Alligator Farm are making another appearance, this time showing off their painted jungle background. This is their favorite place to be. How did this happen? Well, if its a painted background, it is probably Topaz’s (see sidebar for website link) wonderful Impression plug-in, now in Topaz Studio. Yes, this time the Edward Hopper I preset was used and then the Toucans were painted out somewhat – left a few strokes around them. While in Studio, a Glow Adjustment using the Soft Liquid preset was applied and the Primary Glow was changed to 0.90 – used the same mask as in the Impression Adjustment so the birds were not affected. Also used AI Clear Adjustment to sharpen up their eyes and bodies. Several PS adjustment layers were used, a Clone Stamp layer to clean up the strokes, and Nik Viveza 2 to adjust the vignette effect. These birds are such happy creatures – no wonder they are the first exhibit you see when entering the Alligator Farm. ….. Digital Lady Syd
Hanging in There!
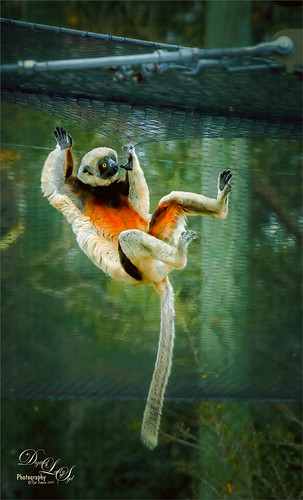
This Coquerel’s Sifaka monkey was having so much fun when I was at the Jacksonville Zoo recently – couldn’t help but smile and watch him. This image was done in blue tones first, and Topaz (see sidebar for website link) Studio’s Basic Adjustment and AI Clear were applied. Then the Impression Adjustment was added using the default settings and a mask to bring back the monkey and the netting above. An Image Adjustment was added and the original image was placed in the Background. A layer mask was used to paint the monkey back and the overall adjustment was set to 0.54. At this point the image was saved as a tiff and opened in Topaz AI Gigapixel as the size of the monkey was very small in the image – it was enlarged by 2 times. The Tiff file was then opened in PS and Topaz ReStyle plugin’s Grass Swing preset was selected to bring out all these beautiful fun colors. Quite a bit of clean up and painting was needed to get the final effect. Just had a lot of fun doing this image. …… Digital Lady Syd
Senior Neighborhood Pine Cone Meeting Today
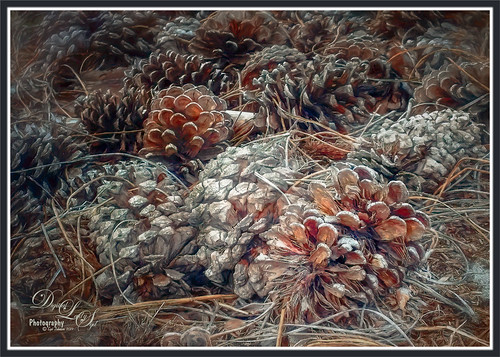
The old Pine Cones were all having a giant convention underneath a couple of their favorite Pines trees. I decided to sneak up on them and get an image of part of this large group. Since I took this image with an older Android phone, it was not one of the best but I liked it. Therefore I ran the image through Topaz (see sidebar for website link) JPEG to Raw AI program which produced a Raw tiff file. (See my What Is Topaz’s New JPEG to RAW AI? blog.) Then the image was opened in Adobe Camera Raw and adjusted before going into Photoshop. The image was first run through Nik’s Color Efex Pro. Then a Saturation mask was created for a Hue/Saturation Adjustment Layer. Some spotlight effects were created on the cones. Then Topaz Studio was opened were AI Clear, HSL Color Tuning, and Impression’s default with Type 03 brush was applied. That was it. It was a lot of fun to post-process!…..Digital Lady Syd
Lunch at Its Best

I think this place is perfect for having a nice lunch on a warm sunny day. Scotland does not get days like this very often so these locals were enjoying themselves. I see the tourists coming up the block though. I have to be honest I am not totally sure what I did to create the look in this image. I like the final effect though. Topaz (see sidebar for website info) Studio’s AI Clear was applied. Then back in Photoshop Topaz Simplify was applied using the BuzSim preset. Then Topaz Sharpening AI set to Focus was used. A High Pass Filter was used to sharpen up some of the details. Then back into Topaz Studio where an Abstract Adjustment was applied and an AI ReMix Adjustment. In PS the Rough Pastels filter and the Dry Brush filter was applied. A Darken and Lighten Curves Adjustment Layers were applied. A Noise Gradient Map Adjustment Layer was applied and a Foggy Night preset in the Color Lookup was added. There were some painting layers and other things, and I think I was going nuts by the time I finished this. Anyway, I like the overall look but I don’t think I could reproduce the effect. ….. Digital Lady Syd
The Trail from ??????

This image was taken at Ravine Gardens State Park in Palatka, Florida where it is known for their beautiful Azaleas. They were blooming a bit early this year so my Photo Club made a quick trip to catch the buds at just the right time. How could this beautiful flower lined trail be so bad? Word to the wise if planning a visit to this park. It is quite steep in places and the stones are very unevenly placed so it is a little tricky to hike on, especially if carrying a heavy camera around. In this Park’s defense, it was heavily damaged by Hurricane Michael last year and they are just getting it back up to speed. Not a lot was done to this image (after all it is of gorgeous Azaleas – what else do you need?) but of course I used my trusty Topaz (see sidebar for website link) Studio AI Clear. Just enhanced the steps with a spotlighting effect for where the sun was peaking through already, added a pink overlay to enhance the pink color, and added a little vignette. Lots of fun to explore!…..Digital Lady Syd
My Magical Garden

This Spanish Moss image was photographed at Ravine Gardens in Palatka, Florida. Since the trees do not have their leaves yet, the Moss is just hanging off the bare branches and with the sun was just rising, it gave a sort of magical feel. This image took a lot of post processing. Topaz (see sidebar for website link) Studio’s AI Clear was applied and this time the Exposure was set up to 0.53 and Clarity to 0.36 to lighten up the whole image. And a little bit of Topaz Detail was used to really sharpen up the moss effect. Some lighten and darken Curves Adjustment Layers were used to add some contrast. On a stamped layer Topaz ReStyle”s Polo Blue and Pink Lace preset was applied at 62% opacity using the Color blend mode. Another stamped layer was created and Luminar’s (see sidebar for website link) Image Radiance (this creates a really nice effect) and Cross Processing using the Auckland preset at Amount of 20 finally gave me the result I liked when set to 53% opacity. Nik Viveza 2 was used to even out all the coloring and adjust the focal point. Who knew all these filters would be needed to get this magical effect???……Digital Lady Syd
Best Friends
Just went a little crazy here and had a bunch of fun in Topaz (see sidebar for website link) Studio! My recent trip to the St. Augustine Alligator Farm was a lot of fun but my pix of these two characters did not come out well. (They reminded me of Heckle & Jeckle from cartoon days past.) So I decided to improvise using a lot of adjustments to get this colorful Toucan image. Used AI Clear, Ai ReMix twice, Edge and HSL Color Tuning – threw them all into a preset and put it up in the Community called SJ AI ReMix Cartoon Look if you want to give it a try. Back in PS just cleaned up the image a little, and added an Exposure Adjustment Layer on the eyes (yep, use it even on cartoon looks). This was a lot of fun to create. …..Digital Lady Syd
Don’t Take My Picture!!!
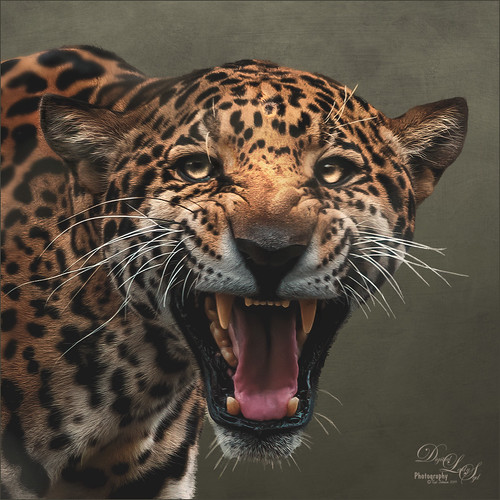
This unhappy Jaguar was stomping around his terrain at the Jacksonville Zoo when I creeped up on him to get his image – he was not at all happy about it – I guess he thought I was the paparazzi. Such a beautiful cat with such a humongous roar! Anyway I got his photo in spite of his attitude and luckily he was behind a fence. Used the technique from my How to Get Rid of Those Darn Fences in Zoo Shots blog. In Lightroom I just used settings that worked, then into PS and the Topaz (see sidebar for website link) AI Clear to sharpen it up a bit more (settings: Remove Noise – Auto and Enhance Sharpness Low – Exposure -0.12 and Clarity 0.19). Actually used the Shadows and Highlights Command to pop the eyes a bit (see my The Eyes Have It – How to Make them Pop in an Image blog). Then used some Darken and Lighten Curves Adjustments Layers. The texture was an old free basic one from Jai Johnson called coffee wall, and then a Hue/Saturation Adjustment Layer was used to fine tune the background color. That meant I needed to select the Jaguar to put him on the nicer background and it took a while – those whiskers were a problem and eventually they had to be painted back in by hand. A Color Lookup Adjustment Layer was added using the Candlelight preset set to 56% layer opacity. Now just some clean up was done. This guy took several hours to really catch his personality. Wow what a cat!!!…..Digital Lady Syd
Happy Valentines Day
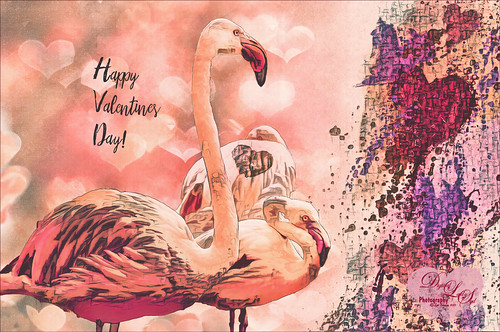
These beautiful birds, the Greater Flamingos which are not real bright pink like the American Flamingos, are enjoying the holiday – here they are observing some rather tree-like hearts in the pen. Since it is a holiday, I will not go into major detail on how I created this effect – it was a major trial-and-error in this case. The hearts are all from Julia Mead, a really great scrapbook object creator. The texture is called Imperfect Heart Soft Pink by Evelyn Flint (can’t find a link but it was in her Flickr feed at one time), and the font is Antalia Script. The rest is my own doing. Used so many different filters: Topaz AI Clear and AI ReMix, Luminar, and Nik Viveza 2 and Color Efex Pro 4. Lots of clean up layers and adjustment layers. Lots of fun to do. Everyone have a very Happy Valentine’s Day…..Digital Lady Syd
Please Return Me to the Jacksonville Zoo!
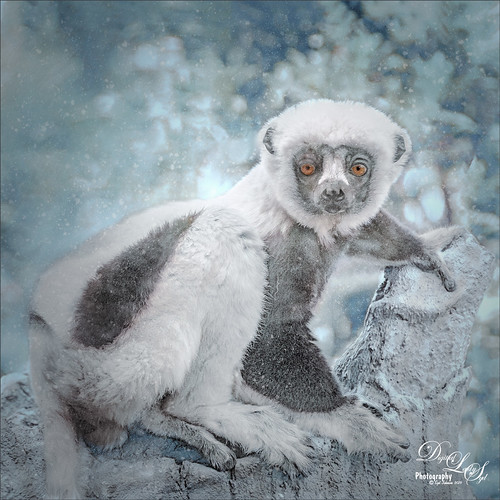
This Coquerel’s Sifaka is actually a native of Madagascar and would never be caught in a snowstorm, much less at the Jacksonville Zoo in Florida. But with a great image and crazy imagination, I felt he just looked like he was in a winter coat. I spent a long time taking pictures of this guy and his buddies – they were very entertaining and those eyes! In Lightroom used one of my camera profiles that created an HDR desaturated look – then just some Basic panel adjustments. The original image was post-processed using the correct coloring of the Lemur with the green background. In PS had to remove some background items with Edit -> Content Aware Fill command. On a stamped layer Topaz (see sidebar for website link) AI Clear, Precision Detail, and HSL Color Tuning adjustments were applied. Then a Darken Curves Adjustment Layer, Nik Viveza 2, Exposure Adjustment Layer for the eyes, and PS’s Charcoal Filter setting the foreground and background colors to light green and yellow. So where did the blue color come from??? The Fuji Eterna 250D Kodak preset was applied and set to Divide at 47% layer opacity – there is the blue. Serge Ramelli’s snow brushes were used on a separate layers to add the snow effect – love these brushes! (The free Snow Brushes can be downloaded under his video called How to Create Snow in Photoshop CC.) Then just another Darken Curves Adjustment Layer to darken his coat in places and a vignette. Lots of fun here!…..Digital Lady Syd
Miss February
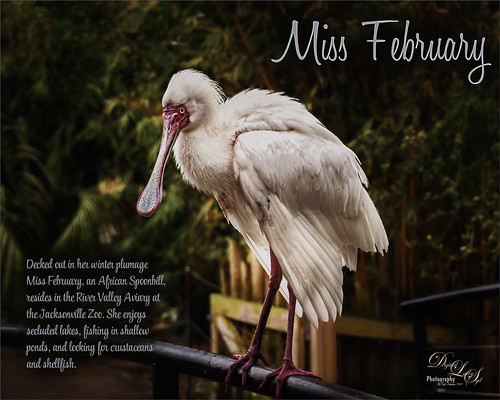
This big African Spoonbill just appeared to look like a calendar girl to me so I had to create an image for this. She was really huge! In Lightroom used Serge Ramelli’s Safari Warm Dramatic Light preset as a starting point – then adjusted a few sliders before coming into PS. On a duplicate layer used Topaz (see sidebar for website link) Studio’s AI Clear with Auto for Noise and High for sharpening. Used Detail on just the bird to enhance some of the feathering. Also worked on bird in Nik Viveza 2 to adjust the tones on the bird. This was a difficult image since the background was so busy. Luminar (see sidebar for website link) was used to help darken it down by using Joel Grime’s Portrait Pop the Blue preset and adjusting the vignette. A few text layers were added and that was about it. She/he is definitely intimidating!…..Digital Lady Syd
Giraffes Playing Hide and Seek
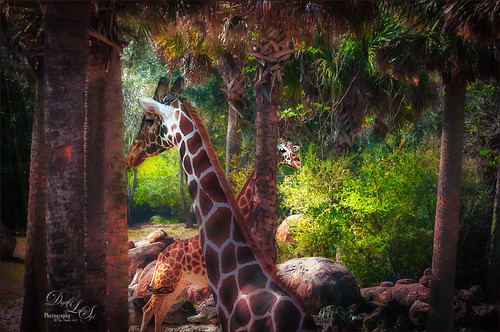
These giraffes were kind of funny when I visited them at the Jacksonville Zoo. This image is another example of using Serge Ramelli’s Safari presets that I discussed in my last Fun Photoshop blog called Showing Some of Serge Ramelli’s Effects. This image used Animal Vignette Cold Strong preset. This image also used Topaz Studio’s (see sidebar for website link) AI Clear adjustment to start in Photoshop – just the best! Then on a stamped layer, Luminar 3 (see sidebar for website link) was opened and their Dehaze, Golden Hour, Image Radiance and Sunrays filters were applied. Some clean up, including a fence removal was also done. That was it!…..Digital Lady Syd
Happy Place for a Hornbill
Love this guy! This Hornbill is definitely in charge of his domain and seems to blend right into it. This image is exactly why I love Topaz (for website link see sidebar) – this Studio Adjustment called AI ReMix never ceases to amaze me. The original image was not good and I had basically decided this Hornbill would never be used. But I am finding AI ReMix is a game-changer for me – this guy turned out pretty nice! (The Studio settings were: AI Clear – Remove Noise Medium and Sharpen High; and AI ReMix: Desert Prism at 65% opacity, Low Style Strength and Brightness -0.35, Contrast 1.04 and Sat 0.75.) Back in Photoshop, a little spotlight effect with a white brush was used to brighten up the tree fronds to get a bit of a translucent effect. It took a little clean up to get the final, but overall, this plugin saved an image…..Digital Lady Syd
Joyous Ornaments Lining Up for the Tree
This is just one of those crazy photos that make me laugh. It is not all that sharp but sort of exemplifies the total chaos it is for me to get all the ornaments up and hanging right! Biggest issue I had was to get this image sharper without deteriorating the quality. In Lightroom’s Develop module, used my SJ Sharply Dark LUT (created in my blog and video called How to Create Profiles in ACR from LR Presets and Some PS LUT Files) and set it to Amount 81. Then did just the normal adjustments. Radial Filters were used to help sharpen up some of the ornaments I wanted particularly in focus. Went into Topaz (see sidebar for website link) Studio from LR and used AI Clear (applied it twice to get some additional sharpness and it worked!), the Precision Contrast adjustment, Topaz Lens Effects Diffusion Adjustment to soften overall just a little and Topaz Studio Focal Blur Adjustment, placing it over the main ornaments to keep sharp. Then back to LR where it was opened up in Photoshop. Did a little clean up of some edges and used Nik Viveza 2 to emphasize the focal point on a few ornaments. That was it. I find this a really soft sort of happy image – not one that goes up on the wall but one that reminds me of Christmas!…..Digital Lady Syd
View from The London Eye
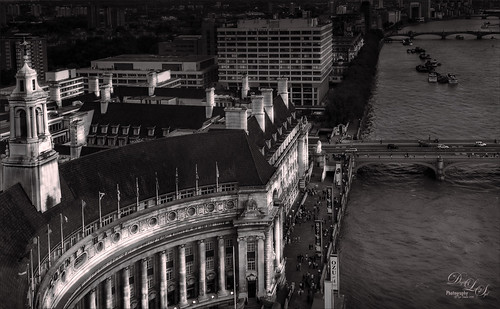
Just thought this image from the London Eye looked nice with a black and white treatment. This time in Lightroom used one of Sergei Ramelli‘s preset called AA Drama Gradient Filter (subscribe to Serge’s newsletter to get the preset and lots of others) and then went in and tweaked the settings – added some Radial Filters also to emphasize the setting sun on the buildings. Did a crop of the image before taking into Photoshop. On a duplicate layer used Topaz (see sidebar for website link) AI Clear Adjustment, applied it, and opened up Topaz Black and White Effects plug-in from the top drop-down. This time selected from the Traditional Collection the Classic with Grain preset – but turned off the Basic section and used mainly the Adaptive Exposure, Regions, Detail, and Detail boost sliders. In the Finishing Touches selected the Silver and Paper Tone and adjusted to get a nice off-black, almost purple color. Back in Photoshop added a Curves Adjustment Layer. Not much too it…..Digital Lady Syd
Fishing the Osprey Way
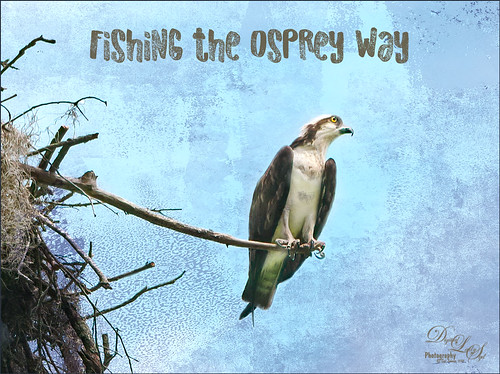
Here’s an image of a beautiful Osprey checking out the swampy area he apparently lives above. I don’t know how he balances on that tiny branch, but you can see how big his talons are so that explains it. Initially I did not think the image was sharp enough to use this cropped in. After adding Topaz (see sidebar for website link) Studio’s AI Clear adjustment and following Unmesh Dinda’s video called The Hidden 3D “Contrast” in Photoshop, the bird just sort of popped. Used a rather washed out texture I created behind him and added a Hue/Saturation Adjustment Layer on top for the blue tones. Then added a Curves Adjustment Layer to brighten the image back up. The free font is called Old Originals……Digital Lady Syd
Mickey Shopping on Main Street USA
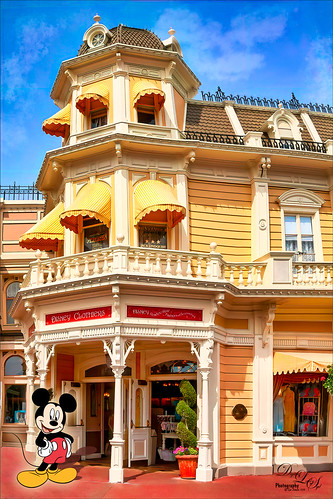
Had some fun working on this image. This image is of a shop on Main Street USA, Magic Kingdom in Orlando, Florida (click on link to see more info and other interesting buildings). I really love the color yellow so this shop always catches my attention. There was a lot of manipulation done to get rid of the people in front of parts of the image, straightening the building, and adding the Mickey Mouse cloud. Note that the top floors are not as high as the bottom floor – Disney does that on all the buildings to make them look bigger than they are. Just a few Basic panel changes done in LR before going into PS. Next the people were removed in front using the new Content Aware-Fill command and little more clean up. Next the Adaptive Wide Angle filter was used to straighten up the columns and the image was cropped (see my How to Use the Adaptive Wide Angle Filter blog). Next on a Composite layer (CTRL+ALT+SHIFT+E) , Topaz (see sidebar for website link) Studio’s AI Clear Adjustment and HSL Color Tuning Adjustment were used. Back in PS on a New Layer on top, Grut’s FX Cloud Kernel Hi brush (these Cloud Brushes are the best around) was used to paint in the Mickey Mouse cloud face. Then Grut’s Cloud Lumens Hi and Sparco HI brushes were used on other sky areas. Another composite layer was created and taken into Skylum’s Luminar 2018 (see sidebar for website link). This used their wonderful new AI Sky Enhancer which really popped the sky. (Settings: On bottom layer used Accent AI Filter Boost 67; AI Sky Enhancer Amount 38; Tone: Exposure 0, Contrast 4, Smart Tone 66, Highlights 31, Shadows -6, Whites 92, and Blacks -80; and Golden Hour Amount 17 and Sat -62. On top layer used my SJ Matt Look preset – Sun Rays which contains Matt Look (Amount 47, Fade 20, Contrast 20, Vividness -44, Toning 7, Hue 256, and Sat 46; and Sunrays – placed the sun down halfway on right side of house (X104/&55) with center off the side of the image, and the rest of the settings: Amount 30, Look 31, Number 23, Length 65, Warmth 67, Radius 63, Glow Radius 69, Glow Amount 66, Warmth 72, Penetration 78, and Randomize 8.) The last step involved adding a Mickey Mouse vector object from Shutter Stock (noted that an .eps file from Illustrator can be opened in PS – to see it first, find file in Adobe Bridge and place into your image) and created shadow for him. I love the color and how sharp the image is!…..Digital Lady Syd
Native American Playing a Flute
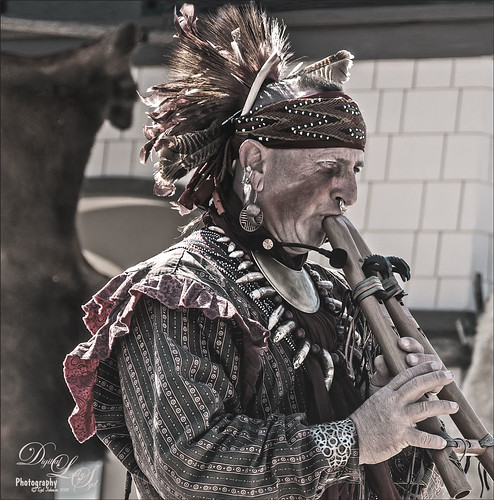
Happy Thanksgiving to everyone here in the States! Usually I put up a funny turkey, but this year I am posting image from the Native American Festival that occurs annually in Ormond Beach, Florida. The first Thanksgiving celebration theoretically occurred in October of 1621 after their first harvest in Plymouth and was attended by 90 Native Americans and 53 Pilgrims. I believe a Native American drone flute is being played. This image uses a technique learned from Adam Sheff of Photoshop Tutorials called Create a Powerful Emotional Effect for Your Portraits in 9 Easy Steps. First cropped the image quite a bit and then used Topaz (see sidebar for website link) Studio’s AI Clear to do a great overall sharpening and noise reduction (this little filter is amazing!). To finish, just followed the steps in the tutorial. Lots of fun to do. Everybody enjoy your day (I have got to go cook a turkey…..)…..Digital Lady Syd
Here is some info on the flute from Wikipedia that I thought was interesting: A double Native American flute is a type of double flute. It has two sound chambers that can be played simultaneously. The two chambers could have the same length or be different lengths. The secondary sound chamber can hold a fixed pitch, in which case the term “drone flute” is sometimes used. The fixed pitch could match the fingering of the main sound chamber with all the finger holes covered, or it could match some other pitch on the main sound chamber. Alternately, various configurations of finger holes on the two sound chambers can be used, in which case terms such as “harmony flute” or “harmonic flute” are sometimes used.
Graham Swamp
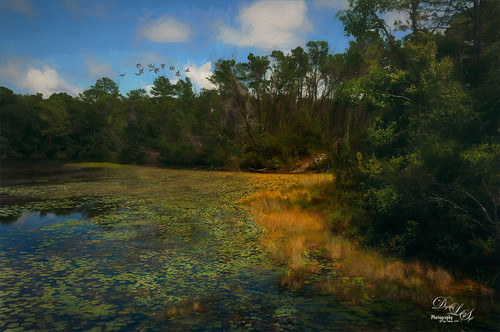
Graham Swamp is a place I have photographed many times. It is not really that pretty most of the time, but this fall it contained just enough color to create this image. And Topaz (see sidebar for website link) came to the rescue for me. In Studio, the new AI Clear Adjustment was terrific on this type of image. Really helped sharpen up all the little details without over-sharpening them. Learned a new workflow from a Topaz Webinar by Joel Wolfson called The Simple Path to Stunning Images with Topaz. Not sure it is posted yet, but do check out the Topaz webinars – there are some really informative ones like this one. Basically it uses Topaz Adjust to adjust exposure without losing the Shadows or Highlights in the image. I had forgotten this and it is a very useful tip. So here is the tip: since the Adaptive Exposure slider is connected to the Regions slider, use them in together – the higher the Adaptive Exposure amount is, the more Regions should be set. Used the Dehaze, Precision Contrast, Precision Detail Adjustments, and somewhere in the mix some Impression and the ReStyle Plugin. Turned this rather dreary image into a beautiful autumn look…..Digital Lady Syd


