
Spreading His Wings

Love this beautiful image of a Roseate Spoonbill at the St. Augustine Alligator Farm Rookery. To create the soft light effect, the Bird and foreground was selected from the background. Then the background was blurred using the Gaussian Blur with a radius of 4.7. The bird was sharpened using Topaz Sharpen. The Camera Raw Filter used several masks to create the lighting in the image. Back in Photoshop the Color Lookup Foggy Night preset was set to 70% opacity. Last step was opening up my favorite filter, Viveza to even out the whole image’s color. Love this bird!…..Digital Lady Syd
Guarding the House

This rather boring and cluttered looking image of this Viking Soldier at Norway Pavilion in Epcot Center in Disney World definitely looks more interesting as a black and white. Now that Lightroom/ACR can do so much, it is easy to isolate the subject to stand out. For a good explanation on how to do this, check Serge Ramelli’s YouTube video called Do Black and White in Lightroom like a Pro. In Photoshop Topaz Sharpen was used and a little dodge and burning to get the final result. Very simple workflow and easy to do!….Digital Lady Syd
Believe!

Just enjoyed doing Christmas Cards this year. This ornament is one I bought years ago at a Cracker Barrel restaurant and I have always loved it! Thought I would share. The image was not real sharp, but I used an older version of Topaz Sharpen AI and it still does a fantastic job! Used an Iridescent Pattern Stamp Brush from Jessica Johnson (she is a Photoshop Pattern Stamp Guru!) and a silver glitter pattern from Chris Spooner ages ago to create the garland. (The patterns can easily be made by following my Fun Photoshop How to Create a Glitter Texture blog from a while ago.) Added some more greenery around Santa using the brushes made by following Jessica Johnson’s Behance video called Creating a Stylized Holiday Holly Illustration in Photoshop & New Brushes. The Merry Christmas font used is called Baroque Script. That was about it! Happy Holidays to everyone!…..Digital Lady Syd
Eastern Lubber Grasshopper

Had to get load my camera with my favorite 60 mm F/2.8 macro lens (with my Bower 0.5 x High Definition Wide Lens attached) to get some pix of this crazy (and major hungry) grasshopper. Never seen such a large grasshopper in my life. (I could actually hear him chomping in the garden)! He was playing peak-a-boo with me while I was taking the images. Topaz Sharpen AI did a fabulous job capturing all the beautiful detail on this insect. Then just some dodge and burn for more on his details (see my The Best Dodging and Burning Technique! blog), an Autumn Colors Lookup Adjustment Layer, Black and White Adjustment Layer to adjust the tones, added a highlights layers and a shadow vignette, and ended up with a Curves Adjustment Layer. He really is quite a spectacular kind of guy!…..Digital Lady Syd
The Mighty Eagle

I am a huge Eagle fan (not the football team!) and am always checking in on Web Cams when the nesting season comes along. This guy is an injured Eagle that resides at the Jacksonville Zoo – I feel sorry for him since he is unable to fly the sky like his relatives. He is still a beautiful specimen and seems to enjoy people stopping by when visiting the Zoo. This image involved only a little AI to Expand the right side a bit to balance out his position in the photo and that is all. The rest was just my regular workflow: a Curves Adjustment Layer, two Hue/Saturation Adjustment Layers, Viveza 2 to pop the color of his feathers, Topaz Sharpen AI to sharpen up the feathers using Too Soft, a dodge and burn layer, an Exposure Adjustment Layer for the eyes, and a clean up layer. It felt good to get back to my regular post processing!…..Digital Lady Syd
Raindrops on a Queen

Can’t believe I did not post this image a while back. It is one of my favorites and it was taken using my 60 mm F/2.8 macro lens (with my Bower 0.5 x High Definition Wide Lens attached) right after a heavy rainfall. Lightroom Camera Raw settings were added before opening Photoshop. Topaz Sharpening AI was applied first (I still love this plugin!) and a Color Lookup Adjustment Layer using my preset. On a stamped layer (CTRL+ALT+SHIFT+E), Viveza was opened – the settings made the image pop! A Burn Layer was added above and another darken layer to darken the background more (used a soft round brush to do this). Last step involved adding a Film Grain Layer set to Overlay blend mode. Pretty basic!….Digital Lady Syd
Handsome Fellow

Love how this beautiful Iguana looks up close – he lives at the Palm Beach Zoo in Florida and I think it may be a juvenile since it was so colorful. It took a lot of manipulating to get this image post-processed, but I really like the final results. Two images had to be stacked and aligned in Photoshop as some parts were more in focus in one image than the another. A black layer mask was added to the top image and just the parts needing to be sharper were added painted back in. Topaz Sharpen AI was tried on a stamped layer, but some bad haloing appeared so this filter was removed. On a stamped layer the Iguana was selected using a layer mask. On a duplicate stamped layer placed underneath the subject layer, the Tilt Shift Filter in the Blur Gallery was applied to smooth out the background. I had to reload PS2021 as the pins were not showing for these filters on my computer in PS2022. Not sure what the issue is here! Used Viveza to sharpen up photo and the new Spectrum Neo for the lighting-love the relight effect in this filter. Then a Color Lookup Adjustment Layer and two Levels Adjustment Layers (one for a vignette) were used to finish up. It took a while, but well worth effort……Digital Lady Syd
The Chocolate Shop

Had fun post-processing this image from Kilwin’s Chocolate Shop in St. Augustine, Florida – excellent chocolate! This image was pretty tricky to do as that little train was moving all over the place and it was in front of the food sign to make it even harder. It really helped to have Topaz Sharpen AI (see sidebar for website link) on this one – use it as a first step almost on every RAW image. The biggest problem was all the spectral reflections on the sign – totally blocked out some of the lettering. Therefore, a lot of clone stamping and painting was done on this image. For cloning, a brush from PS Guru Aaron Nace that is just a 30-pixel round brush set to 25% Spacing and 28% Hardness – the Options Bar was set to 100% Opacity and 80% Flow, Aligned checked and Sample Current & Below. It does a pretty good of job but is a little choppy looking where the strokes stop. To fix that, another clone brush was used – one I call Soft Build up Clone by Pratik Naik, a famous retoucher. It is a very simple brush too – Size 100 pixels, Spacing and Hardness 25% and Build-up checked in the Brush Settings Panel. In the Options Bar, the brush has an Opacity 100% and a Flow of 9% – be sure to turn on the Airbrush – also turn on Aligned and Sample Current & Below. If this does not smooth out the lines enough, just increase the Flow a little. This brush is really fabulous! Just cloned over other lettering to reconstruct the bad letters. Also used Kyle’s Drawing Box-Glide Sketch Pencil/14% (for smoothing) Sm brush and my SJ Pastel3-Painting brush (all over my blogs if you want the settings) for clean up. The font is one I really like – Onamura Thin. That was about it – took some time but overall a good final result!…..Digital Lady Syd
A Duck Enjoying his Habitat

This beautiful and rather friendly male Mallard Duck was swimming all over the place while several people were trying to take his picture at Ames Park, Ormond Beach, Florida. His coloration is what attracted me to this image. Did my basic workflow on this image but thought I would share that Topaz (see sidebar for website link) Sharpen AI was used to really sharpen him up. The Lucis Pro filter was also used – too bad no one has decided to make this great little filter available again. Also Viveza 2 was used – my go to filter to finish up a look. ……. Digital Lady Syd
The Grace of Rhododendrons
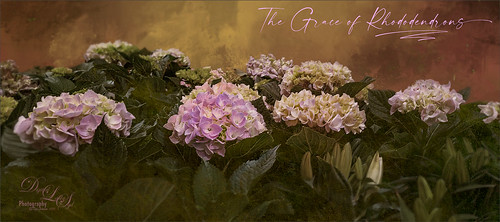
Found these rhododendrons growing in a local Lowes Home and Garden Store and thought I would give my Android phone a spin by capturing a RAW image. I was overall pretty pleased with it. Topaz (see sidebar for website link) Sharpen was used to sharpen it up a little in PS – the background showing the store was removed and a texture from Daily Textures called Explorations 6 was added. A Color Lookup Adjustment Layer was applied using one of my favorite presets (from Photofocus’s Landscape presets) called Africa at 87% layer opacity. Flypaper’s Adriana texture was added on top and set to Pin Light at 73% layer opacity. One of the coolest trick I learned from Karen Alsop and that is to paint over the far edges of items to soften the effect and draw attention away from that part of the image. Just use a soft round 25 pixel brush with only Smoothing on and set the Opacity to 12% and Flow to 24% – then just sample the background color and paint on the edges on a new layer. Can adjust the layer opacity as needed. The font is called Modernline by Ef Studio. Really love these flowers!…..Digital Lady Syd
Enjoying the Day

This is another example of an image that I colorized using the steps from my How to Convert Black and White Images to Colorful Paintings with Topaz Studio 2. I did use Topaz (see sidebar for website link) Sharpen AI and of course Topaz Studio 2 using the same preset as in the my original blog except the ReMix filter was set to Colored Marker for a style. Added a Color Theme filter to get the colors just right. To get a really nice effect, Topaz Lens Effect was applied for a bit of golden feel. That was about it. So fun to do these vintage images!…..Digital Lady Syd
Zooming Man a Ray

Just had some fun with this image. Used Topaz (see sidebar for website link) DeNoise AI Clear, Topaz Sharpen AI, and Topaz Studio Motion Blur. Other than that just had to draw in a few lines that were a bit too blurred from the motion. The font is modernline. A Color Lookup Adjustment Layer was applied and a spotlight effect was added just to his nose. ….. Digital Lady Syd
Sleeping Boats

I have to admit I am a lover of wood boats and this is probably one of the reasons I loved the Hilton Waikoloa Village resort on the Big Island in Hawaii. They have a wonderful long waterway where you can ride in the boats as long as you want – at night the stars are incredible to see. I will not go over all the detail used on this image but it took me forever to get it to look good. Just used all my workflow and a few paint and clone tricks to even everything out. And I did use Topaz (see sidebar for website link) Sharpen AI – it did a fabulous job on this particular image – this program just keeps getting better and better! …..Digital Lady Syd
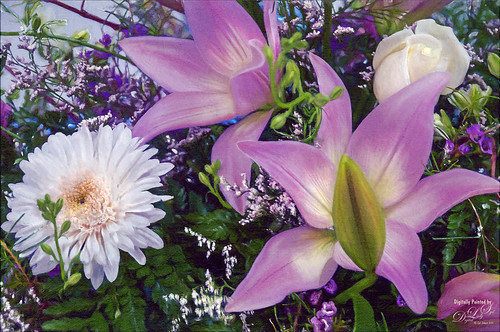
Queen Emma Lily Displaying Her White Blossoms

Another image of my beautiful Queen Emma Lily blossoms. This time she has three visitors – not sure these are wanted guests. Looks like a little garden work is in store. This image contained a very short workflow – a little sharpening in Topaz (see sidebar for website link) Sharpen AI, some dodging and burning, and Nik Viveza to adjust the background color and focus on the blossom. Pretty easy. ….. Digital Lady Syd
Scared Hood Ornament

This vintage Ford image was taken in the parking lot at the St. Augustine Alligator Farm a while ago. I did not realize how scared the hood ornament looked until I started to work on the image. In Lightroom I applied one of my presets called SJ HDR Split Tone – the image did not end up this way in PS, but it is how I started. In PS Topaz (see sidebar for website link) Sharpen AI, Lucis Pro – just a single slider to give it more of a cartoon effect, and a Color Lookup Adjustment Layer using a PhotoFocus preset called Africa set to 40% opacity (and killed the split tone from LR) were added. Did a little dodging and burning on the text and headlights. Finished up with a Levels Adjustment Layer to add more contrast and Hue/Saturation Adjustment Layer to give it a little more saturation (this rarely happens for me). That was it. Very easy and lots of fun. …… Digital Lady Syd
Butterflies Enjoying the Early Morning
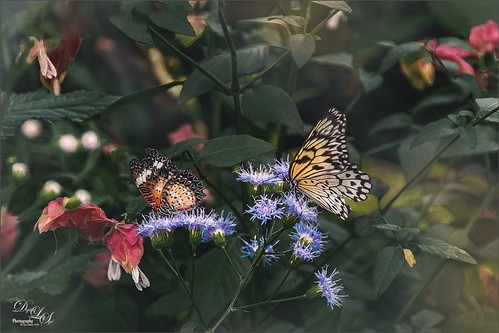
Had some fun with these beautiful butterflies trying out a new tutorial from Glyn Dewis on Creating Realistic Clouds in Photoshop – he used it on a sky photo but I thought I would try it to add a nice soft sunlight effect in this image, which was taken at the Florida Museum’s Butterfly Rainforest in Gainesville, Florida. The image was in pretty good shape out-of-camera so not much was done to the actual photo. Topaz (see sidebar for website link) Sharpen AI was used on the butterflies. The fog was adjusted so accentuate the butterflies and add the fog on the background areas. A Solid Color Adjustment Layer was clipped to the fog to give it the soft yellow sunlight feel – used the Colors White drop-down field and put sliders to Cyan +31%, Magenta +8%, Yellow +28% and Black -39%. On top added one of my Color Lookup presets and set it to 78% layer opacity. Otherwise a few clean up layers were added. These butterflies look so perky!…..Digital Lady Syd
Queen Emma Lily Dressed Up
Have been practicing my Macro Photography recently and decided to give some of my very favorite blossoms a different look. Today we are adding an inverted image (CTRL+I in thumbnail – then set to Color blend mode) showing greens and blues instead of the traditional reds and whites to our collection. These beautiful blossoms were accented with some purple glitter thanks to Kyle’s Concept Brush Small Branch Mix in PS that was converted to a Mixer, thanks to the expertise of Nicolai at Grut Brushes – did you know you can convert any brush into a Mixer by simply clicking on the Mixer brush and ALT+CTRL clicking on a regular brush in the Brushes Panel? That’s what was done here on a New Layer and set to Linar Burn blend mode. Some Sharpening was done using the new updated Topaz (see sidebar for website link) Sharpen AI filter and Lucis Pro. Topaz ReStyle’s Warm Steel Wash preset applied to further enhance the color to the Lily. Last step was to use a Levels Adjustment Layer vignette to further enhance the beautiful blossoms. Yes, the Lily is definitely ready for Spring Holiday Extravaganzas. ….. Digital Lady Syd
Isn’t She Beautiful!
Recently went to the Florida Museum’s Butterfly Rainforest in Gainesville. There were several of these Blue Morpho beauties flitting around – and not standing still for very long – but little one had a ripped wing and was having a some trouble. It games me a chance to get a great photo of both the gorgeous iridescent blue on the back side of her wings and the camouflaged brown on the bottom side. These butterflies were just spectacular to see! And not much was done to get the color – mainly just some Topaz (see sidebar for website link) Sharpen AI and Viveza to some extra sharpness and adjust the color. Also the Camera Raw Filter was used to adjust color on the brown of the wings. These butterflies were definitely the hit of the season at the museum. …..Digital Lady Syd
Introducing the Magnificent Great Orange Tip Butterfly

Yes, brought in all the way from Japan is this little beauty, one of many exotic butterfly species that were entertaining visitors at the Florida Museum’s Butterfly Rainforest exhibit in Gainesville, Florida. She was totally enjoying all the bright colored flowers as she zoomed around the exhibit. I did use a free Lightroom preset, which I do not usually do, to get the really darkened down effect – it was called KP01-Lone Pine from the Explorer Pack at Adobe, then added a bit of Texture and Clarity to it. Very little was done to this image other than sharpen it up a little – used both Topaz Sharpen AI and Luminar Flex to do this. (see sidebar for links to both of their websites.) The Spot Healing brush and a soft round brush at 30% opacity was used to clean up a few rough edges and halos on the foreground yellow flowers. Otherwise that was it. I love combining two of my favorite subjects – butterflies and flowers – in one image!…..Digital Lady Syd
Just Gulliver Saying Hi

Gulliver is a Coquerel’s Sifaka, a medium-sized Lemur. What a character – I could hang out with Gulliver all day at the Jacksonville Zoo. Not a lot was done to the image – it just looked better in black and white to me. Used Topaz (see sidebar for website link) Sharpen AI first, then painted some of his hairs a little darker using some of the brushes noted in my recent blog called Getting the Joel Sartore Look on Your Zoo Images. Little bit of Spotlight Effect on his face and that was about it. He is so photogenic and seems to love to have his picture taken. Go visit him if you get a chance to go the Jacksonville Zoo – he will put on a little show for you……Digital Lady Syd
Painted Flowers
Just had fun painting – I like to practice a bit each week so I do not forget how to do this. Topaz (see sidebar for website link) Sharpen AI was used to sharpen the image. Actually used a plugin I got recently, Perfectly Clear, to brighten up the image – just used Tone, Color and Preprocessing panels. Had to clean up a little and then put together several brushes in a group to use for painting -mainly mixers, blenders, and a couple regular brushes. A bevel and emboss layer style was added on top to get the canvas effect…..Digital Lady Syd
Happy Thanksgiving!
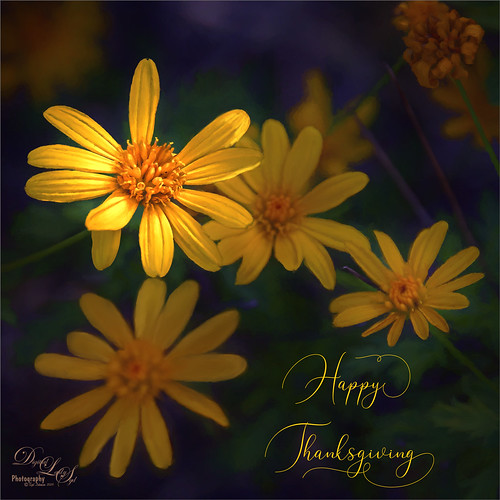
I still have a few yellow daisies blooming in my yard so they decided they would like their picture taken to wish everyone a wonderful Thanksgiving Day. What I like the most is the pretty font in this image – it is called Argentina Script. It lots of different Glyph settings to make your text look fancy. Also used Topaz (see sidebar for website link) Sharpen AI and Topaz Impression (for just the background – painted back the flowers), PS Color Lookup Adjustment Layer using Crisp Winter preset, a red Photo Filter set to 27% Density, and Nik Viveza. Great fun with this one!
Have a Happy Thanksgiving from Digital Lady Syd!
Don’t Even Think About It!

In Lightroom I started out with a new free preset downloaded from SparkleStock called Instant Hipster X Pro 2 and a few Basic changes before going into Photoshop. On a stamped layer applied Topaz (see sidebar for website link) Sharpen AI set to Stabilize, Reduce Blur 0.80 and Noise Reduction 0.12 – a whole bunch of detail became visible in the wings especially. Next a Color Lookup Adjustment Layer was added using PhotoFocus’s Africa preset set to 49% layer opacity. On another stamped layer set to a Smart Object (for any additional edits), Luminar Flex was opened and the Structure and Details filters were applied. Back in PS, A black mask was added and just the wing lines were painted back for a little more detail. An Exposure Adjustment Layer was used on the eye. (See my The Eye Have It – How to Make Them Pop in an Image blog.) That was all that was done! Love this crazy bird!…..Digital Lady Syd
Checking out a Flower
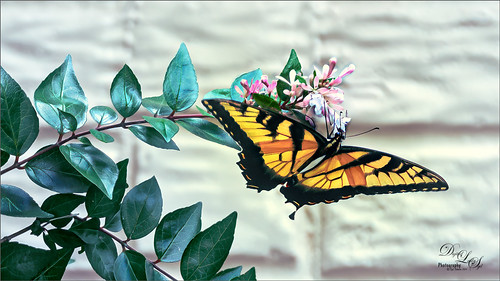
This beautiful Swallowtail Butterfly (of some type I believe) was enjoying a pink and white flower while in a rural area of Virginia a couple months ago. What a beauty she was! And this plant had at last 20 or 30 butterflies flying around it. In LR, just my basic changes were made – no presets, filters or brushes. In PS Topaz Sharpen AI was set to Stabilize, Remove Blur 0.79 and Suppress Noise 0.49. A Color Lookup Adjustment Layer set to PhotoFocus LUT called PF-Candlelight at 62% layer opacity was next. On a New Layer, some of the small halos around the green leaves was renived by cloning out with a very small brush. The image was lightened just a little with a Curves Adjustment Layer. A New Layer was set to Overlay blend mode and used a small brush to add some contrast into just the flowers. Viveza 2 was used last to adjust the colors and focus of the image. What a pretty butterfly!…..Digital Lady Syd


