
A Very Lonely Monkey
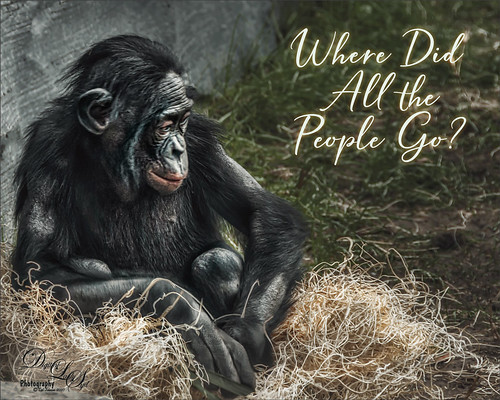
Thought I would post another Bonobo Monkey image from the Jacksonville Zoo – the animals are very confused right now as their major source of entertainment is missing. Only a few things were done to this image after doing just a little Lightroom adjustments. In Photoshop one of my favorite plugins is called Flex by Skylum. They do not make it anymore because Luminar 4 (see sidebar for website link) is now released with some new and different Tools (previously filters). Flex has one Luminar 4 does not have called Image Radiance (Aurora still has it), and it gives a really nice effect to images. I am not sure why they dropped this filter as it is really a nice one. This filter was the main effect applied to this image – several other Tools were also used in Flex like Details Enhancer, Structure, Clarity, HSL, and Top and Bottom Lighting, and which are all available in Luminar 4. Back in Photoshop a Color Lookup Adjustment Layer using Joel Grime’s Soft and Desaturated LUT preset was applied at 89%. A Curves Adjustment Layer was added for some contrast, and darken and lighten spotlight layers were used on his face and body to direct the eye. That was it. I hope we can get back to visit our friends at the zoos soon! …… Digital Lady Syd
Keeping an Eye on the Gorilla in the Premises!

This is a Guereza Colobus Monkey that resides at the Jacksonville Zoo along with several Gorillas, in fact one was roaming around him while he was sitting there. He was definitely keeping an eye on the big guy. What gives this monkey such an interesting background is the Topaz (see sidebar for website link) Studio 2 ReMix filter that was applied. The Beige Sketch Style was used along with the Glow filter to add the interesting line texture. The Edge Filter was also used to do the same. Then a little painting had to be done on the image back in Photoshop just to clean up edges and lines. Also his face had to be painted in as it was lost in all the line work from Studio. Last step was to enhance the texture a little more with the now defunct Luminar Flex – still love the results it gives so I use it a lot. I have a similar image that contained Toucan birds – it is a fun look for kids!…..Digital Lady Syd
Introducing the Magnificent Great Orange Tip Butterfly

Yes, brought in all the way from Japan is this little beauty, one of many exotic butterfly species that were entertaining visitors at the Florida Museum’s Butterfly Rainforest exhibit in Gainesville, Florida. She was totally enjoying all the bright colored flowers as she zoomed around the exhibit. I did use a free Lightroom preset, which I do not usually do, to get the really darkened down effect – it was called KP01-Lone Pine from the Explorer Pack at Adobe, then added a bit of Texture and Clarity to it. Very little was done to this image other than sharpen it up a little – used both Topaz Sharpen AI and Luminar Flex to do this. (see sidebar for links to both of their websites.) The Spot Healing brush and a soft round brush at 30% opacity was used to clean up a few rough edges and halos on the foreground yellow flowers. Otherwise that was it. I love combining two of my favorite subjects – butterflies and flowers – in one image!…..Digital Lady Syd
A Happy Giant Otter

I love it when I go to a zoo and the animals seem happy. The Giant Otter exhibit at the Jacksonville Zoo is one area where the all the otters seems so happy and were totally enjoying themselves. A great place to relax and just watch them while at this Zoo. It is very hard to photograph these fast moving animals, but if you are persistent, a good image can be achieved. Not a lot was done on this image but there was a lot of reflective glare from the water spectral highlights. That is why I decided to use Topaz (see sidebar for website link) Studio 2’s Impression – applied a preset created by Jai Johnson (a fabulous wildlife photographer and texture creator) called Just Paint Hummingbird Scene. (Check out her Artistry Beyond the Camera Episode 1 video for settings – she uses Topaz photoFXlab software, but the Topaz Impression settings are the same.) I made a few changes to the strokes in the Impression filter. Back in Photoshop opened up Luminar Flex – like it to sharpen when Topaz Sharpen AI does not work. Their Detail, Clarity, Structure and Microstructure filters are terrific for this. (These are the same filters as Luminar 4 – see sidebar for website link.) A little line clean up and a free Rain Overlay (from Book Cover Mockup Rain Overlay by Design Cuts) was added at Screen blend mode at 56% layer opacity. A Levels Adjustment Layer was used to add contrast. That was it. What a cute little fellow!…..Digital Lady Syd
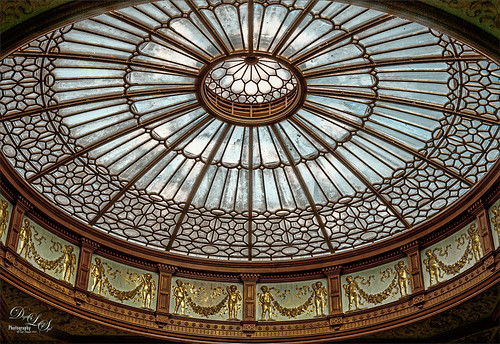
The Dome at Flagler College

I have tried to post process this image before without a lot of success. That was until I ran across an older video by the Photoshop Guru Unmesh Dinda where he used Luminar 2018 on a very similar image. I could not believe how great the details came out so I thought I would share the technique. The video is called 4 Luminar EXCLUSIVE Effects Photoshop Can’t Create and the effect used here is called Image Radiance. The image was taken in St. Augustine at the main entrance to Flagler College, aka the old Hotel Ponce de Leon built in 1890 by Henry Flagler. The dome stands 3 stories high and is still quite spectacular. The effect can be done easily with Luminar (see sidebar for website link) Flex but is much harder with Luminar 4. Here are the filters and settings used for the above – you can see the issue with Luminar 4 not having all the filters/sliders: Dramatic: Amount 39, Contrast 95, Local Contrast 69, Brightness -88, and Sat -42; Highlights/Shadows: Highlights -80 and Shadows 63 (for Lum 4-look in Light filter for sliders); Sharpening: Amount 89, Radius 50, Masking 35, and Dehalo 50 (for Lum 4-look in Details Enhancer – all but the Dehalo sliders are found in Advanced Settings); Image Radiance Amount 14, Smoothness 100, Brightness 29, Shadows 79, Warmth 19, and Sat -70 (for Lum 4 there is a Glow setting but no Shadow or Saturation slider) ; Microstructure: Amount 90 and Softness 50 (for Lum 4 there is not Microstructure filter-possibly AI Structure would work); and added Details Enhancer: Small 41, Medium 35, and Large 21. I also used Topaz (see sidebar for website link) Sharpen AI at the start using the Stabilize mode, Remove Blur 0.90 and Suppress Noise 0.30 – the best sharpening filter around.
Hope this post helped you a little, especially if you are working with the new Luminar 4 – Luminar 3 did have all the filters and sliders still. Have a great day!…..Digital Lady Syd
Don’t Even Think About It!

In Lightroom I started out with a new free preset downloaded from SparkleStock called Instant Hipster X Pro 2 and a few Basic changes before going into Photoshop. On a stamped layer applied Topaz (see sidebar for website link) Sharpen AI set to Stabilize, Reduce Blur 0.80 and Noise Reduction 0.12 – a whole bunch of detail became visible in the wings especially. Next a Color Lookup Adjustment Layer was added using PhotoFocus’s Africa preset set to 49% layer opacity. On another stamped layer set to a Smart Object (for any additional edits), Luminar Flex was opened and the Structure and Details filters were applied. Back in PS, A black mask was added and just the wing lines were painted back for a little more detail. An Exposure Adjustment Layer was used on the eye. (See my The Eye Have It – How to Make Them Pop in an Image blog.) That was all that was done! Love this crazy bird!…..Digital Lady Syd
The Purplepassion Flower

This Purplepassion Flower image was taken at the Harry P. Leu Gardens in Orlando, Florida a while ago. It is a very beautiful bloom and there is a little bee hiding in it. Mainy did the clean up in Luminar (see sidebar for website link) Flex with their wonderful Structure, Detail Enhancer, Image Radiance, Microstructure, and HSL filters. In Photoshop used a Gradient Map tAdjustment Layer to emphasize the color a little. Then used Topaz (see sidebar for website link) Studio 2’s fabulous Impression filter – just adjusted the default settings a little to smooth out the background. Then used Mixers brushes back in Photoshop to further blend in the effect. Finally used Topaz Lens Effects Fog filter to lighten the top slightly. Viveza 2 was used to adjust the focal point and the last step was a Curves Adjustment Layer. The text is a font called Brettany ….. Digital Lady Syd
A Busy Place

Not a whole lot done to my beautiful Bird of Paradise bloom that I photographed yesterday. Looks like the ants are taking over – eish! In Lightroom just did some basic adjustments and used an Adjustment Brush to sharpen up the ants. In Photoshop Luminar’s Flex was used to further sharpen up the blooms and ants and a Vignette was used to darken the background. Then on another layer, used Topaz Studio 2 and applied AI ReMix – a BW filter preset from Greg Rostami was applied (uses Neon Feathers, Style Strength High, Brightness 0.56, Contrast 1.97, Smooth Edge 0.14, Sharpness 0.44, and Suppress Artifacts 0.79.) and set to Luminosity blend mode to give a colored sketch look (check out Greg Rostami’s Topaz webinar AI Magic with ReMix and Clear). In Photoshop a black layer mask was added and painted the effect back in a few places with a low opacity brush on the ants and some of the texture was added in the petals. That was it……Digital Lady Syd
Where is This?

This is another image from the totally fabulous art show called Infinite Space in Washington, DC until September 2nd. The art is by Refik Anadol and is an exceptional virtual experience. For another example, check out my recent Star Wars on Steroids Tidbits Blog.
Very little was done in post-processing for this image. Only a little texture added in Lightroom. In Photoshop, just some cropping to even out the edges, Luminar Flex was used to sharpen it up a little using their Structure, Details Enhancer,and Microstructure filters – then selectively adding them with a Masking brush. And of course AI Clear to remove Noise – but is was masked out so in the black areas but left in the colored areas as I liked the natural grainy effect it created. last step was a Curves Adjustment Layer. That was it! I really love this art!…..Digital Lady Syd
Star Wars on Steroids

Image taken at the Infinite Space Art Show by Refik Anadol in Washington, DC. If you get a chance to see it, definitely go – absolutely wonderful. The silhouette was created from people sitting on soft cushions enjoying the show. This image, shot during a video, reminded me of flying into the Death Star in Star Wars. Not much work had to be done to the image. Luminar Flex was opened and Structure, Details Enhancer and Exposure filters were used to really sharpen up the image. Then on a stamped layer in PS, Topaz (see sidebar for website link) Studio 2 was opened and AI Clear was used to remove the noise in the image. Precision Detail was used just on the Highlights and Precision Contrast’s High Contrast slider was used to really darken the black. Back in PS a Curves Adjustment Layer was added. That was it. This show was full of beautiful color and movement!…..Digital Lady Syd
The Queen Emma Bloom

This is one of my favorite blooms in my yard. I take a lot of images of them and here is another one. This one was shot at using my Nikon 60 mm macro lens at F/5.6, ISO 200, and -1/2 EV. In Lightroom Serge Ramelli’s Safari Warm Dramatic Light preset was applied (to download, check out his How to Edit Amazing Landscape Photos video). In Photoshop Topaz (see sidebar for website link) Sharpen AI set to Remove Blur 30 and Suppress Noise 40 was applied – then a layer mask was added and the effect was painted off the dark background area. Luminar (see sidebar for website link) Flex was applied on a duplicate layer – used these filters: Structure, Brilliance/Warmth, and Advanced Contrast. That was all that was done – pretty simple. ….. Digital Lady Syd
Flagler Beach Fishing Pier
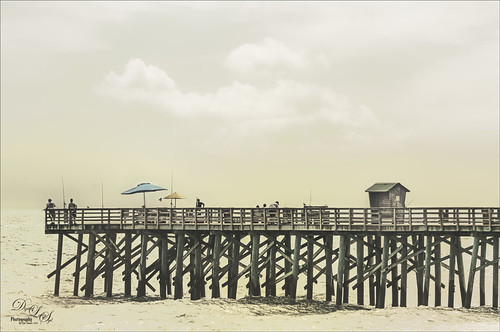
Now I love my image of the Flagler Beach Fishing Pier taken a while back. It was not that great an image so I added a new sky of the beautiful clouds taken at my house which is only 7 miles away. Luminar (see sidebar for website link) Flex was opened and many filters applied to get this sort of vintage feel to the image. A Color Look Up table was used in the Photoshop and a Gradient Overlay Adjustment Layer to get the soft colors. A little Viveza 2 was used to even out the colors for the focal points and that was it! ….. Digital Lady Syd
Look Up!
Sometimes you see something really spectacular if you just Look Up! This glass dome structure is located at the Waverley Railway Station (cc1866) in Edinburgh, Scotland. I did not think much about the image, but started playing around with it this week, and got a pretty interesting result. Just regular workflow in Lightroom. In Photoshop used the Luminar (see sidebar for website link) Flex filters – these are really fabulous, especially if you want sharp details. Details Enhancer and Structure filters were used to get that sharpness. It was converted to a black and white in Flex also and back in Photoshop set to the Darken blend mode. A PS Photo Filter Adjustment Layer using a Cyan Filter at 46% Density was added and set to 59% layer opacity. Then my favorite Grut Cloud Brush Set were used in a new layer to add the white clouds above the dome. To remove the clouds from the dome form, a Blend If Layer Style – Underlying Layer was used so the darker dome lines popped back. Last step was Viveza 2 to add a little brightness to the dome to pop it. Not sure how I missed this image!…..Digital Lady Syd
Swimming in My Secret Pool

This image was just a lot of fun to do. It was actually taken from the Harry P. Leu Gardens of the edge of large Lake Rowena. I just had to give this a fairy tale look. To achieve this effect, a Midnightstouch Swan Lake brush was used to place the swan in the scene. Luminar (see sidebar for website link) Flex was opened and on its bottom layer used these filters: Details Enhancer (be sure to check this fabulous filter out), Foliage Enhancer, Image Radiance, and Dramatic. On a layer on top, Joel Grimes Soft and Desaturated preset was applied and set to 76%. Viveza was used to sharpen up the swan. A Color Lookup Adjustment Layer used On1 Vintage Chrome preset at 60% Layer opacity. A Gradient Map using a Gray, Blue and Beige map was set to Soft Light blend mode and 46% layer opacity. Darken and Lighten Curves Adjustment Layers were added to dodge and burn and a Highlights Curves Adjustment Layer was the last step. This was a lot of fun to create this quiet looking spot. ….. Digital Lady Syd
Hibiscus Stamen

This interesting stamen was part of a huge Hibiscus flower at the Harry P. Leu Gardens in Orlando, Florida. Luminar (see sidebar for website link) Flex was used to sharpen up a stacked macro image. Then PS mixer Flat Blender was used to paint and add texture into the strokes. A variation was created to add color using the same brush. One of my Corel Painter Textures was added on top – the Blend If sliders were used to add a little more texture effect in the background. It took a while to finish up, but it was a lot of fun to create!…..Digital Lady Syd
Presenting the Ragamuffins

The Harry P. Leu Gardens has a large row of these gigantic yellow flowers – totally get your attention! They look a bit like, I hate to say it, a large yellow weed. Anyway, since I totally love the color yellow, I had to figure out a way to show them in good form. The image actually took a very long time to put together since the background had to be totally removed and replaced with a painted one I did in Corel Painter previously. I won’t go through all the steps, but Luminar (see sidebar for website link) Flex was used to get the sharpness and colors and on a second layer in Flex, Sunrays filter was used – this gives the soft sky effect. (See my Luminar Flex – Exactly What is This? blog.) Viveza 2 was used to get the sharpness on the petals correct and what really created the beautiful color look was using Topaz (see sidebar for website link) ReStyle which gave me a better color palette. Lots going on here but these unusual beauties deserved it!…..Digital Lady Syd
Sweating Plant

This Pink Pineapple Plant was really not sweating, it was being watered to keep it from getting too hot on a very hot day at the Harry P. Leu Gardens in Orlando, Florida. The water drops were quite stunning. There is a pineapple attached on the lower left. This plant image was very simple to post process – used a little of the new Texture slider in Lightroom before going to Photoshop. Then used Luminar Flex (see my Luminar Flex – Exactly What is This? blog) – this time just Accent AI Filter, Advanced Contrast and just Shadows slider, and Details Enhancer where it was only applied to the edges with a mask where the water drops are. Back in PS just used Viveza 2, one of my Lookup Tables set to 44%, and a Spotlight Effect on the center of the plant. What a little beauty hidden in this gigantic garden!…..Digital Lady Syd
Monarch Butterfly’s Magical Dust

This was one of many lovely Monarch and other types of butterflies that were very busy spreading the magic dust to the beautiful flowers that were in bloom at the Harry P. Leu Gardens in Orlando, Florida. This image took me forever to decide what to do with it! It had a really distracting background with all the crazy leaves going all over the place – it was a hard image to capture as the butterflies were going crazy on the hot day I visited. In Photoshop Luminar’s (see sidebar for website link) Flex was used to calm it down some and add some structure to the butterfly, then Viveza 2 twice to try and soften the background, before using Topaz (see sidebar for website link) ReStyle to get the final color palette. That’s along with some painting, spotlight effect, and Red Channel Curves Adjustment Layer. I think I finally got the mystical magical effect I was trying to create……Digital Lady Syd


