
Star Wars on Steroids

Image taken at the Infinite Space Art Show by Refik Anadol in Washington, DC. If you get a chance to see it, definitely go – absolutely wonderful. The silhouette was created from people sitting on soft cushions enjoying the show. This image, shot during a video, reminded me of flying into the Death Star in Star Wars. Not much work had to be done to the image. Luminar Flex was opened and Structure, Details Enhancer and Exposure filters were used to really sharpen up the image. Then on a stamped layer in PS, Topaz (see sidebar for website link) Studio 2 was opened and AI Clear was used to remove the noise in the image. Precision Detail was used just on the Highlights and Precision Contrast’s High Contrast slider was used to really darken the black. Back in PS a Curves Adjustment Layer was added. That was it. This show was full of beautiful color and movement!…..Digital Lady Syd
Hiding in the Shadows of a Tree?
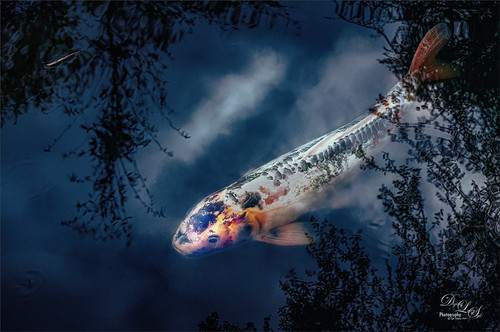
Took this image of the colorful Koi in the Asian Bamboo Gardens pond at the Jacksonville Zoo in Florida. The fish almost looks like he is in a tree but those are just reflections of the large trees around the pond. Topaz (see sidebar for website link) Studio’s AI Clear Adjustment was used on the fish along with the Edge Adjustment to define his body edges and details a little more clearly. Dehaze was also applied at 0.89, a pretty heavy amount to clear up the hazy water. In PS Topaz’s new Sharpen AI filter was set to Stabilize at an amount of 70. (See my Topaz Sharpen AI – Good or Bad? And Yes, Free Upgrade for Topaz Infocus Owners blog for more info.) Back in Photoshop, Topaz Restyle’s Swamp and Sherpa Blue preset was applied. Then on top one of my own Lookup Tables was applied at 40% layer opacity. The last step used a slight spotlight effect on the Koi’s head. There were several quite beautiful large fish in this pond that made it look very interesting. ….. Digital Lady Syd
My Bird Buddies

Had some fun with a shot of my birds that sit on top of my kitchen cabinets. Apparently one of the guys is a little shy. (How did that happen?) This image started off Lightroom with an old preset of mine called Kuboto Warm & Tasty B&W – it gave a little bit of brown and gray tones to the image. In Photoshop Topaz (see sidebar for website link) Studio’s AI Clear Adjustment was applied. I do this on every image now. Next an AI ReMix Adjustment was added using a preset I had created called SJ Illustrated Effect (uses Ink Blog style set to Medium, Brightness -0.24, Contrast 0.57, Sat 0.75, Smooth Edge 0.21, Sharpness 0.50). Then the Radiance Adjustment was set to Light, Strength 0.50, Width 0.73, Length -0.17, and Sat 0.44 – the mask was inverted so only the thick leaves and stems were affected by this adjustment. Back in PS a Jai Johnson texture called Explorations (7) was applied and set to Hard Light blend mode. This added the beautiful golden colors. Then a second texture called Texture 01 1920 X 1080 by Frostbo at Deviant Art set to Linear Burn at 52% opacity was applied. On a New Layer Kyle Webster Impasto Kit for Photoshop (not sure it is still available) from a long time ago was set to a Subtle Touch, and a second New Layer set to Medium was added. Both were set to 0 Fill Layer – a splatter brush was used to add in the texture. This is the same effect shown in my Fun Photoshop blog called How to Create an Impasto Texture Layer Style. Last step was to add a Color Lookup table using my SJ Sharply Dark LUT (created in my Fun Photoshop blog and video called How to Create Profiles in ACR from LR Presets and Some PS LUT Files). This impasto look can really add character to an image!…..Digital Lady Syd
A Very Scary Ride
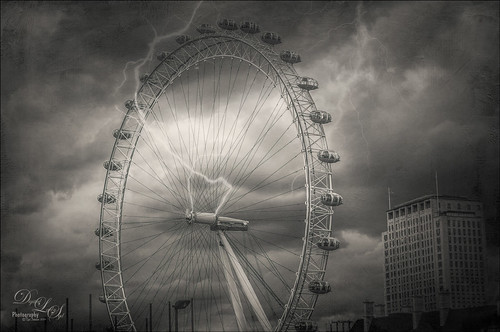
Had some fun with this image of the London Eye – I liked the black and white treatment on it as the colors were not very strong, but it was a bit boring so some lightning brushed onto the image was added. The Serge Ramelli’s B&W Medium Lighting preset was used in Lightroom to convert it to black and white. (See my Showing Some of Serge Ramelli’s Effects blog.) In Photoshop Topaz Studio’s (see sidebar for website link) AI Clear at default was applied, then Texture Effects Distressed Grunge preset. The lightning bolts were from Sparklestock’s 18 seamless Lightning Strokes no. 12 and Serge Ramelli’s lightning brush. Last step was a Curves Adjustment Layer. It looks pretty convincing to me!…..Digital Lady Syd


