
Feeling Groovy

Just had some fun with ISO Republic’s Guitar Man, my favorite practice image, to create a rather crazy abstract using some Corel Painter brushes mainly. A while back I had purchased a learning video and some brushes from Karen Sperling called Quick Fix Color – I decided to use these brushes that make these really interesting dabs. Back in Photoshop added a splatter brush to fill in missed areas, a Curves Adjustment Layer, a Color Lookup Adjustment Layer using On1’s Heat Wave LUT set to Overlay blend mode at 57% opacity, and the Camera Raw Filter. Anyway, just lots of fun to do!…..Digital Lady Syd
Fisherman’s Cabin

This image was created using one of Shorpy.com’s great images called Fisherman’s Cabin-Shore Road-Magnolia-Cloucester-Massachusetts, cc1905. This image was run through the Image Colorizer (see my How to Colorize Using Image Colorizer blog for info on this) first, then after some clean up in PS before taking the image into Topaz Studio 2 where Impression, Edges, and Color Theme filters were applied. Then the image was taken into Corel Painter and the image was painted over where the canned Impression program left stroke I did not like. Back in PS, the Mixer brushes were used to do the final clean up on the image. Lots of fun to do!…..Digital Lady Syd
Some Sunshine when It Is Raining

Had some fun painting these wonderful sunflowers in Corel Painter. If you have Painter, I hope you are following Karen Bonaker who has a great website on how to use the program. Last week she shared the image and several brushes and taught us how to paint the flowers. It has been a long time since using Painter so it felt good to get back to it. And of course for me, I have to finish up in Photoshop and do my same adjustments on photos to my digital art. Anyway, it felt great to be painting again……Digital Lady Syd
Landscape of Old

Finally got back to painting. A lot I have forgotten and a lot more to learn but it was nice to get back into Corel Painter. If you have Painter, check out Davey Baker’s Painter 2018 Awe-Inspiring Environment Painting. The video was actually done in 2017 I believe, but Corel has re-released it and runs for almost an hour. He only used one brush called Wet Brush (check out his short video called How to Create Custom Wet Brush for more on this). I changed my brush from his slightly and created two more variants to do the detail work. What I did learn was that to be able to do this, you need to understand how to use the brush so practice with it on a separate layer before painting. Davey’s video had several tips on painting and other things. In Photoshop I actually used Grut’s FX Cloud Lumens (the best Cloud brushes ever made) to create the clouds as I did not like how mine looked using Dave’s Wet Brush settings in Painter. Also used Perfectly Clear v3 Magic Hour preset to adjust the exposure correctly. For final clean up work, used Fay Sirkis’s (a Corel Master but she also did PS videos and brushes at one time) Precious Oil Diamond Blender Mixer brush that I have used for years (the only place her brushes are still available is on KelbyOne – if you are a member, do a search for her name – she has 5 webinars, which are still great, and brushes can be downloaded). This was so much fun but it took several hours to complete……Digital Lady Syd
Savannah Home

Just enjoyed painting an image I took quite a while ago in Savannah, Georgia. These type of homes are everywhere in the historic district. In Photoshop used the Fan-Flat Blender that Photoshop provides in their Legacy set. Also used a couple others to get the smooth effect I wanted on the steps. In Corel Painter, used one of the newer Thick Paint Brushes to add texture and lighting to the ferns which were quite flat in the original image. Then brought the image back into PS to finish up. Actually ended up using a really old Topaz (see sidebar for website link) program called photoFXLabs and the Instatone effect since I could not get an the correct palette for the image. It worked great!…..Digital Lady Syd
Practicing in Painter

Just got an updated version of Corel Painter so decided to try out a few of the new Thick Paint Brushes. I will not go thru all the steps but the thick paint was used on the sails and parts of the boat reflections. I have to admit most of the real post work ended up in PS where I did more sketch work and added the textures. Overall it was just a lot of fun to do – and that is what it is all about. Check L. S. Lowry‘s art work as he did some beautiful paintings – and his original looks a lot different (and better) than this one. ….. Digital Lady Syd
White Abstract Flowers
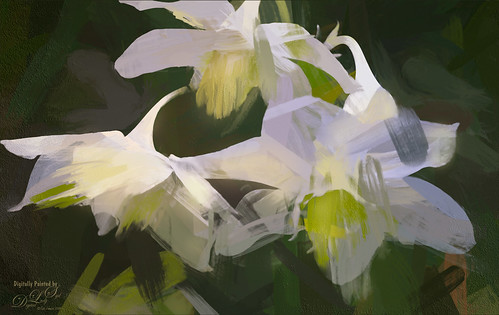
Love the results of this abstract applied to a rather ordinary grouping of white flowers. Applied a basic Topaz (see sidebar for website link) Impression Abstract preset to the flowers to remove the details. Then took the image into Corel Painter to paint in more of the flowers. Saved as a PSD file and opened up in Photoshop to further paint in details with Mixer Brushes. To get the interesting texture effect, added a rather light edged painted border in white and in the layer style, set the Bevel & Emboss to one created by John Derry. At this point I could not find a link where these can be purchased (I got them several years ago) but try playing around with this layer style effect. The opacity of this layer was set to 44% and the Fill amount set to 5% to get the interesting painting look. Used Nik Viveza 2 and added some color for lighting effect……Digital Lady Syd
Posing for my Portrait
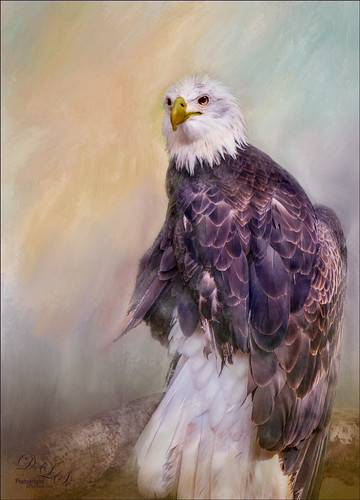
I love this shot of the Bald Eagle – he looks like a king posing for his portrait. I have no idea how he got his feathers this way – I took the image at the Jacksonville Zoo and he was sitting on an old tree stump I think. It is interesting to see his white feather plume. In Lightroom the Adobe Vivid profile was used. Then in Photoshop this guy was separated from the background using Topaz (see sidebar for website link) ReMask 5 as I could not get PS’s Select and Mask to give a good result. I usually can get a better result with ReMask if the selection is complicated. I used two of my own textures behind the eagle but could not quite get the look I wanted. So I took the Eagle layer into Corel Painter and created this soft version for a background. Back in PS the the other two textures were blended in. Used a couple Exposure Adjustment Layers for the eyes and the beak. Curves Adjustment Layers were clipped to each Exposure Adjustment Layer to get the right color in the eyes and beak. Several layers were created for painting out the edges a little with different mixer brushes. On a stamped layer Nik Viveza 2 was used to set the focus on the Eagle’s head and to clarify the feather detail. A Black and White Adjustment Layer set to Luminosity blend mode was used to further adjust the overall color. This is not really a painted image, but it has a painterly feel to it. …..Digital Lady Syd
Happy New Year!
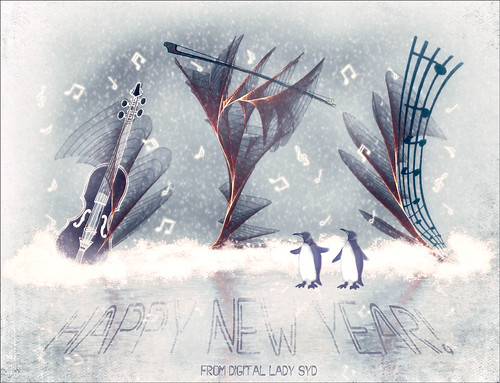
Just wishing everyone a Happy New Year! I am really looking forward to trying out some new techniques and keep working on my digital art, as shown above. I actually painted this image a while ago and decided to make into a Happy New Year greeting by adding the cute penguins brush by Altergromit and some text. There are lots of layers in this image. To get the string look, a Corel Painter brush called Spring Light was used to get this effect. It was saved down as a PSD file and where I could finish up the design. Violin and Bow are from the Design Shop.The notes are from FX Ray Music Brushes. The font is Starway. And lots of snow brushes were used – mine and other peoples to get this wintry look.
The Magic Violin

This image was inspired by a wonderful piece of clip-art from The Design Shop called Vintage Violin clip art. From there the image just kept building. The background abstract city element was created in Corel Painter and a few cool brushes created in PS for more detailed elements. This whole image was just a lot of fun to do and no filters this time!…..Digital Lady Syd
Light Dawning in the Forest
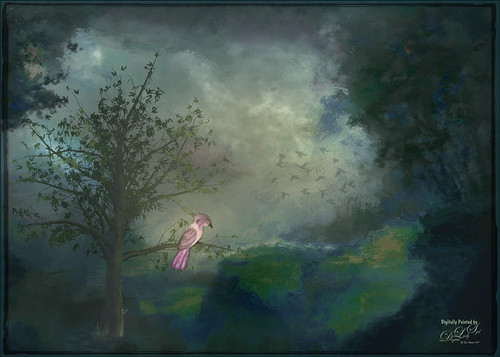
Just created this little image for fun. I started image by opening up the Tree Generator in Photoshop (Filter -> Render -> Tree – not available in CS6 unfortunately) and created a 16 Young Robina tree and just playing with all the fun sliders. If you have not tried out this fun little sub-program inside PS, you should give it a spin – lots of fun! Behind the tree one of my Corel Painter textures was placed and the Hue adjusted with a Hue/Saturation Adjustment Layer. The bird is from some clip art that I had and it was painted and liquified. The flying birds in the background are a free download from Jai Johnson. Not much to this image. I liked the colors that resulted…..Digital Lady Syd
Getting Ready for Spring
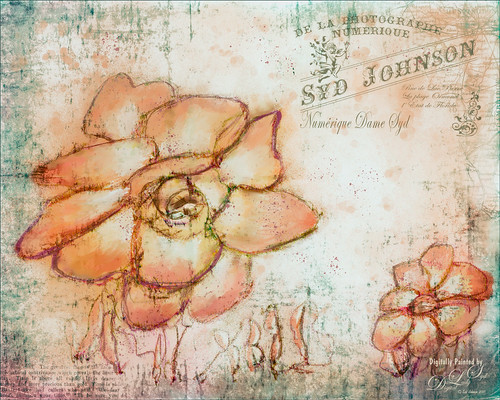
This started with just a little sketching in Corel Painter and ended up like this in Adobe Photoshop! The basic sketch was done with a real small sized brush I had created from a Corel Painter video. Then just used a basic oil brush to add in some color strokes on the petals – it actually started as pinkish tones. It was saved down as a PSD file and opened in Photoshop. Started by cleaning up the petals’ color a little but wanted keep it a little messy. A stamped layer (CTLR+ALT+SHIFT+) was added and a black texture from Kim Klassen called Magic Map was placed on top and set to Subtract blend mode at 47% layer opacity. Next a personal overlay created a while back was placed on top at 69% layer opacity that gave it a bit of a Parisian feel. (See my How to Create an Overlay Out of a Texture Fun Photoshop Blog for more on this.) A Solid Color Fill Adjustment Layer set to a pink color was clipped (ALT-Click between the two layers) and set to 71% layer opacity. Topaz (see sidebar for website link) ReStyle was applied using a preset I had created a while back and set it to 85% layer opacity – this turned the color scheme to the above. Several Splatter brush layers were created at different layer opacities. Some clean up and a Levels Adjustment Layer was added to finish up the image. This turned out to be a lot of fun to create…..Digital Lady Syd
The Valentine Trees

Happy Valentines Day! Just had some fun painting my Valentine Trees – started in Corel Painted and ended up in Photoshop. Lots of layers here a few filters – used Topaz (see sidebar for website link) Impression (true – used after painting the image), Topaz ReStyle, Topaz Lens Effects Reflector, and Nik Viveza 2. Lots of layers for the grass and valentines added. Overall lots of fun to do. Have a great day!…..Digital Lady Syd
Sunny Winter Trees
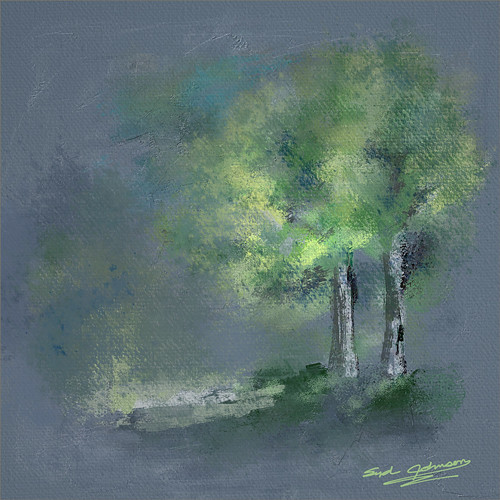
Just having some fun painting trees, my favorite thing to paint. This image was painted for starters in Corel Painter with a solid color light gray color for the background and using several different brushes. Then Photoshop was used and mainly Aaron Blaise’s Photoshop Canvas Texture brushes were used to add more leaves and color into the image. Then I decided I did not like the image but did not know why so I walked away for a couple of weeks. Today I decided to try again and decided the overall color was not what correct. A Hue/Saturation Adjustment Layer was used to change the background to a bluish color which I prefer. A Red Channel Adjustment Layer (see my How to Use a Red Channel to Create a Nice Blended Image Effect Fun Photoshop blog) was used to pop the original tree luminosity and it turned out much better. I am really enjoying getting back into Painter again, but I still have to have my PS brushes to help out!…..Digital Lady Syd
Happy New Year
Wishing everyone a very Happy New Year and hope all your days are sunny as above in the coming year! I just created this image in Corel Painter – have not digitally painted in quite a while so it was fun to poen up Corel Painter and see what happened! Original painting used various brushes from Karen Bonaker, Melissa Gallo, John Lowther, and a few of my own. Then it was saved as a PSD file and brought into Photoshop where a few clean up layers were created using the Clone Stamp Tool and some regular brushes to even out the tones. The image was then taken into Topaz (see sidebar for website link) Texture Effects 2 to just give a nice overall effect to pull it all together. Last step, used Nik Viveza 2 to adjust the lighting to my liking. This was so much fun to create. Feels good to paint again!…..Digital Lady Syd
Quietly Standing Out
Sometimes it just feels good to paint! Totally enjoyed trying out and practicing with Melissa Gallo’s Painting Spring brushes and paper (still have a lot to learn but enjoying it immensely). Once the basic background was painted, it was brought into Photoshop to finish up. The impasto effect was created using Kyle Webster’s Impasto Kit – Super Light Gesso 2 layer style with the Natural Media Knit Pin brush from Grut.com to paint in the snowy effect. Topaz (see sidebar for website link) Lens Effects’s Polarization filter using the Bottom Half 2 Stops preset was applied. The Fox was created on its own layer using a free brush from Fox-russdepress.com and adjusting it to match my image. Topaz Texture Effects’s 1 Color Burst II was added without the vignette effect. Last step was to add Nik Viveza 2 (now free) to really showcase the fox. That was it! Loved painting this image!…..Digital Lady Syd
Waiting for Spring

Just had some fun painting in Corel Painter. This image was created using several of Melissa Gallo watercolor brushes from her Painting Spring class. Really nice course and am having a lot of fun watching the videos. The bird was painted in Photoshop using my friend Nicolai’s Ink brush Brezh Brow and Pastel brush Re-Cc – check out his huge variety of wonderful brushes at GrutBrushes.com and his free weekly brush. Nik Viveza 2 (now free) was used to emphasize the bird just perfectly. Lots of fun playing with these brushes!…..Digital Lady Syd
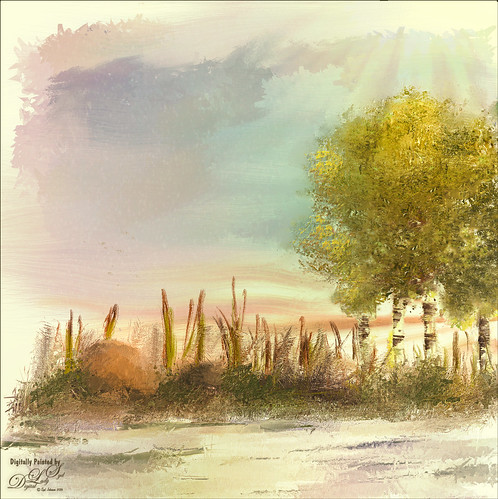
Spring Is in the Air!
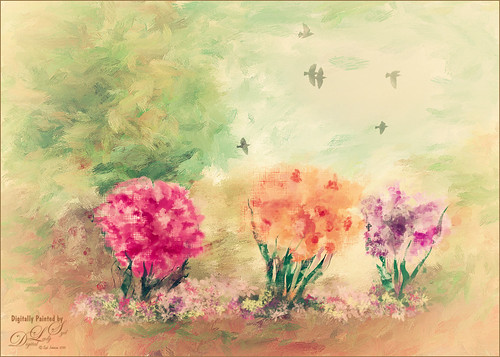
I really love painting flowers in Paintstorm Studio as the colors look so wonderful. Therefore the three pretty blossoms were painted using several Paintstorm brushes – a watercolor brush, a cross hatch brush, and two manga hair brushes for the leaves. Then in Photoshop a brush from Ruan Jia called Leaf 5 with some hatching texture added and color to create the flowers on the ground – scroll down to find download and check out all the other sources of some wonderful brushes. The birds are from a Lost & Taken set photo IMG 4721 set to Multiply blend mode at 33% layer opacity (not sure these are still available) and a Pattern Fill Adjustment Layer with a watercolor pattern was clipped to it to give a little texture to the birds. The background texture is one I created in Painter a while back. Topaz (see sidebar for website link) Lens Effects Graduated Neutral Density filter using 1 Stop Bottom preset. Finally Nik Color Efex Pro 4 (now free) was added using these filters: Darken/Lighten Center, Film Efex Vintage, White Neutralized, and Vignette Filter. That was it. I really like the results!…..Digital Lady Syd
A Little Birdie Told Me So
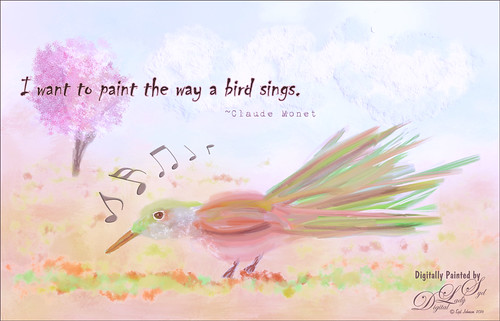
Just having some fun today creating this little bird. The bird, tree, and background were done in Painter. In Photoshop some Impasto effect was added to the some feathers, the music notes and clouds using a layer style. The free font is called Chiller and the wonderful Musical Note brushes are by Coby 17. It was fun to try out some different brushes in Painter ……Digital Lady Syd
A Spring Scene
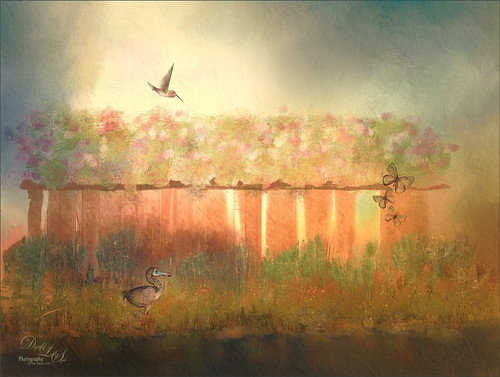
Just having some fun here. Created the original image in Corel Painter – got stuck and came into Photoshop to finish up the image. The basic structure, flowers and plants were created in Painter using various brushes. In Photoshop the DoDo bird Hummingbird were from a scrapbook set called HappyUnBday by Mischief Circus (this is one of my favorite sets) and the Butterflies are from a set called Intermixture Elements & Papers by Algera Designs. A texture called Clouds Over the Pasture from Jai Johnson was added underneath and set to Hard Light blend mode – it gives the beautiful light around the bird. Several layers were added where some texture was added in using plant brushes and texture brushes. Nik Viveza 2 was used twice and Topaz (see sidebar for website link) Lens Effects three times to get this final result. Also some Impasto layers were used on the plants to give a little 3-D effect to the image. This actually took quite a while as I just could not get the feel I liked. I think it is now complete!…..Digital Lady Syd
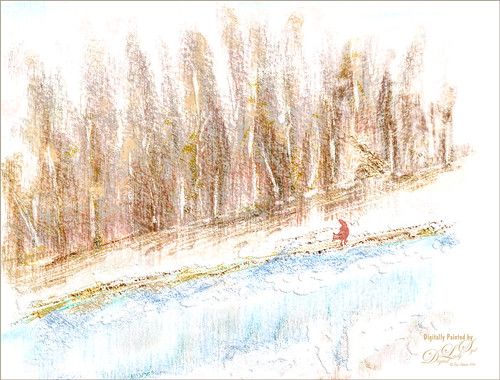
In the Country
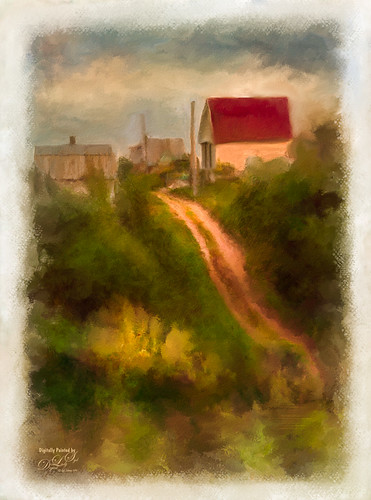
This is an image taken several years ago of the Belarusian countryside. I just watched on the Corel Painter website an older set of videos by John Derry (see Workflow 1, Workflow 2 and Workflow 3 videos) and decided to try his technique. It involves using several layers of auto-painting with different brush sizes and then adding layer masks to target your focus area. I had a little trouble following all the steps at the end, so I went into Photoshop to use my favorite brushes for cleaning up paintings. Overall I liked the final effect but I am not too sure if I liked the auto-paint results. This is definitely one you need to play with the different Painter brushes to get a pleasing effect. …..Digital Lady Syd
Merry Christmas!

Merry Christmas and hope everyone is having a wonderful holiday! Enjoy the season!…..Digital Lady Syd
Full Moon Rising
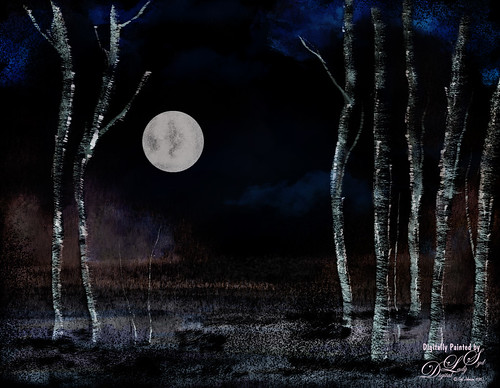
This image was painted using some of Karen Bonaker’s Painter 2016 Holiday brushes that she is graciously giving away to us Corel Painter lovers! I have to be honest and say I had to tweak the brushes quite a bit to get the correct effect (in her downloaded brush she had the Damping set to 60%, not 33% like the default in the Options Bar) – mainly changed in the Liquid Ink panel the Ink Type to Ink Plus Color from Ink Only and tried different settings for the various slider like the Volume and Jitter sliders. Also unchecked Continuous Time Deposition box and set the Boost to 38%. Went into the Particles-Common panel and tried different settings for the Chaos, Smoothness and Damping sliders. Several brushes were created using different settings and I think I finally got some decent trees! A background I had created in Painter was added behind the image. The image was saved as a psd file and taken into Photoshop where I got this night effect – set an adjustment curve to the Negative (RGB) preset. The moon was stamped in using Fantasy Brushes Moon 2 brush. Did a lot of manipulation to get the moon to look correct. Some clone clean up and that was it. Lots of fun to do and I wish to thank Karen for always giving us the most fun brushes during the holidays!…..Digital Lady Syd
Looking for Dinner
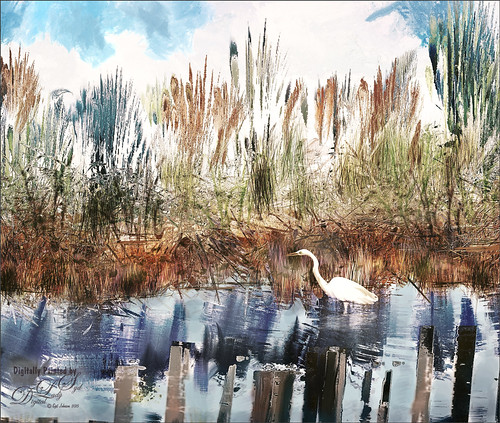
This is an image I created mainly in Corel Painter using John Lowther’s Landscape brushes – still learning how to use them but they are beautiful brushes! I have done a couple different iterations of this image, but I think I like this one the best. My birds are always my favorite subjects so here is another one. I did have to use Photoshop to add the egret (in the set called rEgrets I’ve Had A Few by Midnight Touch that are really nice egret brushes). Once the bird was added, used the Mixer brush to add detail and color to the face and body. Frostbo Grass Set 2 brushes (my favorite Photoshop grass and reed brushes!) were used on individual layers and a Gaussian Blur filter set to a Radius of 3 was used to soften the strokes to fit in with Painter reeds and grasses. Topaz (see sidebar for website link) Lens Effects was opened and the Single Tone Filter set to Morning preset was applied to warm it up. Topaz ReStyle was opened and the Zambezi Zest preset was used to bring out some more autumn looks – in ReStyle the Color Style was set to Soft Light Blend Mode and then back in Photoshop the layer was set to 65% opacity. A Solid Color Adjustment Layer was set to medium gray, Color blend mode, and 55% layer opacity -the areas I wanted to appear a little more vivid was painted back in the layer mask. That was it! It took a while to get this the way I wanted it. Just takes some experimentation. Lots of fun!…..Digital Lady Syd


