
Guarding the House

This rather boring and cluttered looking image of this Viking Soldier at Norway Pavilion in Epcot Center in Disney World definitely looks more interesting as a black and white. Now that Lightroom/ACR can do so much, it is easy to isolate the subject to stand out. For a good explanation on how to do this, check Serge Ramelli’s YouTube video called Do Black and White in Lightroom like a Pro. In Photoshop Topaz Sharpen was used and a little dodge and burning to get the final result. Very simple workflow and easy to do!….Digital Lady Syd
Introducing the Magnificent Great Orange Tip Butterfly

Yes, brought in all the way from Japan is this little beauty, one of many exotic butterfly species that were entertaining visitors at the Florida Museum’s Butterfly Rainforest exhibit in Gainesville, Florida. She was totally enjoying all the bright colored flowers as she zoomed around the exhibit. I did use a free Lightroom preset, which I do not usually do, to get the really darkened down effect – it was called KP01-Lone Pine from the Explorer Pack at Adobe, then added a bit of Texture and Clarity to it. Very little was done to this image other than sharpen it up a little – used both Topaz Sharpen AI and Luminar Flex to do this. (see sidebar for links to both of their websites.) The Spot Healing brush and a soft round brush at 30% opacity was used to clean up a few rough edges and halos on the foreground yellow flowers. Otherwise that was it. I love combining two of my favorite subjects – butterflies and flowers – in one image!…..Digital Lady Syd
Checking Out the Visitors

This guy resides at The Smithsonian Zoo in Washington, DC (check this cool Lion live web cam to see what is happening). He seemed to be enjoying watching the crowds come by for a visit. I decided to do a monochromatic treatment. In Lightroom the sepia tone used is similar to that used by the famous wildlife photographer Nick Brandt. In Photoshop Perfectly Clear was used to adjust the exposure where a preset called Fill Flash was used – it really brought out the details in the face. A Dodge and Burn layer was also used. I love to visit the Lions at the zoo!…..Digital Lady Syd
Bison Buddies

These two Bison were trying to find a nice shady place to hide from the exceptionally hot day in Washington, DC. Since the original color in the image was so beige and brown already, it was an easy choice to make the image a sepia tone. I started with the color tones from one of the best wildlife photographer’s, Nick Brandt, creating a Lightroom very subtle preset (Split Tone section: Highlights Hue 23/Sat 6 and Shadows Hue 41/Sat 6). There was a large fence line through the bison and two different methods to remove it were used. For Wilma, just a Curves Adjustment Layer and a Hue/Saturation Adjustment Layer clipped to it. Zora was a little harder – had to select and feather the fence line and then put the selection on its own layer. Again a Curves Adjustment Layer was used, but the edges were still showing so several painting layers using Coyotemange fur and poodle curl brushes were used to sample and match the regular fur. The light color was just harder to match so you do what you have to do! Then a little text and some Viveza 2 to finish them off. ….. Digital Lady Syd
Early Morning Yoga Session
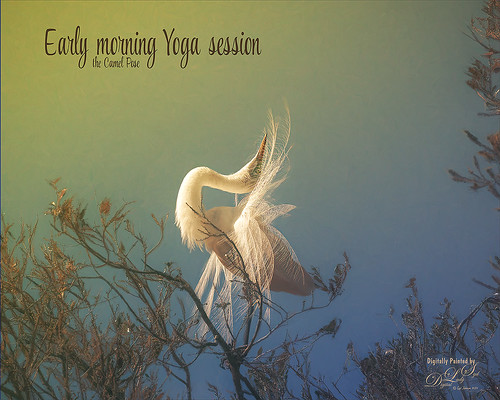
This beautiful feathery Snowy Egret is getting up early and doing a few Yoga exercises to get ready for a full day of finding a mate. Image was taken at the St. Augustine’s Alligator Farm’s fabulous rookery. Tried out the new Lightroom Texture slider which made the feathers just pop out really nicely. In Photoshop, Topaz (see sidebar for website link) Studio where AI Clear was added first. Then the Default setting for Impression was used, but this time the Painting Progress was set to 0.31 so only a bit of paint was added to the tree branches which looked really bad. The paint was removed from the bird using a Luminosity mask and painting out some more at 0.42 Mask Transparency. Then some Mixer painting clean up was done in Photoshop to smooth out some of the edges around the bird. A yellow light leak was added to make the sky look warm and to match the lighting on the bird. The text used the font called Style Casual. That was about it. …… Digital Lady Syd
The Lioness – Need I Say More?
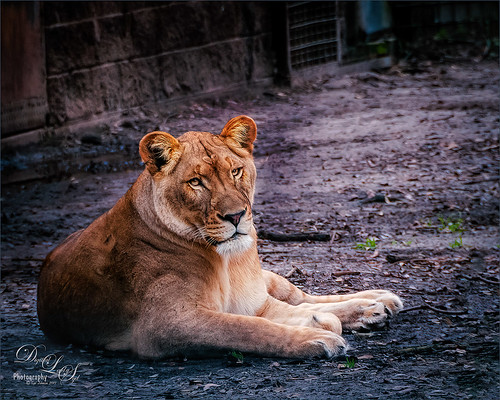
This beautiful lioness named Taum (I think) lives at the Jacksonville Zoo and looks totally regal while she watches over her domain. She was originally post-processed in Lightroom using Serge Ramelli’s Safari Animal Vignette Cold Medium (click for video to download link) and then made changes to fit this image. Overall it just gave a nice cool feel to the background. In Photoshop Topaz (see sidebar for website link) DeNoise AI was used and it just gave a very subtle effect. So the image was taken into Topaz Studio using the AI Clear Adjustment (Remove Noise Low, Enhance Sharpness High, Recover Details 0.33, Exposure -0.13, and Clarity 0.35), and the Precision Detail Adjustment (Subtle Sharp preset and in layer mask, inverted it and then painted back the lion face and end of foreground paw – middle paws were set to 0.50 and painted back just a little). This creates a very good combination for sharpness. Then just added in some contrast and a Lookup Table (Fuji Reala 500D Kodak 2393 preset) to give a moody feel to the image. That was it……Digital Lady Syd
Thistles at the Zoo?
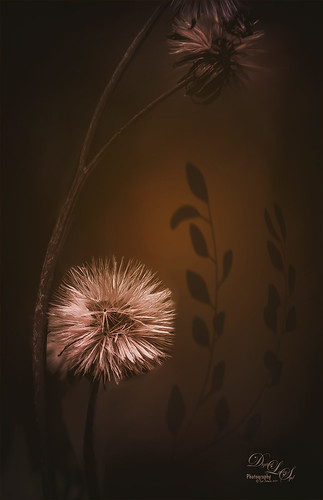
It is amazing the things you can find at the zoo. There was a large blooming thistle bush growing along one of paths so I had to take a few shots. In Lightroom used Serge Ramelli’s Tone Bleak Mountains preset (a freebie from Kelby One) and added a couple radial filters to light up the plants. In PS, not much was done but a Center Spotlight Background was added – I used one I created in a recent Design Cuts tutorial on How to Create an Epic Poster Design in Photoshop – the tutorial was actually a little hard to follow but at the beginning a nice background effect was created. I just saved it down as a file to be used again. Shapes by amber & ink Floral Shadow 11 was used in the background – did a Free Transform and warped the shadow to fit. Last step used On1’s Color Lookup Table Moody 5 (part of owning On1 Photo Raw software) and was set to 43% layer opacity. Last step added a Curves Adjustment Layer and that was it……Digital Lady Syd
Trying to Eat Your Roommate for Lunch!
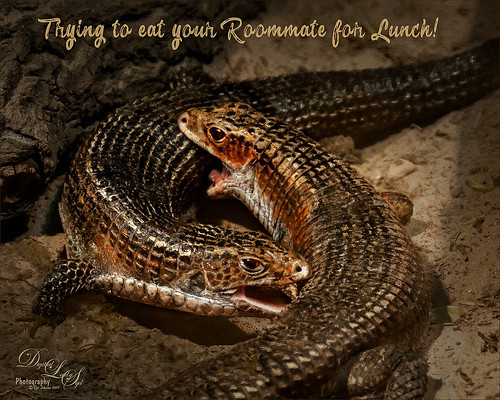
These two Western Plated Lizards at the Jacksonville Zoo Reptile House were having a great time trying to bite each other! I guess this is how lizards play? or maybe a little territory fighting? Anyway, it sure made for an interesting image. Changes were done in Lightroom – mainly the standard edits and a couple Adjustment Brushes were used to enhance their color and patterns. In Photoshop the Topaz (see sidebar for website link) Sharpening AI filter was applied using just the Stabilize setting at 70 with no noise reduction (see my Topaz Sharpen AI – Good or Bad? And Yes, Free Upgrade for Topaz Infocus Owners blog). Then just a little edge clean up, a spotlight effect put on their heads (see my How to Add a Spot of Light Effect blog), and the eyes were sharpened using the Exposure Adjustment Layer (see my The Eyes Have – How to Make Them Pop! blog). A vignette using a Levels Adjustment Layer was applied as a last step (see my Using a Levels Adjustment Layer for a Vignette blog). The text is called Chameleon. That was it!…..Digital Lady Syd
Giraffes Playing Hide and Seek
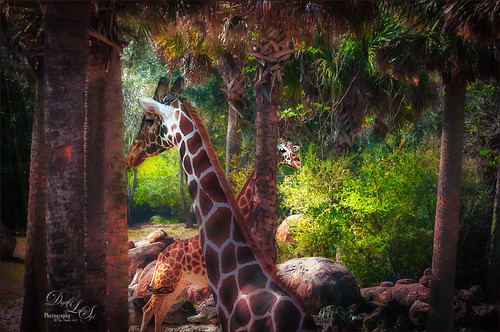
These giraffes were kind of funny when I visited them at the Jacksonville Zoo. This image is another example of using Serge Ramelli’s Safari presets that I discussed in my last Fun Photoshop blog called Showing Some of Serge Ramelli’s Effects. This image used Animal Vignette Cold Strong preset. This image also used Topaz Studio’s (see sidebar for website link) AI Clear adjustment to start in Photoshop – just the best! Then on a stamped layer, Luminar 3 (see sidebar for website link) was opened and their Dehaze, Golden Hour, Image Radiance and Sunrays filters were applied. Some clean up, including a fence removal was also done. That was it!…..Digital Lady Syd
A Very Scary Ride
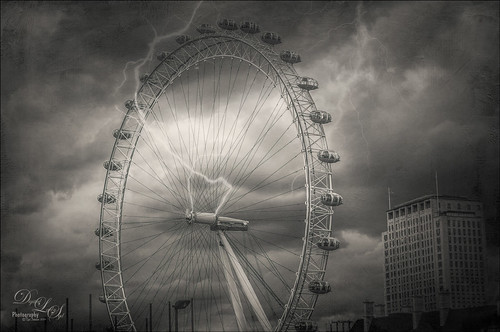
Had some fun with this image of the London Eye – I liked the black and white treatment on it as the colors were not very strong, but it was a bit boring so some lightning brushed onto the image was added. The Serge Ramelli’s B&W Medium Lighting preset was used in Lightroom to convert it to black and white. (See my Showing Some of Serge Ramelli’s Effects blog.) In Photoshop Topaz Studio’s (see sidebar for website link) AI Clear at default was applied, then Texture Effects Distressed Grunge preset. The lightning bolts were from Sparklestock’s 18 seamless Lightning Strokes no. 12 and Serge Ramelli’s lightning brush. Last step was a Curves Adjustment Layer. It looks pretty convincing to me!…..Digital Lady Syd
View from The London Eye
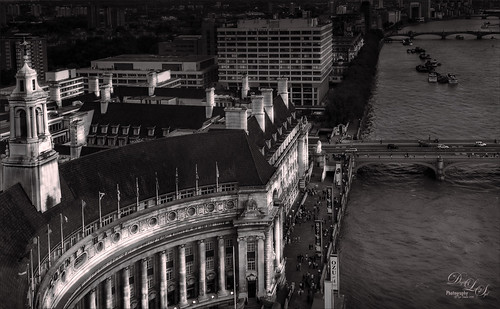
Just thought this image from the London Eye looked nice with a black and white treatment. This time in Lightroom used one of Sergei Ramelli‘s preset called AA Drama Gradient Filter (subscribe to Serge’s newsletter to get the preset and lots of others) and then went in and tweaked the settings – added some Radial Filters also to emphasize the setting sun on the buildings. Did a crop of the image before taking into Photoshop. On a duplicate layer used Topaz (see sidebar for website link) AI Clear Adjustment, applied it, and opened up Topaz Black and White Effects plug-in from the top drop-down. This time selected from the Traditional Collection the Classic with Grain preset – but turned off the Basic section and used mainly the Adaptive Exposure, Regions, Detail, and Detail boost sliders. In the Finishing Touches selected the Silver and Paper Tone and adjusted to get a nice off-black, almost purple color. Back in Photoshop added a Curves Adjustment Layer. Not much too it…..Digital Lady Syd
A British Countryside
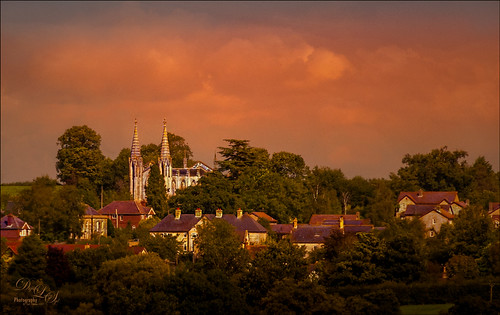
This image was taken of the British countryside on the way to Stonehinge. Lots of post-processing in Lightroom following Serge Ramirez’s instructions and using his very Sunset preset. Check out his My Most Liked Photos-Part 1: The Making of a Composition for basic info on this. Then in PS used Lucis Pro (no longer available) to really sharpen up the image. A couple Curves Adjustments layers, Topaz (see sidebar for website link) ReStyle to really add the nice color treatment, and Camera Raw Filter to add a top bluish gradient. A final little sky clean up and that was it. Really like the nice feel of the little town…..Digital Lady Syd
2017 January Calendar
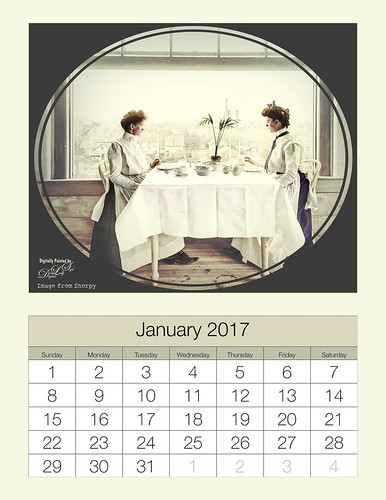
I just love this image of these two women eating by a window and it makes a perfect calendar image I think. This vintage image is from Shorpy.com, my favorite site for the old historical images, taken in 1902 at the National Cash Register Company‘s restaurant in Dayton, Ohio. In my How to Hand Tint a Vintage and Create a Brush To Do This blog, I show how I colorized this image. It was then put into the Calendar using the 8 1:2 X 11 1-month Lightroom template provided by Ed Weaver at Red Photographic – also used his January Calendar image. The calendar headers were set to matching colors in the Develop module so everything blends together nicely. Now that Lightroom 6 has a Reference Photo option in the Develop module, it is easier to compare the calendar color with the image being added. The Split Tone section works nicely for changing the header colors as well as the Adjustment Brush using a Color sampled from the image and then adjusting all the other sliders. Check out my How To Create 2017 Calendars in Both Lightroom and Photoshop blog for more info on using these templates. Just remember that if the templates do not look right, check out your Page Setup Printer properties – see if you have it set to Landscape instead of Portrait or vice versa. Also if the background color does not fit quite right, check out the Print Job section, set to Print to JPEG File and check Custom File Dimensions to fill out. These are mistakes I have made. Lightroom templates can be a bit tricky, so keep at it as eventually they will line up. Enjoy making your calendars!…..Digital Lady Syd
Foggy Day on the ICW

Can you tell whose Lightroom preset this is? It looks so classic Trey Ratcliff to me and yes, it is one of his new ones called Venice Canalman that came in a free December 2015 preset package he gave away with his newsletter. I bought some of his presets a couple years ago and have used them frequently. This image was taken in the park across the street of The Casements on the Halifax River (Intracoastal Waterway). In Photoshop a person was removed from the walkway on a separate layer. Topaz (see sidebar for website link) Clarity was used to just sharpen the piers in the distance – layer mask filled with black and just the piers were painted back in white. Nik Viveza 2 was used to draw the focus to the far right boat cover. Anyway, I really loved the way this preset worked on this image……Digital Lady Syd
M&M’s Getting Their Last Breath of Air
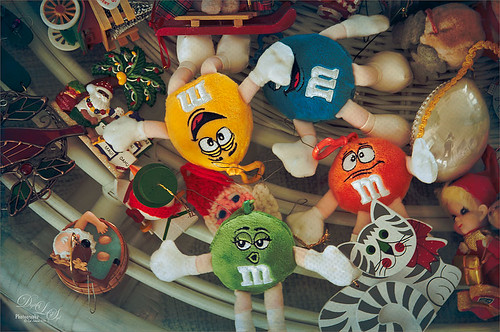
Sunday it was time to take down the Christmas ornaments. These adorable M&M ornaments my sister got me a few years ago are some of my favorites. In Lightroom 2 Lil’ Owls (see sidebar for website link) Fresh Color 7 preset was applied and then a couple adjustment brushes were used, one with Clarity and Sharpness increased and painted in the faces, and one with a little yellow color to draw the eye more towards the yellow M&M. In Photoshop Topaz (see sidebar for website link) Detail 3 with my Little Med Large Details preset applied (Detail Overall Medium Details 0.38 and Large Details 0.16 and Tone Contrast 0.30 and Shadows -0.01). Back in Photoshop a black layer mask (CTRL+I in regular layer mask) was added and just faces were sharpened again. A stamped layer was created (CTRL+ALT+SHIFT+E) and Topaz Adjust’s French Countryside preset (my favorite Adjust preset) was applied. This time a regular layer mask was added back in Photoshop and the bodies were slightly painted back with a 30% opacity black brush. The layer was set to Linear Burn blend mode at 40% layer opacity. I just wanted a touch of the Adjust in the image to soften the background area. Next R Gough’s Watercolour on Canvas Overlay was added. This overlay was in the a wonderful free holiday pack from Design Cut. A blue Solid Color Fill Adjustment Layer was clipped (ALT+click between layers to clip) to add a pretty bluish vignette. The last step was a Curves Adjustment Layer. That was it. This was a lot of fun to do a very traditional treatment to the photo!…..Digital Lady Syd
The Boy in the Bubble

This looks like so much fun – wish I could try it! This boy is riding in one of 4 giant floating bubbles at the 2014 Native American Festival in Ormond Beach, Florida, this past weekend. The kids don’t get wet andhave a great time trying to stand up and run. Very little processing was done on this image, which is unbelievable since he is behind a thick piece of soft vinyl. In Lightroom, after some basic adjustments and cropping, Dave Delnea’s Forest Walks Look 3 preset was applied – but I used The Fader to reduce the preset effect to just 61%. Really brought out just the right amount of greens and blues. In Photoshop Topaz (see sidebar for website link) DeNoise 5 was set to an Overall Setting of 0.19. Some clean up was done where the water looked funny on his face. Nik Viveza 2 was used to slightly tone down the bright specular light in the upper left side of the image and to even out the face color. That was it. I like the natural texture the vinyl created. What a cool amusement – looks like he is really is floating!…..Digital Lady Syd
Where Can You Find the Cutest Lion?
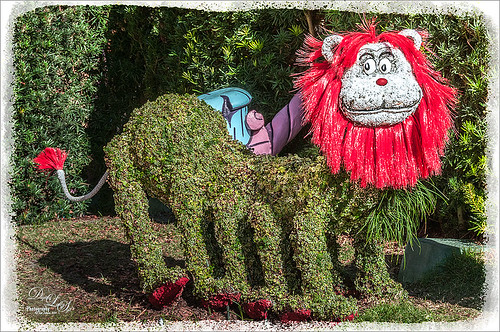
This little guy that was standing on the side in Dr. Seuss Landing at Universal Studios Islands of Adventure has got to rank right up there for cuteness! I loved the topiaries in this area – Universal did a great job on them. Very little processing was done to this guy. In Lightroom just the Basic slider adjustments and cropping. Used an Adjustment Brush to even out some of the shadows on the lion’s body and Dave Delnea’s Backlight Horizontal Right preset was applied to even out the light a little. In Photoshop just a little basic clean up in the top corner where a branch was showing. Next the High Pass filter set to 6 and Overlay Blend Mode was used to sharpen just the face and edges of his red mane by adding a black layer mask to the filter and painting back those areas. A painted frame was added as a border and an Adjustment Layer to add just a little overall contrast. That was it! Just love this shot!…..Digital Lady Syd
Happy Veterans Day!

Happy Veterans Day to all who served! While visiting Savannah, Georgia, recently, I was impressed by how patriotic the city is – US flags were everywhere. I found this image to be quite pretty on a beautiful Sunday morning! In Lightroom the NAPP preset called Hang Ten (the preset is referenced in Scott Kelby’s The Adobe Photoshop Lightroom 5 Book for Digital Photographers) and Dave Delnea’s Backlight 002 Vertical preset (which creates the beautiful lighting effect) were applied along with the basic sliders. This image used Topaz (see right side for website link) Simplify and Alien Skin’s Snap Art 3 in Photoshop. A couple Curves Adjustment Layers were used, one for targeting the flag and the other creating a light vignette effect…..Digital Lady Syd
A Beautiful Morning, I Think I’ll Go Outside for A While…..

This image was totally processed in Lightroom (could have been done completely in ACR) and it just reminded me of how this day really felt. It was a beautiful Sunday morning in Savannah, Georgia, USA, and could not have been more perfect! What a great city to spend a day in! This image actually looked great as a black and white, but I still liked the fall tones better in this image. Pretty much did a few basic tab slider changes and then found Jack Davis’ Wow-Antique 01 Lightroom preset. (Go to Jack Davis Wow Facebook page and Like his page to get 46 Lightroom presets in his Freebies section – it includes this beautiful preset.) Then the Aqua Luminance and Saturation was boosted to give a little more color into the bikes. To get the blown out look on the street, I used the Tone Curve TAT tool (located in upper left corner of panel) and dragged it into the center of the image until the slight High Key look was achieved. Then saved as a JPG in Lightroom to post. So simple but so lovely!…..Digital Lady Syd
More Butterflies Enjoying the World

Can’t get over how many wonderful butterfly shots I got this year. I think they really liked out yard since we had so many blooming plants. These mating monarchs were dancing around my plumbago bushes in the back yard. They were moving so fast it was hard to get a shot where they were both in focus, but this one was pretty good. I actually had my ISO set to 800 in full light to get a quick enough shutter speed! In Lightroom I did just basic sliders and sharpened the butterflies using an Adjustment Brush on just them. Then I applied the Retro Vintage preset I created from Allen Mowery’s free preset (for download link and my preset settings, check out my Fun Photoshop Blog How To Add a Little Retro To Your Shots). The Radial Filter was used to created to slightly darken and desaturate the edges. In Photoshop Alien Skin’s Snap Art 3 was opened and the Impasto Portrait (soft) preset was selected. Three layers were used – one to sharpen the butterflies a little, one for the white flower, and one for the leaves around the butterflies. Back in Photoshop a layer mask was added and a little more of the detail of the butterflies was painted back. The frame is my SJ Double Edge Frame layer style. The colors turned out so beautiful!…..Digital Lady Syd
Just a Little Flowing Water

This is not a traditional image for me – I usually do not shoot flowing water, especially in close-ups, but with a little Photoshop help, I got a really nice look. The rock was in a stream at Iao Valley in Maui, Hawaii. Very little was done to this image – just basic changes in Lightroom which included using an Adjustment Brush set to 100 Clarity to smooth out the water areas. The thing that really made this image pop was opening up the Topaz (see sidebar for website link) ReStyle and selecting the Blue Dreams preset. The color combinations really changed a boring image into a beautiful image. I am amazed by what this plug-in can do! The Structure and Detail were increased on just the rocks and flowers using a Mask for this section inside the plug-in. I wanted the water to still look soft. Back in Photoshop a Levels Adjustment Layer was added where the Midtones tab was set to 0.82 and the Output Levels were set to 7/255. The last step was adding a Layer Style by double clicking a composite layer (CTRL+ALT+SHIFT+E) that I created on top. A Pattern Overlay was added using Photoshop’s pattern called Dark Coarse Weave set to Overlay blend mode, 65% opacity and a Scale of 128%. These settings can change depending upon the size and resolution of your image. Anyway, pretty easy to do and I love the result!…..Digital Lady Syd
Light on the Plant

This is an image of the Canna MACtro flowers that grows in my crazy front yard – always has healthy blooms for me! It was mainly processed in Lightroom. The image in Lightroom was first turned to black and white by going to the HSL Saturation panel and setting all the colors to -100. Then the colored sliders were adjusted until I got a pleasing color balance. With an Adjustment Brush, the flowers were sharpened. I used a preset I made from David duChemin older Refining Your Vision in Adobe Photoshop Lightroom book (still a great read) that I call duChemin Classic India preset. Dave Delnea’s Backlight Horizontal Left preset was applied to light up the flowers and last free Matt Kloskowski’s Vignette (Strong) was applied. The image was now ready for Photoshop where Nik Viveza 2 was opened and control points placed on the flowers to sharpen a bit more, and on the background areas to further darken the distractions. My free SJ B&W Border Style was applied and the Inner Glow changed from white to a sampled color in the image. That was it!…..Digital Lady Syd
Digital Lady Syd Related Blogs:
How to Pop a Picture in Lightroom 5
How to Use Adobe Camera Raw (ACR) or Lightroom 4 Quickly
I Didn’t Know That! Converting Lightroom Preset to Adobe Camera Raw Preset
Fly Like a Butterfly!

Just had to post this image of a beautiful Palamedes Swallowtail Butterfly flying mid-air in my pink penta flowers. I love the soft effect I got in this image even though the colors are so bright. So how did I get this pretty image? First I added the Retro Vintage preset I created earlier (see my Fun Photoshop How to Add a Little Retro to Your Shots Blog under Create a Lightroom Preset For a Vintage Feel) at 145% Strength by using The Fader, a Lightroom plug-in that let’s you adjust the strength of the preset from 0% through 150% – major cool to use at times. A vignette was added and some colors were adjusted in the Saturation section of the HSL panel. Noise was removed and a little overall sharpening was applied. The butterfly was sharpened more using an Adjustment Brush. In Photoshop, Nik Viveza 2 was opened and three control points were placed – one on the butterfly and one each on the pink penta flowers to bring out exactly the correct detail and color. I love this plug-in! Next a Curves Adjustment Layer was opened to lighten up the butterfly and pentas. The Layer Mask was filled with black and a soft low opacity white brush was used to paint back the butterfly and flowers to get just the right amount of contrast. That was it. Very easy and I love the way this turned out!…..Digital Lady Syd
Digital Lady Syd Related Blogs:
Great Free Plug-in for Lightroom – The Fader!
A Little Hollywood for My Butterfly Model
Butterfly Beauty!
Feeling Butterflies!
Butterfly Season is Here!
Yellow Dogface Butterfly in her Glory!
Mushroom to “Mission Control”

Recently a few Meadow Mushrooms grew to a large size very quickly in my yard. (Here’s is another mushroom image I took.) They actually were quite pretty, especially when the morning dew was on them. It really reminded me of a strange moon’s terrestrial surface. This image used very little processing to get this final look. In Lightroom the most important step was the crop to bring in all the interesting dew drops – the image was cropped quite drastically! The White Balance was adjusted and it was opened in Photoshop. Next Nik’s Viveza 2 was selected from the Filters list and three control points were placed to emphasize the structure of the larger drops and also to brighten up the center of the mushroom. Back in Photoshop a Curves Adjustment Layer was added on top and a couple points added to the curve to get the contrast needed. The last step involved adding a Stroke Layer Style – used the Fill Type Gradient set to an angle of -60 degrees and Photoshop’s Rainforest gradient. The Size was set to 21 pixels. That was all the processing done. Love the results! (I guess it is a good thing that I like own work – LOL)…..Digital Lady Syd


