
St. Michaels Parish Church in Scotland
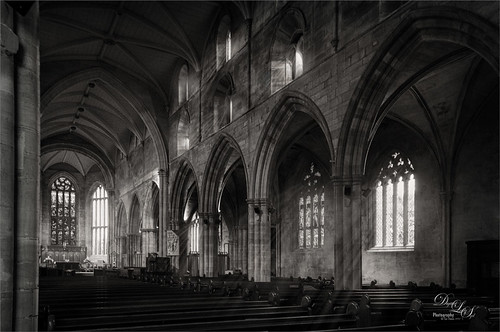
The image above is from the old Parish Church next to Linlithgow Castle, where Mary, Queen of Scotts was born in 1542 and baptized here. Recently I tried out a new technique by Joel Grimes using his YouTube video called How to Use Photoshop Brushes to Build Atmosphere and Drama. The Light Ray brush he used (and can be downloaded there) created the lovely light rays coming through the windows above. To convert to black and white, a stamped layer was taken into my old Nik Silver Efex Pro 2 (here is a link for the newer version) and just applied the Soft Sepia preset. Another stamped layer was added and taken into Luminar Neo (latest Luminar version but the older versions can be used also) using Joel’s settings. Used Kyle’s 100 px Vignette found in Kyle’s Photoshop Action Set for Artists. Last step was to apply Topaz DeNoise as it appeared just a little grainy for my taste (I used an older version and it works fine). Have not done a black and white in a while and it was fun to do…..Digital Lady Syd
Pretending I’m Driving My Dream Car
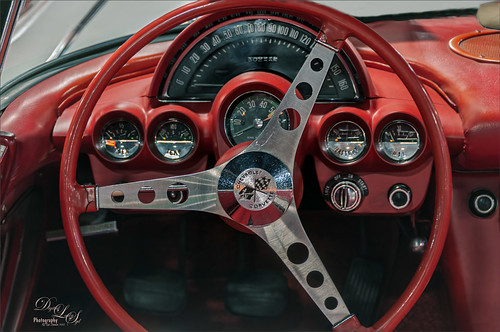
This 1961 Chevrolet Corvette was sitting in the Classic Car Museum of St. Augustine just waiting for me to take its picture. I so wanted to take this baby out for a spin! Not much post work was done on this image – just used a couple settings in Lightroom before beginning work in Photoshop. Had to do some cropping and a bit of Clone Stamp work to get it to line up correctly. Then Topaz Denoise AI (see sidebar for website link) Standard effect was applied. To further sharpen those little numbers on the dials, Viveza 2 came to the rescue with just the right amount. A Green Channel Luminosity Curves Adjustment Layer was added to further enhance the instruments. See my How to Use a Red Channel to Create a Nice Blended Image Effect blog – works pretty similar with the Green Channel if the Red Channel does not look that great. Last step was a regular Curves Adjustment Layer to set the Red color just right. That was it. What a great day to see this little beauty!…..Digital Lady Syd
Old Ford with a Fancy Radiator Cap

Recently went to the wonderful Classic Car Museum of St. Augustine with some of my Club buddies. There was so much to see so if you are in the area, be sure to check them out – lots of great old cars and the owners are happy to share information on all them. I forgot to get the information on this particular car, but I believe it is roughly about a 1930-ish Ford Model A Deluxe Sedan from its appearance. What is so interesting is that the hood ornament is a Boyce MotoMeter that is actually a radiator cap indicator and was designed in 1912. From the driver’s side, you can see what the car temperature is while driving. The wings are a separate part added to the cap. I wish I had looked on the other side!
Well just a few comments on the post processing here. Used Topaz Denoise AI (see sidebar for website link) and the Clear version – worked great! Then a stamped layer was created (CTRL+SHIFT+ALT+E) and the Sponge Tool (yep – that’s what I said) was used to desaturate some of the extraneous colors on this layer that appeared on the car because it was so shiny. The Options Bar was set to Mode Desaturate, Flow 100%, Airbrush on and Vibrance unchecked. It does not have a Sample All Layers box so that is why a stamped layer was needed. A little Clone Stamp was used to clean up a few areas and a Color Lookup table was set to a Joel Grimes preset called Detailed Warmth – set it to Overlay blend mode at 47% layer opacity. On another stamped layer Viveza 2 was applied to sharpen the cap detail and darken down the corners a little bit. Last step was to do a Red Channel Luminosity Curve to bring out the cap more. That was it – lots of fun!…..Digital Lady Syd
A Beautiful Butterfly!

This was just a fun image to do. This is a Blue Morpho Buttterfly and was definitely one of the butterflies that stood out when at the Butterfly Rainforest in Gainesville, Florida. It looks like she is studying the artwork. Just did a few things with this image. In Lightroom used an old preset from Blake Rudis called HDR 4 – Exagerado. I don’t usually use presets but did not this one. In Photoshop ran Topaz DeNoise AI on this image, but only applied it to the green foliage on the left and on the actual body of the butterfly. I did not want to remove the natural texture from the rest of the image. Added a Gradient Map Adjustment Layer set to a brown to clear gradient set to Overlay blend mode at 75% layer opacity. Also added a Color Lookup Adjustment Layer set to Fall Colors preset at 45% layer opacity. Some dodge and burning with done and a Levels Adjustment Layer for a vignette was created and set to 71% layer opacity. Ran a High Pass Sharpen layer. Last step was a Curves Adjustment Layer to add brighten up the midtones a little more. That was it!….. Digital Lady Syd
New Guinea Singing Dog – Singing?

This was one of the cutest animals I have ever seen in a zoo – this one at the Palm Beach Zoo – seemed totally happy. He also had a buddy running around outside his doghouse. Just used a lot of different filters here – Topaz DeNoise AI (this filter is getting really good!), Luminar 4 (this program is becoming my go-to plugin for cleaning up an image – it is incredible) (see sidebar for website link), and an Exposure Adjustment Layer for the eyes. And then several individual layers were used to just clean up some of the edges of his face, muzzle and ears using an erodible brush by Aaron Blaise. That was it!…..Digital Lady Syd
What a Beautiful View!

This is an image taken a while back at Edinburgh Castle in Scotland – missing not having any gorgeous landscape images to take like this one. Hard to believe these clouds were so dramatic! Not much done on this photo – just some LR basic processing, then in PS, Topaz (see sidebar for the website link) Denoise AI was used. Next a little Luminar (see sidebar for website link) and finished off with Viveza. All my favorite plugins!…..Digital Lady Syd
Beautiful Hawaii
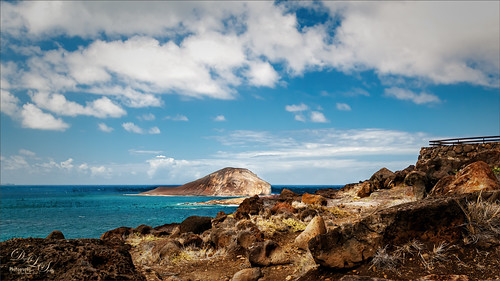
Just missing Hawaii. This image was taken at the Ka Iwi Scenic Shoreline in Oahu – great place to take pix. Just adjusted sliders in Lightroom – no presets or a local adjustments. A B&W Adjustment Layer, a Color Lookup Adjustment Layer using my preset, a Red Channel Curves Adjustment Layer, Viveza 2 to direct focus, a Spotlight Effect layer, Topaz (see sidebar for website link) DeNoise AI at 0.47 was added and applied to just the sky with a layer mask, and finally a Vignette using the Levels Adjustment Layer. Pretty much my basic workflow. ….. Digital Lady Syd
The Contortionist

This funny Green Tree Snake at the St. Augustine Alligator Farm was showing off one of his many tricks in his exhibit. He loves it when people stop by – very friendly! Not much was done on this image as he was perfectly lighted in his exhibit – apparently he likes it very warm. Topaz (see sidebar for website link)k DeNoise AI was used along with Aurora 2019. A Look Up Table Adjustment Layer and Viveza 2 was used. A Charming Font is the text font. I love this entertaining guy!…..Digital Lady Syd
Pretty in Pink

This little beauty was on display at the Harry P. Leu Gardens in Orlando, Florida – most of the flowers were not in great shape but there were a few that looked very pretty. A Hue/Saturation Adjustment Layer was used. Topaz (see sidebar for website link) DeNoise AI was also applied and lots of painting layers to even out the edges. Viveza 2 was added along with some lighten and darken Curves Adjustment Layers. The texture is from Adobe Paper Texture Pro’s panel called Brushed Rose. It was set to Hard Light blend mode, 74% layer opacity and a Properties Density of 36. That was it. Roses are so pretty to photograph!…..Digital Lady Syd
The Lioness – Need I Say More?
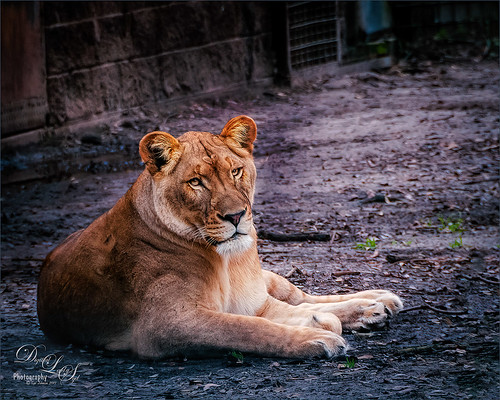
This beautiful lioness named Taum (I think) lives at the Jacksonville Zoo and looks totally regal while she watches over her domain. She was originally post-processed in Lightroom using Serge Ramelli’s Safari Animal Vignette Cold Medium (click for video to download link) and then made changes to fit this image. Overall it just gave a nice cool feel to the background. In Photoshop Topaz (see sidebar for website link) DeNoise AI was used and it just gave a very subtle effect. So the image was taken into Topaz Studio using the AI Clear Adjustment (Remove Noise Low, Enhance Sharpness High, Recover Details 0.33, Exposure -0.13, and Clarity 0.35), and the Precision Detail Adjustment (Subtle Sharp preset and in layer mask, inverted it and then painted back the lion face and end of foreground paw – middle paws were set to 0.50 and painted back just a little). This creates a very good combination for sharpness. Then just added in some contrast and a Lookup Table (Fuji Reala 500D Kodak 2393 preset) to give a moody feel to the image. That was it……Digital Lady Syd


