
Just Enjoying the Day

Just enjoyed posting an image a Bonobo Monkey at the Jacksonville Zoo – needed some wildlife post-processing practice! Used the Remove Tool, Sharpen Tool, a texture, Liquify Filter, layer for filling in hairs by painting using Coyote Mange animal hair brushes (still the best out there for this), Viveza, Lighten and Darken layers, Exposure Adjustment Layer for the eyes, Red Channel Curve Adjustment Layer, Luminar Leo Filter using my favorite Mystical effect, and Color Efex Pro Filter (an oldie but goodie for me). These are all techinques I have discussed on my Fun Photoshop Blog or my Tidbits Blog here at some time or another. As you can see, I still use them a lot. …… Digital Lady Syd
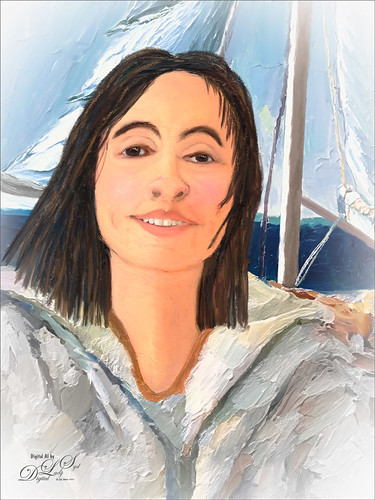
Skiing Selfie

Another one of my selfie AI-generated portraits – this time put me in a skiing background scene using the Generative Fill prompt “Oil Painting of Ski Slopes in Background” – it took several variations and had to use one background with trees and one with the skiers which was reduced in size and moved. Used the same generating process that I discussed in the last several blogs (see blog links below). Parts of the coat had splashy colors which I did not like. I found a great brush that covers without being too heavy with the paint in Kyle T. Webster’s new Winter 2024 set called Thinner Oil (this set is free to download with Adobe Photoshop subscription members – just go to the Brush Panel upper right hamburger icon’s drop down and click Get More Brushes – it is at the top). The brush Size was changed to 25 pixels and in the Dual Brush section changed the Size to 17 pixels – then saved the brush to use for painting. On a New Layer the snow was painted in using Snow Large & Heavy-use Motion Blur -70/33 brush, one of the 9 nice brushes of Serge Ramelli’s that he gives away in his How to Create Snow in Photoshop CC tutorial from several years ago. I like how the snow can be placed exactly where I want it and removed in a layer mask off parts of the face. Also added my Snow Overlay slight blur png – a black layer mask was added (ALT+click in added white layer mask) and just painted back in the smaller sized snow into the trees on the right and on the brown distant trees. To get the skin tone right, used a Gradient Fill Adjustment Layer set to Linear and white to gold to clear gradient. Added a layer mask to remove from the gold from the trees. Could go on and on – it does take a while. Each time I do one, I learn something else. Lots of fun…..Digital Lady Syd
Digital Lady Syd Additional Blogs:
At the Lake Selfie

Just having more fun creating the crazy images from my selfie (about the only one I have actually). Use the same settings as for the previous sailing selfie by creating two versions of the image. One using 55% Brightness in the HSB settings for the subject, and the other using 65% Brightness setting for the background. On subject layer, the subject was selected by using the Quick Selection Tool before running the Generative Fill with prompt Oil Painting. On the Background layer, used the Quick Selection Tool to select the background and in Generative Fill the prompt read Oil Painting Lake Background. Created image layers using the Apply Image command (see my Placing any Photoshop Generative Fill Variation on a Layer Easily blog on how to do this) and then used a layer mask to hide my original image from the background layer. The sunglasses were selected and Generative Fill was used to add in the eyes – prompt Oil Paintng Eyes (and Apply Image also used.) Then painted on several separate layers to clean up. This time Mixers were used mainly. The birds are in a set by Wavenwater. Skylum’s Neo was used to add more tone into the image. Last step was a Black and White Adjustment Layer to adjust the colors just right. Can’t believe how many different looks you can get doing this!…..Digital Lady Syd
Sailor Selfie
Just a quick blog here to show you how to get more of a realistic AI result as your subject, me in this case, and get a nice interesting background. The original is still the one of me in the car from the other pictures, except this time used both the 65% Brightness for one image, and 55% Brightness for the HSB setting for another image. By stacking the two Apply Images (see my blog Placing Any Photoshop Generative Fill Variation on a Layer Easily) from each Generative Fill layer, I was able to use a layer mask leaving the coat from the 65% layer and painting in the face from the 55% layer. Used an “Oil Painting” prompt for both layers. Created a stamped layer on top and selected the Subject in the Contextual Task Bar, which once the subject is selected turns into the Generative Fill command – must click the inverse icon to run Generative Fill to select the background. In this case the prompt was “Oil Painting small sailboat background” – it did not turn out great – no sails, just the sailboat lines. So had to select certain areas and run Gen Fill two more times for the white sails. Then lots of clean up layers which is what it often takes with the PS AI generation. Also lots of painting layers – had to use my nose, mouth and eyes from the original again – PS just is not doing that great a job with face details in my opinion. (See my blog Being One with Nature on how to do this.) And the Liquify filter and Luminar’s Neo filter were used. This may be the closest I can get to my selfie – hmmm…..Digital Lady Syd
St. Michaels Parish Church in Scotland
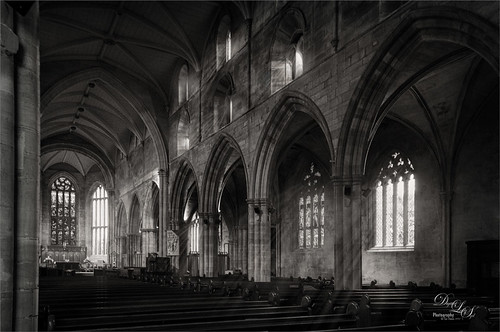
The image above is from the old Parish Church next to Linlithgow Castle, where Mary, Queen of Scotts was born in 1542 and baptized here. Recently I tried out a new technique by Joel Grimes using his YouTube video called How to Use Photoshop Brushes to Build Atmosphere and Drama. The Light Ray brush he used (and can be downloaded there) created the lovely light rays coming through the windows above. To convert to black and white, a stamped layer was taken into my old Nik Silver Efex Pro 2 (here is a link for the newer version) and just applied the Soft Sepia preset. Another stamped layer was added and taken into Luminar Neo (latest Luminar version but the older versions can be used also) using Joel’s settings. Used Kyle’s 100 px Vignette found in Kyle’s Photoshop Action Set for Artists. Last step was to apply Topaz DeNoise as it appeared just a little grainy for my taste (I used an older version and it works fine). Have not done a black and white in a while and it was fun to do…..Digital Lady Syd
Another AI Oil Painted Image of the Natural Bridge

The process used for this AI image is from Brian Mataish’s video called Photoshop Generative Fill AI Can Turn Photos into Paintings using the Quick Mask to set the partial opacity selection. Check out my blog at AI Digital Oil Painting – How To Do Fun Photoshop Blog for info on this technique. This blog is to show the post-processing after the Generative Fill was created to demonstrate what can be done with an AI generated image.
Had to use the Remove Tool/Spot Healing Brush on a layer first thing (see center of my Photoshop Beta AI with Fenced Zoo Images Fun Photoshop Blog for more on this). Then a Color Lookup Adjustment Layer using On1’s Heat Wave 7 preset (yep they work in PS too) was added. I was not happy with the results yet so this time Luminar’s Neo was opened and only my favorite filter called Mystical (a bit like the Orton Effect) was selected. It was masked so the foreground water mainly used it. A swan was added using Midnightstouch Swan Lake set brush #22 (the set is on DeviantArt) – just painted over it with my SJ Pastel-3 Painting brush (it is set to 67% opacity most of the time – see my How to Create My Favorite Brush Fun Photoshop Blog for the settings) and lowered the layer opacity to blend it in. I felt a focal point needed to be supplied. A bluish texture was applied using the Adobe Paper Texture Pro panel (Caspian) set to Saturation blend mode at 79% layer opacity, and used a Levels Adjustment Layer to fine tune the using only the color Channels (followed Aaron Nace’s video called Make Amazing Photoshop Composites Quickly-part 1 at the 22-minute point – really interesting technique). A Curves Adjustment Layer for tone was added (see Denny Tang’s site with a Tone Chart Photoshop Action to download for doing this – have been using this technique as an action for over 5 years – it’s the best way to do this and use it on almost every image). There was this ugly blob on the right side of the image which was supposed to be a tree. Selected the tree area – generated it and got what you see in this image which looks so much better. The color was off a little so a Curves Adjustment Layer was clipped to it to make it match – to clip use the first icon at the bottom. Some sparkly dots were added to add a texture interest on two different layers – one using light colors and one using darker ones. Last step used Pratik Naik’s technique (see How to Create a Fun Cartoon Tip 2 Fun Photoshop Blog – on a layer above set to Overlay blend mode – use at least a 100 px soft round brush set to Airbrush in the Options Bar and Flow at 9% and use white or light color to lighten image or black or darker – different colors give some great results – use layer opacity to lower effect) to draw the eye to the swan. Still using a pretty basic workflow!…..Digital Lady Syd


