
My Bird Buddies

Had some fun with a shot of my birds that sit on top of my kitchen cabinets. Apparently one of the guys is a little shy. (How did that happen?) This image started off Lightroom with an old preset of mine called Kuboto Warm & Tasty B&W – it gave a little bit of brown and gray tones to the image. In Photoshop Topaz (see sidebar for website link) Studio’s AI Clear Adjustment was applied. I do this on every image now. Next an AI ReMix Adjustment was added using a preset I had created called SJ Illustrated Effect (uses Ink Blog style set to Medium, Brightness -0.24, Contrast 0.57, Sat 0.75, Smooth Edge 0.21, Sharpness 0.50). Then the Radiance Adjustment was set to Light, Strength 0.50, Width 0.73, Length -0.17, and Sat 0.44 – the mask was inverted so only the thick leaves and stems were affected by this adjustment. Back in PS a Jai Johnson texture called Explorations (7) was applied and set to Hard Light blend mode. This added the beautiful golden colors. Then a second texture called Texture 01 1920 X 1080 by Frostbo at Deviant Art set to Linear Burn at 52% opacity was applied. On a New Layer Kyle Webster Impasto Kit for Photoshop (not sure it is still available) from a long time ago was set to a Subtle Touch, and a second New Layer set to Medium was added. Both were set to 0 Fill Layer – a splatter brush was used to add in the texture. This is the same effect shown in my Fun Photoshop blog called How to Create an Impasto Texture Layer Style. Last step was to add a Color Lookup table using my SJ Sharply Dark LUT (created in my Fun Photoshop blog and video called How to Create Profiles in ACR from LR Presets and Some PS LUT Files). This impasto look can really add character to an image!…..Digital Lady Syd
Enjoying the Attention
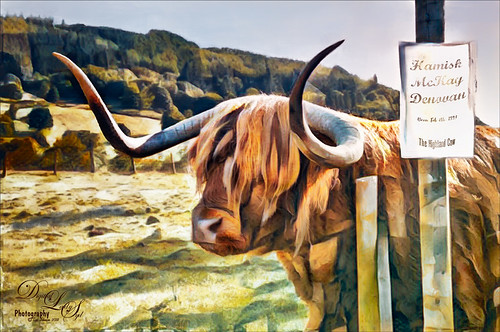
Here is an image of one of the most beloved creatures in Scotland – Hamish McKay Denovan, the Highland Cow. This guy was as tame and sweet as could be. (Another Flickr contributor noted that “Hamish the Highland Bull at Kilmahog, a popular stop off point on the road through the Trossachs to Lochaber and the western isle” in Scotland is where this guy can be found.) It had not been post-processed since it had a fence going everywhere in the image, but Photoshop’s terrific spot healing brush took the lines out completely. Just Basic Panel changes were done in Lightroom. Then in Photoshop, after removing the fencing, a stamped layer was created. Topaz Studio (see sidebar for website link) was opened and once again and three Adjustments were added, Precision Contrast and two AI ReMix (settings were: Precision Contrast: Micro -0.52, Low 0.72, Medium 0.27, High 0.45, Shadow 0.51, and Midtone 0.12; AI ReMix: Opacity 0.79, Low, Row 13/Col 2 swatch, Brightness 0.14, Contrast 1.15, Sat 0.75; and AI ReMix: Opacity 0.89, Color bm, Low, Col 17/Row 1 swatch, Painted out the animal slightly). The sign on the fence post was different and faded so I put some text in it for this highland cow – three different text layers were used, grouped, duplicated, turned off, and the copy was rasterized. Then the text could be transformed using the Warp to fit the paper. Some clean up was done and some darkening and lightening using two Curves Adjustment Layers with black layer masks. Google Nik Viveza 2 was used to emphasize the focal point. Then my final workflow steps were done: added a Red Channel Luminosity Curves adjustment layer, a Gradient Map adjustment layer using a reddish tone to light blue color gradient, added a layer for a white spotlight effect on his face, and finished up with Matt Kloskowski’s vignette. Love how the Topaz AI ReMix can produce this type of interesting texture…..Digital Lady Syd
Dodging the Fire
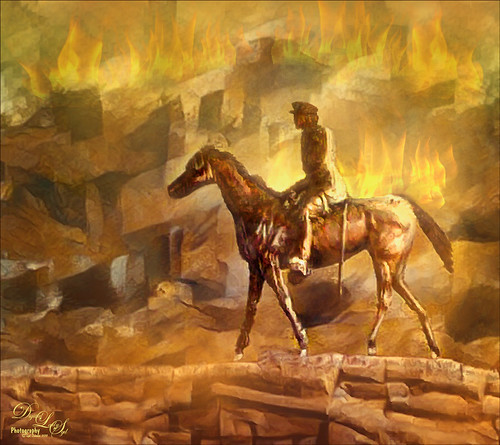
This image is a composite put together using a really bad image I took a while back of a Statue of WWI Field Marshall Earl Haig riding on a horse that was located at the entrance to Edinburgh, Scotland (it has now been relocated to outside the National War Museum inside the castle walls). As a personal challenge I decided to figure out if there was any way this major blurry image could be rescued. Surprisingly, this turned out much better than I thought was possible. First step was to try and remove some of the major blurring. The PS Shake Reduction Filter was applied and it worked just a little. Next sharpening was tried by using the Hard Mix blend mode (see my Storm on the Way Tidbits Blog) and it helped a little bit more. On a stamped layer I tried Topaz (see sidebar for website link) Infocus and it actually helped even more. Much better but still not that great. Therefore, I decided to try something different. One of my Painter backgrounds was added as a layer, and a copy of the Infocus layer was placed on top of it. A layer mask was added and just the statue was left. Next a stamped layer (CTRL+ALT+SHIFT+E) was created and Topaz Studio’s AI ReMix adjustment was added twice. (Settings were: 1st Adjustment: Style Strength Low, Row 2/Col 2 swatch, Brightness -0.17, Contrast 1.04, and Sat 0.75; and AI ReMix – 2nd Adjustment: Opacity 0.66, Style Strength Low, Row 13/Col 2, Brightness -0.55, Contrast 0.96, Sat 0.58, and Smooth Edge 0.01.) Back in PS the statue was cleaned up. The Flames Filter was opened and flames were placed in the background. Several smoke layers were created in yellow and orange tones using Grut’s FX Cloud Heft (from his fabulous cloud set) – see sidebar for website link. More flames were created in the midground area. A Pink to Beige Gradient Adjustment Layer was added to lighten up the image with some warm color – Soft Light blend mode and Linear gradient style. To finish up, a vignette was created around the rider. This was really fun to do!…..Digital Lady Syd
A Scottish Countryside Town
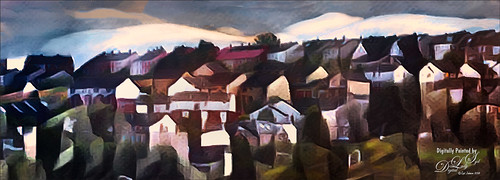
Loved how this image turned out using the new Topaz (see sidebar for website link) Studio AI ReMix Adjustment. I am finding that to get AI Remix to look really good, it helps to stack this adjustment a couple times to get an interesting look. In this case a Precision Contrast adjustment was added first, then an AI ReMix adjustment using the Row 13/Col 2 swatch, then AI ReMix adjustment was applied again using Row 6/Col 3 swatch set to Lighten color blend mode at 0.59 opacity, next an Edges adjustment set to Multiply blend mode, and finally a Color Theme adjustment to change some of the colors of the image (this adjustment seems to work best for changing the colors in these swatches). I created a preset called SJ AI Blocked Blue Look and put it up in the community group if you would like to try it. Back in PS the layer was set to the Luminosity blend mode, did a crop, and a little painting clean up was done in the background. A stamped layer (CTRL+ALT+SHIFT+E) and Nik Viveza 2 was opened and 4 control points were used to adjust the color. The last step was to go back into Topaz Studio and apply the Pony Express preset from the Simplify section. Back in PS it was set to 26% layer opacity. Last step was to add a Matt K vignette. (See my How to Create a Subtle Vignette blog). I really like the texture and color in this image…..Digital Lady Syd
The Wildebeest
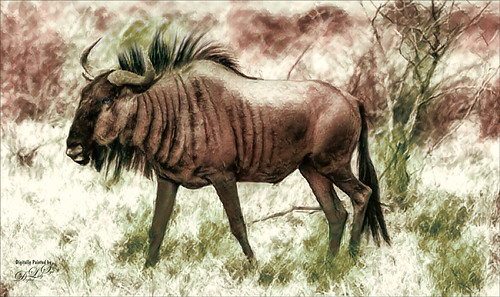
This image of a Wildebeest was in a packet of images I recently bought from Deal Jumbo in a set called Amazing Wild Animals 2 from images taken at South Africa, Namibia and Botswana. I would love to go there and take images, but will settle for this since I love animals! This is very simple post-processing – on the original image just added a Curves Adjustment Layer and a Black and White Adjustment Layer to get the contrast correct and turn the image into a black and white. Then Topaz’s (see sidebar for website link) new AI ReMix adjustment was applied. Unfortunately I lost all the setting for this, but I was able to figure out it used the last swatch in the list. Then used Color Theme adjustment to change colors around (it is the only adjustment that I find to change colors in the image after AI Remix was applied – I placed a preset called SJ Abstract Animal Effect in the Community that is similar to the above results). Back in PS, a little paint was used to adjust out the coloring in his legs which had turned very green. Created a vignette using Matt K’s technique (see my How to Create a Subtle Vignette blog). That was it. Love playing with these type of images!…..Digital Lady Syd
The Mighty Zebra
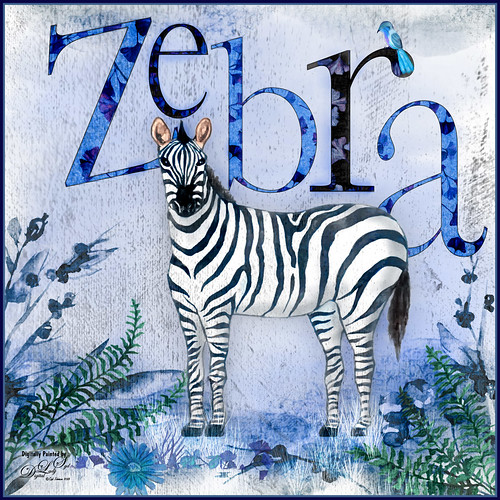
Just had a little fun with this one – started by painting a blue background with a large watercolor brush. Next added a background template by Anastezia-Luneva which added the side detail. Next a Zebra from Freepik was added. The letters from Ginko Textured Watercolor Graphics by Paperly Studio were added underneath along with the green ferns and flowers in foreground. Topaz (see sidebar for website link) Studio was opened and the new Topaz AI ReMix adjustment (see my What is Topaz AI ReMix???? blog) was applied using the swatch that looks like a B&W drawing (Col 2/Row 9). The adjustment was set to Opacity 0.47 and Overlay blend mode. Then added a Texture adjustment and used my cat painting texture (can download at my Deviant Art site) and painted the texture off the dark parts of the lettering. Last added an HSL Color Tuning adjustment and changed the Blue and Gray saturation sliders. The brush used to create the grass was from one of my very favorite natural brush sets at DeviantArt called Grass Set2 Frostbo Grass. A basic little painted bird was added. Some shading was painted onto the Zebra to give him some depth. The border is my Layer Style with sampled colors from the image (can download here). That is all that was done but it was a lot of fun to do!…..Digital Lady Syd


