
Using photoFXlab v1.1

These sculptured fish mark the entrance to a huge breakfast buffet at the Hilton Waikoloa Village where you can have breakfast with several hundred of your closest tourist friends! Since I have been trying out Topaz photoFXlab v1.1 (see sidebar for website link), I thought I would try it out on this image that was adjusted in Lightroom first. Since it has a comical appearance to it, I thought the Topaz Simplify Cartoon preset would suit this shot. Basically some minor adjustments were made to the preset and then the Adjustments tab in photoFXlab was opened and these sliders were used: Dynamics (the Topaz Adjust HDR slider and is really a great new addition) was set to 56, Sharpness 44, Highlights 49 and Shadows -34. After application of the plug-in, a Curves Adjustment Layer was added in Photoshop along with OnOne PhotoFrame lines 04 (see sidebar for website link) with color sampled from the image. That’s it! Pretty fast and I really like it. Also it did not need any more sharpening or clean up.
Not all images work out this easy in the plug-in, but it really is nice once you start using it……Digital Lady Syd
Digital Lady Syd Related Blogs:
Digital Lady Syd’s Review of Topaz photoFXlab v1.1
Topaz Adjust 5 Is Here! First Look!
 |
Topaz Adjust 5 was just released and here is my first attempt at using it. Hover over the image to see the original HDR image. (Click on sidebar Topaz 4 to go to website.) The interface has been greatly expanded to look like their very popular new plug-in Topaz Black and White Effects. This is a big improvement and I really enjoyed working with the new version of the plug-in. If you own an earlier version of Topaz Adjust, you are entitled to a free upgrade. If not, try out the trial and see what you think. They have added over 100 new presets and also included all of the ones from Topaz Adjust 4. A histogram has been added along with a really nice new Local Adjustment brush called Brush Out where the effect can be removed and a small mask shows how much is being removed (similar to Adobe Camera Raw or Lightroom’s Adjustment Brush). In the image above, it was created as a Photomatix 4 HDR using 3 images, then brought into Photoshop and processed in Topaz Adjust 5. Just a subtle sunlight feel was placed on the building. (See my blog “Quad Tones in Topaz Black and White Effects Plug-in” for colors used to create the soft sunlight effect in the Tone section.) There are so many choices and the image could be made to look more vivid and moody.
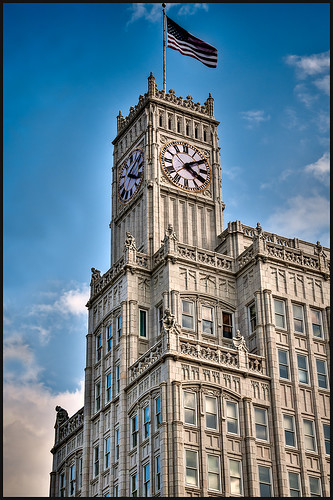
The image above is of the Lamar Life Insurance Building tower with beautiful gargoyles all around it in Jackson, Mississippi. It is a very striking looking building even in this day and age and the clock tower can be seen almost everywhere in the city. Below is a copy of a postcard from 1924 when it was built showing this beautiful building, thanks to Bill Badzo’s Flickr site. He states this about the building “…a close observation reveals it as nothing less than a scaled-down version of New York City’s Woolworth Building.” Interesting observation!

Give this new plug-in a try when you get a chance – you will not be disappointed. Lots of fun ahead of you…..Digital Lady Syd
Digital Lady Syd’s Related Blogs:
Digital Lady Syd’s Review of Topaz Adjust 5!
Little Nighttime Fun from Topaz!
Why I Love Topaz Adjust!
Combining Plug-ins – Double the Effect!
The New Film Efex-Vintage Filter From NIK CEP 4
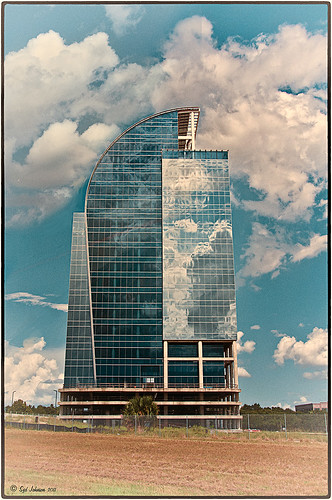 |
I love this image – the clouds reflecting in this building on I-4 in Orlando were beautiful! Hover over image to see original image. The stack contains these filter effects: Darken/Lighten Center, Brilliance/Warmth, Tonal Contrast, Image Borders, Dark Contrasts, and Film Efex: Vintage (another one of the new filters that has so many different film types that it is hard to choose one). Below is what the Film Efex: Vintage screen looks like to give you an idea of how many choices you have just for this one new filter.

In this NIK interface image, you can see how all the filter effects stack. For just this filter there are 29 film types to choose from – the one showing is Type 17 but I actually ended up using Type 11. There are so many sliders to adjust to get just the look you want. (In case you cannot read them, from top to bottom they are: Saturation, Warmth, Vignette, Brightness, Grain per Pixel, Film Strength, Film Type (drop down list) and Opacity. The Opacity slider at the bottom will do a final effect amount so the image does not look overdone. Below is another example of what a nice effect this filter will give. Only this filter with Film Type 16 was applied and it brought out the texture of the wall very nicely.

Just using this one filter and trying out different effects will be a lot of fun! Definitely give this filter a second look – much more than it appears at first glance!…..Digital Lady Syd
PS: Check out my Fun Photoshop Blog “NIK Color Efex Pro – Digital Lady Syd’s Review” and my Tidbit Blog “NIK Color Efex Pro 4 – First Try!” for more information on this great plug-in from NIK.


