
The Old 1929 Ford Model A Car

Just posting a quick blog of an antique car that is usually parked outside the Cordova Hotel (now the Casa Monica Hotel) cc 1888 in St. Augustine, Florida. Lots of fun adding an old feel to the image. After watching Unmesh Dinda’s video called 4 Luminar EXCLUSIVE Effects Photoshop Can’t Create!, I decided to use my similar image and try out the technique. From Lightroom Luminar 4 (see sidebar for website link) was opened and his steps were followed. The LUT used is from the Street Look set called 60’s B&W preset. In Photoshop used On1 (see sidebar for website link) as a plugin to add Cross Processing filter using Yellow Strong and Vintage filter using Earth – all filters were set to Opacity 59%. Now the image had a more yellow/green look so in PS a Color Adjustment Layer was added to get more of a dark purple and cyan feel. A Levels Adjustment Layer was used to adjust the overall brightness of the image. Last step was to add a subtle vignette. I love doing vintage look images. …..Digital Lady Syd
Deserted Beach on Spanish Cay
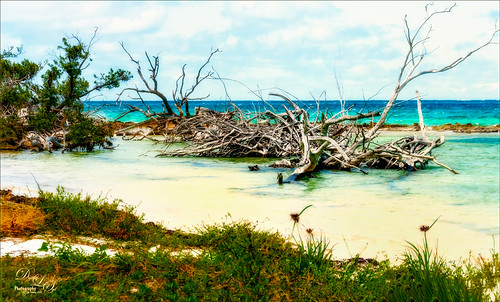
This image of a very deserted beach on Spanish Cay in the Bahamas was post-processed using the new On1 Photo Raw 2019 (see sidebar for website link). The software has had a major update and is much better. First of all, it is even faster loading your images . The next big improvement is that you can quickly switch between the Develop, Effects, Portrait (a new module) and Local tabs when accessed from Photoshop. This image used the Dynamic Contrast filter set to Natural, Glow Filter using Softlight Strong and painting out the dead trees, and Color Adjustment Filter changing the blue color a little. All the filters were set to an Opacity of 65. Then back in PS, a blue Solid Color Adjustment Layer was set to Hard Mix blend mode, layer Opacity 100%, and Fill set to 8%. Nik Viveza 2 was applied to add just a little warmth to the foreground water area. A spotlight effect was added to the wood and the edges were darkened down a little for a slight vignette effect. Last step was a Curves Adjustment Layer to add a little contrast. I will be learning more about this software soon and pass any tips along. I really like what I am seeing with the new On1 software!…..Digital Lady Syd


