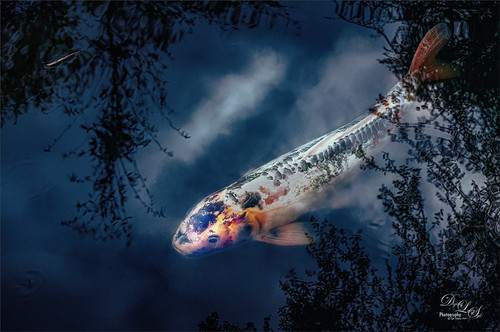
Anything Photoshop or Photography

Latest

My Magical Garden

Image of Spanish Moss at Ravine Gardens in Palatka, Florida

This Spanish Moss image was photographed at Ravine Gardens in Palatka, Florida. Since the trees do not have their leaves yet, the Moss is just hanging off the bare branches and with the sun was just rising, it gave a sort of magical feel. This image took a lot of post processing. Topaz (see sidebar for website link) Studio’s AI Clear was applied and this time the Exposure was set up to 0.53 and Clarity to 0.36 to lighten up the whole image. And a little bit of Topaz Detail was used to really sharpen up the moss effect. Some lighten and darken Curves Adjustment Layers were used to add some contrast. On a stamped layer Topaz ReStyle”s Polo Blue and Pink Lace preset was applied at 62% opacity using the Color blend mode. Another stamped layer was created and Luminar’s (see sidebar for website link) Image Radiance (this creates a really nice effect) and Cross Processing using the Auckland preset at Amount of 20 finally gave me the result I liked when set to 53% opacity. Nik Viveza 2 was used to even out all the coloring and adjust the focal point. Who knew all these filters would be needed to get this magical effect???……Digital Lady Syd

Best Friends

Image of Two Toucans at the St. Augustine Alligator Farm in Florida

Just went a little crazy here and had a bunch of fun in Topaz (see sidebar for website link) Studio! My recent trip to the St. Augustine Alligator Farm was a lot of fun but my pix of these two characters did not come out well. (They reminded me of Heckle & Jeckle from cartoon days past.) So I decided to improvise using a lot of adjustments to get this colorful Toucan image. Used AI Clear, Ai ReMix twice, Edge and HSL Color Tuning – threw them all into a preset and put it up in the Community called SJ AI ReMix Cartoon Look if you want to give it a try. Back in PS just cleaned up the image a little, and added an Exposure Adjustment Layer on the eyes (yep, use it even on cartoon looks). This was a lot of fun to create. …..Digital Lady Syd

Old Scotland

An image of Edinburgh using a Wet Plate Template effect

Decided to do something different today. This image of Scotland taken from Edinburgh Castle was created using a pretty cool template to get this vintage effect. This is a Wet Plate Template file by Photo Spirit. The file comes in as a PSD file and one of your images is inserted in the Smart Object layer provided. There are then all kinds of groups provided that can be adjusted to get the final effect you want. In this case the Light Textures group and the Dark Textures group were used. Lots of fun here and I think it gave a pretty realistic old image effect…..Digital Lady Syd

Twirling Out of Control

Just had some fun trying out a technique shared by one of my Photo Club friend Joe. Apparently this twirling technique was quite popular several years ago and it creates some really interesting results. This image started out as a macro image of purple and white pentas growing in my front yard. By adding several Radial Blur, Twirl, and Mezzotint filters, this interesting combination of lines and swirls is created. Here are links to two short and interesting videos on how to create this effect if you would like to try it yourself: The first by Steve Patterson is very well done and is called How to Create Abstract Twirl Effects in Photoshop, and the next one by Jay adds some more ideas to enhance the effect and is called The Twirl Effect Using Photoshop. I found several color schemes that worked really good with this result and finally ended up with a light more muted effect. Try Topaz (see sidebar for website link) ReStyle for some interesting results. Guess I had better get back to really post-processing some of my images. …..Digital Lady Syd

Don’t Take My Picture!!!

Image of a roaring Jaguar

This unhappy Jaguar was stomping around his terrain at the Jacksonville Zoo when I creeped up on him to get his image – he was not at all happy about it – I guess he thought I was the paparazzi. Such a beautiful cat with such a humongous roar! Anyway I got his photo in spite of his attitude and luckily he was behind a fence. Used the technique from my How to Get Rid of Those Darn Fences in Zoo Shots blog. In Lightroom I just used settings that worked, then into PS and the Topaz (see sidebar for website link) AI Clear to sharpen it up a bit more (settings: Remove Noise – Auto and Enhance Sharpness Low – Exposure -0.12 and Clarity 0.19). Actually used the Shadows and Highlights Command to pop the eyes a bit (see my The Eyes Have It – How to Make them Pop in an Image blog). Then used some Darken and Lighten Curves Adjustments Layers. The texture was an old free basic one from Jai Johnson called coffee wall, and then a Hue/Saturation Adjustment Layer was used to fine tune the background color. That meant I needed to select the Jaguar to put him on the nicer background and it took a while – those whiskers were a problem and eventually they had to be painted back in by hand. A Color Lookup Adjustment Layer was added using the Candlelight preset set to 56% layer opacity. Now just some clean up was done. This guy took several hours to really catch his personality. Wow what a cat!!!…..Digital Lady Syd

Observing the Local Terrain

Image of two Abdim's Storrks

As I stated on Flickr, these Abdim’s Storks are huge and they were not real happy about being in a rather crowded aviary at the Jacksonville Zoo. So at their request, here they are in a more appropriate setting. They seem to be quite comfortable now. First in Lightroom Serge Ramelli’s Safari Warm Dramatic Light preset was used – then adjusted his Graduated Filters and Radial Filters before bringing them into Photoshop. (For presets go to his video called How to Edit Amazing Landscape Photos in Adobe Photoshop and Lightroom.) The birds were selected using the Quick Select Tool and the Select and Mask command. Then to find a good background, I used one of Serge’s free skies called Blue Morning from his his video called Replace the Sky in 2 minutes using Photoshop Libraries. I did create a PS Library Group for these skies and added a few of my own. Then just some clean up and an Eye Exposure Adjustment Layer. Nik Viveza 2 was used to even out the color tones in their bodies and last step was a Curves Adjustment Layer. I think they look much happier……Digital Lady Syd

Happy Valentines Day

Valentines Day image of some Greater Flamingos

These beautiful birds, the Greater Flamingos which are not real bright pink like the American Flamingos, are enjoying the holiday – here they are observing some rather tree-like hearts in the pen. Since it is a holiday, I will not go into major detail on how I created this effect – it was a major trial-and-error in this case. The hearts are all from Julia Mead, a really great scrapbook object creator. The texture is called Imperfect Heart Soft Pink by Evelyn Flint (can’t find a link but it was in her Flickr feed at one time), and the font is Antalia Script. The rest is my own doing. Used so many different filters: Topaz AI Clear and AI ReMix, Luminar, and Nik Viveza 2 and Color Efex Pro 4. Lots of clean up layers and adjustment layers. Lots of fun to do. Everyone have a very Happy Valentine’s Day…..Digital Lady Syd

Please Return Me to the Jacksonville Zoo!

Image of a Black and White Lemur at the Jacksonville Zoo

This Coquerel’s Sifaka is actually a native of Madagascar and would never be caught in a snowstorm, much less at the Jacksonville Zoo in Florida. But with a great image and crazy imagination, I felt he just looked like he was in a winter coat. I spent a long time taking pictures of this guy and his buddies – they were very entertaining and those eyes! In Lightroom used one of my camera profiles that created an HDR desaturated look – then just some Basic panel adjustments. The original image was post-processed using the correct coloring of the Lemur with the green background. In PS had to remove some background items with Edit -> Content Aware Fill command. On a stamped layer Topaz (see sidebar for website link) AI Clear, Precision Detail, and HSL Color Tuning adjustments were applied. Then a Darken Curves Adjustment Layer, Nik Viveza 2, Exposure Adjustment Layer for the eyes, and PS’s Charcoal Filter setting the foreground and background colors to light green and yellow. So where did the blue color come from??? The Fuji Eterna 250D Kodak preset was applied and set to Divide at 47% layer opacity – there is the blue. Serge Ramelli’s snow brushes were used on a separate layers to add the snow effect – love these brushes! (The free Snow Brushes can be downloaded under his video called How to Create Snow in Photoshop CC.) Then just another Darken Curves Adjustment Layer to darken his coat in places and a vignette. Lots of fun here!…..Digital Lady Syd

Miss February

Image of an African Spoonbill at the Jacksonville Zoo in Florida

This big African Spoonbill just appeared to look like a calendar girl to me so I had to create an image for this. She was really huge! In Lightroom used Serge Ramelli’s Safari Warm Dramatic Light preset as a starting point – then adjusted a few sliders before coming into PS. On a duplicate layer used Topaz (see sidebar for website link) Studio’s AI Clear with Auto for Noise and High for sharpening. Used Detail on just the bird to enhance some of the feathering. Also worked on bird in Nik Viveza 2 to adjust the tones on the bird. This was a difficult image since the background was so busy. Luminar (see sidebar for website link) was used to help darken it down by using Joel Grime’s Portrait Pop the Blue preset and adjusting the vignette. A few text layers were added and that was about it. She/he is definitely intimidating!…..Digital Lady Syd

Bonobo Monkeys on the Way to the Kapok Tree

Image of Bonobo Monkeys heading over to the Kapok Tree.

Above is an image of a group of Bonobo Monkeys heading over to the Kapok tree for a day of fun. The Jacksonville Zoo recently upgraded to include this wonderful feature for various species to give them a chance to spend some time in a different environment. I was lucky enough to catch a pretty nice silhouette of the group. Not much was done to the image in PS. Two Curves Adjustment Layer were added. The background color was created by using a Selective Color Adjustment Layer and adding to the Whites Cyan (-15), Magenta (-5), Yellow (-39), and Black +3); and to the Neutrals Yellow (+16) and Blacks (+17) – it gives this beautiful yellow background coloration. A Levels Adjustment Layer was applied with the Output set to 9/255 and the Black regular tab set to 230 to slightly flatten out the black tones. And a couple clean up layers were needed for some of the tree branches. That was about it. I really like the final result…..Digital Lady Syd