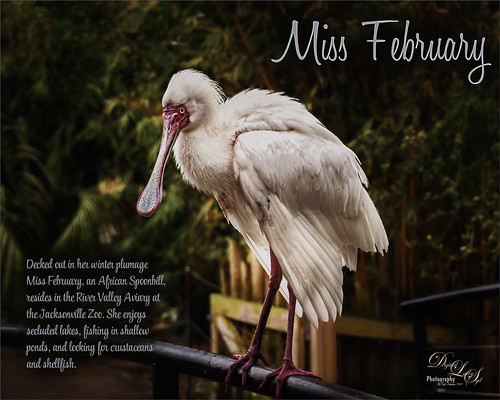
This big African Spoonbill just appeared to look like a calendar girl to me so I had to create an image for this. She was really huge! In Lightroom used Serge Ramelli’s Safari Warm Dramatic Light preset as a starting point – then adjusted a few sliders before coming into PS. On a duplicate layer used Topaz (see sidebar for website link) Studio’s AI Clear with Auto for Noise and High for sharpening. Used Detail on just the bird to enhance some of the feathering. Also worked on bird in Nik Viveza 2 to adjust the tones on the bird. This was a difficult image since the background was so busy. Luminar (see sidebar for website link) was used to help darken it down by using Joel Grime’s Portrait Pop the Blue preset and adjusting the vignette. A few text layers were added and that was about it. She/he is definitely intimidating!…..Digital Lady Syd
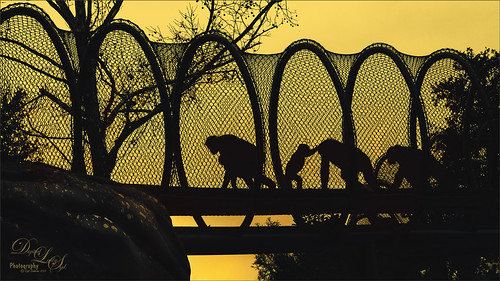
Above is an image of a group of Bonobo Monkeys heading over to the Kapok tree for a day of fun. The Jacksonville Zoo recently upgraded to include this wonderful feature for various species to give them a chance to spend some time in a different environment. I was lucky enough to catch a pretty nice silhouette of the group. Not much was done to the image in PS. Two Curves Adjustment Layer were added. The background color was created by using a Selective Color Adjustment Layer and adding to the Whites Cyan (-15), Magenta (-5), Yellow (-39), and Black +3); and to the Neutrals Yellow (+16) and Blacks (+17) – it gives this beautiful yellow background coloration. A Levels Adjustment Layer was applied with the Output set to 9/255 and the Black regular tab set to 230 to slightly flatten out the black tones. And a couple clean up layers were needed for some of the tree branches. That was about it. I really like the final result…..Digital Lady Syd
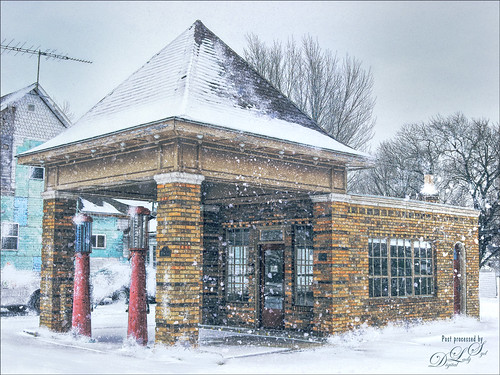
I saw this image posted on Facebook for my hometown and remembered driving by this old 1930 Hy-Red Gas Station in Greentown, Indiana, many times while growing up – apparently it is still standing and is on the National Register of Historic Places. Since Indiana is in the middle of a terrible cold spell right now, I thought I would add some more snow to it to really give this image a major wintry feel. It also gave me a chance to play with the free Snow Brushes that Serge Ramelli offered during the holidays (see under his video called How to Create Snow in Photoshop CC). I used a couple other splatter brushes to add solid snow build ups to the image (one by Melissa Gallo from a long time ago and one from Aaron Blaise). Topaz (see sidebar for website link) Studio’s AI Clear, Precision Detail and Precision Contrast Adjustments were used to really get a nice sharp effect to the image. On a stamped layer in PS, Topaz ReStyle’s Warm Steel Wash preset was applied to the image, then set to 50% layer opacity and Color blend mode – this gives it the vintage feel. Nik Viveza 2 was used to add just a soft blue color to the sky which was a total white – two control points were placed in the upper corners where the Brightness sliders were set to the negative side to add in the wintry sky color. I was really surprised how sharp the image turned out……Digital Lady Syd
Had some fun with a shot of my birds that sit on top of my kitchen cabinets. Apparently one of the guys is a little shy. (How did that happen?) This image started off Lightroom with an old preset of mine called Kuboto Warm & Tasty B&W – it gave a little bit of brown and gray tones to the image. In Photoshop Topaz (see sidebar for website link) Studio’s AI Clear Adjustment was applied. I do this on every image now. Next an AI ReMix Adjustment was added using a preset I had created called SJ Illustrated Effect (uses Ink Blog style set to Medium, Brightness -0.24, Contrast 0.57, Sat 0.75, Smooth Edge 0.21, Sharpness 0.50). Then the Radiance Adjustment was set to Light, Strength 0.50, Width 0.73, Length -0.17, and Sat 0.44 – the mask was inverted so only the thick leaves and stems were affected by this adjustment. Back in PS a Jai Johnson texture called Explorations (7) was applied and set to Hard Light blend mode. This added the beautiful golden colors. Then a second texture called Texture 01 1920 X 1080 by Frostbo at Deviant Art set to Linear Burn at 52% opacity was applied. On a New Layer Kyle Webster Impasto Kit for Photoshop (not sure it is still available) from a long time ago was set to a Subtle Touch, and a second New Layer set to Medium was added. Both were set to 0 Fill Layer – a splatter brush was used to add in the texture. This is the same effect shown in my Fun Photoshop blog called How to Create an Impasto Texture Layer Style. Last step was to add a Color Lookup table using my SJ Sharply Dark LUT (created in my Fun Photoshop blog and video called How to Create Profiles in ACR from LR Presets and Some PS LUT Files). This impasto look can really add character to an image!…..Digital Lady Syd
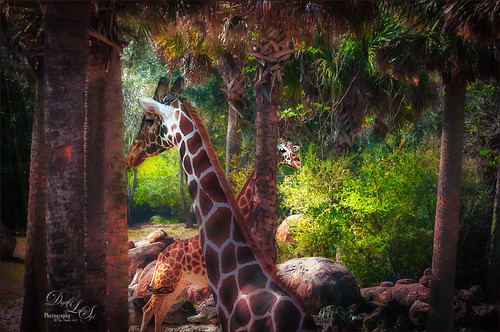
These giraffes were kind of funny when I visited them at the Jacksonville Zoo. This image is another example of using Serge Ramelli’s Safari presets that I discussed in my last Fun Photoshop blog called Showing Some of Serge Ramelli’s Effects. This image used Animal Vignette Cold Strong preset. This image also used Topaz Studio’s (see sidebar for website link) AI Clear adjustment to start in Photoshop – just the best! Then on a stamped layer, Luminar 3 (see sidebar for website link) was opened and their Dehaze, Golden Hour, Image Radiance and Sunrays filters were applied. Some clean up, including a fence removal was also done. That was it!…..Digital Lady Syd
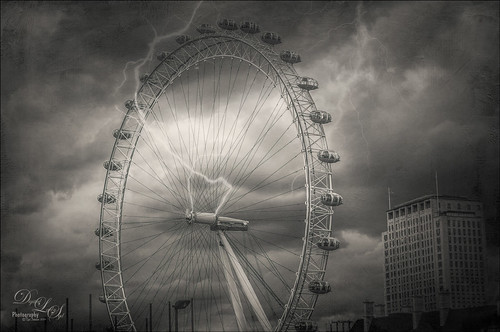
Had some fun with this image of the London Eye – I liked the black and white treatment on it as the colors were not very strong, but it was a bit boring so some lightning brushed onto the image was added. The Serge Ramelli’s B&W Medium Lighting preset was used in Lightroom to convert it to black and white. (See my Showing Some of Serge Ramelli’s Effects blog.) In Photoshop Topaz Studio’s (see sidebar for website link) AI Clear at default was applied, then Texture Effects Distressed Grunge preset. The lightning bolts were from Sparklestock’s 18 seamless Lightning Strokes no. 12 and Serge Ramelli’s lightning brush. Last step was a Curves Adjustment Layer. It looks pretty convincing to me!…..Digital Lady Syd
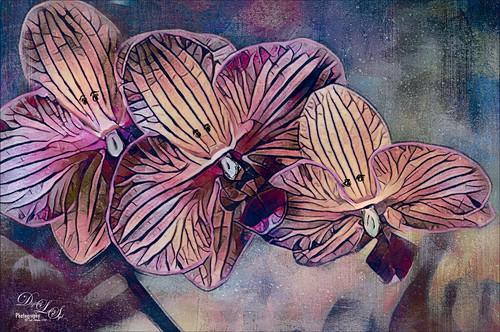
Just had some fun with these orchids again – Lots done in Topaz (see sidebar for website link). Mainly used Studio’s AI Remix Neon Rise preset, Glow Adjustment, Smudge Adjustment, and Texture Adjustment. Used French Kiss’s Solstice SeaSprite texture set to Linear Dodge at 53% layer opacity and on a stamped layer applied Topaz ReStyle’s Cream and Plum preset. Added some crazy eyes and painted a few lines for definition. Finished off with Nik Viveza 2. Totally just a fun image to create……Digital Lady Syd
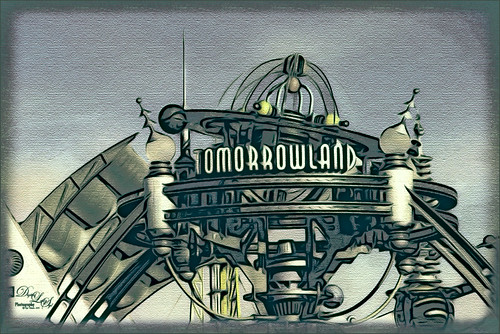
Just had some fun creating a bit of a drawing look by following Jesus Remirez’s video called Smart Way to Quickly Make Comic Book Drawings from Your Photos. For my image the Texturizer Filter was also added – it gave it a little different look. Topaz Studio was used to add the border and – used a Texture Effect called Dahlia Dreams preset. Topaz ReStyle’s Tradewind and Tana preset gives it the metallic effect which I thought looked appropriate for this image. That was about it……Digital Lady Syd
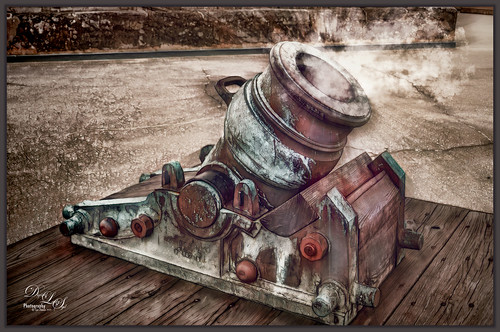
This image was taken on the top side of the Castillo de San Marcos old fort in St. Augustine, Florida. So many things were done in this image that it would take a long blog to explain. Mainly following one of Hazel Meredith’s Topaz Studio (see sidebar for website link) webinar examples from a few days ago and just started playing with all the settings and adding new adjustments like Edges Adjustment, Motion Blurs, and Color Themes. Grut’s Cloud Brushes (none better than these) were used to create the smoke from the cannon – even though they are cloud brushes, the smoke effect is very nice also. Topaz Adjust was added as a last step back in Photoshop. It took a long time to get a result I liked – many attempts to get a good look. I forget about how good Topaz’s original star plugin, Adjust, really is. This plugin gave me the final result that I really liked…..Digital Lady Syd
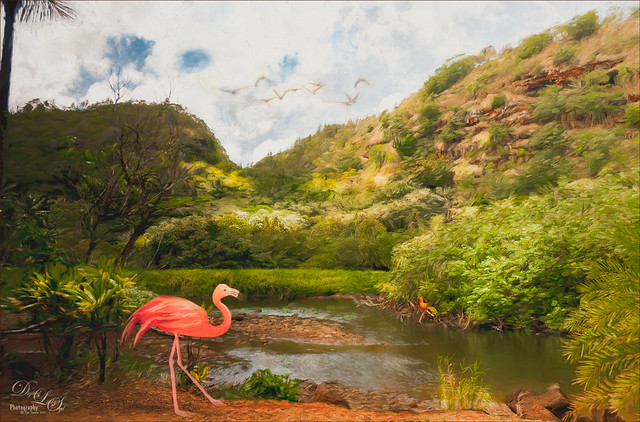
This image was created because I watched a couple really interesting videos and thought I would try them out. The original image was pretty nice, every image taken in Hawaii is usually pretty good, but it was boring. This is actually an image from Waimea Valley on Oahu. One technique I did try out was Dinda Unmesh’s technique for adding a Saturation layer mask to a Hue/Saturation adjustment layer. The video was called Saturation Mask? A Great Way to Enhance Colors. (This is very similar to my blog and video called Using Adobe Photoshop’s HSB/HSL Filter as a Saturation Mask). The Flamingo is one from PixelSquid – a polygonal looking bird that had to be painted to smooth him out. The Flying Birds are also from PixelSquid. The other bird near the water is free stock image. A shadow was created for the Flamingo using another new technique by Jesus Ramirez called How to Make Realistic Shadows in Photoshop – it used a 3D technique that was quite easy to do. Then his Color Matching in Photoshop Fast and Easy Method video was followed – this is major easy and works great using the Curves Adjustment Layer settings. Amazing! It blended all the objects into one image. Otherwise just followed my workflow to finish up and added a white painterly looking texture I created a while back. It was a lot of fun to try out some new techniques……Digital Lady Syd
Check out AI Gigapixel stand-alone software for upsizing your images. It’s incredible! And it can now be used as a plugin when in Photoshop. Also Topaz Labs Photo AI has some great sharpening and denoise tools along with Photo Video AI.
GRUT BRUSHES – Photoshop Brushes for Digital Artists
Click here to visit GrutBrushes.com
And be sure to check out his Free Brush of the Week and Brush Sampler! These are the best brushes you can find!
Topaz Studio 2 and Legacy Topaz Labs Filters
Unfortunately Topaz Studio 2 and other Topaz Lab filters are no longer available for sale as of 2020. If you had bought these filters and would like to put them back on, here is a link to the Legacy Apps where they can be downloaded again. Below is an example of the wonderful Remix AI Filter from Studio 2. The wonderful Impression still works fine in Photoshop right now along with Adjust (all versions), ReStyle, and even PhotoFXLab!
Please note that I do make a very small commission on purchases made if you click through to the websites using the links above – it helps me keep my site going. Thanks for clicking.