
Hiding in a Palm Tree

I think this is a little Eastern Bluebird female who was helping me while I cleaned up my flower beds in my front yard. Not much was done in Lightroom, and Photoshop added Viveza 2 filter to sharpen her up a bit. The light was really dark in the palm tree, but really bright behind her so it was hard to get that looking correct. A Curves Adjustment Layer was used for this. Just a slight painterly effect was added in Topaz (see sidebar for website link) Studio 2’s Impression filter. Then in PS on a few New Layers, mainly just painted in some lines in the foreground palm fronds as they were really blurred. The Camera Raw filter was used to further tweak the color in the HSL panel. Topaz Lens Effects’ Soft Olive Green Vignette preset was added. That was it!…..Digital Lady Syd
Ahh! That Feels Good

This sweet Jaguar resides the Jacksonville Zoo and seems a lot more relaxed than her crazy “cagemate” who spends most of his time prancing around his exhibit and roaring at anyone who looks at him. (See my Don’t Take My Picture!!! Tidbits Blog.) She sat posing for me and then I got this rather cute image – she looks just like a large domestic cat. Don’t think I would test this theory though! Not much was done to the image. In Lightroom the regular basic adjustments were done. In PS tried out an interesting new technique presented by Unmesh Dinda in his Free 100+ Amazing Duotone Presets for Photoshop! video. I liked the colors resulting from this technique. Used Viveza to sharpen up her face. Used a Levels Adjustment Layer to create a vignette and ended up with a Curves Adjustment Layer to add a little more contrast to the image. That was it!…..Digital Lady Syd
Bird of Paradise Bark

Took this image of a Bird of Paradise tree growing in my front yard – it is huge and has some great textures in its bark. The little spike in the middle is the beginning of a flower. This image was taken in manual mode (200 mm, F/13, 1/160 sec, ISO 200, and 0.5 EV) and just Basic work was done in Lightroom before bringing it into Photoshop. Topaz AI Clear was used to remove a little noise and sharpen it up a bit. A Gradient Map using pink and blue tones was added and set to Soft Light blend mode at 88% opacity. More blue color was added into the image on a New Layer. On a stamped layer Viveza 2 was used to sharpen up the focal point before a Curves Adjustment Layer was used to add back contrast. Very simple. Lots of fun to work with colorful patterns!…..Digital Lady Syd
Woodpecker on Guard

This little male Downy Woodpecker was visiting one of his favorite snack spots in a beautiful shaded yard. Not much was done with this image as the bokeh effect was from the 70-300 mm lens shot at 300 mm and set to f/7.1 at ISO 200, 1/50 sec and EV -1/2. In Photoshop Topaz (see sidebar for website link) Sharpen AI was used to really popped the bird (Processing Mode Stabilize, Remove Blur 0.50, and Suppress Noise 0.20). Otherwise not a lot here. Viveza 2 was used to further sharpen the bird and a Curves Adjustment Layer was added to add some contrast. What a wonderful little bird!…..Digital Lady Syd
Bison Buddies

These two Bison were trying to find a nice shady place to hide from the exceptionally hot day in Washington, DC. Since the original color in the image was so beige and brown already, it was an easy choice to make the image a sepia tone. I started with the color tones from one of the best wildlife photographer’s, Nick Brandt, creating a Lightroom very subtle preset (Split Tone section: Highlights Hue 23/Sat 6 and Shadows Hue 41/Sat 6). There was a large fence line through the bison and two different methods to remove it were used. For Wilma, just a Curves Adjustment Layer and a Hue/Saturation Adjustment Layer clipped to it. Zora was a little harder – had to select and feather the fence line and then put the selection on its own layer. Again a Curves Adjustment Layer was used, but the edges were still showing so several painting layers using Coyotemange fur and poodle curl brushes were used to sample and match the regular fur. The light color was just harder to match so you do what you have to do! Then a little text and some Viveza 2 to finish them off. ….. Digital Lady Syd
Blushing Roses

Loved the way these roses were lined up at the Harry P. Leu Gardens so I decided to give them a texture and post them. These flowers were first post processed in the updated Topaz (see sidebar for website link) Studio 2 using the Impression filter’s default with Type 03 brush, then tried out one of my old Topaz Studio 1 presets (now Looks) that was migrated over in to the new program – it had a Texture filter and a HSL Color Tuning filter. Adobe’s Paper Texture Pro was opened and the texture named Newt was added using the Overlay blend mode at 76% blend mode. Viveza 2 was used to sharpen up the top flower, and Topaz ReStyle using a preset from an old image’s colors saved down as a preset finished up the effect. I ended up with the sort of dreamy look I wanted!…..Digital Lady Syd
A Rose Hanging In There

This once beautiful rose was trying its best to show pretty even though its outer ring of leaves were pretty much spent. I decided to paint it since it had some pretty leaves and nice central rosebud. Several painting layers were created using Photoshop’s Legacy Brush called the Fan Flat Blender. I created a couple variants so color could be added easily, but it is pretty much the same brush. What is so nice is that it has a texture in the brush which adds a great effect to the mixer brush. Also Color Efex Pro 4 was added using the Darken/Lighten Center, Film Efex Vintage, and Detail Extractor filters. In PS On1’s Moody 5 Color Lookup preset was added at 61% layer opacity. And the last step was to use Viveza 2 to emphasize the center of the flower and give a slight vignette effect…..Digital Lady Syd
Flagler Beach Fishing Pier
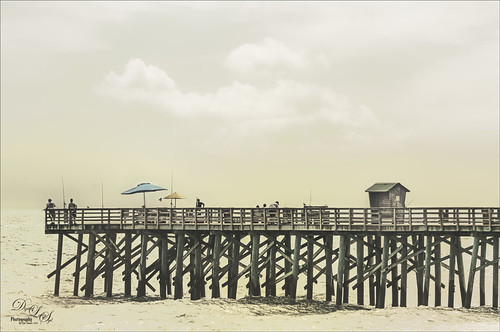
Now I love my image of the Flagler Beach Fishing Pier taken a while back. It was not that great an image so I added a new sky of the beautiful clouds taken at my house which is only 7 miles away. Luminar (see sidebar for website link) Flex was opened and many filters applied to get this sort of vintage feel to the image. A Color Look Up table was used in the Photoshop and a Gradient Overlay Adjustment Layer to get the soft colors. A little Viveza 2 was used to even out the colors for the focal points and that was it! ….. Digital Lady Syd
Look Up!
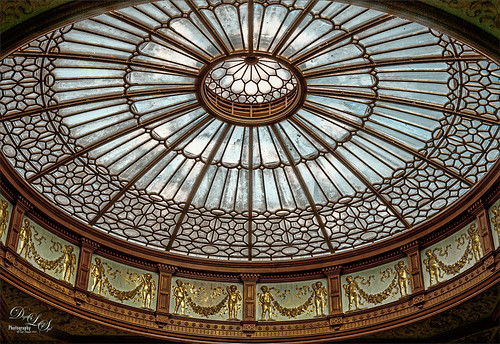
Sometimes you see something really spectacular if you just Look Up! This glass dome structure is located at the Waverley Railway Station (cc1866) in Edinburgh, Scotland. I did not think much about the image, but started playing around with it this week, and got a pretty interesting result. Just regular workflow in Lightroom. In Photoshop used the Luminar (see sidebar for website link) Flex filters – these are really fabulous, especially if you want sharp details. Details Enhancer and Structure filters were used to get that sharpness. It was converted to a black and white in Flex also and back in Photoshop set to the Darken blend mode. A PS Photo Filter Adjustment Layer using a Cyan Filter at 46% Density was added and set to 59% layer opacity. Then my favorite Grut Cloud Brush Set were used in a new layer to add the white clouds above the dome. To remove the clouds from the dome form, a Blend If Layer Style – Underlying Layer was used so the darker dome lines popped back. Last step was Viveza 2 to add a little brightness to the dome to pop it. Not sure how I missed this image!…..Digital Lady Syd
Swimming in My Secret Pool

This image was just a lot of fun to do. It was actually taken from the Harry P. Leu Gardens of the edge of large Lake Rowena. I just had to give this a fairy tale look. To achieve this effect, a Midnightstouch Swan Lake brush was used to place the swan in the scene. Luminar (see sidebar for website link) Flex was opened and on its bottom layer used these filters: Details Enhancer (be sure to check this fabulous filter out), Foliage Enhancer, Image Radiance, and Dramatic. On a layer on top, Joel Grimes Soft and Desaturated preset was applied and set to 76%. Viveza was used to sharpen up the swan. A Color Lookup Adjustment Layer used On1 Vintage Chrome preset at 60% Layer opacity. A Gradient Map using a Gray, Blue and Beige map was set to Soft Light blend mode and 46% layer opacity. Darken and Lighten Curves Adjustment Layers were added to dodge and burn and a Highlights Curves Adjustment Layer was the last step. This was a lot of fun to create this quiet looking spot. ….. Digital Lady Syd
Hibiscus Stamen

This interesting stamen was part of a huge Hibiscus flower at the Harry P. Leu Gardens in Orlando, Florida. Luminar (see sidebar for website link) Flex was used to sharpen up a stacked macro image. Then PS mixer Flat Blender was used to paint and add texture into the strokes. A variation was created to add color using the same brush. One of my Corel Painter Textures was added on top – the Blend If sliders were used to add a little more texture effect in the background. It took a while to finish up, but it was a lot of fun to create!…..Digital Lady Syd
Beautiful Leaves

This macro image was taken with my 60 mm Nikor Lens at F/2.8 with a Bower 0.5 x High Resolution Digital Lens with Macro added to the lens. This leaf image taken at the Harry P. Leu Gardens in Orlando, Florida, was actually turned into black and white in Lightroom before bringing it into Photoshop. In the Camera Raw Filter a profile called Underworld was added to turn it more of a dark blue and white which was really kind of nice. Viveza 2 was used to emphasize certain leaf parts and a Gradient Map was used to turn the color to green and white. I thought it looked more natural in green. Some clean up was done along with Darken and Lighten Curves Adjustment Layers. A Color Balance Adjustment Layer finally adjusted out the tones. A slight vignette was added to finish up!…..Digital Lady Syd
The Contortionist

This funny Green Tree Snake at the St. Augustine Alligator Farm was showing off one of his many tricks in his exhibit. He loves it when people stop by – very friendly! Not much was done on this image as he was perfectly lighted in his exhibit – apparently he likes it very warm. Topaz (see sidebar for website link)k DeNoise AI was used along with Aurora 2019. A Look Up Table Adjustment Layer and Viveza 2 was used. A Charming Font is the text font. I love this entertaining guy!…..Digital Lady Syd
Pretty in Pink

This little beauty was on display at the Harry P. Leu Gardens in Orlando, Florida – most of the flowers were not in great shape but there were a few that looked very pretty. A Hue/Saturation Adjustment Layer was used. Topaz (see sidebar for website link) DeNoise AI was also applied and lots of painting layers to even out the edges. Viveza 2 was added along with some lighten and darken Curves Adjustment Layers. The texture is from Adobe Paper Texture Pro’s panel called Brushed Rose. It was set to Hard Light blend mode, 74% layer opacity and a Properties Density of 36. That was it. Roses are so pretty to photograph!…..Digital Lady Syd
Presenting the Ragamuffins

The Harry P. Leu Gardens has a large row of these gigantic yellow flowers – totally get your attention! They look a bit like, I hate to say it, a large yellow weed. Anyway, since I totally love the color yellow, I had to figure out a way to show them in good form. The image actually took a very long time to put together since the background had to be totally removed and replaced with a painted one I did in Corel Painter previously. I won’t go through all the steps, but Luminar (see sidebar for website link) Flex was used to get the sharpness and colors and on a second layer in Flex, Sunrays filter was used – this gives the soft sky effect. (See my Luminar Flex – Exactly What is This? blog.) Viveza 2 was used to get the sharpness on the petals correct and what really created the beautiful color look was using Topaz (see sidebar for website link) ReStyle which gave me a better color palette. Lots going on here but these unusual beauties deserved it!…..Digital Lady Syd
Nik Color Efex Pro 4 Just Does It Right!

Loved the beautiful old puppets on display in one of the walkways at the Hilton Waikoloa Village on the Big Island in Hawaii. It seemed like a perfect time to once again add the Nik Color Efex Pro 4’s new Film Efex – Vintage filter. The Colorize Filter, Midnight Filter, and Image Border were then stacked on top. Finally a little Nik Viveza 2 to sharpen the elephant a bit and that was it! Love the results!…..Digital Lady Syd
Digital Lady Syd Related Blogs:
The New Film Efex-Vintage Filter From NIK CEP 4
Beautiful Daisies with Film Efex: Vintage in Nik Color Efex Pro 4
Unsharp Mask Filter In LAB Mode
(Here are my settings for the filters: Film Efex-Vintage – Saturation 10%, Warmth 79, Vignette 63, Brightness -2, Grains per pixel 500, Film Strength 80%, and Film Type 13; Colorize – Method 6, Color R143G209B219, Strength 5%; Midnight – Color Set Neutral, Blur 0, Contrast 30, Brightness 60, Color 57, Shadows 20, and Overall 78%; and Image Border – Type 3, Size 60%, and Spread 98%.)
The Macro Shot

Recently I have been working on my Macro photography, especially since I have had some beautiful flowers on my porch due to the warm winter we are having in Florida this year. One of my favorite blogs is by Mike Moats called Tiny Landscapes where he gives some great advice on taking and processing macro images. A few things I am starting to try and the above chrysanthemums are the result of one of my efforts. A 60 mm Nikkor macro lens was used at F/19 at 1/20 to 1/350 sec. A Bower 0.5 x High Resolution Digital Lens with Macro was added to the lens. I created an HDR image from five shots which is how I got the large dynamic range in the photo. After that the processing was in Nik Color Efex Pro 4 using Tonal Contrast, Detail Extractor and High Key filter effects and Viveza 2. This is the basic workflow Mike Moats uses and it works very well on macro photos. My original shot was taken with a white background but I just did not like the way it looked. Mike says if you do not like the background feel, crop tight, which is what I did. I hope to try out some of his other tips in the near future – it is a lot of fun to take those close up shots…..Digital Lady Syd
Where Am I?

This image was taken in London a few years back of The Royal Horseguards Hotel, a 5 star hotel that overlooks the River Thames near the London Eye. It is a beautiful old building that stands out from the treetops. Check out this virtual tour of the outside to see the size of the immense building!
The image was processed using OnOne’s Perfect Effects plug-in (see sidebar for website link) where a light blue-dark blue cross-processed layer was created. Next Nik’s Viveza was added to add more detail to the buildings since I cropped in pretty close from a much larger image. In Photoshop a Selective Color Adjustment Layer was next using only the Whites and adjusting the Yellow to +21 and the Black to -5 – this adds the sunny feel to the image. The Sharpen Tool was applied to the building tops and Curves Adjustment Layer to add contrast. Finally, one Florabella’s Snow Texture 3 (the link is to her Facebook page with the free download on the left side) was applied on top – the layer was set to Screen at 73% opacity. I am having so much fun playing with all the different looks you can get with the different plug-ins applied together. Try combining some of your plug-ins and see what great results you can get!…..Digital Lady Syd
Digital Lady Syd Related Blogs:
Digital Lady Syd’s Review of OnOne Perfect Effects
Another OnOne Perfect Effects Pix – Got To Love It!
Pseudo HDR in OnOne Perfect Effects
Using Nik’s Color Efex Pro 4 and Viveza Together
Digital Landscape Effects with Nik Software


