
Flagler Beach Fishing Pier
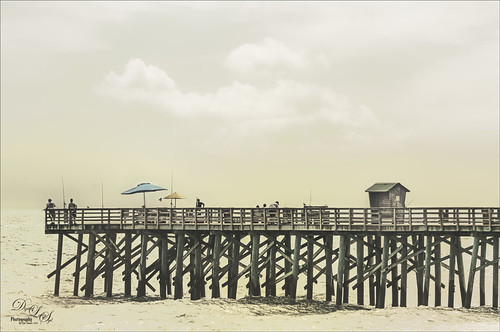
Now I love my image of the Flagler Beach Fishing Pier taken a while back. It was not that great an image so I added a new sky of the beautiful clouds taken at my house which is only 7 miles away. Luminar (see sidebar for website link) Flex was opened and many filters applied to get this sort of vintage feel to the image. A Color Look Up table was used in the Photoshop and a Gradient Overlay Adjustment Layer to get the soft colors. A little Viveza 2 was used to even out the colors for the focal points and that was it! ….. Digital Lady Syd
Look Up!
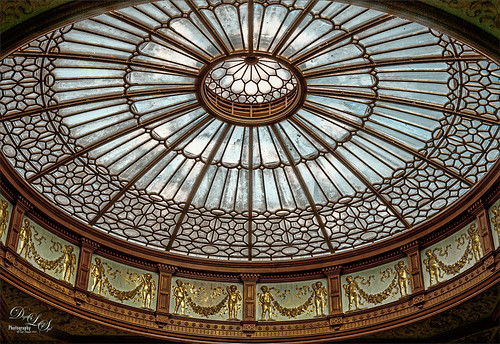
Sometimes you see something really spectacular if you just Look Up! This glass dome structure is located at the Waverley Railway Station (cc1866) in Edinburgh, Scotland. I did not think much about the image, but started playing around with it this week, and got a pretty interesting result. Just regular workflow in Lightroom. In Photoshop used the Luminar (see sidebar for website link) Flex filters – these are really fabulous, especially if you want sharp details. Details Enhancer and Structure filters were used to get that sharpness. It was converted to a black and white in Flex also and back in Photoshop set to the Darken blend mode. A PS Photo Filter Adjustment Layer using a Cyan Filter at 46% Density was added and set to 59% layer opacity. Then my favorite Grut Cloud Brush Set were used in a new layer to add the white clouds above the dome. To remove the clouds from the dome form, a Blend If Layer Style – Underlying Layer was used so the darker dome lines popped back. Last step was Viveza 2 to add a little brightness to the dome to pop it. Not sure how I missed this image!…..Digital Lady Syd
Swimming in My Secret Pool

This image was just a lot of fun to do. It was actually taken from the Harry P. Leu Gardens of the edge of large Lake Rowena. I just had to give this a fairy tale look. To achieve this effect, a Midnightstouch Swan Lake brush was used to place the swan in the scene. Luminar (see sidebar for website link) Flex was opened and on its bottom layer used these filters: Details Enhancer (be sure to check this fabulous filter out), Foliage Enhancer, Image Radiance, and Dramatic. On a layer on top, Joel Grimes Soft and Desaturated preset was applied and set to 76%. Viveza was used to sharpen up the swan. A Color Lookup Adjustment Layer used On1 Vintage Chrome preset at 60% Layer opacity. A Gradient Map using a Gray, Blue and Beige map was set to Soft Light blend mode and 46% layer opacity. Darken and Lighten Curves Adjustment Layers were added to dodge and burn and a Highlights Curves Adjustment Layer was the last step. This was a lot of fun to create this quiet looking spot. ….. Digital Lady Syd
Hibiscus Stamen

This interesting stamen was part of a huge Hibiscus flower at the Harry P. Leu Gardens in Orlando, Florida. Luminar (see sidebar for website link) Flex was used to sharpen up a stacked macro image. Then PS mixer Flat Blender was used to paint and add texture into the strokes. A variation was created to add color using the same brush. One of my Corel Painter Textures was added on top – the Blend If sliders were used to add a little more texture effect in the background. It took a while to finish up, but it was a lot of fun to create!…..Digital Lady Syd
Beautiful Leaves

This macro image was taken with my 60 mm Nikor Lens at F/2.8 with a Bower 0.5 x High Resolution Digital Lens with Macro added to the lens. This leaf image taken at the Harry P. Leu Gardens in Orlando, Florida, was actually turned into black and white in Lightroom before bringing it into Photoshop. In the Camera Raw Filter a profile called Underworld was added to turn it more of a dark blue and white which was really kind of nice. Viveza 2 was used to emphasize certain leaf parts and a Gradient Map was used to turn the color to green and white. I thought it looked more natural in green. Some clean up was done along with Darken and Lighten Curves Adjustment Layers. A Color Balance Adjustment Layer finally adjusted out the tones. A slight vignette was added to finish up!…..Digital Lady Syd
The Contortionist

This funny Green Tree Snake at the St. Augustine Alligator Farm was showing off one of his many tricks in his exhibit. He loves it when people stop by – very friendly! Not much was done on this image as he was perfectly lighted in his exhibit – apparently he likes it very warm. Topaz (see sidebar for website link)k DeNoise AI was used along with Aurora 2019. A Look Up Table Adjustment Layer and Viveza 2 was used. A Charming Font is the text font. I love this entertaining guy!…..Digital Lady Syd
Pretty in Pink

This little beauty was on display at the Harry P. Leu Gardens in Orlando, Florida – most of the flowers were not in great shape but there were a few that looked very pretty. A Hue/Saturation Adjustment Layer was used. Topaz (see sidebar for website link) DeNoise AI was also applied and lots of painting layers to even out the edges. Viveza 2 was added along with some lighten and darken Curves Adjustment Layers. The texture is from Adobe Paper Texture Pro’s panel called Brushed Rose. It was set to Hard Light blend mode, 74% layer opacity and a Properties Density of 36. That was it. Roses are so pretty to photograph!…..Digital Lady Syd
Presenting the Ragamuffins

The Harry P. Leu Gardens has a large row of these gigantic yellow flowers – totally get your attention! They look a bit like, I hate to say it, a large yellow weed. Anyway, since I totally love the color yellow, I had to figure out a way to show them in good form. The image actually took a very long time to put together since the background had to be totally removed and replaced with a painted one I did in Corel Painter previously. I won’t go through all the steps, but Luminar (see sidebar for website link) Flex was used to get the sharpness and colors and on a second layer in Flex, Sunrays filter was used – this gives the soft sky effect. (See my Luminar Flex – Exactly What is This? blog.) Viveza 2 was used to get the sharpness on the petals correct and what really created the beautiful color look was using Topaz (see sidebar for website link) ReStyle which gave me a better color palette. Lots going on here but these unusual beauties deserved it!…..Digital Lady Syd
Sweating Plant

This Pink Pineapple Plant was really not sweating, it was being watered to keep it from getting too hot on a very hot day at the Harry P. Leu Gardens in Orlando, Florida. The water drops were quite stunning. There is a pineapple attached on the lower left. This plant image was very simple to post process – used a little of the new Texture slider in Lightroom before going to Photoshop. Then used Luminar Flex (see my Luminar Flex – Exactly What is This? blog) – this time just Accent AI Filter, Advanced Contrast and just Shadows slider, and Details Enhancer where it was only applied to the edges with a mask where the water drops are. Back in PS just used Viveza 2, one of my Lookup Tables set to 44%, and a Spotlight Effect on the center of the plant. What a little beauty hidden in this gigantic garden!…..Digital Lady Syd
Candle Lilies

Had some fun with these beautiful white day lilies taken in the bright sunshine at the Harry P. Leu Gardens in Orlando, Florida. To get the golden color in the flowers, one of Serge Ramelli’s LR presets, Safari Warm Dramatic Strong, was used and then just some basic changes were done. In PS a High Pass layer was created to sharpen the image. Then Lighten and Darken Curves Adjustment Layers were used. A Color Lookup Adjustment Layer using Kodak 5218 Kodak 2395 preset was applied at 55% layer opacity. Then a Gradient Layer Adjustment Layer selecting Sepia 5 as a gradient was added next and set to Soft Light blend mode and 57% layer opacity. Viveza 2 was used to finish up. I like the surreal candle effect. …..Digital Lady Syd
Monarch Butterfly’s Magical Dust

This was one of many lovely Monarch and other types of butterflies that were very busy spreading the magic dust to the beautiful flowers that were in bloom at the Harry P. Leu Gardens in Orlando, Florida. This image took me forever to decide what to do with it! It had a really distracting background with all the crazy leaves going all over the place – it was a hard image to capture as the butterflies were going crazy on the hot day I visited. In Photoshop Luminar’s (see sidebar for website link) Flex was used to calm it down some and add some structure to the butterfly, then Viveza 2 twice to try and soften the background, before using Topaz (see sidebar for website link) ReStyle to get the final color palette. That’s along with some painting, spotlight effect, and Red Channel Curves Adjustment Layer. I think I finally got the mystical magical effect I was trying to create……Digital Lady Syd
Splendiferous Bougainvillea

The beautiful blooms above are growing in my front yard right now – they are quite pretty and textured. Shot manually My 60 mm Nikkor macro lens was used with a Bower 0.5 x High Resolution Digital Lens with Macro added to the lens. I always love the results of this lens. Luminar 3 (see sidebar for website link) was used to bring out the detail (used Structure, Details Enhance, Image Radiance, and Top and Bottom filters). A mixer brush was used to smooth out the background. The font is called Beauty Angelique. Nik Viveza 2 was used to further highlight the focal area. That was it!…..Digital Lady Syd
The Lioness – Need I Say More?
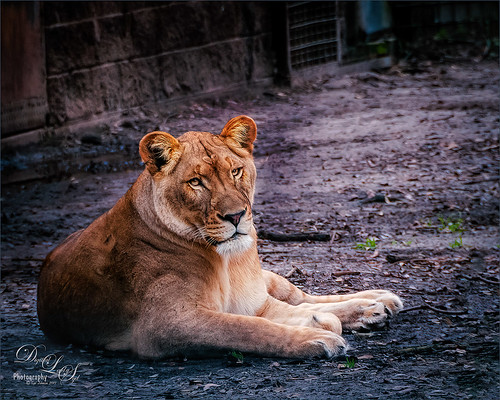
This beautiful lioness named Taum (I think) lives at the Jacksonville Zoo and looks totally regal while she watches over her domain. She was originally post-processed in Lightroom using Serge Ramelli’s Safari Animal Vignette Cold Medium (click for video to download link) and then made changes to fit this image. Overall it just gave a nice cool feel to the background. In Photoshop Topaz (see sidebar for website link) DeNoise AI was used and it just gave a very subtle effect. So the image was taken into Topaz Studio using the AI Clear Adjustment (Remove Noise Low, Enhance Sharpness High, Recover Details 0.33, Exposure -0.13, and Clarity 0.35), and the Precision Detail Adjustment (Subtle Sharp preset and in layer mask, inverted it and then painted back the lion face and end of foreground paw – middle paws were set to 0.50 and painted back just a little). This creates a very good combination for sharpness. Then just added in some contrast and a Lookup Table (Fuji Reala 500D Kodak 2393 preset) to give a moody feel to the image. That was it……Digital Lady Syd
Just Catching a Few Rays
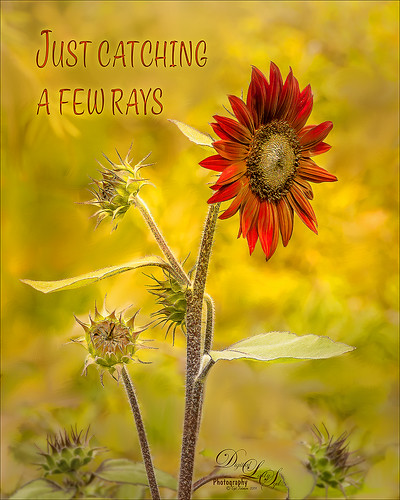
I loved this beautiful red Sunflower taken at the Harry P. Leu Gardens in Orlando, Florida. The color is so striking. I put the flower in a warm background since it was so busy – used a soft mixer brush by David Belliveau (his brushes are really good) to smooth out any unusual lines or blobs. Topaz (see sidebar for website link) Sharpen AI set to Stabilize and both sliders to 50 to get a super sharp image. Nik Viveza 2 was used to sharpen the little buds individually and the center of the main flower. Text was one of my favorites fonts called Style Casual. An Inner Glow and Outer Glow layer style was added to the type. A Spotlight Effect using a white color to emphasize the center of the flower to draw the eye a little more. A slight vignette was created using Unmesh Dinda’s Levels Adjustment Layer technique. The last step was to create a Stamped Layer (CTRL+ALT+SHIFT+E) on top and a Gaussian Blur set to a Radius of 4.3. Then in a layer mask, the Gradient Tool set black to white and a Linear Gradient was used on just the bottom so only the very bottom buds were blurred out a little. The main stems were painted back at 50% brush opacity. That was it. I love the yellow and red color palette. ….. Digital Lady Syd
Another “Uptown Girl”

Enjoyed creating this double exposure in Photoshop – had not done a lot of this so it was fun to try out a new tutorial to see how it went. This time a video called How to Combine Double Exposure and Selective Color Design in Photoshop by Ahmad Salahuddin was followed. (No voice so you have to watch carefully, but he has provided resources to download to follow along – very helpful.) To get the effect, the text (the font is called Adrenaline Brush) has to be set to white and clipped to the selected portrait layer (Unsplash-Portrait of a Young Woman, Florina, Greece by Pete Bellis) and then duplicated, set to black, and moved under the image. Then the image to fill up the portrait is placed on top and set to Lighten blend mode – duplicated and flipped so the words all fill up with the image. Finally the NYC image (from 20 Free New York Photos Deeezy image 05) was placed underneath – it was reduced to a sketch by using Topaz (see sidebar for website link) Studio’s Black Only II preset set to 48%. A Hue/Saturation Adjustment Layer was clipped to the NYC image and the lines were set to brownish color. The last step involved taking a Composite (stamped) layer into Topaz ReStyle and applying the Surf and Tallow preset. I was surprised how nice the final image came out. Lots of fun!…..Digital Lady Syd
Pink in Its Full Glory

This image of the beautiful pink Azaleas in bloom at the Ravine Gardens State Park in Palatka, Florida, was pretty difficult to post-process. It was taken around 9 AM in the morning, which was still enough sun to cause shadow problems on a sunny day. Listened to Matt Kloskowsky’s video called Channel Masks and Spring Color where he adjusted a similar type image. It really helped cut down on the overall sharp shadow effect and brought in the colors nicely. I can also say I used several of my own tricks and tips from my recent blogs on Topaz (see sidebar for website link) Sharpen AI, dodging and burning, spotlight effects, and vignetting. This actually looks pretty close to what I was seeing. Amazing!…..Digital Lady Syd
Hanging in There!
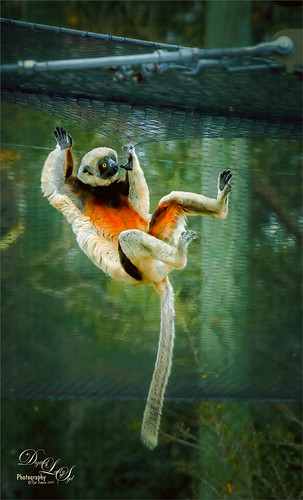
This Coquerel’s Sifaka monkey was having so much fun when I was at the Jacksonville Zoo recently – couldn’t help but smile and watch him. This image was done in blue tones first, and Topaz (see sidebar for website link) Studio’s Basic Adjustment and AI Clear were applied. Then the Impression Adjustment was added using the default settings and a mask to bring back the monkey and the netting above. An Image Adjustment was added and the original image was placed in the Background. A layer mask was used to paint the monkey back and the overall adjustment was set to 0.54. At this point the image was saved as a tiff and opened in Topaz AI Gigapixel as the size of the monkey was very small in the image – it was enlarged by 2 times. The Tiff file was then opened in PS and Topaz ReStyle plugin’s Grass Swing preset was selected to bring out all these beautiful fun colors. Quite a bit of clean up and painting was needed to get the final effect. Just had a lot of fun doing this image. …… Digital Lady Syd
Lunch at Its Best

I think this place is perfect for having a nice lunch on a warm sunny day. Scotland does not get days like this very often so these locals were enjoying themselves. I see the tourists coming up the block though. I have to be honest I am not totally sure what I did to create the look in this image. I like the final effect though. Topaz (see sidebar for website info) Studio’s AI Clear was applied. Then back in Photoshop Topaz Simplify was applied using the BuzSim preset. Then Topaz Sharpening AI set to Focus was used. A High Pass Filter was used to sharpen up some of the details. Then back into Topaz Studio where an Abstract Adjustment was applied and an AI ReMix Adjustment. In PS the Rough Pastels filter and the Dry Brush filter was applied. A Darken and Lighten Curves Adjustment Layers were applied. A Noise Gradient Map Adjustment Layer was applied and a Foggy Night preset in the Color Lookup was added. There were some painting layers and other things, and I think I was going nuts by the time I finished this. Anyway, I like the overall look but I don’t think I could reproduce the effect. ….. Digital Lady Syd
How Did This Happen?
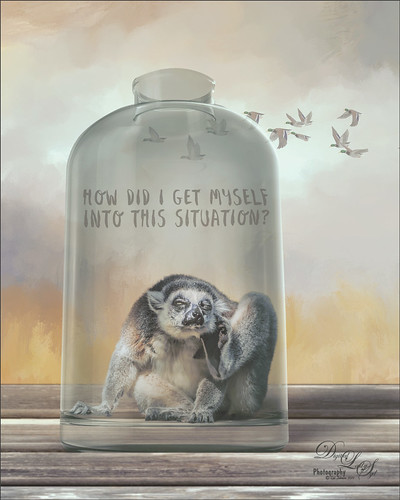
I had initially post-processed the Lemur as its own image. Then I ran across a nice video by Jesus Ramirez called The Best Way to Select and Mask Glass (or Transparent Objects in Photoshop. I had to try it and that is how my Lemur buddy ended up in a bottle. The original Ring-Tailed Lemur image was taken at the St. Augustine Alligator Farm in Florida. This image used a Noise Gradient Map Adjustment Layer (see my How to Randomize Some Color with the Gradient Map Adjustment Layer blog). The Lemur was selected out of my original image that I may post sometime and was run through the Select and Mask command before moving him into a glass bottle from Pixel Squid. The flying Canadian Geese are also from Pixel Squid. The background is one I painted in Corel Painter and the wood is a texture from Kelby One. Just a lot of fun to put together!…..Digital Lady Syd
My Magical Garden

This Spanish Moss image was photographed at Ravine Gardens in Palatka, Florida. Since the trees do not have their leaves yet, the Moss is just hanging off the bare branches and with the sun was just rising, it gave a sort of magical feel. This image took a lot of post processing. Topaz (see sidebar for website link) Studio’s AI Clear was applied and this time the Exposure was set up to 0.53 and Clarity to 0.36 to lighten up the whole image. And a little bit of Topaz Detail was used to really sharpen up the moss effect. Some lighten and darken Curves Adjustment Layers were used to add some contrast. On a stamped layer Topaz ReStyle”s Polo Blue and Pink Lace preset was applied at 62% opacity using the Color blend mode. Another stamped layer was created and Luminar’s (see sidebar for website link) Image Radiance (this creates a really nice effect) and Cross Processing using the Auckland preset at Amount of 20 finally gave me the result I liked when set to 53% opacity. Nik Viveza 2 was used to even out all the coloring and adjust the focal point. Who knew all these filters would be needed to get this magical effect???……Digital Lady Syd
Best Friends
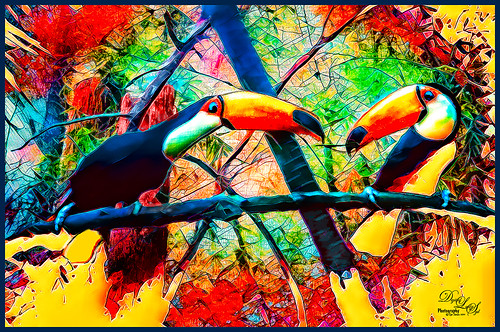
Just went a little crazy here and had a bunch of fun in Topaz (see sidebar for website link) Studio! My recent trip to the St. Augustine Alligator Farm was a lot of fun but my pix of these two characters did not come out well. (They reminded me of Heckle & Jeckle from cartoon days past.) So I decided to improvise using a lot of adjustments to get this colorful Toucan image. Used AI Clear, Ai ReMix twice, Edge and HSL Color Tuning – threw them all into a preset and put it up in the Community called SJ AI ReMix Cartoon Look if you want to give it a try. Back in PS just cleaned up the image a little, and added an Exposure Adjustment Layer on the eyes (yep, use it even on cartoon looks). This was a lot of fun to create. …..Digital Lady Syd
Twirling Out of Control
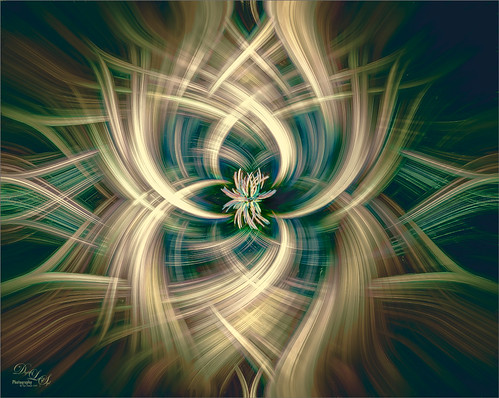
Just had some fun trying out a technique shared by one of my Photo Club friend Joe. Apparently this twirling technique was quite popular several years ago and it creates some really interesting results. This image started out as a macro image of purple and white pentas growing in my front yard. By adding several Radial Blur, Twirl, and Mezzotint filters, this interesting combination of lines and swirls is created. Here are links to two short and interesting videos on how to create this effect if you would like to try it yourself: The first by Steve Patterson is very well done and is called How to Create Abstract Twirl Effects in Photoshop, and the next one by Jay adds some more ideas to enhance the effect and is called The Twirl Effect Using Photoshop. I found several color schemes that worked really good with this result and finally ended up with a light more muted effect. Try Topaz (see sidebar for website link) ReStyle for some interesting results. Guess I had better get back to really post-processing some of my images. …..Digital Lady Syd
Happy Valentines Day
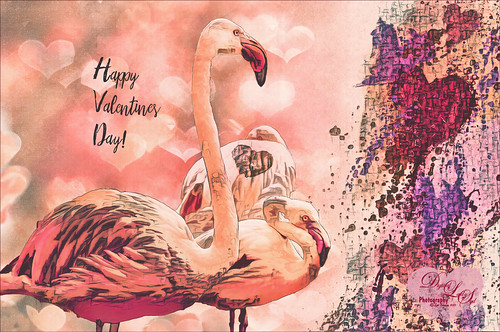
These beautiful birds, the Greater Flamingos which are not real bright pink like the American Flamingos, are enjoying the holiday – here they are observing some rather tree-like hearts in the pen. Since it is a holiday, I will not go into major detail on how I created this effect – it was a major trial-and-error in this case. The hearts are all from Julia Mead, a really great scrapbook object creator. The texture is called Imperfect Heart Soft Pink by Evelyn Flint (can’t find a link but it was in her Flickr feed at one time), and the font is Antalia Script. The rest is my own doing. Used so many different filters: Topaz AI Clear and AI ReMix, Luminar, and Nik Viveza 2 and Color Efex Pro 4. Lots of clean up layers and adjustment layers. Lots of fun to do. Everyone have a very Happy Valentine’s Day…..Digital Lady Syd
Please Return Me to the Jacksonville Zoo!
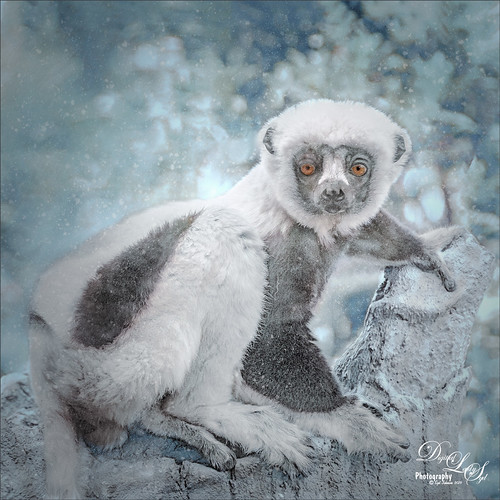
This Coquerel’s Sifaka is actually a native of Madagascar and would never be caught in a snowstorm, much less at the Jacksonville Zoo in Florida. But with a great image and crazy imagination, I felt he just looked like he was in a winter coat. I spent a long time taking pictures of this guy and his buddies – they were very entertaining and those eyes! In Lightroom used one of my camera profiles that created an HDR desaturated look – then just some Basic panel adjustments. The original image was post-processed using the correct coloring of the Lemur with the green background. In PS had to remove some background items with Edit -> Content Aware Fill command. On a stamped layer Topaz (see sidebar for website link) AI Clear, Precision Detail, and HSL Color Tuning adjustments were applied. Then a Darken Curves Adjustment Layer, Nik Viveza 2, Exposure Adjustment Layer for the eyes, and PS’s Charcoal Filter setting the foreground and background colors to light green and yellow. So where did the blue color come from??? The Fuji Eterna 250D Kodak preset was applied and set to Divide at 47% layer opacity – there is the blue. Serge Ramelli’s snow brushes were used on a separate layers to add the snow effect – love these brushes! (The free Snow Brushes can be downloaded under his video called How to Create Snow in Photoshop CC.) Then just another Darken Curves Adjustment Layer to darken his coat in places and a vignette. Lots of fun here!…..Digital Lady Syd


