
Paris 1920

Just had fun with this one. Took a very blurry snapshot from an old colored short video of the streets of Paris. I actually wanted a copy of the dress one of the ladies was wearing in a different segment for drawing, and thought this interesting cafe image would be fun for try out. Just good ole’ Topaz plug-ins were used on this image. On a duplicate layer Topaz Studio 2 was opened and AI ReMix Crinkled Portrait preset was used changing some of the Brightness and Color sliders in the panel. Then on a New Layer above, Topaz ReStyle was opened to add the final effect using a preset called Midday Hay Fields. A Black & White, Color Balance, Levels and Selective Color Adjustment Layers were add and some text using the Broadway Engraved BT font. Enjoyed going back to my basic filters!…..Digital Lady Syd
Queen Emma Lily Dressed Up
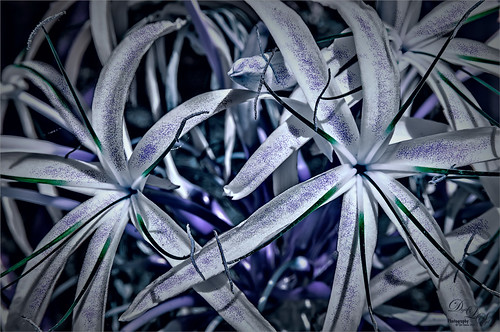
Have been practicing my Macro Photography recently and decided to give some of my very favorite blossoms a different look. Today we are adding an inverted image (CTRL+I in thumbnail – then set to Color blend mode) showing greens and blues instead of the traditional reds and whites to our collection. These beautiful blossoms were accented with some purple glitter thanks to Kyle’s Concept Brush Small Branch Mix in PS that was converted to a Mixer, thanks to the expertise of Nicolai at Grut Brushes – did you know you can convert any brush into a Mixer by simply clicking on the Mixer brush and ALT+CTRL clicking on a regular brush in the Brushes Panel? That’s what was done here on a New Layer and set to Linar Burn blend mode. Some Sharpening was done using the new updated Topaz (see sidebar for website link) Sharpen AI filter and Lucis Pro. Topaz ReStyle’s Warm Steel Wash preset applied to further enhance the color to the Lily. Last step was to use a Levels Adjustment Layer vignette to further enhance the beautiful blossoms. Yes, the Lily is definitely ready for Spring Holiday Extravaganzas. ….. Digital Lady Syd
A Vintage Gas Station

Had a lot of fun colorizing this vintage image taken in 1941 in Minneapolis, Minnesota, using mostly the settings from my recent blog called How to Convert Black and White Images to Colorful Paintings with Topaz Studio 2. Click here to see the black and white photo at Shorpy.com. In the Look I settings I provided, the unchecked ReMix AI was turned on and the Eye of the Storm style set to a High strength and the Overlay blend mode (Brightness -0.41, Contrast 1.42 and Hue -1.00 sliders). The Quad Tone Filter was added on top and the Strength was set to 0.65 – this added a little color in the sky and reduces the color around the flags. Back in Photoshop Viveza 2 was added and the attendant was highlighted to emphasize him a little. On a stamped layer Topaz (see sidebar for website link) Restyle was added using the Butterfly Wings preset – the ReStyle Opacity was set to 30% and the blend mode to Multiply. Give this a try if you have Topaz Studio!…..Digital Lady Syd
Blushing Roses

Loved the way these roses were lined up at the Harry P. Leu Gardens so I decided to give them a texture and post them. These flowers were first post processed in the updated Topaz (see sidebar for website link) Studio 2 using the Impression filter’s default with Type 03 brush, then tried out one of my old Topaz Studio 1 presets (now Looks) that was migrated over in to the new program – it had a Texture filter and a HSL Color Tuning filter. Adobe’s Paper Texture Pro was opened and the texture named Newt was added using the Overlay blend mode at 76% blend mode. Viveza 2 was used to sharpen up the top flower, and Topaz ReStyle using a preset from an old image’s colors saved down as a preset finished up the effect. I ended up with the sort of dreamy look I wanted!…..Digital Lady Syd
Presenting the Ragamuffins

The Harry P. Leu Gardens has a large row of these gigantic yellow flowers – totally get your attention! They look a bit like, I hate to say it, a large yellow weed. Anyway, since I totally love the color yellow, I had to figure out a way to show them in good form. The image actually took a very long time to put together since the background had to be totally removed and replaced with a painted one I did in Corel Painter previously. I won’t go through all the steps, but Luminar (see sidebar for website link) Flex was used to get the sharpness and colors and on a second layer in Flex, Sunrays filter was used – this gives the soft sky effect. (See my Luminar Flex – Exactly What is This? blog.) Viveza 2 was used to get the sharpness on the petals correct and what really created the beautiful color look was using Topaz (see sidebar for website link) ReStyle which gave me a better color palette. Lots going on here but these unusual beauties deserved it!…..Digital Lady Syd
Monarch Butterfly’s Magical Dust

This was one of many lovely Monarch and other types of butterflies that were very busy spreading the magic dust to the beautiful flowers that were in bloom at the Harry P. Leu Gardens in Orlando, Florida. This image took me forever to decide what to do with it! It had a really distracting background with all the crazy leaves going all over the place – it was a hard image to capture as the butterflies were going crazy on the hot day I visited. In Photoshop Luminar’s (see sidebar for website link) Flex was used to calm it down some and add some structure to the butterfly, then Viveza 2 twice to try and soften the background, before using Topaz (see sidebar for website link) ReStyle to get the final color palette. That’s along with some painting, spotlight effect, and Red Channel Curves Adjustment Layer. I think I finally got the mystical magical effect I was trying to create……Digital Lady Syd
Another “Uptown Girl”

Enjoyed creating this double exposure in Photoshop – had not done a lot of this so it was fun to try out a new tutorial to see how it went. This time a video called How to Combine Double Exposure and Selective Color Design in Photoshop by Ahmad Salahuddin was followed. (No voice so you have to watch carefully, but he has provided resources to download to follow along – very helpful.) To get the effect, the text (the font is called Adrenaline Brush) has to be set to white and clipped to the selected portrait layer (Unsplash-Portrait of a Young Woman, Florina, Greece by Pete Bellis) and then duplicated, set to black, and moved under the image. Then the image to fill up the portrait is placed on top and set to Lighten blend mode – duplicated and flipped so the words all fill up with the image. Finally the NYC image (from 20 Free New York Photos Deeezy image 05) was placed underneath – it was reduced to a sketch by using Topaz (see sidebar for website link) Studio’s Black Only II preset set to 48%. A Hue/Saturation Adjustment Layer was clipped to the NYC image and the lines were set to brownish color. The last step involved taking a Composite (stamped) layer into Topaz ReStyle and applying the Surf and Tallow preset. I was surprised how nice the final image came out. Lots of fun!…..Digital Lady Syd
A Frozen World
This image is another view of the trail at Ravine Gardens State Park in Palatka, Florida. This time it was given a frosty feel – just felt like doing something different with it. Topaz (see sidebar for website link) Studio’s preset Paint by Numbers was used to get this sort of half painted effect – and the original image was loaded over the effect using an Image Adjustment Layer. Back in PS Topaz ReStyle’s Snow Cover II preset was used to give the wintry look. The birds were added and a Pattern Fill Adjustment Layer was used to give the texture in them. ….. Digital Lady Syd
Hanging in There!
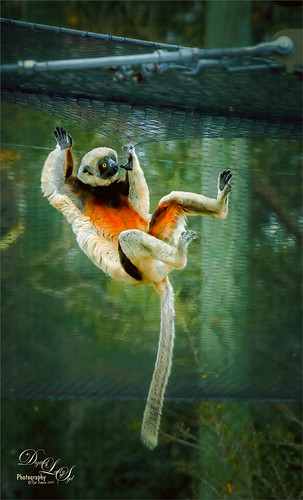
This Coquerel’s Sifaka monkey was having so much fun when I was at the Jacksonville Zoo recently – couldn’t help but smile and watch him. This image was done in blue tones first, and Topaz (see sidebar for website link) Studio’s Basic Adjustment and AI Clear were applied. Then the Impression Adjustment was added using the default settings and a mask to bring back the monkey and the netting above. An Image Adjustment was added and the original image was placed in the Background. A layer mask was used to paint the monkey back and the overall adjustment was set to 0.54. At this point the image was saved as a tiff and opened in Topaz AI Gigapixel as the size of the monkey was very small in the image – it was enlarged by 2 times. The Tiff file was then opened in PS and Topaz ReStyle plugin’s Grass Swing preset was selected to bring out all these beautiful fun colors. Quite a bit of clean up and painting was needed to get the final effect. Just had a lot of fun doing this image. …… Digital Lady Syd
Hiding in the Shadows of a Tree?
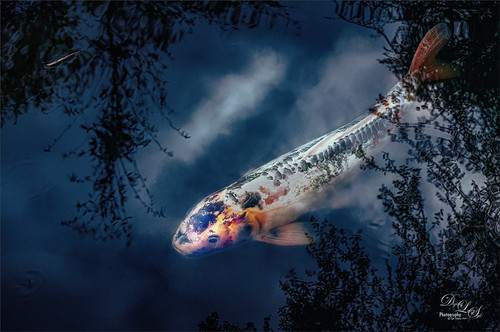
Took this image of the colorful Koi in the Asian Bamboo Gardens pond at the Jacksonville Zoo in Florida. The fish almost looks like he is in a tree but those are just reflections of the large trees around the pond. Topaz (see sidebar for website link) Studio’s AI Clear Adjustment was used on the fish along with the Edge Adjustment to define his body edges and details a little more clearly. Dehaze was also applied at 0.89, a pretty heavy amount to clear up the hazy water. In PS Topaz’s new Sharpen AI filter was set to Stabilize at an amount of 70. (See my Topaz Sharpen AI – Good or Bad? And Yes, Free Upgrade for Topaz Infocus Owners blog for more info.) Back in Photoshop, Topaz Restyle’s Swamp and Sherpa Blue preset was applied. Then on top one of my own Lookup Tables was applied at 40% layer opacity. The last step used a slight spotlight effect on the Koi’s head. There were several quite beautiful large fish in this pond that made it look very interesting. ….. Digital Lady Syd
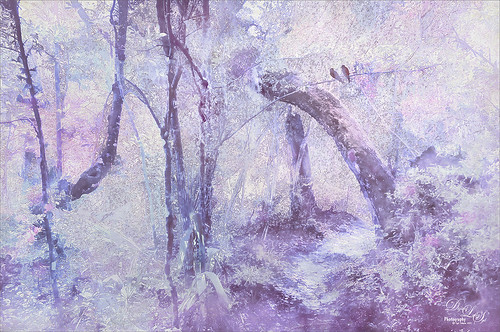
My Magical Garden

This Spanish Moss image was photographed at Ravine Gardens in Palatka, Florida. Since the trees do not have their leaves yet, the Moss is just hanging off the bare branches and with the sun was just rising, it gave a sort of magical feel. This image took a lot of post processing. Topaz (see sidebar for website link) Studio’s AI Clear was applied and this time the Exposure was set up to 0.53 and Clarity to 0.36 to lighten up the whole image. And a little bit of Topaz Detail was used to really sharpen up the moss effect. Some lighten and darken Curves Adjustment Layers were used to add some contrast. On a stamped layer Topaz ReStyle”s Polo Blue and Pink Lace preset was applied at 62% opacity using the Color blend mode. Another stamped layer was created and Luminar’s (see sidebar for website link) Image Radiance (this creates a really nice effect) and Cross Processing using the Auckland preset at Amount of 20 finally gave me the result I liked when set to 53% opacity. Nik Viveza 2 was used to even out all the coloring and adjust the focal point. Who knew all these filters would be needed to get this magical effect???……Digital Lady Syd
Twirling Out of Control
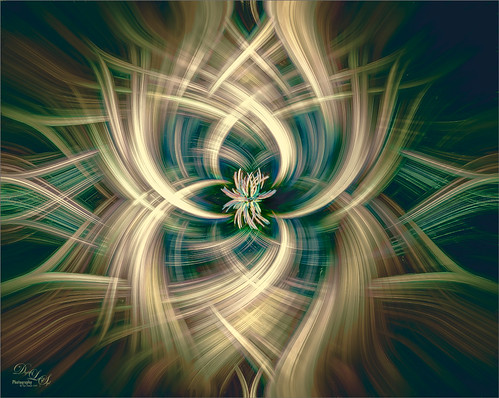
Just had some fun trying out a technique shared by one of my Photo Club friend Joe. Apparently this twirling technique was quite popular several years ago and it creates some really interesting results. This image started out as a macro image of purple and white pentas growing in my front yard. By adding several Radial Blur, Twirl, and Mezzotint filters, this interesting combination of lines and swirls is created. Here are links to two short and interesting videos on how to create this effect if you would like to try it yourself: The first by Steve Patterson is very well done and is called How to Create Abstract Twirl Effects in Photoshop, and the next one by Jay adds some more ideas to enhance the effect and is called The Twirl Effect Using Photoshop. I found several color schemes that worked really good with this result and finally ended up with a light more muted effect. Try Topaz (see sidebar for website link) ReStyle for some interesting results. Guess I had better get back to really post-processing some of my images. …..Digital Lady Syd
Vintage Hy-Red Gasoline Station
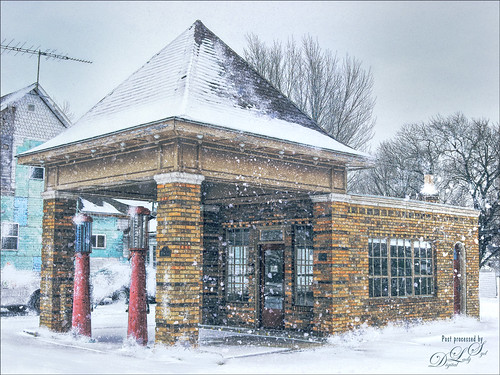
I saw this image posted on Facebook for my hometown and remembered driving by this old 1930 Hy-Red Gas Station in Greentown, Indiana, many times while growing up – apparently it is still standing and is on the National Register of Historic Places. Since Indiana is in the middle of a terrible cold spell right now, I thought I would add some more snow to it to really give this image a major wintry feel. It also gave me a chance to play with the free Snow Brushes that Serge Ramelli offered during the holidays (see under his video called How to Create Snow in Photoshop CC). I used a couple other splatter brushes to add solid snow build ups to the image (one by Melissa Gallo from a long time ago and one from Aaron Blaise). Topaz (see sidebar for website link) Studio’s AI Clear, Precision Detail and Precision Contrast Adjustments were used to really get a nice sharp effect to the image. On a stamped layer in PS, Topaz ReStyle’s Warm Steel Wash preset was applied to the image, then set to 50% layer opacity and Color blend mode – this gives it the vintage feel. Nik Viveza 2 was used to add just a soft blue color to the sky which was a total white – two control points were placed in the upper corners where the Brightness sliders were set to the negative side to add in the wintry sky color. I was really surprised how sharp the image turned out……Digital Lady Syd
Graham Swamp
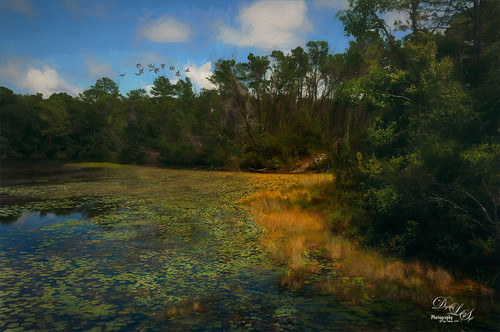
Graham Swamp is a place I have photographed many times. It is not really that pretty most of the time, but this fall it contained just enough color to create this image. And Topaz (see sidebar for website link) came to the rescue for me. In Studio, the new AI Clear Adjustment was terrific on this type of image. Really helped sharpen up all the little details without over-sharpening them. Learned a new workflow from a Topaz Webinar by Joel Wolfson called The Simple Path to Stunning Images with Topaz. Not sure it is posted yet, but do check out the Topaz webinars – there are some really informative ones like this one. Basically it uses Topaz Adjust to adjust exposure without losing the Shadows or Highlights in the image. I had forgotten this and it is a very useful tip. So here is the tip: since the Adaptive Exposure slider is connected to the Regions slider, use them in together – the higher the Adaptive Exposure amount is, the more Regions should be set. Used the Dehaze, Precision Contrast, Precision Detail Adjustments, and somewhere in the mix some Impression and the ReStyle Plugin. Turned this rather dreary image into a beautiful autumn look…..Digital Lady Syd
Color of the Wind
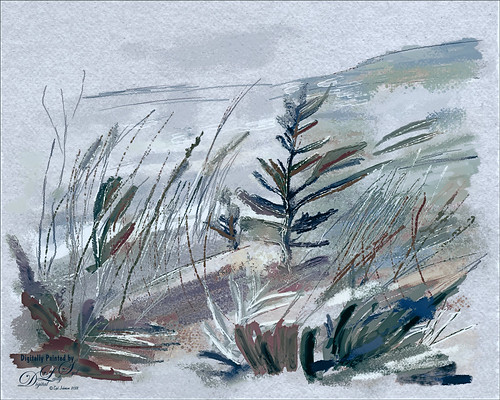
Once again just had some fun – this time painting with Grut’s Ink Brushes and paper. Decided to try and create an image somewhat like an Andrew Wyeth. (Right, like I could paint like Andrew Wyeth – I would be in heaven!) He is one of my favorite painters. It also gave me a chance to go through all the wonderful Ink Brush Nicolai has created at his Grut Brush site. There were so many I wanted to use but stayed instead to these brushes: Gone Coral, Coven Sloth, Pensive Linny, Bed Kelp, Bone Soak, Holy Slips, Go Folly, Raggedy Tag, and Wain Pip. (These were all placed into a brush Group named SJ Grut Ink Brush Favs – and backed up in the Preset Manager.) I also used his Oil Impasto Chip Gimble brush for ground cover. All these were used on separate layers so they could be adjusted and the opacity set correctly. Nicolai also has some marvelous papers – this one started with SP Espaloaf which gave the beautiful overall texture. To finish up, Topaz ReStyle was opened up and the Peppermint Gray preset applied for a very cool feeling to the image. Last step was to use Nik Viveza 2 to bring in the focus to the main tree. If you like ink brushes I suggest you check the Grut Brush Site – lots to choose from and for a low price, you can get all his brushes including these ink brushes. And the best deal is he gives away a free brush each week under his Freebies tab – all different kinds. I can’t tell you how many brushes I have gotten from this free downloads. …..Digital Lady Syd
Leaf Waterfall in a Rain Forest
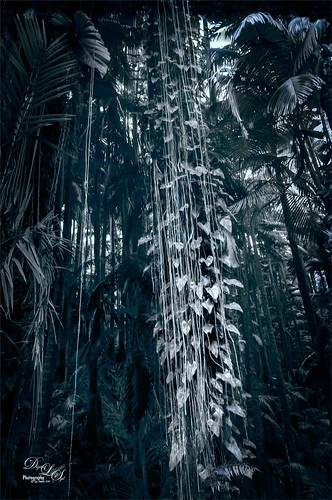
Image was taken at the Hawaii Tropical Botanical Garden on the Big Island near Hilo. This is a wonderful place to visit if you get on the island. Everything grows in giant size here including these philodendrons on a vine around the tree trunk – it really did look like a waterfall made of leaves. I created the image as a black and white and decided I liked having the dark green blue color in the image as it looked more natural to me. To change the color, Topaz (see sidebar for website link) ReStyle was used by applying the Midnight on Swan Lake preset. A Matt K vignette was created (see my How to Create a Subtle Vignette blog) and that that was about it.
Beautiful Blue Door

Just felt like doing a digital painting. This image was created using an image on Unsplash by Luca Bravo in Arles, France (unable to find link as it was downloaded 10 months ago). The original image is in beige tones and the door is more turquoise. Several of my Faye Sirkis mixer brushes along with some erodible mixer brushes from Photoshop were used for painting. Used different layers to create underpainting, more detailed layer, and fine details. The colors were changed using Topaz (see sidebar for website link) ReStyle’s Dull Cornflower preset. Five textures were layered : 3 from 2 Lil Owls Studio (see sidebar for website link) and 2 of mine using different blend modes and layer masks to fine tune the effects. A Curves Adjustment Layer was placed on top. That was it! It is so relaxing to paint!…..Digital Lady Syd
Just Another Beautiful Hawaiian View
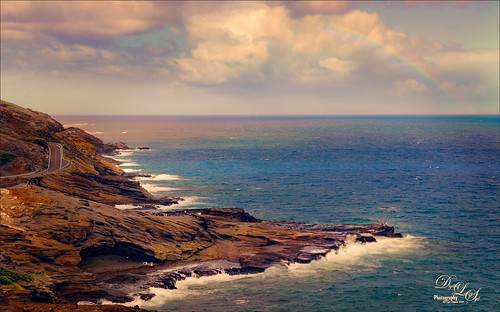
Just thought I would post another beautiful view taken on Maui in the Hawaiian Islands. There are several people in this image, especially a couple guys fishing out on the point. I actually added a little saturation this image to make it pop some. Topaz (see sidebar for website link) ReStyle’s Zambezi Zest preset was used to get the colors – this is one of my favorite presets for landscapes. The Spotlight Effect was used to lighten up some of the rocks out toward the fishermen. Otherwise just a pretty standard image…..Digital Lady Syd
Little Hidden Tree
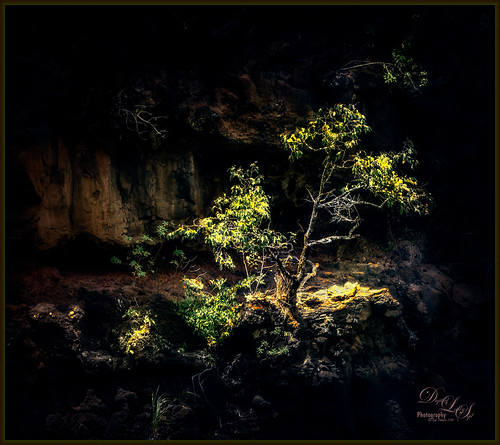
This little tree was growing on the side of the hill almost right behind the waterfall at Waimea Falls in Oahu, Hawaii. Lovely place to visit! Had lots of fun just trying out the different Photoshop plug-ins: Used On1 Photo Raw 2018 Effects to sharpen with the Dynamic Contrast filter, Luminar 2018 using their Golden Hour, Adjustable Gradient, Image Radiance and Dodge & Burn filters, and Topaz ReStyle’s Regal Blue Shades preset. See sidebar for links to all three plug-ins. Added a Black and White Adjustment Layer to fine tune the colors (See How to Use a Black & White Adjustment Layer to See Contrast in an Image blog) and a spotlight effect on the yellow leaves (see How to Add a Spot of Light blog). That was about it!…..Digital Lady Syd
Butterfly Paradise
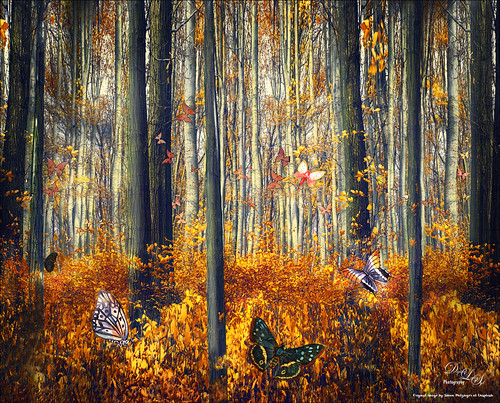
This image was created using an image by Simon Matzinger at Unsplash, one of my favorite images to use for PS experimentation. Creative Live recently had another Photoshop Week and an interesting class was presented by Simon Peter Raible on Using Photoshop to Extend Images. I had to try out some of the technique so here it is the result of one of them. If you look at the original file, it does not have near as many trees in it. Following the technique in the videos, this is how the whole background ended up with a little clean up. Several more trees were added that were rendered in PS and is also explained in the videos. A layer had to be added to adjust sunlight on some of the trees and several layers were used to add the Beautiful Watercolor Butterflies by Knopazyzy. The center butterfly was from a brush set by All Things Precious called Vintage Butterflies Set 1 – just painted underneath to add color the butterfly. The string of small butterflies of different sizes I created using a Butterfly brush my Marrielle P Kokosidou. (Created a paintbrush and setting it to a small size with Spacing at 180%, Shape Dynamics Size Jitter 24% and Angle Jitter 21%, and a Color Dynamics set to 100% Foreground/Background Jitter, a little Hue, and Purity -24%.) Some color was sprayed on them. Topaz (see sidebar for website link) ReStyle was used to get a nice overall color tone to the forest image using the Dark Goldenrod Sunset preset. It was fun to try out the new technique and work with one of my favorite subjects, butterflies……Digital Lady Syd
Enjoying a Swim
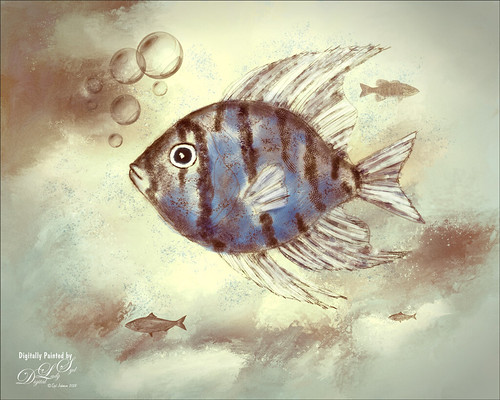
I am not the best drawer, but I did this Angelfish image following a really fun blog called How to Draw a Tropical Fish by Eugenia Hauss at Envato Tuts. It does not look exactly like the final result of the tutorial, but this was all done digitally where the tutorial is using actual graphite pencils. For the drawing Grut’s I Qwillo brush for doing the beginning design, Grut’s H Hatch Blanket brush (he has the best hatch brushes around), and Grut’s NM Shim Timber for shading were used. One of my Corel Painter textures was placed underneath for the watery look. The little fish are from Fish No2 Ars Frafix (no longer available) and the bubbles are from Lisa Carney’s Filters and Smart Objects Creative Live class which created a bubbles brush. A stamped layer was placed on top and Topaz ReStyle’s Silver and Ivory Cloak preset was applied with a few changes. Nik’s Color Efex Pro 4 was used on another stamped layer and the Film Efex Vintage filter with no changes and a Vignette set very softly were added. A Luminosity Red Channel Curves Adjustment Layer and a Dodge and Burn layer using a 50% gray layer set to Overlay to finish up. It was a lot of fun to create!…..Digital Lady Syd
View from the Road
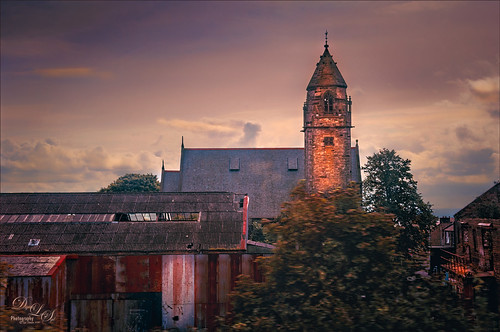
This image was taken somewhere in Scotland. I tried a few different effects but finally ended up with this rather simple result. Used Topaz (see sidebar for website link) Studio for this image. Started with the Desaturated Blush I preset and changed several sliders. Then used the Tone Theme Filter which made the barn more of an orange color – this is a really nice filter and you should check it out if you own it. Back in PS, created a stamped layer (CTRL+ALT+SHIFT+E), applied a Black and White Adjustment Layer set to Luminosity blend mode, a Red Channel Luminosity Curves Adjustment Layer, and a regular Curves Adjustment Layer. Next applied Topaz ReStyle Zambezi Zest to the image at 42% layer opacity. Again back in PS, did some clean up and Black and White Adjustment Layers. A Gradient Fill Adjustment Layer to add a soft vignette and a Selective Color Adjustment Layer for a corner blue sky issue were then applied. Next added a Blake Rudis 5 Tone Heat Map to add a really pleasing look to the image. ……Digital Lady Syd
Room with a View
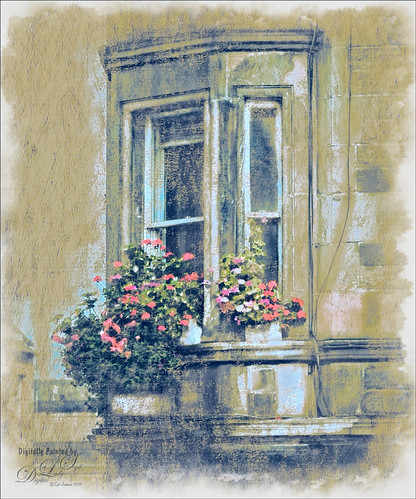
Decided to do a little watercolor painting in Photoshop of these flowers sitting on a window ledge that looks at Edinburgh Castle in Scotland. Basically cleaned up the image using Topaz (see sidebar for website link) ReStyle to set some colors, and then used Melissa Gallo’s method to paint the image using her watercolor brushes. I took her class several years ago, but the method still works. (If you are interested in purchasing her Painting with Photoshop class, it is still available. There are so few really good PS painting classes, but Melissa’s may be the best of the bunch.) Topaz ReStyle was actually applied again at the end to create a more interesting color palette. The last step used my watercolor border frame. Lot of fun to paint again…..Digital Lady Syd
Deer on a Fountain
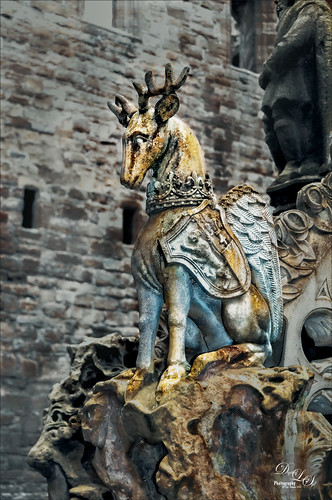
This image is of a a fountain built in 1538 by James V at the old Linlithgow Palace in Scotland – it has been known to flow with wine on a few occasions. This actual center fountain is not this colorful, but these colors came from the image itself so I imagine at some time it was quite beautiful. I loved the regal look of this deer statue on the fountain. On1 (see sidebar for website link) Photo Raw Effects 2018 made this image really nice and sharp – used Overall Settings filters of Dynamic Contrast (which really adds the nice detail to just the deer), Glow (47% opacity) and Color Enhancer, and Local Adjustments of Vibrance to just the deer at 57% layer opacity. On a stamped layer, Topaz ReStyle (see sidebar for website link) Zambezi Zest preset was applied. Nik Viveza 2, a Black and White Adjustment Layer and several Curves Adjustment Layers were used to get the final look. On a New Layer a white Spotlight Effect was added to the deer head to draw the eye. That was it. Wonderful place to visit and explore!…..Digital Lady Syd


