
Happy New Year!
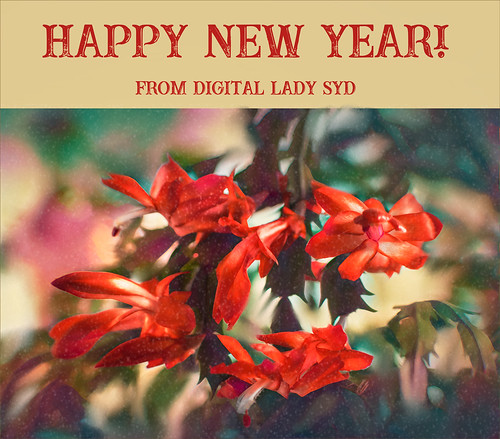
Happy New Year to everyone – thanks for visiting my blog when you get a chance. This image is of my Christmas Cactus that was in full bloom for my holiday this year. To get the soft background, used Topaz (see sidebar for website link) AI Remix (A Neon Rose preset with the leaves brushed out at 50%). Painted some texture and snow on the image. Last step was to add Nik Viveza 2 to sharpen up the petals a little. The font is called Buffalo Inline 2 Grunge. Looking forward to have a wonderful 2019!…..Digital Lady Syd
Santa Relaxing after Busy Holiday Flight
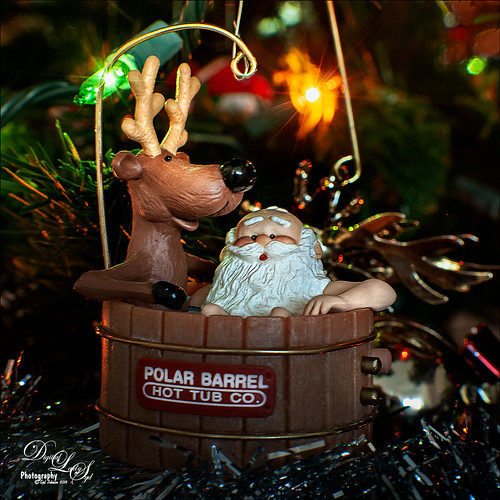
Just an image of one of the my son’s favorite tree ornaments. Nothing like a warm dip after a hard night’s work. Workflow included a few changes and a crop in Lightroom. In Photoshop used Topaz (see sidebar for website link) AI Clear, Lucis Pro 6.0.9 applied with a black layer mask and painted in on Santa’s beard and Reindeer face, and some clean up and line accent. A spotlight layer was created on Santa and the Reindeer’s faces. Last step was to add a little Nik Viveza 2 to add a slight vignette effect. Hope everyone is having a wonderful holiday!…..Digital Lady Syd
Posing for the Family Christmas Picture

Merry Christmas to everyone! Enjoyed making my annual Christmas images – this one was particularly fun since I really like the free funny vector characters in the image from Spoon Graphics. The really cool spiral was created using the Hibiscus flower in Topaz (see sidebar for website link) Studio using the Motion Blurs Swirl set to an angle of -1.00. Back in Photoshop, the Hibiscus flower was selected and taken back into Studio where the Impression Adjustment was using Jai Johnson Oil Glaze Light preset (see her In the Digital Studio January 6 2017 video for the settings). Then some snow was added on the ground and a white texture added and set to Multiply blend mode. My free SJ Snow 2 Overlay slight blur PNG was placed on top at 54% (I still think mine is the best out there since it is a png – no blend modes needed to use it). The font is Honey Script. Maybe you can download or use some of these resources. Anyway, have a very Happy Holiday!…..Digital Lady Syd
Happy Place for a Hornbill
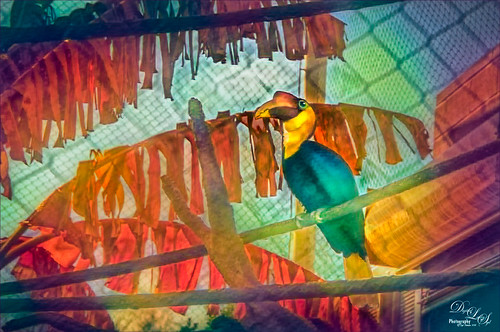
Love this guy! This Hornbill is definitely in charge of his domain and seems to blend right into it. This image is exactly why I love Topaz (for website link see sidebar) – this Studio Adjustment called AI ReMix never ceases to amaze me. The original image was not good and I had basically decided this Hornbill would never be used. But I am finding AI ReMix is a game-changer for me – this guy turned out pretty nice! (The Studio settings were: AI Clear – Remove Noise Medium and Sharpen High; and AI ReMix: Desert Prism at 65% opacity, Low Style Strength and Brightness -0.35, Contrast 1.04 and Sat 0.75.) Back in Photoshop, a little spotlight effect with a white brush was used to brighten up the tree fronds to get a bit of a translucent effect. It took a little clean up to get the final, but overall, this plugin saved an image…..Digital Lady Syd
Joyous Ornaments Lining Up for the Tree
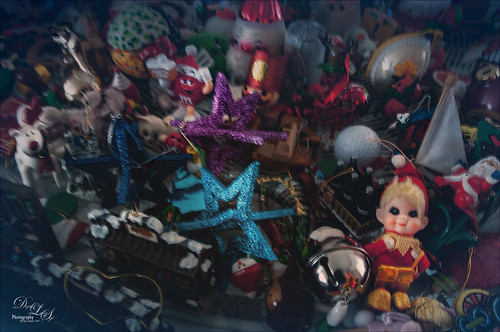
This is just one of those crazy photos that make me laugh. It is not all that sharp but sort of exemplifies the total chaos it is for me to get all the ornaments up and hanging right! Biggest issue I had was to get this image sharper without deteriorating the quality. In Lightroom’s Develop module, used my SJ Sharply Dark LUT (created in my blog and video called How to Create Profiles in ACR from LR Presets and Some PS LUT Files) and set it to Amount 81. Then did just the normal adjustments. Radial Filters were used to help sharpen up some of the ornaments I wanted particularly in focus. Went into Topaz (see sidebar for website link) Studio from LR and used AI Clear (applied it twice to get some additional sharpness and it worked!), the Precision Contrast adjustment, Topaz Lens Effects Diffusion Adjustment to soften overall just a little and Topaz Studio Focal Blur Adjustment, placing it over the main ornaments to keep sharp. Then back to LR where it was opened up in Photoshop. Did a little clean up of some edges and used Nik Viveza 2 to emphasize the focal point on a few ornaments. That was it. I find this a really soft sort of happy image – not one that goes up on the wall but one that reminds me of Christmas!…..Digital Lady Syd
View from The London Eye
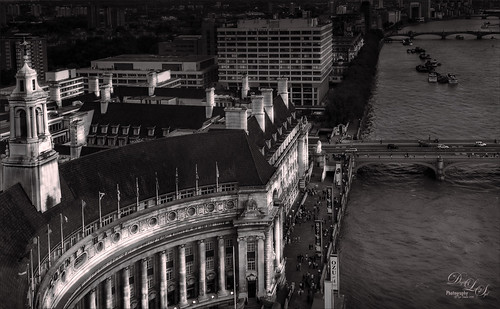
Just thought this image from the London Eye looked nice with a black and white treatment. This time in Lightroom used one of Sergei Ramelli‘s preset called AA Drama Gradient Filter (subscribe to Serge’s newsletter to get the preset and lots of others) and then went in and tweaked the settings – added some Radial Filters also to emphasize the setting sun on the buildings. Did a crop of the image before taking into Photoshop. On a duplicate layer used Topaz (see sidebar for website link) AI Clear Adjustment, applied it, and opened up Topaz Black and White Effects plug-in from the top drop-down. This time selected from the Traditional Collection the Classic with Grain preset – but turned off the Basic section and used mainly the Adaptive Exposure, Regions, Detail, and Detail boost sliders. In the Finishing Touches selected the Silver and Paper Tone and adjusted to get a nice off-black, almost purple color. Back in Photoshop added a Curves Adjustment Layer. Not much too it…..Digital Lady Syd
A Little Wintry Guitar Playing
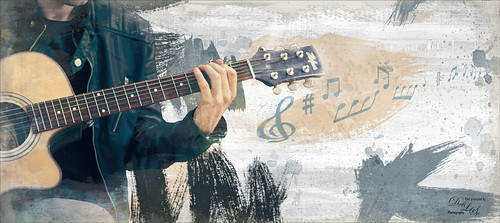
Well here is one of my favorite ISORepublic images called Guitar Man that I often choose when trying out a new technique. I used to play guitar and I think that is why I like it. This time I liked the result so well I decided to post it. I spent a lot of today watching a video (unfortunately it was not a talky), but it was so good I took notes and worked along with the basic steps anyway. The video is on You Tube and called Technical Dost/Digital Painting/Smudge Painting/Photoshop Tutorial by Nikhil Shirkar – some of the technique just did not work for this image like a lot of the smudging, which seems to apply to portraits more than this type of image. What I did like were the brushes he linked for the download. I especially liked the Danger Pig Strokes 01 free brush set and there was also a nice white watercolor grunge texture to use. I decided to use my own background texture, but his is quite nice. Otherwise it is just adding in elements and strokes to get a nice grunge feel. I used a watercolor border at low opacity to give a little vignette effect. The notes were created from some sheet that was downloaded and made them into brushes – I use them all the time. Overall just a lot of fun to do and the only filter used was Topaz (see sidebar for website link) AI Clear to sharpen the image. And also beware that when using some free images (including this image), the resolution is set to 72 dpi. Need to adjust this by going to Image -> Image Size and setting the Resolution to 300, then uncheck the Resample – the Width and Height will readjust – and recheck. That will give you a normal size image with the correct Resolution. ….. Digital Lady Syd
Fishing the Osprey Way
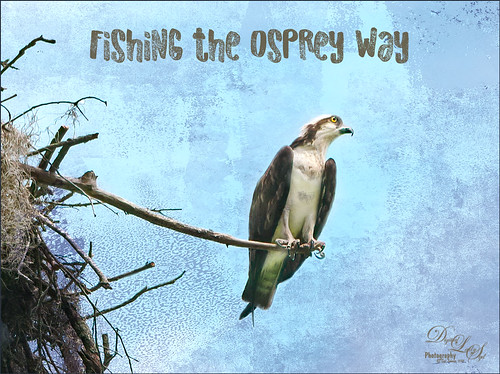
Here’s an image of a beautiful Osprey checking out the swampy area he apparently lives above. I don’t know how he balances on that tiny branch, but you can see how big his talons are so that explains it. Initially I did not think the image was sharp enough to use this cropped in. After adding Topaz (see sidebar for website link) Studio’s AI Clear adjustment and following Unmesh Dinda’s video called The Hidden 3D “Contrast” in Photoshop, the bird just sort of popped. Used a rather washed out texture I created behind him and added a Hue/Saturation Adjustment Layer on top for the blue tones. Then added a Curves Adjustment Layer to brighten the image back up. The free font is called Old Originals……Digital Lady Syd
Mickey Shopping on Main Street USA
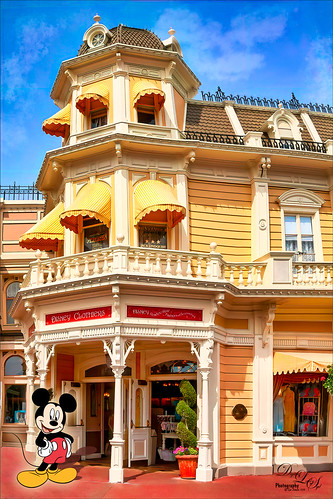
Had some fun working on this image. This image is of a shop on Main Street USA, Magic Kingdom in Orlando, Florida (click on link to see more info and other interesting buildings). I really love the color yellow so this shop always catches my attention. There was a lot of manipulation done to get rid of the people in front of parts of the image, straightening the building, and adding the Mickey Mouse cloud. Note that the top floors are not as high as the bottom floor – Disney does that on all the buildings to make them look bigger than they are. Just a few Basic panel changes done in LR before going into PS. Next the people were removed in front using the new Content Aware-Fill command and little more clean up. Next the Adaptive Wide Angle filter was used to straighten up the columns and the image was cropped (see my How to Use the Adaptive Wide Angle Filter blog). Next on a Composite layer (CTRL+ALT+SHIFT+E) , Topaz (see sidebar for website link) Studio’s AI Clear Adjustment and HSL Color Tuning Adjustment were used. Back in PS on a New Layer on top, Grut’s FX Cloud Kernel Hi brush (these Cloud Brushes are the best around) was used to paint in the Mickey Mouse cloud face. Then Grut’s Cloud Lumens Hi and Sparco HI brushes were used on other sky areas. Another composite layer was created and taken into Skylum’s Luminar 2018 (see sidebar for website link). This used their wonderful new AI Sky Enhancer which really popped the sky. (Settings: On bottom layer used Accent AI Filter Boost 67; AI Sky Enhancer Amount 38; Tone: Exposure 0, Contrast 4, Smart Tone 66, Highlights 31, Shadows -6, Whites 92, and Blacks -80; and Golden Hour Amount 17 and Sat -62. On top layer used my SJ Matt Look preset – Sun Rays which contains Matt Look (Amount 47, Fade 20, Contrast 20, Vividness -44, Toning 7, Hue 256, and Sat 46; and Sunrays – placed the sun down halfway on right side of house (X104/&55) with center off the side of the image, and the rest of the settings: Amount 30, Look 31, Number 23, Length 65, Warmth 67, Radius 63, Glow Radius 69, Glow Amount 66, Warmth 72, Penetration 78, and Randomize 8.) The last step involved adding a Mickey Mouse vector object from Shutter Stock (noted that an .eps file from Illustrator can be opened in PS – to see it first, find file in Adobe Bridge and place into your image) and created shadow for him. I love the color and how sharp the image is!…..Digital Lady Syd
Native American Playing a Flute
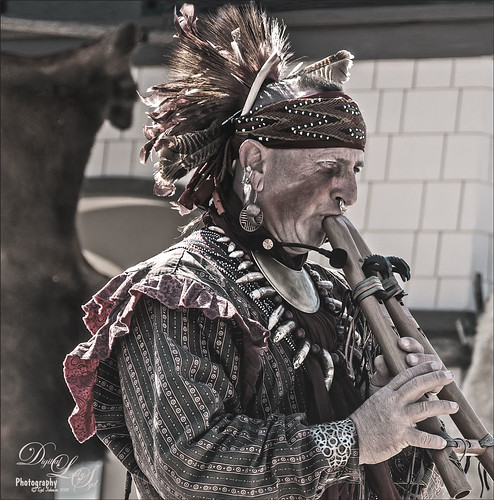
Happy Thanksgiving to everyone here in the States! Usually I put up a funny turkey, but this year I am posting image from the Native American Festival that occurs annually in Ormond Beach, Florida. The first Thanksgiving celebration theoretically occurred in October of 1621 after their first harvest in Plymouth and was attended by 90 Native Americans and 53 Pilgrims. I believe a Native American drone flute is being played. This image uses a technique learned from Adam Sheff of Photoshop Tutorials called Create a Powerful Emotional Effect for Your Portraits in 9 Easy Steps. First cropped the image quite a bit and then used Topaz (see sidebar for website link) Studio’s AI Clear to do a great overall sharpening and noise reduction (this little filter is amazing!). To finish, just followed the steps in the tutorial. Lots of fun to do. Everybody enjoy your day (I have got to go cook a turkey…..)…..Digital Lady Syd
Here is some info on the flute from Wikipedia that I thought was interesting: A double Native American flute is a type of double flute. It has two sound chambers that can be played simultaneously. The two chambers could have the same length or be different lengths. The secondary sound chamber can hold a fixed pitch, in which case the term “drone flute” is sometimes used. The fixed pitch could match the fingering of the main sound chamber with all the finger holes covered, or it could match some other pitch on the main sound chamber. Alternately, various configurations of finger holes on the two sound chambers can be used, in which case terms such as “harmony flute” or “harmonic flute” are sometimes used.
Graham Swamp
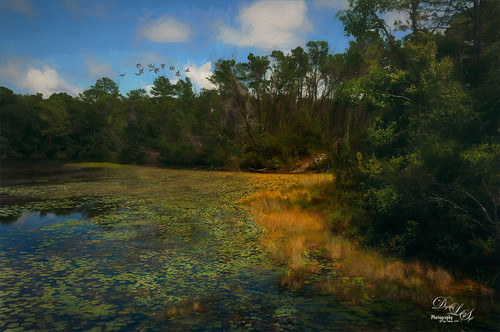
Graham Swamp is a place I have photographed many times. It is not really that pretty most of the time, but this fall it contained just enough color to create this image. And Topaz (see sidebar for website link) came to the rescue for me. In Studio, the new AI Clear Adjustment was terrific on this type of image. Really helped sharpen up all the little details without over-sharpening them. Learned a new workflow from a Topaz Webinar by Joel Wolfson called The Simple Path to Stunning Images with Topaz. Not sure it is posted yet, but do check out the Topaz webinars – there are some really informative ones like this one. Basically it uses Topaz Adjust to adjust exposure without losing the Shadows or Highlights in the image. I had forgotten this and it is a very useful tip. So here is the tip: since the Adaptive Exposure slider is connected to the Regions slider, use them in together – the higher the Adaptive Exposure amount is, the more Regions should be set. Used the Dehaze, Precision Contrast, Precision Detail Adjustments, and somewhere in the mix some Impression and the ReStyle Plugin. Turned this rather dreary image into a beautiful autumn look…..Digital Lady Syd
Colorful Queen Emma Lily
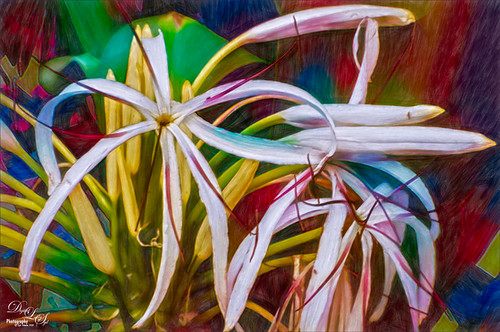
Enjoyed post-processing this Queen Emma Lily growing in my front yard (they bloom all year long). I was mainly experimenting more with Topaz (see sidebar for website link) Studio AI ReMix. This time used the Neon Rise Style set to Linear Light blend mode and added Impression’s default settings except for Paint Opacity at 0.05 and Precision Detail. Back in Photoshop, added Nik Viveza 2 to sharpen up the center of the flower for focus and that was it. I just love the colorful results! For more on AI ReMix, check out my Topaz ReMix – Update and Better than Ever! blog for more information.
The Beautiful Comet 67P
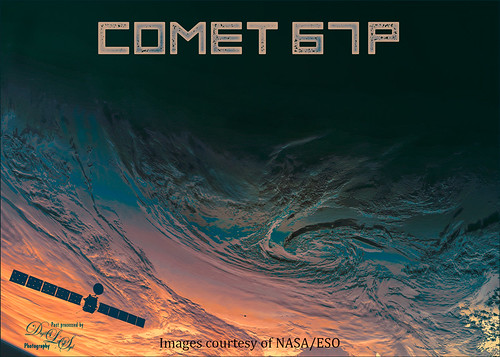
Totally enjoy downloading different images from the NASA and ESO websites and trying out different colors on them. (See my Colorizing NASA Photos Using Topaz Studio (And Check Out Updated Detail) blog for one with Saturn’s rings.) This is not a recent image (from November 13, 2009 and posted July 29, 2015) on the ESA’s website – check out all their images that can be downloaded. Added an image of the Rosetta Spacecraft Model from Wikipedia. Just played around with different fonts and colors and this is what I got!…..Digital Lady Syd
Chatting with the Ladies on the Bridge
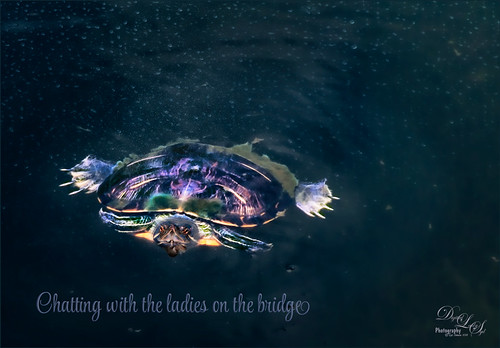
This was a fairly large sized turtle that was hanging around the bridge platform where I was talking with a few other ladies – he seemed totally enthralled with our conversation. Something tells me he was looking for a hand-out. Lucis Pro was added to sharpen him up a little first. Then Topaz (see sidebar for website link) Studio Texture Effects filter (started with Earthy Cat and Window Gaze preset – only used these adjustments: Blurs, Basic Adjustment, Texture and set the Opacity to 0.30 – used as it gave a natural looking interest in the water; added Dehaze Adj – 0.72 opacity and Strength 0.91 and Suppress Artifacts 0.73 – gave water a darker richer color; next added Radiance Adj – 0.97 opacity, Overlay bm, Radiance Type Light, Strength 0.53, Width 0.16, Length -0.28, Curl 0, Suppress Weak 0.01, Effect Coverage 1.00, Fade 0.13, and Sat 0.63 – in mask painted around turtle with small brush which lightened it up around turtle, then used the Adjust settings and set the Density and Contrast to blend the color into the water color – gave a very soft edge around the turtle; the Glow filter was added last – Opacity 0.58, Overlay bm, Primary Glow Type 0.10, Primary Effect Sharpness 0.74, Primary Electrify 0.23, Primary Simplify Details 0.87, Primary Edge Color 0.17, Primary Detail Strength -0.40, Primary Detail Size 0.20, Primary Brightness 0.37, Primary Contrast 0.98, Primary Sat 0.23, Primary Line Rotation 0, Primary Glow Spread 0.08, Coverage Transition 0.31 and Sharp Radius 0.10). In Photoshop a Vignette was created using Matt K’s technique (see my How to Create a Subtle Vignette blog). The font is called Style Casual, one of my favorites. ….. Digital Lady Syd
Bird on the Prowl
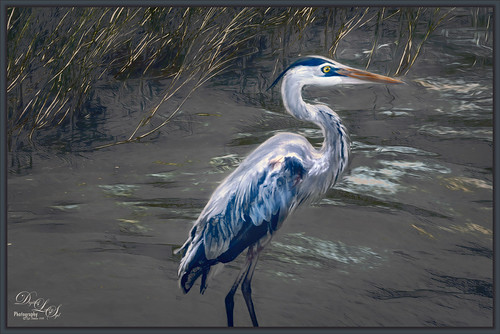
This Blue Heron image which was taken at Mount Dora, Florida, looks a little scraggly and I wonder if he has just gotten his adult plumage. That actually made it a little hard to post-process the image, so I decided to help him along a little bit with a few strokes of the Mixer brushes in Photoshop. Used On1 Photo Raw 2018 Effects (see sidebar for website link) to sharpen him up a little (the Dynamic Contrast and Sharpen filters at default settings does wonders on an image). Then on a stamped layer used Topaz Studio (see sidebar for website link) to get a more interesting background (used Impression with Chalk Smudge II along with Precision Contrast to just the background and AI ReMix for the more modern looking edges in the water). Added my favorite Color Lookup preset – Foggy Night at 78% opacity. From here it was just adding layers to clean him up a little. It was fun to do one of my favorite bird subjects again!…..Digital Lady Syd
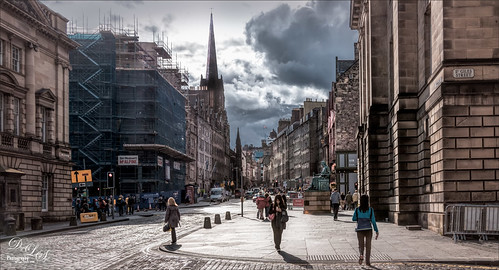
Teacher and Student
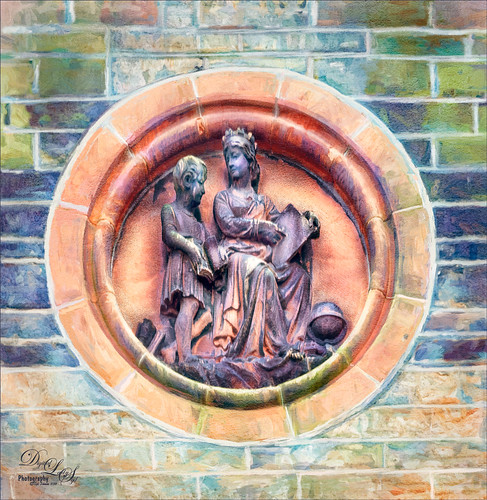
Am planning on taking a few weeks off from blogging to get some things done around the home – blogging takes up a lot time, so this will be it for a few! This image is of some architectural sculpture associated with the “Castle School” building connected to the Camera Obscura building in Edinburgh, Scotland, near the castle. I thought the sculpture was really charming of a teacher and her student. In LR the image used a Profile by VoxColor called NC to get the interesting tones. In Photoshop just did some normal clean up, used a Black and White Adjustment Layer, a Curves Adjustment Layer, and a Dodge and Burn layer. On a stamped layer, opened up Topaz Studio (see sidebar for website link) and applied the Impression Adjustment and Topaz AI ReMix Adjustment at 0.14 to add some painterly effect into the image. Then added several painting layers using my SJ Pastel 3 brushes (see my How to Create my Favorite Brush Blog and my Painting Fun in Photoshop Blog) to smooth out some of the paint strokes from the Impression filter. A New Layer set to Overlay was used to add a little spotlight effect on the figures. French Kiss (see sidebar for website link) Solstice Initiation texture was set to Color Burn blend mode at 59%. A Hue/Saturation Adjustment Layer was clipped to it and the Saturation was reduced to -43 to reduce the color effect of the texture. Finished off with Nik Viveza 2 to draw focus a little more into the sculpture. Last step was to create a vignette using Matt Kloskowski’s technique (see my How to Create a Subtle Vignette blog). That was it – lots of fun here! Will try to add some more blogs as time allows!…..Digital Lady Syd
Beautiful Hibiscus
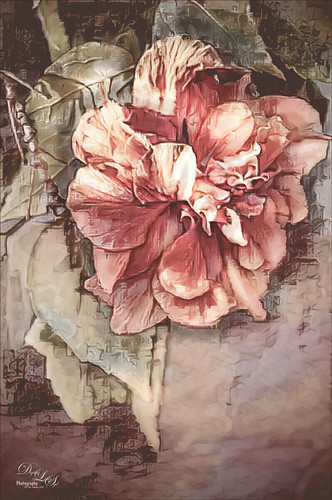
Had fun with this image. This is one of my peach hibiscus that I turned into a beautiful coral color. Used On1 (see sidebar for website link) Photo Raw 2018 Effects Dynamic Contrast on parts of the image by using the filter’s mask, and Sharpening filter. In Photoshop painted on the layer to fill in areas that were blown out. Added a Texture from Melissa Gallo Paints called Garden Canvas (from her Painting with Photoshop Workshop – excellent course and comes with some great brushes) at 26% layer opacity. Duplicated it and set Blend If Underlying Layer white tab split to 30/60. Three colored spotlight effects were painted on the petals. On a stamped layer, Topaz (see sidebar for website link) Studio was opened and the AI ReMix adjustment applied twice and Dehaze adjustment once. The image had a really bright red and orange effect color. Nik Viveza was opened to add some focus. Then applied my SJ Nastalgia profile (from a preset) in Camera Raw Filter. (See my How to Create Profiles in ACR from LR Presets and some PS LUT Files blog for info on this.) Now the colors are this pretty pink color. A couple layer of painting and burning and that was it. …..Digital Lady Syd
Planet X
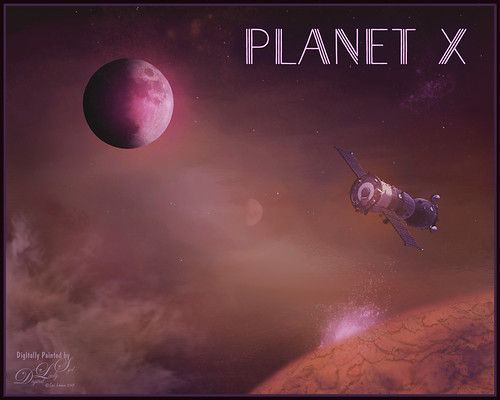
Just had some fun creating this. Design Cuts gave everyone a freebie pack called Vintage Style 3D Lettering Moon Phase Graphic and Sunbeam Photo Overlay (Phew!). It contained the moon in the above and got me thinking about what I could do with it since Astronomy is one of my major hobbies. Created an New Image and added the Moon image into it. Next added a Solid Fill Adjustment Layer set to black on the white background layer since it is a space scene. Decided to use the Starfield png in the pack and put it behind the moon. Then added one of the smoke layers from the psd in the pack. Then just started adding in elements. Used one of my Corel painted backgrounds that created the lighting effect for the whole image by placing it just above the Solid Black Fill Adjustment Layer. The satellite was from the space satellite in orbit image from Free design file.com. Some brushes called Galaxies by LoRdaNdRe were used to add in little elements to the sky. The foreground Planet X was created by first just painting an orange corner into the image. Then took just this layer into Topaz Studio and applied the Impression adjustment (settings: Darker Color blend mode, Stroke Type 16, Number of Strokes Medium, Brush Size 0.89, Paint Volume 0.93, Large Brush Volume 0.58, Print Opacity 0.60, Stroke Rotation 0.26, Rotation Variation 0.22, Stroke Color Variation 0.18, Stroke Width 0.18, Stroke Length 0.04) which created the interesting cracks on the surface. The spewing fountain on the planet was created by using another galaxy brush and then adding a watery flume to it with a sparkle brush. The moon in the distance is in the Moon Brush Set by EMelody – changed the angle of the moon to fit the image. A Color Grading Action called Blackberry Stain by Chris Spooner was also used to get a little bit of a cinematic effect. The font is Naive Deco Sans. That was it – just a lot of fun to put together!…..Digital Lady Syd
Enjoying the Attention
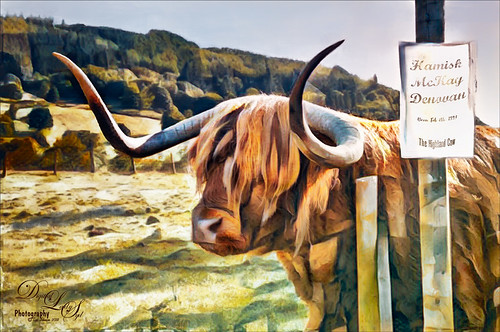
Here is an image of one of the most beloved creatures in Scotland – Hamish McKay Denovan, the Highland Cow. This guy was as tame and sweet as could be. (Another Flickr contributor noted that “Hamish the Highland Bull at Kilmahog, a popular stop off point on the road through the Trossachs to Lochaber and the western isle” in Scotland is where this guy can be found.) It had not been post-processed since it had a fence going everywhere in the image, but Photoshop’s terrific spot healing brush took the lines out completely. Just Basic Panel changes were done in Lightroom. Then in Photoshop, after removing the fencing, a stamped layer was created. Topaz Studio (see sidebar for website link) was opened and once again and three Adjustments were added, Precision Contrast and two AI ReMix (settings were: Precision Contrast: Micro -0.52, Low 0.72, Medium 0.27, High 0.45, Shadow 0.51, and Midtone 0.12; AI ReMix: Opacity 0.79, Low, Row 13/Col 2 swatch, Brightness 0.14, Contrast 1.15, Sat 0.75; and AI ReMix: Opacity 0.89, Color bm, Low, Col 17/Row 1 swatch, Painted out the animal slightly). The sign on the fence post was different and faded so I put some text in it for this highland cow – three different text layers were used, grouped, duplicated, turned off, and the copy was rasterized. Then the text could be transformed using the Warp to fit the paper. Some clean up was done and some darkening and lightening using two Curves Adjustment Layers with black layer masks. Google Nik Viveza 2 was used to emphasize the focal point. Then my final workflow steps were done: added a Red Channel Luminosity Curves adjustment layer, a Gradient Map adjustment layer using a reddish tone to light blue color gradient, added a layer for a white spotlight effect on his face, and finished up with Matt Kloskowski’s vignette. Love how the Topaz AI ReMix can produce this type of interesting texture…..Digital Lady Syd
Stand Tall
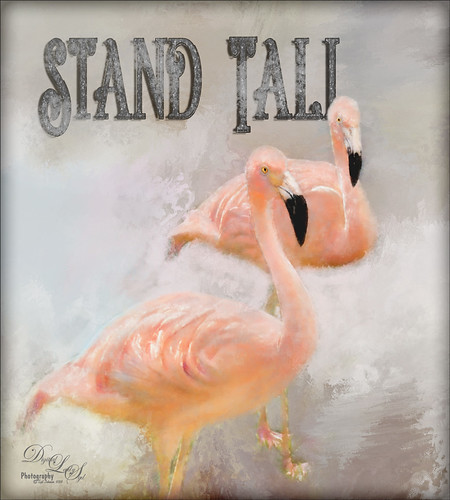
Just love Flamingos – this image taken in Hawaii a while back of some beautiful flamingos at the Hilton Waikoloa Village. This image needed to be made bigger so some more space was added on the right side using Image -> Canvas Size and setting to 120% for the width. Then used Content Aware Fill to fill in the area. Topaz Impression was added to the flamingos. A painted background I created in Corel Painter was taken into Topaz Studio (see sidebar for website link) and my SJ AI Graphic Design Effect preset was added (in community). It was turned into a black and white using a Black and White Adjustment Layer. The Flamingo Shadow font was used and a couple layers were placed above and below. Grut’s Charcoal Shin Ding brush was used to add a slight smokey feeling around the text. My Silver Pattern created using my Glitter texture was added to the text. (See my How to Quickly Add a Touch of Gold to Your Text blog on how to do this.) Nik Viveza 2 was used to emphasize the heads and a darken layer was created to highlight a few of the lines between the birds. That was it. I really love the color of Flamingos…..Digital Lady Syd
Dodging the Fire
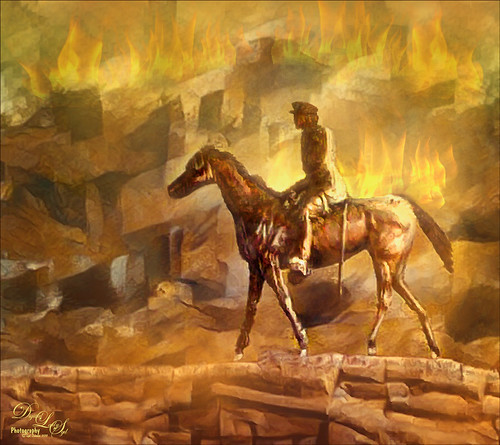
This image is a composite put together using a really bad image I took a while back of a Statue of WWI Field Marshall Earl Haig riding on a horse that was located at the entrance to Edinburgh, Scotland (it has now been relocated to outside the National War Museum inside the castle walls). As a personal challenge I decided to figure out if there was any way this major blurry image could be rescued. Surprisingly, this turned out much better than I thought was possible. First step was to try and remove some of the major blurring. The PS Shake Reduction Filter was applied and it worked just a little. Next sharpening was tried by using the Hard Mix blend mode (see my Storm on the Way Tidbits Blog) and it helped a little bit more. On a stamped layer I tried Topaz (see sidebar for website link) Infocus and it actually helped even more. Much better but still not that great. Therefore, I decided to try something different. One of my Painter backgrounds was added as a layer, and a copy of the Infocus layer was placed on top of it. A layer mask was added and just the statue was left. Next a stamped layer (CTRL+ALT+SHIFT+E) was created and Topaz Studio’s AI ReMix adjustment was added twice. (Settings were: 1st Adjustment: Style Strength Low, Row 2/Col 2 swatch, Brightness -0.17, Contrast 1.04, and Sat 0.75; and AI ReMix – 2nd Adjustment: Opacity 0.66, Style Strength Low, Row 13/Col 2, Brightness -0.55, Contrast 0.96, Sat 0.58, and Smooth Edge 0.01.) Back in PS the statue was cleaned up. The Flames Filter was opened and flames were placed in the background. Several smoke layers were created in yellow and orange tones using Grut’s FX Cloud Heft (from his fabulous cloud set) – see sidebar for website link. More flames were created in the midground area. A Pink to Beige Gradient Adjustment Layer was added to lighten up the image with some warm color – Soft Light blend mode and Linear gradient style. To finish up, a vignette was created around the rider. This was really fun to do!…..Digital Lady Syd
Storm on the Way
I decided to work on this image using an old sharpening technique I recently learned. This image was taken into Topaz (see sidebar for website link) Studio and one of my old presets was applied which is just a Precision Contrast adjustment and a HSL Color Tuning adjustment where the individual colors were tweaked. The next step was to sharpen it in Photoshop by duplicating the Topaz layer and setting it to Hard Mix blend mode. Then a Gaussian Blur was set to Radius 3 pixels and the Fill (not the opacity) slider in the Layers Panel was set to 6%. This is a great way to sharpen and does not usually cause haloing. A little dodge and burning was done and a Red Channel Luminosity Curves Adjustment Layer was added. Last step was to add a Vignette using Topaz Lens Effects’s Soft Pearl preset with a few changes to sliders. In PS it was set to 73% opacity. That was it. It looks extremely sharp I think…..Digital Lady Syd
A Scottish Countryside Town
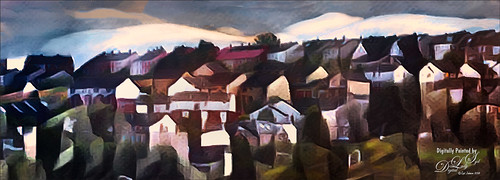
Loved how this image turned out using the new Topaz (see sidebar for website link) Studio AI ReMix Adjustment. I am finding that to get AI Remix to look really good, it helps to stack this adjustment a couple times to get an interesting look. In this case a Precision Contrast adjustment was added first, then an AI ReMix adjustment using the Row 13/Col 2 swatch, then AI ReMix adjustment was applied again using Row 6/Col 3 swatch set to Lighten color blend mode at 0.59 opacity, next an Edges adjustment set to Multiply blend mode, and finally a Color Theme adjustment to change some of the colors of the image (this adjustment seems to work best for changing the colors in these swatches). I created a preset called SJ AI Blocked Blue Look and put it up in the community group if you would like to try it. Back in PS the layer was set to the Luminosity blend mode, did a crop, and a little painting clean up was done in the background. A stamped layer (CTRL+ALT+SHIFT+E) and Nik Viveza 2 was opened and 4 control points were used to adjust the color. The last step was to go back into Topaz Studio and apply the Pony Express preset from the Simplify section. Back in PS it was set to 26% layer opacity. Last step was to add a Matt K vignette. (See my How to Create a Subtle Vignette blog). I really like the texture and color in this image…..Digital Lady Syd
The Wildebeest
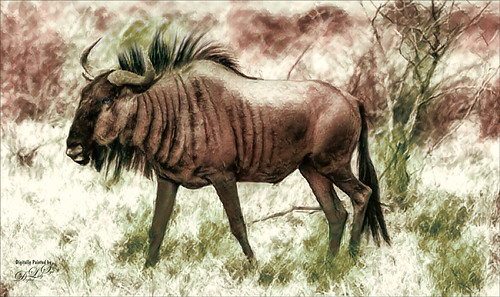
This image of a Wildebeest was in a packet of images I recently bought from Deal Jumbo in a set called Amazing Wild Animals 2 from images taken at South Africa, Namibia and Botswana. I would love to go there and take images, but will settle for this since I love animals! This is very simple post-processing – on the original image just added a Curves Adjustment Layer and a Black and White Adjustment Layer to get the contrast correct and turn the image into a black and white. Then Topaz’s (see sidebar for website link) new AI ReMix adjustment was applied. Unfortunately I lost all the setting for this, but I was able to figure out it used the last swatch in the list. Then used Color Theme adjustment to change colors around (it is the only adjustment that I find to change colors in the image after AI Remix was applied – I placed a preset called SJ Abstract Animal Effect in the Community that is similar to the above results). Back in PS, a little paint was used to adjust out the coloring in his legs which had turned very green. Created a vignette using Matt K’s technique (see my How to Create a Subtle Vignette blog). That was it. Love playing with these type of images!…..Digital Lady Syd


