
My Older Selfie

Will keep this short! On my original Selfie image, first ran Dave Kelly’s AI action at 70%. Then used the Quick Selection Tool to select just the background and hair from the whole selection created by Dave’s action. Last step was to invert selection to run Generative Fill Prompt: Digital oil paint glamor look. Chose a variation and selected the resulting layer mask. On Generative Fill panel clicked the Invert Selection so background and hair were selected and ran Generative Fill again with this prompt: Digital Oil painting with fancy hair and wintry background. From these results, created a stamped layer and duplicated it as a New Document with just this layer (right click on layer and choose Duplicate Layer – then in Document drop-down select New). This was the starting point of this image and how I usually work with these AI results. From here created different layers on top and painted over the face, hair, coat and background. Used these brushes – Kyle T. Webster’s Winter 2024 set Thinner Oil (see Skiing Selfie blog for settings used with it – definitely a New Favorite for painting especially skin) and Right Angled for the background, his Summer 2018 Ocean Brush (for hair), and Fay Sirkis’s Short Streaky Detail Blender (not sure it is still available anymore), but any small detail mixer brush would probably work for the little edges of the hair. Used Viveva to pull the whole look together….Digital Lady Syd
Being One with Nature
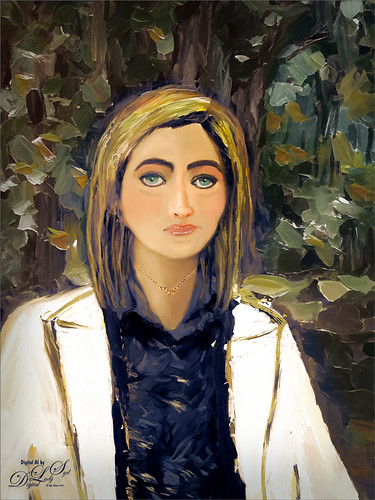
Above is another of my variations from my selfie image. These AI variations all turn out so different although in most cases the person is looking in the direction I was and the coat is somewhat similar, mine being light beige. I find that when having a problem with a face feature looking right, going back to the original selfie and copying that part onto it own layer. Then moving the layer above the variation layer and free transforming if needed works nice for getting a more accurate look – then blend into the face with a brush. My original nose is appearing in many of these AI images! In this case, the Liquify Tool was used along with Viveza and Topaz Lens Effects Reflector filter to lighten the left side of the image – it gaves the background some depth difference. For tree background, used Generative Fill prompt of “Oil painting outdoor background with trees.” Otherwise using all the same brushes as in my other blogs. It is fun to do these, and I am hoping I am getting better at drawing and painting faces!…..Digital Lady Syd
Trans Siberian Orchestra in Concert
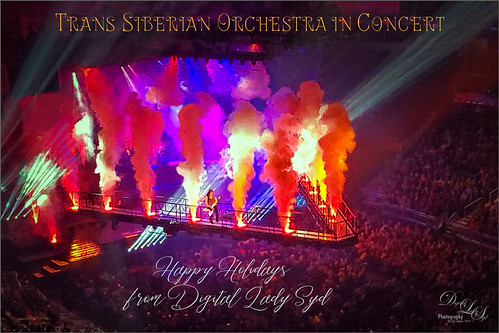
Hoping everyone is having a great holiday! This image was taken a week ago when they performed their Christmas show (hence the holiday card even though it is stretching it a bit) at the Amway Arena in Orlando. We were sitting pretty far away, but it was still awesome! Had to post a pix even if it is a bit crazy! I actually pulled this image out of a video, and then ran it through Skylum’s software Neo – used a lot of different effect before I liked it. Used Viveza to tweak it a little more and finally painted in a few areas to remove lines holding the hanging contraption. This is pretty much how the color was, which is what I remember most. Anyway, it definitely shows the scope of the color effects from the show! See ya next year!…..Digital Lady Syd
The Pirate

Am I the only one who photographs mannequins – yep this guy was in the gift shop at Universal Studios-Orlando. They have some wonderful displays if you look around. Of course, he was not exactly a pirate – I added the hat, hook and map from PixelSquid to make him look authentic. Otherwise pretty normal post-processing. Topaz Sharpen set to Out of Focus was used to really sharpen him up. Sam Peterson Shadows and Highlights layers were used first to even out the lighting (See My Fun Photoshop Blog A Few Photoshop and Lightroom Tips and Tricks, Tip 2 for info on how to do this). Then Viveza was used for adjusting everything. Three textures were added: Kim Klassen’s Pinitonly and Stay textures (not sure these are still available), and 2 Lil’ Owls Workbook texture from forever ago. Some of the texture was masked out using Kyle’s Megapack Drawing Box-Shady Graphite Fat Dry brush – really nice for when you want a little grain. A Color Lookup Adjustment Layer was added using On1’s Urban Explorer preset and set to 83%. PS Camera Raw Filter was used to create a slight vignette effect. The Font is called Fratello Nick. That is about all that was done. I have a couple other images like this one for a set……Digital Lady Syd
Living in the Abstract

Just a short blog – I thought I would show you the results using this drawing I created of a lioness turned into a painted image using Kyle T. Webster’s Spring 2022 brush set. The drawing is one I did following Aaron Blaise’s Digital Painting for Photoshop – Getting Started-Sketching in Photoshop video. (See my recent Fun Photoshop A Little Aaron Blaise Digital Drawing Practice blog for more info on this.) I used one of Aaron’s resource images – it is not an exact representation but I felt he should get credit for the original drawing idea. Then, just following Kyle T. Webster’s YouTube called Illustration Masterclass: Draw Stylized Portraits with Custom Brushes to paint the lioness. This video used many of his newly released Spring 2022 brushes, which can be found in PS by clicking on the Hamburger icon in the top right corner of the Brushes Panel and clicking “Get More Brushes” – if you have any recent version of PS and are on a monthly plan, it will be listed at the top of the page, after logging if needed. There appear to be 37 brushes in this set. If you want to see how each works, watch his Brush Hour with Kyle T. Webster: Check Out the Spring 2022 Brush Set! video. This image mainly used his Woodchuck Joey, Pellets and Old Blue brushes with a few other ones thrown in. I actually changed the Pellets-Alt brush to a Spacing of 98 and a smaller size of 45 pixels to get a really nice texture effect when the stylus is pressed lightly and really smooth when pressed hard. To select the colors, a color palette layer was created by following Kyle’s video called Illustration Masterclass: Choosing the Right Colors for Your Digital Illustrations which is very helpful when trying to get colors that blend nicely. The splatter effect is a PNG overlay file that was downloaded from Creative Market in a set called 48 Subtle Grunge Textures Vector by Anastasia Autumn. It has PNGs, JPGs, ABRs PS brushes, and Vector AI files with the 48 textures in each file format. By adding a layer style to the PNG texture 01 layer and in Layer Styles selecting the Gradient Overlay, all these colors would be added (not sure which gradient, but it had a lot of horizontal gradient colors in it). It was set to 59% layer opacity. Major Cool! Viveza was used to fine tune the final image. Overall, this was just major fun to do!…..Digital Lady Syd
Handsome Fellow

Love how this beautiful Iguana looks up close – he lives at the Palm Beach Zoo in Florida and I think it may be a juvenile since it was so colorful. It took a lot of manipulating to get this image post-processed, but I really like the final results. Two images had to be stacked and aligned in Photoshop as some parts were more in focus in one image than the another. A black layer mask was added to the top image and just the parts needing to be sharper were added painted back in. Topaz Sharpen AI was tried on a stamped layer, but some bad haloing appeared so this filter was removed. On a stamped layer the Iguana was selected using a layer mask. On a duplicate stamped layer placed underneath the subject layer, the Tilt Shift Filter in the Blur Gallery was applied to smooth out the background. I had to reload PS2021 as the pins were not showing for these filters on my computer in PS2022. Not sure what the issue is here! Used Viveza to sharpen up photo and the new Spectrum Neo for the lighting-love the relight effect in this filter. Then a Color Lookup Adjustment Layer and two Levels Adjustment Layers (one for a vignette) were used to finish up. It took a while, but well worth effort……Digital Lady Syd
Playing Lionfish

Yes, these two rather vicious looking lionfish are probably friends. I had one for several years that was very tame. He would follow me around the tank when I was in the room. Who knew? (Check out Ray Hunziker’s book on Marine Aquarium Basic Setup and Maintenance on pg. 67 – he had similar experiences!) Had to take some pix of my Leo the Lionfish relatives when I had the chance. Since they were both moving and the tank itself gave some pretty weird shadows, it was a challenge. Using Topaz DeNoise AI and Sharpen AI totally saved the image – that is why it was never post-processed before due to the high level of noise. Many steps were involved, but probably the most important thing was the lighting on the two fish. Overlay and Multiply layers were used to create the shadow and highlight effects…..Digital Lady Syd
Winter in Indiana

Just practicing my painting and decided to do an abstract from one of my childhood haunts. The originals of this image were really of the lake trying to freeze but I decided to add a little more drama for my image. In this case, the lake has frozen and melted several times to get this rough edge.
One reason this image was done was to try out a couple Smudge brushes created since I discovered I don’t have any in my favorite painting tool set. Basically followed the older Digital Painting Techniques Volume 1 from Brian Recktenwald tutorial. It served the purpose and several brushes were made and used on this image. Also a lot of painting was done with my SJ Pastel 3-Painting (have used this brush forever – great for just painting in solids with a little texture in it.) I also downloaded Daarken’s brushes and used one called Texture Sample Brush 45 3 to add the icy feel to the image. Used Carlos Cabrera’s brush for the overcast clouds from the same book. The bird set is called Bird Brushes by Canmax Stock-SB 3. Lots of other brushes were used like Kyle’s Animator Pencil 2016 and his Glide Sketch Pencil and David Belliveau Mixer Brush. Last step used Viveza 2 to get a nice focal point to the birds……Digital Lady Syd
A Duck Enjoying his Habitat

This beautiful and rather friendly male Mallard Duck was swimming all over the place while several people were trying to take his picture at Ames Park, Ormond Beach, Florida. His coloration is what attracted me to this image. Did my basic workflow on this image but thought I would share that Topaz (see sidebar for website link) Sharpen AI was used to really sharpen him up. The Lucis Pro filter was also used – too bad no one has decided to make this great little filter available again. Also Viveza 2 was used – my go to filter to finish up a look. ……. Digital Lady Syd
Pretending I’m Driving My Dream Car
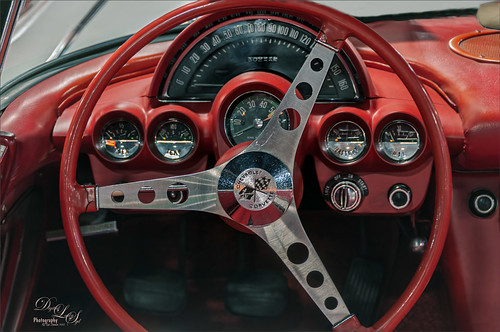
This 1961 Chevrolet Corvette was sitting in the Classic Car Museum of St. Augustine just waiting for me to take its picture. I so wanted to take this baby out for a spin! Not much post work was done on this image – just used a couple settings in Lightroom before beginning work in Photoshop. Had to do some cropping and a bit of Clone Stamp work to get it to line up correctly. Then Topaz Denoise AI (see sidebar for website link) Standard effect was applied. To further sharpen those little numbers on the dials, Viveza 2 came to the rescue with just the right amount. A Green Channel Luminosity Curves Adjustment Layer was added to further enhance the instruments. See my How to Use a Red Channel to Create a Nice Blended Image Effect blog – works pretty similar with the Green Channel if the Red Channel does not look that great. Last step was a regular Curves Adjustment Layer to set the Red color just right. That was it. What a great day to see this little beauty!…..Digital Lady Syd
Old Ford with a Fancy Radiator Cap

Recently went to the wonderful Classic Car Museum of St. Augustine with some of my Club buddies. There was so much to see so if you are in the area, be sure to check them out – lots of great old cars and the owners are happy to share information on all them. I forgot to get the information on this particular car, but I believe it is roughly about a 1930-ish Ford Model A Deluxe Sedan from its appearance. What is so interesting is that the hood ornament is a Boyce MotoMeter that is actually a radiator cap indicator and was designed in 1912. From the driver’s side, you can see what the car temperature is while driving. The wings are a separate part added to the cap. I wish I had looked on the other side!
Well just a few comments on the post processing here. Used Topaz Denoise AI (see sidebar for website link) and the Clear version – worked great! Then a stamped layer was created (CTRL+SHIFT+ALT+E) and the Sponge Tool (yep – that’s what I said) was used to desaturate some of the extraneous colors on this layer that appeared on the car because it was so shiny. The Options Bar was set to Mode Desaturate, Flow 100%, Airbrush on and Vibrance unchecked. It does not have a Sample All Layers box so that is why a stamped layer was needed. A little Clone Stamp was used to clean up a few areas and a Color Lookup table was set to a Joel Grimes preset called Detailed Warmth – set it to Overlay blend mode at 47% layer opacity. On another stamped layer Viveza 2 was applied to sharpen the cap detail and darken down the corners a little bit. Last step was to do a Red Channel Luminosity Curve to bring out the cap more. That was it – lots of fun!…..Digital Lady Syd
Happy Lilies

Had a great time with some of my Photo Club buddies photographing Lilies at a small park in Ormond Beach, Florida, called Ames Park. This image was taken while I was lying flat on my stomach shooting as straight out as I could. It was shot using F/8.0 using a 40 mm lens. There was a lot of shine on the flowers so that all needed to be toned down a bit in Photoshop. A lot of clean up had to be done and Viveza 2 was used to help with the overall lighting effect. The last step used was applying an Orton Effect that Mark Denney uses a lot on his image. The steps are in his 6 Things I Never Do Inside Lightroom! video. I thought it added a nice finishing touch for these flowers. …..Digital Lady Syd
The Beautiful Autumn Leaf Butterfly

Just another one of the beautiful butterflies at the Florida Museum Butterfly Rainforest in Gainesville, Florida. This is a really fun place to visit if you are in the area and it open now. Just did my basic post work – a little Luminar 4 and Viveza, some painting, a Blake Rudis sharpening action, and a Blake Rudis Dodge and Burn action. I really enjoy post processing these butterflies……Digital Lady Syd
Enjoying the Day

This is another example of an image that I colorized using the steps from my How to Convert Black and White Images to Colorful Paintings with Topaz Studio 2. I did use Topaz (see sidebar for website link) Sharpen AI and of course Topaz Studio 2 using the same preset as in the my original blog except the ReMix filter was set to Colored Marker for a style. Added a Color Theme filter to get the colors just right. To get a really nice effect, Topaz Lens Effect was applied for a bit of golden feel. That was about it. So fun to do these vintage images!…..Digital Lady Syd
My Favorite Lemur

This guy is my favorite Lemur – a Coquerel’s Sifaka Lemur – at the Jacksonville Zoo. Definitely a very friendly male who is always glad to say “Hi” when you come by his exhibit. Luminar 4 (see sidebar for website link) was used on the image and of course Viveza. I love working on the beautiful animal images from this Zoo…..Digital Lady Syd
Adding Some Pink Delight
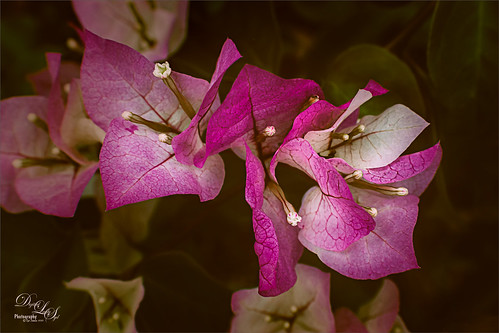
This unusual bush is blooming in my front yard – the leaves are actually the large pink colored looking blooms that will turn green soon. A High Pass Layer was created using a Radius of 12.5, much higher than usual. I have recently seen several people doing this and thought I would try it out. In the layer mask the part that should not be sharpened so much, mainly the background areas, were painted out with a black soft round brush. Otherwise just the same process I usually use – the Darken and Lighten Curves for dodging and burning, Color Look Table, Levels for a vignette, and Color Balance Adjustment Layers were applied. The last step was to add Viveza 2 to the main focal point area.
The Beautiful Queen Emma Entertains a Visitor

Yes, since I am stuck at home, I decided to practice some of my macro photography by starting with one of my favorite subjects, a Queen Emma plant in my front yard. This beauty had a beetle of which I have no idea what kind it is, tromping around, but it did not seem to be hurting the blossom. There is also a photo-bombing ant – oh, my! I will keep an eye on the Queen from now on. Not much was done with this image other than using a profile in Lightroom called Artistic 02 at an Amount of 76 and a little sharpening on the beetle with the Adjustment Brush. In PS the file was duplicated and Luminar 4 was opened to sharpen up the beetle a little more – just used the AI Enhance Tool at 50%, and Structure on and Detail Enhance Tools on just the beetle, using a mask to do this. Used Viveza 2 to really adjust the color and lighting in the final image. That was it. What an intriguing visitor…..Digital Lady Syd
Monkey Deep in Thought

This guy is an example of why I love to go to the Jacksonville Zoo – almost always there is a different type of animal to photograph that was not noticed before. This is a male Southern Black Howler Monkey from Argentina and Bolivia. The texture is one I created in Corel Painter and a Hue/Saturation Adjustment Layer was used to give it the matching blue tones of the monkey. The monkey was selected from his background by using the Quick Selection Tool and the Select & Mask panel. A Color Lookup Adjustment Layer was used using a free LUT called SS (SparkleStock) Bleak Trellick preset – I really like this set of LUTs. Viveza 2 was used to even out the lighting in the image and adjust it to his face. A Spotlight Effect layer was added and last a Curves Adjustment Level. I love they way this image turned out – a lot different than the Zoo image!…..Digital Lady Syd
Isn’t She Beautiful!
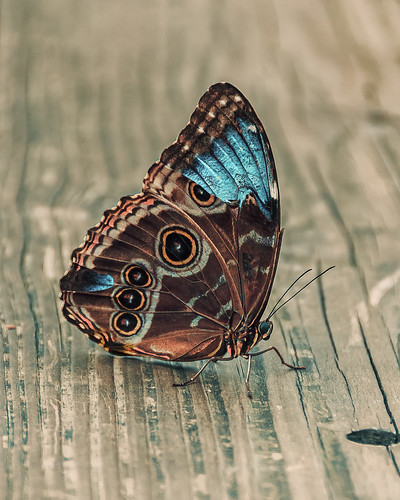
Recently went to the Florida Museum’s Butterfly Rainforest in Gainesville. There were several of these Blue Morpho beauties flitting around – and not standing still for very long – but little one had a ripped wing and was having a some trouble. It games me a chance to get a great photo of both the gorgeous iridescent blue on the back side of her wings and the camouflaged brown on the bottom side. These butterflies were just spectacular to see! And not much was done to get the color – mainly just some Topaz (see sidebar for website link) Sharpen AI and Viveza to some extra sharpness and adjust the color. Also the Camera Raw Filter was used to adjust color on the brown of the wings. These butterflies were definitely the hit of the season at the museum. …..Digital Lady Syd
A Vintage Gas Station

Had a lot of fun colorizing this vintage image taken in 1941 in Minneapolis, Minnesota, using mostly the settings from my recent blog called How to Convert Black and White Images to Colorful Paintings with Topaz Studio 2. Click here to see the black and white photo at Shorpy.com. In the Look I settings I provided, the unchecked ReMix AI was turned on and the Eye of the Storm style set to a High strength and the Overlay blend mode (Brightness -0.41, Contrast 1.42 and Hue -1.00 sliders). The Quad Tone Filter was added on top and the Strength was set to 0.65 – this added a little color in the sky and reduces the color around the flags. Back in Photoshop Viveza 2 was added and the attendant was highlighted to emphasize him a little. On a stamped layer Topaz (see sidebar for website link) Restyle was added using the Butterfly Wings preset – the ReStyle Opacity was set to 30% and the blend mode to Multiply. Give this a try if you have Topaz Studio!…..Digital Lady Syd
The Red Cedar Stump

Had fun with this great image from Shorpy’s – the historical photo archive site. This image was called Pacific Highway through a Washington Red Cedar Stump and was taken in 1920. Here is a link for info on this stump which is still standing in the State of Washington. Is this guy really looking at his phone????
Recently I did a Fun Photoshop blog called How to Convert Black and White Images to Colorful Paintings with Topaz Studio 2. This image followed this technique except a different Look that was created in Studio 1 a long time ago was applied. Three filters were in the Look: Color Themes, AI ReMix (used Wave of Color Style), and Precision Contrast. Also HSL Color Tuning and Details (with settings in the minus to give a painterly effect) filters were added. Back in Photoshop Viveza was used to balance it all out. Last step involved adding a bit of a vignette so car and man stood out. It was a nice image to colorize. ….. Digital Lady Syd
Beautiful Hawaii
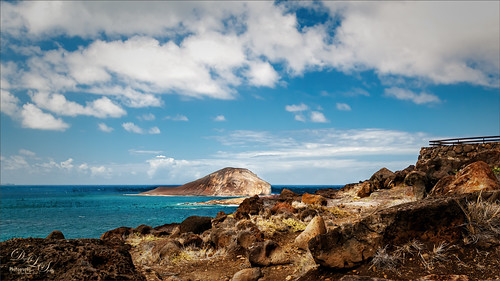
Just missing Hawaii. This image was taken at the Ka Iwi Scenic Shoreline in Oahu – great place to take pix. Just adjusted sliders in Lightroom – no presets or a local adjustments. A B&W Adjustment Layer, a Color Lookup Adjustment Layer using my preset, a Red Channel Curves Adjustment Layer, Viveza 2 to direct focus, a Spotlight Effect layer, Topaz (see sidebar for website link) DeNoise AI at 0.47 was added and applied to just the sky with a layer mask, and finally a Vignette using the Levels Adjustment Layer. Pretty much my basic workflow. ….. Digital Lady Syd
Checking out a Flower
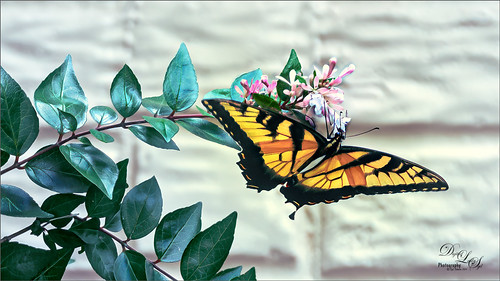
This beautiful Swallowtail Butterfly (of some type I believe) was enjoying a pink and white flower while in a rural area of Virginia a couple months ago. What a beauty she was! And this plant had at last 20 or 30 butterflies flying around it. In LR, just my basic changes were made – no presets, filters or brushes. In PS Topaz Sharpen AI was set to Stabilize, Remove Blur 0.79 and Suppress Noise 0.49. A Color Lookup Adjustment Layer set to PhotoFocus LUT called PF-Candlelight at 62% layer opacity was next. On a New Layer, some of the small halos around the green leaves was renived by cloning out with a very small brush. The image was lightened just a little with a Curves Adjustment Layer. A New Layer was set to Overlay blend mode and used a small brush to add some contrast into just the flowers. Viveza 2 was used last to adjust the colors and focus of the image. What a pretty butterfly!…..Digital Lady Syd
The Purplepassion Flower

This Purplepassion Flower image was taken at the Harry P. Leu Gardens in Orlando, Florida a while ago. It is a very beautiful bloom and there is a little bee hiding in it. Mainy did the clean up in Luminar (see sidebar for website link) Flex with their wonderful Structure, Detail Enhancer, Image Radiance, Microstructure, and HSL filters. In Photoshop used a Gradient Map tAdjustment Layer to emphasize the color a little. Then used Topaz (see sidebar for website link) Studio 2’s fabulous Impression filter – just adjusted the default settings a little to smooth out the background. Then used Mixers brushes back in Photoshop to further blend in the effect. Finally used Topaz Lens Effects Fog filter to lighten the top slightly. Viveza 2 was used to adjust the focal point and the last step was a Curves Adjustment Layer. The text is a font called Brettany ….. Digital Lady Syd


