
New Guinea Singing Dog – Singing?

This was one of the cutest animals I have ever seen in a zoo – this one at the Palm Beach Zoo – seemed totally happy. He also had a buddy running around outside his doghouse. Just used a lot of different filters here – Topaz DeNoise AI (this filter is getting really good!), Luminar 4 (this program is becoming my go-to plugin for cleaning up an image – it is incredible) (see sidebar for website link), and an Exposure Adjustment Layer for the eyes. And then several individual layers were used to just clean up some of the edges of his face, muzzle and ears using an erodible brush by Aaron Blaise. That was it!…..Digital Lady Syd
What a Beautiful View!

This is an image taken a while back at Edinburgh Castle in Scotland – missing not having any gorgeous landscape images to take like this one. Hard to believe these clouds were so dramatic! Not much done on this photo – just some LR basic processing, then in PS, Topaz (see sidebar for the website link) Denoise AI was used. Next a little Luminar (see sidebar for website link) and finished off with Viveza. All my favorite plugins!…..Digital Lady Syd
Fishing in 1904

This image is a fabulous one from Shorpy.com, one of the best places to see great historical images. I decided to use one of my colorizing techniques since the image was so clear and interesting. Used my blog called How to Convert Black and White Images to Colorful Painting with Topaz Studio 2. The first step is very important as noted in the blog – make sure you have adjusted the resolution and size of the image before beginning to change the image. When opened in Topaz (see sidebar for website link) Studio 2, only AI ReMix was applied using Daylight Fade preset, High, Brightness 0.60, Contrast 1.00, Sat 0.75, Hue 0.15. From within Topaz Studio, Topaz Adjust AI was opened and set to Standard and Strength 0.71 – then mainly all the sliders were adjusted to get a really nice look. Back in PS, the skin color was painted in as for some reason it did not pick up color. The blue color came from Topaz ReStyle and Nik Viveza was used to even out the whole effect. This was the perfect image for this type of coloring…..Digital Lady Syd
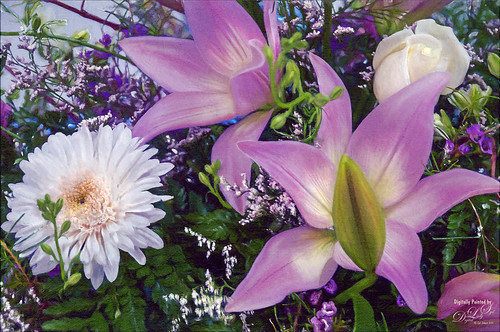
Queen Emma Lily Displaying Her White Blossoms

Another image of my beautiful Queen Emma Lily blossoms. This time she has three visitors – not sure these are wanted guests. Looks like a little garden work is in store. This image contained a very short workflow – a little sharpening in Topaz (see sidebar for website link) Sharpen AI, some dodging and burning, and Nik Viveza to adjust the background color and focus on the blossom. Pretty easy. ….. Digital Lady Syd
Scared Hood Ornament

This vintage Ford image was taken in the parking lot at the St. Augustine Alligator Farm a while ago. I did not realize how scared the hood ornament looked until I started to work on the image. In Lightroom I applied one of my presets called SJ HDR Split Tone – the image did not end up this way in PS, but it is how I started. In PS Topaz (see sidebar for website link) Sharpen AI, Lucis Pro – just a single slider to give it more of a cartoon effect, and a Color Lookup Adjustment Layer using a PhotoFocus preset called Africa set to 40% opacity (and killed the split tone from LR) were added. Did a little dodging and burning on the text and headlights. Finished up with a Levels Adjustment Layer to add more contrast and Hue/Saturation Adjustment Layer to give it a little more saturation (this rarely happens for me). That was it. Very easy and lots of fun. …… Digital Lady Syd
Butterflies Enjoying the Early Morning
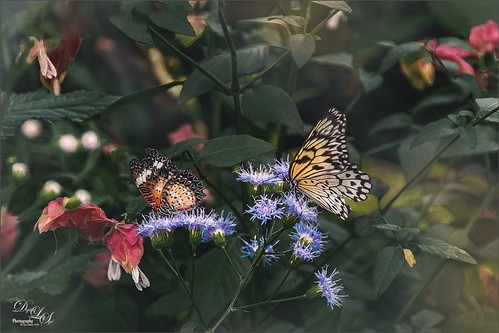
Had some fun with these beautiful butterflies trying out a new tutorial from Glyn Dewis on Creating Realistic Clouds in Photoshop – he used it on a sky photo but I thought I would try it to add a nice soft sunlight effect in this image, which was taken at the Florida Museum’s Butterfly Rainforest in Gainesville, Florida. The image was in pretty good shape out-of-camera so not much was done to the actual photo. Topaz (see sidebar for website link) Sharpen AI was used on the butterflies. The fog was adjusted so accentuate the butterflies and add the fog on the background areas. A Solid Color Adjustment Layer was clipped to the fog to give it the soft yellow sunlight feel – used the Colors White drop-down field and put sliders to Cyan +31%, Magenta +8%, Yellow +28% and Black -39%. On top added one of my Color Lookup presets and set it to 78% layer opacity. Otherwise a few clean up layers were added. These butterflies look so perky!…..Digital Lady Syd
Adding Some Pink Delight
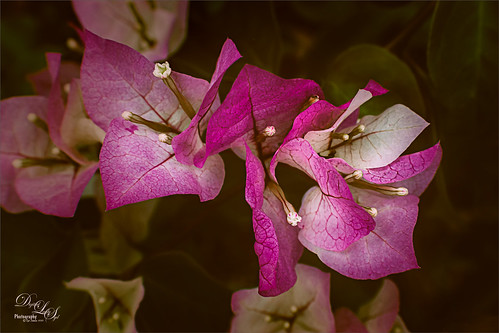
This unusual bush is blooming in my front yard – the leaves are actually the large pink colored looking blooms that will turn green soon. A High Pass Layer was created using a Radius of 12.5, much higher than usual. I have recently seen several people doing this and thought I would try it out. In the layer mask the part that should not be sharpened so much, mainly the background areas, were painted out with a black soft round brush. Otherwise just the same process I usually use – the Darken and Lighten Curves for dodging and burning, Color Look Table, Levels for a vignette, and Color Balance Adjustment Layers were applied. The last step was to add Viveza 2 to the main focal point area.
A Very Lonely Monkey
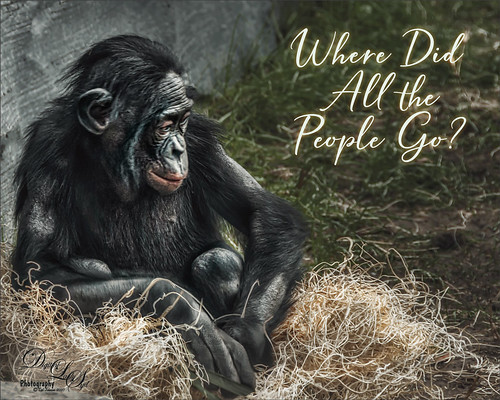
Thought I would post another Bonobo Monkey image from the Jacksonville Zoo – the animals are very confused right now as their major source of entertainment is missing. Only a few things were done to this image after doing just a little Lightroom adjustments. In Photoshop one of my favorite plugins is called Flex by Skylum. They do not make it anymore because Luminar 4 (see sidebar for website link) is now released with some new and different Tools (previously filters). Flex has one Luminar 4 does not have called Image Radiance (Aurora still has it), and it gives a really nice effect to images. I am not sure why they dropped this filter as it is really a nice one. This filter was the main effect applied to this image – several other Tools were also used in Flex like Details Enhancer, Structure, Clarity, HSL, and Top and Bottom Lighting, and which are all available in Luminar 4. Back in Photoshop a Color Lookup Adjustment Layer using Joel Grime’s Soft and Desaturated LUT preset was applied at 89%. A Curves Adjustment Layer was added for some contrast, and darken and lighten spotlight layers were used on his face and body to direct the eye. That was it. I hope we can get back to visit our friends at the zoos soon! …… Digital Lady Syd
Queen Emma Lily Dressed Up
Have been practicing my Macro Photography recently and decided to give some of my very favorite blossoms a different look. Today we are adding an inverted image (CTRL+I in thumbnail – then set to Color blend mode) showing greens and blues instead of the traditional reds and whites to our collection. These beautiful blossoms were accented with some purple glitter thanks to Kyle’s Concept Brush Small Branch Mix in PS that was converted to a Mixer, thanks to the expertise of Nicolai at Grut Brushes – did you know you can convert any brush into a Mixer by simply clicking on the Mixer brush and ALT+CTRL clicking on a regular brush in the Brushes Panel? That’s what was done here on a New Layer and set to Linar Burn blend mode. Some Sharpening was done using the new updated Topaz (see sidebar for website link) Sharpen AI filter and Lucis Pro. Topaz ReStyle’s Warm Steel Wash preset applied to further enhance the color to the Lily. Last step was to use a Levels Adjustment Layer vignette to further enhance the beautiful blossoms. Yes, the Lily is definitely ready for Spring Holiday Extravaganzas. ….. Digital Lady Syd
The Beautiful Queen Emma Entertains a Visitor

Yes, since I am stuck at home, I decided to practice some of my macro photography by starting with one of my favorite subjects, a Queen Emma plant in my front yard. This beauty had a beetle of which I have no idea what kind it is, tromping around, but it did not seem to be hurting the blossom. There is also a photo-bombing ant – oh, my! I will keep an eye on the Queen from now on. Not much was done with this image other than using a profile in Lightroom called Artistic 02 at an Amount of 76 and a little sharpening on the beetle with the Adjustment Brush. In PS the file was duplicated and Luminar 4 was opened to sharpen up the beetle a little more – just used the AI Enhance Tool at 50%, and Structure on and Detail Enhance Tools on just the beetle, using a mask to do this. Used Viveza 2 to really adjust the color and lighting in the final image. That was it. What an intriguing visitor…..Digital Lady Syd
Keeping an Eye on the Gorilla in the Premises!

This is a Guereza Colobus Monkey that resides at the Jacksonville Zoo along with several Gorillas, in fact one was roaming around him while he was sitting there. He was definitely keeping an eye on the big guy. What gives this monkey such an interesting background is the Topaz (see sidebar for website link) Studio 2 ReMix filter that was applied. The Beige Sketch Style was used along with the Glow filter to add the interesting line texture. The Edge Filter was also used to do the same. Then a little painting had to be done on the image back in Photoshop just to clean up edges and lines. Also his face had to be painted in as it was lost in all the line work from Studio. Last step was to enhance the texture a little more with the now defunct Luminar Flex – still love the results it gives so I use it a lot. I have a similar image that contained Toucan birds – it is a fun look for kids!…..Digital Lady Syd
Monkey Deep in Thought

This guy is an example of why I love to go to the Jacksonville Zoo – almost always there is a different type of animal to photograph that was not noticed before. This is a male Southern Black Howler Monkey from Argentina and Bolivia. The texture is one I created in Corel Painter and a Hue/Saturation Adjustment Layer was used to give it the matching blue tones of the monkey. The monkey was selected from his background by using the Quick Selection Tool and the Select & Mask panel. A Color Lookup Adjustment Layer was used using a free LUT called SS (SparkleStock) Bleak Trellick preset – I really like this set of LUTs. Viveza 2 was used to even out the lighting in the image and adjust it to his face. A Spotlight Effect layer was added and last a Curves Adjustment Level. I love they way this image turned out – a lot different than the Zoo image!…..Digital Lady Syd
Isn’t She Beautiful!
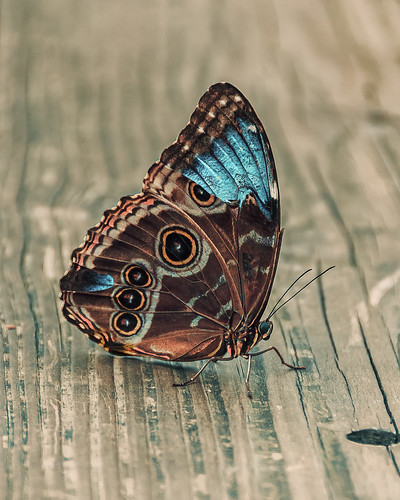
Recently went to the Florida Museum’s Butterfly Rainforest in Gainesville. There were several of these Blue Morpho beauties flitting around – and not standing still for very long – but little one had a ripped wing and was having a some trouble. It games me a chance to get a great photo of both the gorgeous iridescent blue on the back side of her wings and the camouflaged brown on the bottom side. These butterflies were just spectacular to see! And not much was done to get the color – mainly just some Topaz (see sidebar for website link) Sharpen AI and Viveza to some extra sharpness and adjust the color. Also the Camera Raw Filter was used to adjust color on the brown of the wings. These butterflies were definitely the hit of the season at the museum. …..Digital Lady Syd
A Vintage Gas Station

Had a lot of fun colorizing this vintage image taken in 1941 in Minneapolis, Minnesota, using mostly the settings from my recent blog called How to Convert Black and White Images to Colorful Paintings with Topaz Studio 2. Click here to see the black and white photo at Shorpy.com. In the Look I settings I provided, the unchecked ReMix AI was turned on and the Eye of the Storm style set to a High strength and the Overlay blend mode (Brightness -0.41, Contrast 1.42 and Hue -1.00 sliders). The Quad Tone Filter was added on top and the Strength was set to 0.65 – this added a little color in the sky and reduces the color around the flags. Back in Photoshop Viveza 2 was added and the attendant was highlighted to emphasize him a little. On a stamped layer Topaz (see sidebar for website link) Restyle was added using the Butterfly Wings preset – the ReStyle Opacity was set to 30% and the blend mode to Multiply. Give this a try if you have Topaz Studio!…..Digital Lady Syd
Enjoying the Holidays!

My image of this beautiful Palamedes Swallowtail Butterfly was converted to a wintry scene and put in holiday apparel. Butterflies like to dress up. To get her to this point, Perfectly Clear was used to do an overall exposure and sharpening effect. The background had a chain-link fence that looked terrible and a couple extra flowers on the left side. To get rid of all this distraction? Just select an 80% hard round brush set to 5% Flow and paint ed it away. If you accidentally paint over the edges, can either choose a small eraser or add layer mask to remove it. This is how the butterfly lines could be shown so clearly. It is amazing how easy a clean color can be achieved. Elements were added on each side to give a nice frosty look. For the right plant, used Sweet Floral Watercolor Bundle by Mnuk with a clipped Curves Adjustment Layer using the color channels to get the colors needed. The left element is Watercolor Leaves by Sunny Illustrations with a clipped Curves Adjustment Layer with both the RGB and Color channel color changes. Foreground leaf was covered up with a leaf by Sweet Floral using a Selective Color Adjustment Layer clipped to get the correct color. The font is called Alberobello Script and the free snow brushes were from Serge Ramelli (the best out there). It did take some time to do, but it was a lot of fun……Digital Lady Syd
The Old 1929 Ford Model A Car

Just posting a quick blog of an antique car that is usually parked outside the Cordova Hotel (now the Casa Monica Hotel) cc 1888 in St. Augustine, Florida. Lots of fun adding an old feel to the image. After watching Unmesh Dinda’s video called 4 Luminar EXCLUSIVE Effects Photoshop Can’t Create!, I decided to use my similar image and try out the technique. From Lightroom Luminar 4 (see sidebar for website link) was opened and his steps were followed. The LUT used is from the Street Look set called 60’s B&W preset. In Photoshop used On1 (see sidebar for website link) as a plugin to add Cross Processing filter using Yellow Strong and Vintage filter using Earth – all filters were set to Opacity 59%. Now the image had a more yellow/green look so in PS a Color Adjustment Layer was added to get more of a dark purple and cyan feel. A Levels Adjustment Layer was used to adjust the overall brightness of the image. Last step was to add a subtle vignette. I love doing vintage look images. …..Digital Lady Syd
Painted Flowers
Just had fun painting – I like to practice a bit each week so I do not forget how to do this. Topaz (see sidebar for website link) Sharpen AI was used to sharpen the image. Actually used a plugin I got recently, Perfectly Clear, to brighten up the image – just used Tone, Color and Preprocessing panels. Had to clean up a little and then put together several brushes in a group to use for painting -mainly mixers, blenders, and a couple regular brushes. A bevel and emboss layer style was added on top to get the canvas effect…..Digital Lady Syd
Beautiful Hawaii
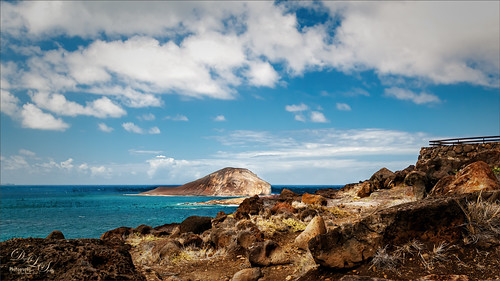
Just missing Hawaii. This image was taken at the Ka Iwi Scenic Shoreline in Oahu – great place to take pix. Just adjusted sliders in Lightroom – no presets or a local adjustments. A B&W Adjustment Layer, a Color Lookup Adjustment Layer using my preset, a Red Channel Curves Adjustment Layer, Viveza 2 to direct focus, a Spotlight Effect layer, Topaz (see sidebar for website link) DeNoise AI at 0.47 was added and applied to just the sky with a layer mask, and finally a Vignette using the Levels Adjustment Layer. Pretty much my basic workflow. ….. Digital Lady Syd
Happy Thanksgiving!
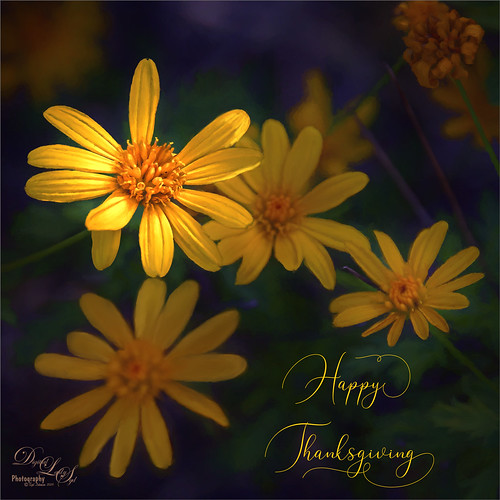
I still have a few yellow daisies blooming in my yard so they decided they would like their picture taken to wish everyone a wonderful Thanksgiving Day. What I like the most is the pretty font in this image – it is called Argentina Script. It lots of different Glyph settings to make your text look fancy. Also used Topaz (see sidebar for website link) Sharpen AI and Topaz Impression (for just the background – painted back the flowers), PS Color Lookup Adjustment Layer using Crisp Winter preset, a red Photo Filter set to 27% Density, and Nik Viveza. Great fun with this one!
Have a Happy Thanksgiving from Digital Lady Syd!
The Dome at Flagler College

I have tried to post process this image before without a lot of success. That was until I ran across an older video by the Photoshop Guru Unmesh Dinda where he used Luminar 2018 on a very similar image. I could not believe how great the details came out so I thought I would share the technique. The video is called 4 Luminar EXCLUSIVE Effects Photoshop Can’t Create and the effect used here is called Image Radiance. The image was taken in St. Augustine at the main entrance to Flagler College, aka the old Hotel Ponce de Leon built in 1890 by Henry Flagler. The dome stands 3 stories high and is still quite spectacular. The effect can be done easily with Luminar (see sidebar for website link) Flex but is much harder with Luminar 4. Here are the filters and settings used for the above – you can see the issue with Luminar 4 not having all the filters/sliders: Dramatic: Amount 39, Contrast 95, Local Contrast 69, Brightness -88, and Sat -42; Highlights/Shadows: Highlights -80 and Shadows 63 (for Lum 4-look in Light filter for sliders); Sharpening: Amount 89, Radius 50, Masking 35, and Dehalo 50 (for Lum 4-look in Details Enhancer – all but the Dehalo sliders are found in Advanced Settings); Image Radiance Amount 14, Smoothness 100, Brightness 29, Shadows 79, Warmth 19, and Sat -70 (for Lum 4 there is a Glow setting but no Shadow or Saturation slider) ; Microstructure: Amount 90 and Softness 50 (for Lum 4 there is not Microstructure filter-possibly AI Structure would work); and added Details Enhancer: Small 41, Medium 35, and Large 21. I also used Topaz (see sidebar for website link) Sharpen AI at the start using the Stabilize mode, Remove Blur 0.90 and Suppress Noise 0.30 – the best sharpening filter around.
Hope this post helped you a little, especially if you are working with the new Luminar 4 – Luminar 3 did have all the filters and sliders still. Have a great day!…..Digital Lady Syd
First View of Land

This was a pretty exciting moment when land is first seen after sailing across the Gulf Stream all night. There was a sailboat off in the distance in this image, but we did not see another one until Spanish Cay – the ocean is very empty around here. To post process the image, very little was done. The water was adjusted in Topaz (see sidebar for website link) Studio 2 by adding a little bit of the Impression filter set to the default to tone down all the white reflection on the water – it was masked off the sky. This is exactly how the clouds looked – totally incredible. A Color Lookup Adjustment Layer was added using the free SparkleStock’s Wedding LUT called Airy 01 set to 58% layer opacity. A Curves Adjustment Layer was added on top where the RGB curve was set to a little S curve for contrast and the Red Channel was used to lighten up the Cyan just a little. That was it. ….. Digital Lady Syd
Savannah Home

Just enjoyed painting an image I took quite a while ago in Savannah, Georgia. These type of homes are everywhere in the historic district. In Photoshop used the Fan-Flat Blender that Photoshop provides in their Legacy set. Also used a couple others to get the smooth effect I wanted on the steps. In Corel Painter, used one of the newer Thick Paint Brushes to add texture and lighting to the ferns which were quite flat in the original image. Then brought the image back into PS to finish up. Actually ended up using a really old Topaz (see sidebar for website link) program called photoFXLabs and the Instatone effect since I could not get an the correct palette for the image. It worked great!…..Digital Lady Syd
A Distinguished Forefather Lemur
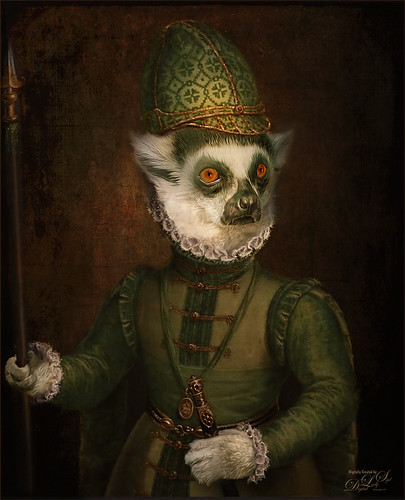
I have always wanted to try this and I finally found a really great Photoshop tutorial on how to do it. This image started with a wonderful painting by Sofonsiba Anguissola called Portrait of a Spanish Prince from 1567 (it is probably an image of Prince Phillip III – the link gives some interesting perspective on this guy). Anyway, I will not go into all the steps since I pretty much just followed the steps presented in Chris Spooner’s video called How to Make a Fun Oil Painting Pet Portrait in Photoshop. This effect is especially popular with people’s pet images. The trick is to find an image that works with your pet image. It took a lot of manipulation using the Free Transform Tool with the Warp in the Options Bar to get it looking correct. And in this case, I had to use two other images of lemurs for the hands. The colors can be matched using the video after the images are combined. 2 Little Owl’s Carnevala 23 texture was added on top and set to Vivid Light at 65% layer opacity to get the illuminated effect in the background. If you want to have some fun, give this a try……Digital Lady Syd
Don’t Even Think About It!

In Lightroom I started out with a new free preset downloaded from SparkleStock called Instant Hipster X Pro 2 and a few Basic changes before going into Photoshop. On a stamped layer applied Topaz (see sidebar for website link) Sharpen AI set to Stabilize, Reduce Blur 0.80 and Noise Reduction 0.12 – a whole bunch of detail became visible in the wings especially. Next a Color Lookup Adjustment Layer was added using PhotoFocus’s Africa preset set to 49% layer opacity. On another stamped layer set to a Smart Object (for any additional edits), Luminar Flex was opened and the Structure and Details filters were applied. Back in PS, A black mask was added and just the wing lines were painted back for a little more detail. An Exposure Adjustment Layer was used on the eye. (See my The Eye Have It – How to Make Them Pop in an Image blog.) That was all that was done! Love this crazy bird!…..Digital Lady Syd


