
The Spring in the Desert
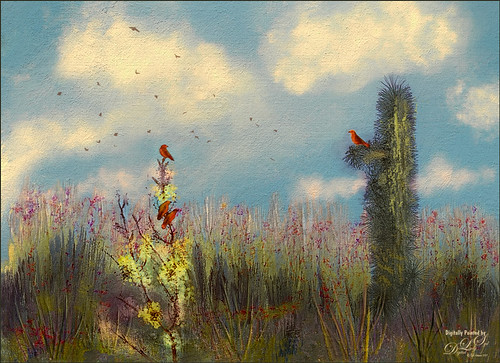
Image of what I imagine the Arizona desert looks like in the Spring after a bit of rain and before the sun gets too hot during the day for flowers to bloom on the plants. Painted the basic layout in Corel Painter and 4 layers for this. The clouds were blocked in and the plants and a few flowers using mainly Karen Bonaker’s brushes. In Photoshop created several different layers to add more plant details. Tried out the new inexpensive Flypaper Bird Brush set in this image – used the bush with the three birds on it, a single bird sitting on the cactus and the birds flying in the background. Grut 50 Photoshop Cloud brushes were used to embellish the sky more. Topaz (see sidebar) ReStyle’s silver and ivory cloak preset was added to adjust out the color a little. Nik Viveza 2 was used to add focal point emphasis. Topaz Lens Effects Graduated Neutral Density filter set to Bottom Quarter 2 stops was applied. On a New Layer above John Derry’s Impasto Smooth Light layer style was applied and with the Fill set to 0, used Grut’s OI Gypsum Slate brush painted over plants. French Kiss (see sidebar for website link) Atelier Canvas texture was added on top. A Hue/Saturation Adjustment Layer was clipped to the texture and Saturation was set to -100. Then on the texture layer, the blend mode was changed to Multiply and the layer opacity was set to 73%. A Levels Adjustment Layer was added on top to bring back the contrast. That was it……Digital Lady Syd
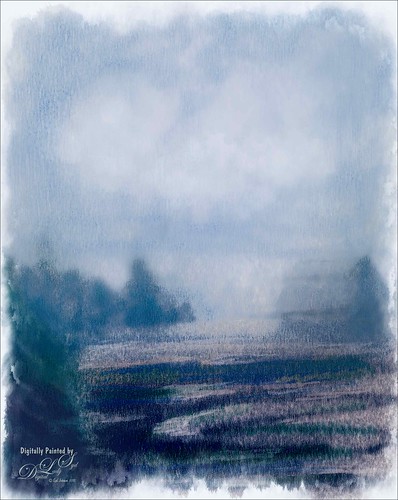
High Tide at the Sand Dunes
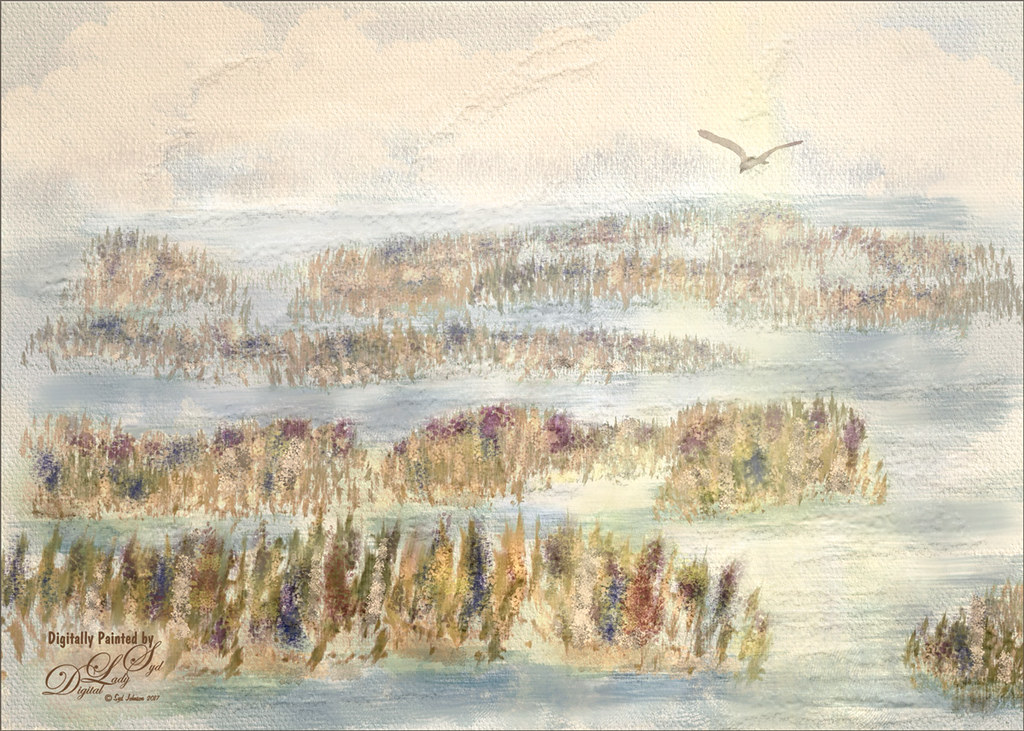
Back into my painting mode with what I envision the Sand Dunes in Indiana would look with a high tide. This image was completely painted in Photoshop using a basic white Canvas Texture as the background above my Background layer and set to the creamy cloud color using a Color Fill Adjustment. Layer. Next the ground areas were painted in using the various flower brushes, including several I created. On a layer below the flowers, the water was painted in. A bird from Obsidian Dawn was added – actually 4 birds were in the group but 3 were masked out. It looked pretty good at this point. Then Topaz (see sidebar for website link) Restyle Lavender gray preset was applied on a stamped layer on top (CTRL+ALT+SHIFT+E) to create a little bit different color palette. Duplicated the layer opened Topaz Texture Effects 2 – just added Diffusion section and used a mask to only apply the effect to the background plants; and Texture section using one of my own textures and removed effect from water with a mask. On layer above filled in a few more plants and added some color the the sky with a fog brush. To add a little warmth to the water, used a Sunbeam brush set to a low opacity. On another stamped layer, Topaz Lens Effects Fog 1 Filter was applied to soften the middle ground of image just a little. Last step was to add Kyle T. Webster’s Gentle Glaze layer style with Fill set to 0 and painted over the water areas to give a really nice painted effect in the water and sky areas. Painting in Photoshop is really fun!…..Digital Lady Syd
The Waters Edge in Florida
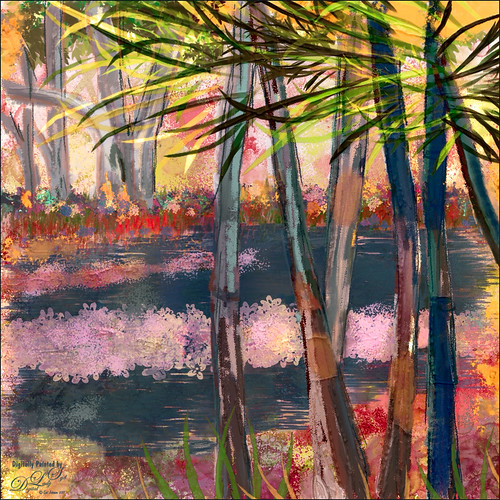
This image was painted completely in Photoshop. Lots of different brushes here. My SJ Playing with Grut’s Inky Leaks FX brushes texture gave a lot of the pretty background colors. (Click here to see original texture.) I drew in the basic image before painting in the foreground trees. Then painted in the background trees, water and flowers with several brushes. Nik Viveza 2 was used to adjust the emphasis in the image. John Derry’s Impasto Smooth Heavy layer style was used to add some painterly effects. Topaz (see sidebar for website link) ReStyle’s Zambezi Zest was used to give the image a better color scheme. On layer above, some light yellow sunbeams were painted in and the foreground was masked out with the overall layer set to 29% layer opacity. A Red Channel Luminosity Curves Adjustment Layer (see my How to Use a Red Channel to Create a Nice Blended Image Effect blog) was added as a last step. Just a lot of painting and fun!…..Digital Lady Syd
Hello from a Queen
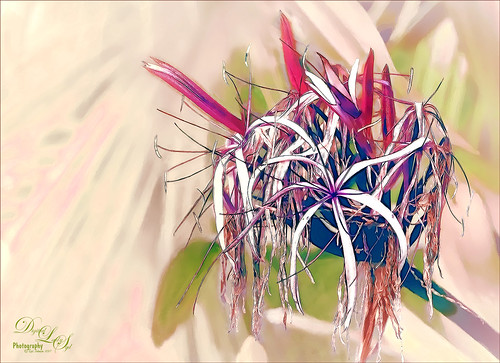
I was updating all my Topaz (see sidebar for website link) plug-ins this morning (many were updated in December 2016) and ended up experimenting with a few. I was using this beautiful Queen Emma Lily bloom, which was a difficult image to remove the distracting green background from the bloom. So I just started applying filters as I was checking update info. Topaz Black and White Effects was used to create an image with some color in it. Then on a stamped layer (CTRL+ALT+SHIFT+E) Topaz Clean’s Cartoon Desaturated preset was used to get a more detailed effect. On a duplicate layer Topaz ReStyle’s Zombie Ziggurat preset was applied. On another duplicate layer Topaz Glow was used. Lots of clean up layers were created to make sure it looks right. I finally found a fabulous Photoshop Pencil – Grut’s P Tin Softy – a new one he recently included in a great collection of 43 pencils. This brush was used to fill in black lines which were missing and adding a little color in little areas. Last step was adding Nik Viveza 2 to even out the background. That was all that was done!…..Digital Lady Syd
A Bird Christmas Tree
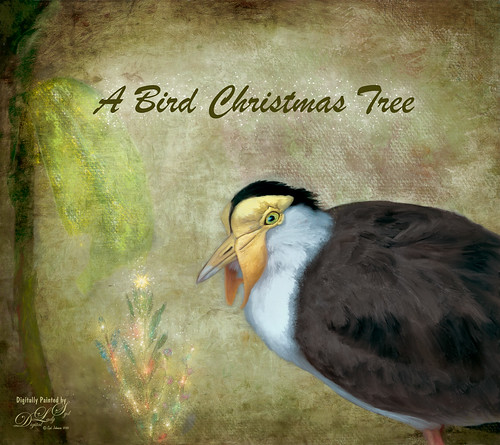
This bird is a Masked Lapwing that was photographed at the Palm Beach Zoo. I decided I needed to practice some painting so I picked this funny guy who sort of waltzed into my shot. Since the background was not too exciting, I decided to give him a little more holiday spirit by both painting and adding several filters. This image uses a lot of different filters and textures. The background texture is from Kim Klassen called Papertrio Paper and Paste (not sure it is still available but she has some beautiful textures) – applied twice, the second time set to Hard Light at 49% layer opacity. Topaz (see sidebar for website link) ReMask was used to select the bird and put him on his own layer – then used the Mixers to paint him. Used Grut’s MI Sues Hedge brush to soften and get the pretty edging between the brown and white feathers and am finding this to be a very useful mixer! Also used one of Fay Sirkis’s hair blenders. Have to find the right brushes to paint these guys! French Kiss (see sidebar for website link) Myrica Gale png was used for the plant – color was painted on a layer underneath it to add some colors. On a stamped layer (CTRL+ALT+SHIFT+E) Topaz Impression 2 was opened and Cezanne 2 preset was applied but masked out the bird to retain my painting strokes. On another stamped layer Topaz ReStyle’s Emerald preset was applied. Set the opacity to 69%. Corel’s Partical Shop was opened and used the Flame brush to paint a little color in the tree leaf and used Cluster brush to add some lights to the plant. Then used the Star brush to create the bright star on top and added a little color in by turning off the Glow and painting a little on the branches. Its Eraser brush was used to soften the effect a little. (See my Intro to Corel ParticleShop Brushes for Photoshop blog.) Back in PS, this layer looked pretty bright so lowered the opacity. Magic Dust Pretty Actions Brush was used to add a little white snow effect on tree and underneath text. Added some texture and clean up was done to finish up……Digital Lady Syd
A Guilded Age Bathroom
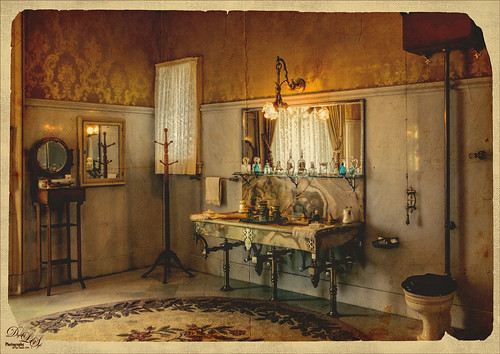
This image was taken at the Flagler Museum (Whitehall) in West Palm Beach, Florida. The image was actually post-processed without the border or vintage effect. Topaz (see sidebar for website link) Clarity, Lucis Pro (no longer available), Topaz ReStyle and Topaz Lens Effects were used to begin the process. I was actually really happy with the results, and then Adobe came out with Photoshop CC2017. If you open a New Document, now a New Document Dialog box opens – select the Photo tab at top and Templates is one of the choices. I scrolled down to Vintage Photo Effects which was downloaded and my image was placed on top. In the template I changed the background layer color and added a grunge overlay set to 47% layer opacity. I also clipped (ALT+click between the layers) a second texture under the Vintage Photo Paper. The Vintage paper texture was set to 47% layer opacity. Last step was to open up the now free Nik Viveza 2 to sharpen up the bottles and detail throughout the pix. The lighting was a little difficult to handle in this image due to the mirrors and the light coming in through a bright window off to the left. Try out Adobe’s free templates if you want a little different look……Digital Lady Syd
Just a Flower
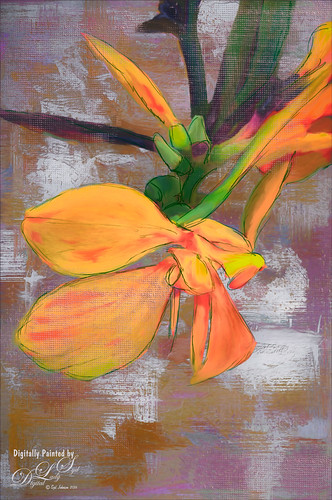
Had some fun painting this Canna Lily growing in my front yard. Used Topaz (see sidebar for website link) Clarity and ReMask (to select the flower) before adding one of my textures behind it. Then on a New Layer above, just painted the lily using Jack Davis’s Wow C Oil Blender 2 Mixer Brush that can be downloaded from his Facebook page. Topaz ReStyle was used to soften the color a little using a preset called Cotton Cloud set to Luminosity blend mode at 38% layer opacity. Some lines were added on a layer above and the last step was to add some texture using Just Jaimee Summer 2012 Brush Sampler 4 with a Bevel & Emboss layer style. It was set to Pin Light Blend Mode at 64% layer opacity. Last step used Nik Viveza 2 to emphasize the focal point. Pretty simple and lots of fun!…..Digital Lady Syd
BFF’s!

These two guys are from different places – not BFF’s at all – the larger elephant is from that wonderful object program called PixelSquid (see my How To Use the PixelSquid Add-on In Photoshop blog), and the other is from an image I took of the elephant at the Jacksonville Zoo. Just a few steps here: the plants are from brushes created mainly from my favorite plant brushes by Frostbo Brush Grass Set2 with a Bevel and Emboss added to it; both elephants were worked on using Lucis Pro (no long available); Topaz (see sidebar for website link) ReStyle was used to get the correct color effect; and the now free Nik Viveza 2 was used to get the correct focus on the elephants. It actually took me several hours to get the effect, but I love the texture…..Digital Lady Syd
Beautiful Flower
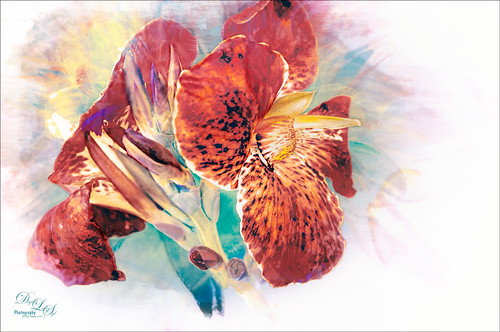
The flower in this image was an orange Canna Lily that grow really well in Florida. Topaz Detail 3 was applied to sharpen the image first in Photoshop. On a stamped layer, the Topaz (see sidebar for website link) Impression 2 preset as created in my Adding a Creative Touch in Topaz Impression 2 was applied, but this time the Coverage was set to 0.12, Coverage Transition 0.03, and Coverage Center X -0.13/Y 0.31. In the Masking section, the Spot Transition was set to 0.93 and Color Aware was set to 0.27 and the effect was placed on the center of the flower. The really bright colorful background could be controlled this way. Next a Black & White Adjustment Layer was added and set to Luminosity blend mode to get the tones correct. (See my How to Use a Black & White Adjustment Layer to See Contrast in an Image for more information on this.) On another stamped layer, Topaz ReStyle was applied a preset that used some colors from a previous image I had processed. (See my How to Use a Topaz ReStyle Trick for Improving Your Image blog to do this.) Two Curves Adjustment Layers were used to apply dodging and burning in the image. (See my How to Use Curves Adjustment Layers to Dodge and Burn an Image blog on how to do this.) On top of those, a Color Lookup Adjustment Layer was applied using the Filmstock_50.3dl filter. A light pink Color Fill Adjustment Layer was placed on top and set to Color blend mode. Last step used the now free Nik Viveza 2 plug-in to draw attention to the focal point. Lots of fun to do!…..Digital Lady Syd
Riding the London Eye
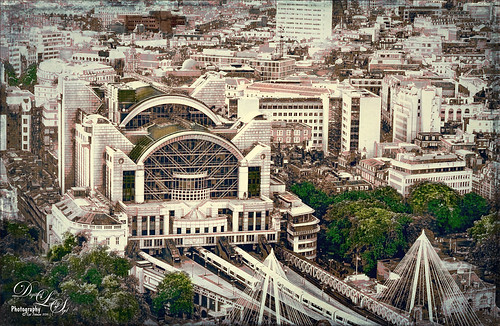
This image of a train station was taken from the London Eye. Topaz (see sidebar for website link) DeNoise 6 was used to get rid of the noise in the shadow areas. The now free Nik Silver Efex Pro 2 was used to convert image to a black and white. On a stamped layer above, Lucis Pro 6.0.0 (no longer available) was set to Enhance Detail 105 and Smooth Detail 95. This layer was set to a Difference blend mode, and the Blend If Underlying Layer white tab slider was used to bring back some of the white in the image. A Red to Gray Gradient Map Adjustment Layer was placed above at 47% layer opacity. On another stamped layer Topaz ReStyle was used to get the a good color balance. Last step was to add Topaz Texture Effects to get the vignette in the image. It was fun to see what stacking these filters would do!…..Digital Lady Syd
St. Trinity Church in Mir, Belarus
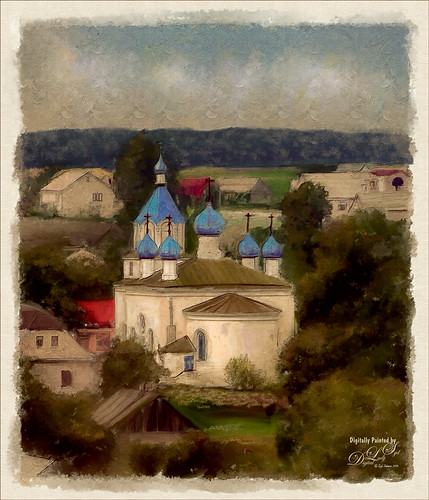
This is an image of the St. Trinity Church as taken from a window at Mir Castle in Belarus. The spire color is fabulous! This image was also painted using Jack Davis’s painting action as discussed in my More Jack Davis Painting! Fun Photoshop Blog last weekend. Very similar steps as the other two images in my original blog. This time I kept the sketch layer turned on and set to Multiply blend mode at 90% layer opacity. Topaz (see sidebar for website link) ReStyle’s Winter Hazel & Wood Bark preset was used to get the vintage effect. I am really starting to enjoy painting using this action…..Digital Lady Syd
The Red Bromeliad
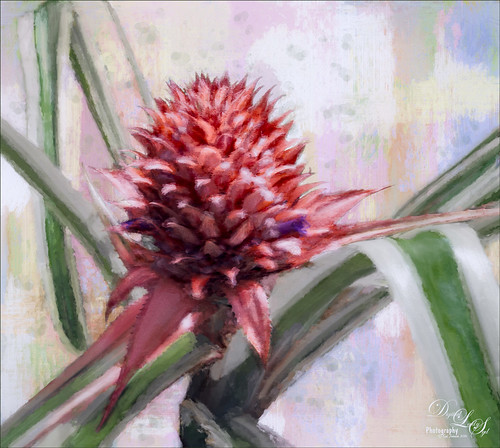
This is a red Bromeliad taken at the Harry P. Leu Gardens in Orlando, Florida. In Lightroom just basic adjustments were done on the RAW file. In Photoshop, the plant was selected using the Quick Selection Tool and then the Select and Mask Panel was used to clean up the selection. This is a wonderful addition to the latest version of CC. One of my Corel Painter textures was placed behind the the selection. Topaz (see sidebar for website link) Impression 2 was opened one of my Impressionistic textures was applied. A Brightness/Contrast and Curves Adjustment Layers were placed on top and the layer mask converted to black by CTRL+I inside the mask. Then just areas I wanted brightened or more contrast added into were painted back. On a New Layer above, a lot of painting using a regular brush to smooth out rough edges from the plug-in was used. Nik Viveza 2 was used to set the focal point in the flower and the last step was to add Topaz ReStyle to get a nice pleasing color palette. Love the final effect!…..Digital Lady Syd
Sunrays At the Beach
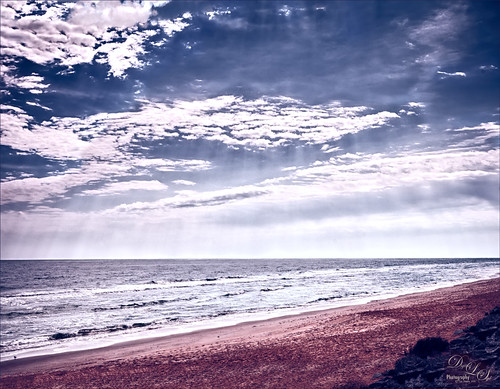
This is an HDR image of Flagler Beach, Florida, taken with 3 bracketed images. The images were taken into the now free HDR Efex Pro 2 plug-in from Photoshop (see my How to Use Google (Nik) HDR Efex Pro 2 blog for instructions on how to do this). The Bright preset was used with some minor changes. Nik Silver Efex Pro 2 (also part of the free Nik Collection) was then used to give a different feel to the image – High Contrast (Harsh) preset was used and the layer was set to Luminosity blend mode at 78% layer opacity. On a stamped layer, Topaz (see sidebar for website link) ReStyle was used to give the beautiful color palette – used my favorite Cream and Plum preset and just adjusted the Color Temperature and Tones a little. That was it. This is really how I see this beach on a beautiful day!…..Digital Lady Syd
Some Blue Berries
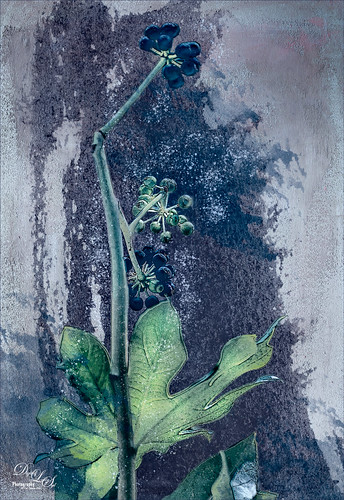
Just wanted to try something fun and creative. These beautiful blue berries were found growing at the Jacksonville Zoo a few months ago. The berries and leaves were selected in Topaz (see sidebar for website link) ReMask 5, mask was applied, and a French Kiss (see sidebar for website link) texture called Solstice Zenith was placed behind them. On the berries, a Photoshop Filter was used – Artistic -> Poster Edges set to 2/1/4 was applied. French Kiss Grunge Brush 15 was placed underneath the berries and Grunge Brush 14 was applied to add some texture. A spatter brush was used around the berries just to give a magical feel to the image and set to 67% layer opacity. Topaz ReStyle was used to give a slightly different color palette and finally Nik Viveza 2 (now free) was used to direct attention more fully to the green foreground leaf. Just a lot of fun!…..Digital Lady Syd
Heron on Watch Duty
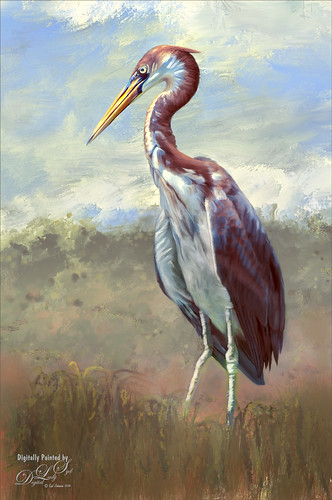
Just having fun painting yet another of my favorite subjects, the birds. This guy is a tri-colored heron taken at the St. Augustine Alligator Farm a few years ago and I just missed him. I loved all the beautiful colors of feathers he was displaying! This was done using my standard workflow where the bird is selected in Topaz (see sidebar for website link) ReMask 5, then the bird is painted on top of a new background texture, one I painted in Painter. Used Grut’s Photoshop mixer brush called Twig Scuffle for the fore grass plants. Topaz ReStyle’s Silver and Ivory Cloak preset was used to adjust the color palette a little. Last step was to apply Nik Viveza 2 to even out the focal point to his head. That was it – I just love to paint these birds!…..Digital Lady Syd
Paintstorm Studio Purple Flowers
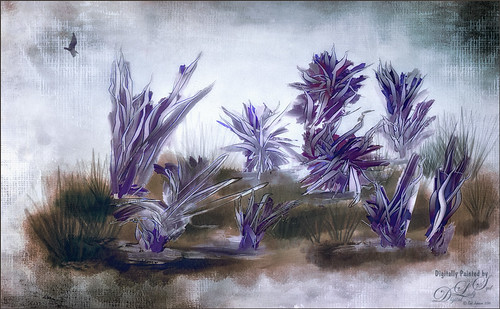
These flowers were painted in an inexpensive painting program I recently purchased called Paintstorm Studio. Just learning how to use all the various settings, but if you save down your images as a PSD file, you get nice layers with objects on them. That is how I created these flowers – just painted on a layer and saved down as a PSD file. This program has some incredible brushes and you can import PS brushes! Pretty cool! A couple textures were added in PS – 2 Lil’ Owls (see sidebar for website link) Mosaic Set’s Aveline set to Multiply blend mode and 56% layer opacity and Jai Johnson’s DT-Be My Valentine-12 set to Color Burn blend mode at 80% layer opacity. Topaz (see sidebar for website link) Restyle’s Lavender Gray preset was applied which make the image more purplish instead of pinkish. I tend to do a lot in pink so I liked the change here. Nik’s Color Efex Pro 4 was applied using the Warm Preset (Polarization, Sunlight, and Vignette Lens filters). Obsidian Dawn’s Birds Flying Single 3 brush was added to the image and a Pattern Fill was used to give the nice wing effect.
Just Being a Little Abstract
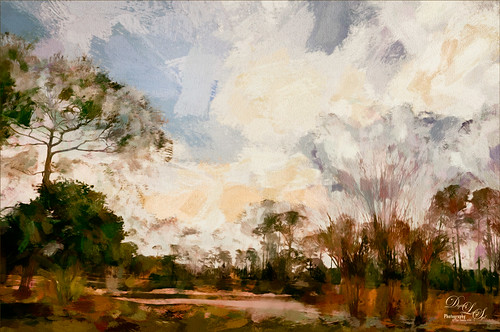
This image shows a local golf course view seen when playing. I had some fun with a couple of Topaz (Stroke: Brush Type 04, Brush Size 0.91, Paint Volume 0.42, Paint Opacity 0.87, Stroke Rotation 0, Stroke Color Variation 0, Stroke Width 0.33, Stroke Length 0.89, Spill 0.23, Smudge 0.26, and Coverage 1.00; Color: Overall Hue 0.15, St -0.20, and Lightness 0.06; Red Sat 0.47 and Lightness 0.14; Orange Sat 0.60 and Lightness -0.42; Yellow Sat -0.33 and Lightness 0.13; Green Sat 0.20 and Lightness -0.32; and Blue Sat 0.36; Lighting: Brightness -0.04, Contrast 0.39, and Light Direction x0.33 and y0.06; and Texture: Strength 0.78, Size 0.30, Canvas IV, Background Type Solid, and Background #d38967 (soft melon color).)
see sidebar for website link) Labs newer plug-ins. The initial layer was duplicated and Topaz Impression was added using my SJ WC like effect on bldgs preset. This preset is sort of crazy but gives some wonderful results at time. (Settings for preset: On a New Layer, some clean up was done where the paint went that did not look good. On a stamped layer (CTRL+ALT+SHIFT+E) Nik Analog Efex Pro 2 was applied using just the Basic Adjustments 5 control points were added to adjust the Detail in different parts of the image. Also Film Type Warm (Row 2 Col 2) was added to the stack. Now the image was brightened up quite a bit. Last step using Topaz ReStyle’s Warm Tones Contrasted preset. That was it. I just liked the rather abstract feel that Impression gave to the image……Digital Lady Syd
The Mighty Jaguar
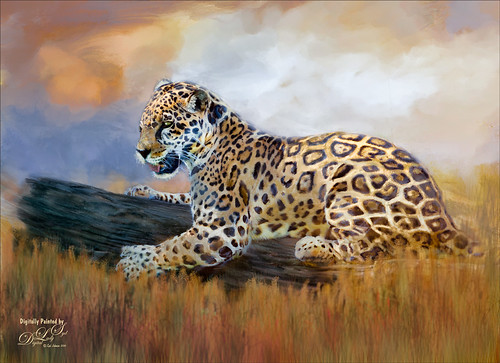
Took this image at the Jacksonville Zoo a couple days ago – the original is totally unremarkable and I did not think it would turn out nice at all. Just thought it would be a good challenge to see what I could do with it. I will actually post some much better pictures of these beautiful cats later. Normally I would give you step-by-step, but this was a pretty heavy workflow so I will just tell you what all it took. The biggest problem was the chain-length fence that went through his body. Since I could not get close enough to the fence to get rid of the distortion, I had to paint it away. The fence was selected and a Curves Adjustment Layer was used to reduce the effect. Then three more Curves Adjustment Layers before I was ready to paint him. Topaz (see sidebar for website link) Adjust using French Countryside (my favorite) preset and several slider adjustments to get the color in the cat that I liked. Then I went into Corel Painter and painted a background that matched his colors. Put the background on top of the cat and painted the cat in with a layer mask. Next painted using 7 layers and both mixers and regular brushes (my SJ Pastel 3 painting brush mainly – do a search at my Fun Photoshop Blog for settings). Used Nik Viveza 2 to emphasize his face. Used Blur Gallery to soften the foreground, Liquify Filter to make his eye a little larger, Topaz Lens Effects for some special reflector and graduated filter effects, and Camera Raw Filter to bring out the orange effect just a bit more. Last step, Topaz Restyle using the Tawny Tint. That about did it but it was a pretty big process. I just love painting the big cats!…..Digital Lady Syd
A Windy Beach!
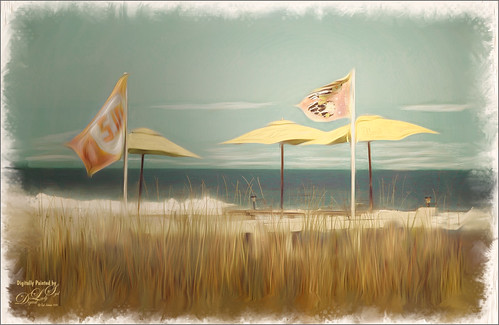
One of my favorite local place, beautiful Flagler Beach on the Atlantic Ocean in Florida, shows a pretty windy day. This image was one I was experimenting on and came up with this effect. The Oil Paint Filter was used on the image and on a layer mask the sky was painted out so the filters only affected the foreground, flags and umbrellas. The original image had red umbrellas and a much brighter blue sky. I wanted to use softer colors so the color palette was changed in Topaz (see sidebar for website link) ReStyle that used the tones from another image. (See How To Use a Topaz ReStyle Trick for Improving Your Image showing which image colors were used here.) On a stamped layer Nik Color Efex Pro 4 was used to further soften and tweak the colors. On several New Layers the mixers were used to create the edges and Nik Viveza 2 was used to add a little focal point emphasis. I really love the final colors!…..Digital Lady Syd
Little White Convertible
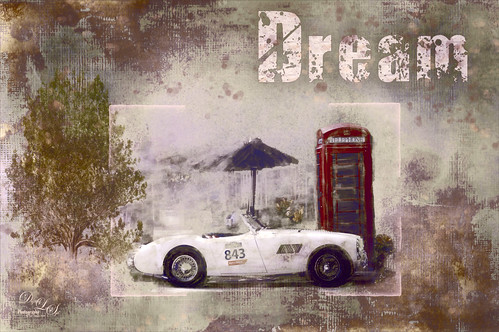
This is just a pretty little white car next to an old British Phone Booth in downtown Savannah, Georgia. Don’t know why I took the picture, but the car was so cool looking. This image really need to have a lot of background clutter removed, so one of my favorite texture people, 2 Lil’ Owls (see sidebar for website link) had a texture from their Mosiac Set called darcy. I also created an Oak Tree in Photoshop using the Filter -> Render -> Trees command. The Dream lettering is from Kim Klassen’s Dreamy Brush set. On layers above some paint splatters were added. The last step was to open a stamped layer (CTRL+ALT+SHIFT+E) and applied Topaz (see sidebar for website link) ReStyle, one of my favorite Photoshop plug-ins! Wish I owned that car!…..Digital Lady Syd
The Lemonade Cart

I have been wanting to use this image of a Lemonade Cart taken a couple years ago at the Annual Turkey Run in Daytona Beach, Florida, but it was too hard to select all the “stuff” around it. That was until Topaz (see sidebar for website link) ReMask 4/5 was released. This time, it took a little effort, but overall it came out pretty fast. Once I had the cart on its own layer, it was opened in Topaz Impression and the Renoir II preset was selected with no changes. This blended the cart nicely into my Corel Painter background. On a stamped layer (CTRL+ALT+SHIFT+E), the layer was opened in Topaz ReStyle and the Native Dancer preset was once again applied (see my How to Use a Topaz ReStyle Trick for Improving Your Image blog.) Several layers of painting with both regular and mixer brushes were used to make sure it did not look like a “canned” painting – I am very sensitive to this so I always try to add some of my own strokes if I use Impression. The bird is from Midnightstouch Egret brushes – these are great for that little extra touch – just be sure to paint them some to blend them into the image……Digital Lady Syd
Looking for Dinner
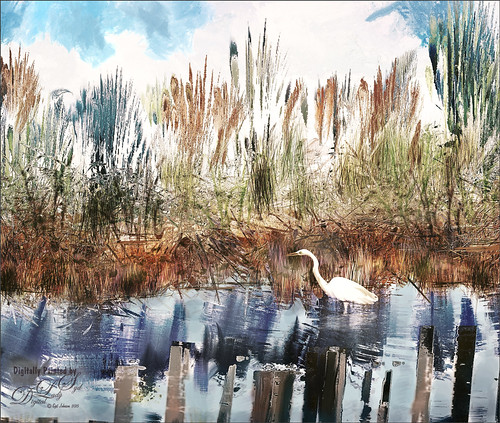
This is an image I created mainly in Corel Painter using John Lowther’s Landscape brushes – still learning how to use them but they are beautiful brushes! I have done a couple different iterations of this image, but I think I like this one the best. My birds are always my favorite subjects so here is another one. I did have to use Photoshop to add the egret (in the set called rEgrets I’ve Had A Few by Midnight Touch that are really nice egret brushes). Once the bird was added, used the Mixer brush to add detail and color to the face and body. Frostbo Grass Set 2 brushes (my favorite Photoshop grass and reed brushes!) were used on individual layers and a Gaussian Blur filter set to a Radius of 3 was used to soften the strokes to fit in with Painter reeds and grasses. Topaz (see sidebar for website link) Lens Effects was opened and the Single Tone Filter set to Morning preset was applied to warm it up. Topaz ReStyle was opened and the Zambezi Zest preset was used to bring out some more autumn looks – in ReStyle the Color Style was set to Soft Light Blend Mode and then back in Photoshop the layer was set to 65% opacity. A Solid Color Adjustment Layer was set to medium gray, Color blend mode, and 55% layer opacity -the areas I wanted to appear a little more vivid was painted back in the layer mask. That was it! It took a while to get this the way I wanted it. Just takes some experimentation. Lots of fun!…..Digital Lady Syd
A Wintry Day
Just trying out the Watercolor category in Corel Painter. Usually use Photoshop to do the watercolor effects, but I finally got around to watching Jason Maranto’s videos on the Painter 2015 brush engine and learned how to use them. This image mainly used a Painter 2016 brush in the Watercolor category called Speckle Wash with the opacity changed for the various areas of the image. In Photoshop Topaz (see sidebar for website link) Lens Effects was opened and used the Graduated Neutral Density Filter, and Topaz ReStyle using the Tierra Frost preset. Really enjoyed doing this image!…..Digital Lady Syd
Sharing the Good News!
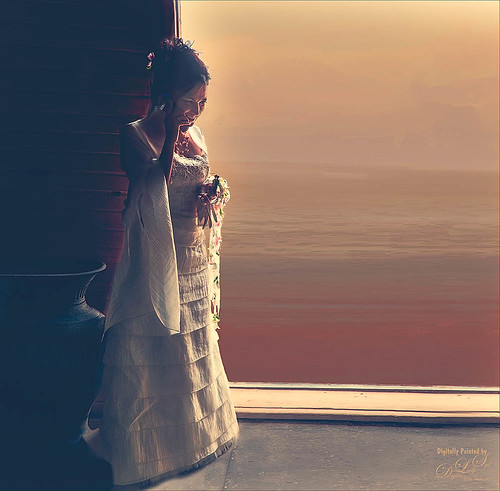
This image was taken at The Old Village of Ayaymku in Belarus on her wedding day. This image was just a snap that I had forgotten I had taken. The scenery from the doorway was changed to more of a seaside effect using one of the texture I created in Corel Painter. The door was first selected using Topaz (see sidebar for website link) ReMask 5 in the duplicated image, and the texture was placed behind the image. The Subtract blend mode was selected on a stamped (CTRL+ALT+SHIFT+E) layer at 51% layer opacity to get the nice light on her dress. A Gaussian Blur was applied to the layer and set to a Radius of 250 px – a layer mask was applied and the lighted edge of her dress was lightly painted back with a black brush. (See my How to Use the Subtract Blend Mode as a Spotlight). Topaz Lens Effects Toy Camera Memories preset was used to adjust the colors on duplicated layer. Then Topaz ReStyle’s Zambezi Zest preset was applied to get the overall warm tone. A little bit of a different look for me, but it is fun to try different effects……Digital Lady Syd


