
Riding the London Eye
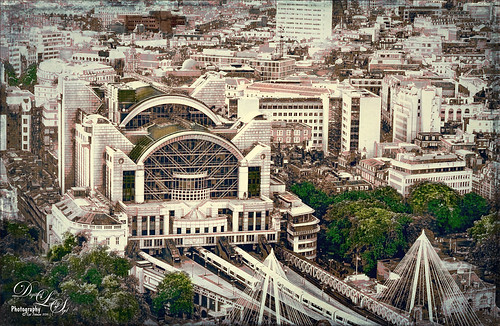
This image of a train station was taken from the London Eye. Topaz (see sidebar for website link) DeNoise 6 was used to get rid of the noise in the shadow areas. The now free Nik Silver Efex Pro 2 was used to convert image to a black and white. On a stamped layer above, Lucis Pro 6.0.0 (no longer available) was set to Enhance Detail 105 and Smooth Detail 95. This layer was set to a Difference blend mode, and the Blend If Underlying Layer white tab slider was used to bring back some of the white in the image. A Red to Gray Gradient Map Adjustment Layer was placed above at 47% layer opacity. On another stamped layer Topaz ReStyle was used to get the a good color balance. Last step was to add Topaz Texture Effects to get the vignette in the image. It was fun to see what stacking these filters would do!…..Digital Lady Syd
Beautiful Hole 4
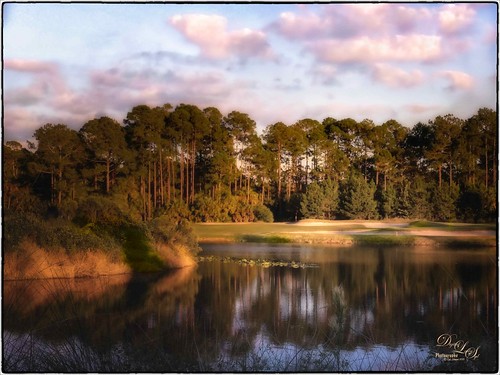 So this is why I play golf. It’s not because I play well but the views are fabulous. This course is one of the most natural looking and it feels like you are walking in a park! This image taken just before the gold hour in late afternoon was first corrected in Lightroom by just adjusting the Basic sliders. It was taken into Photoshop where Topaz (see sidebar for website link) DeNoise 5 was applied just to the sky where most of the noise appeared. On a duplicate layer, Nik Color Efex Pro 4 was used to get this overall effect – filter effects used were: Darken/Lighten Center, Glamour Glow, Monday Morning, and Image Borders. A Curves Adjustment Layer and a Color Balance Adjustment Layer were added and the masks filled with black. With a soft low opacity brush, the clouds were painted back just the cloud areas that were too vivid with the Nik filters applied to them. That is about it. Hope you all are enjoying your Fall season!…..Digital Lady Syd
A Little Scottish Architecture
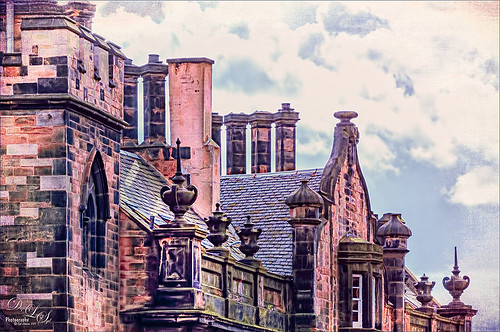
Just an image of the beautiful architecture taken near Edinburgh Castle in Scotland. The original image in Lightroom was major dark – not sure why. Used the Basic sliders to brighten up the image, but the noise was pretty bad. Therefore , in Photoshop Topaz (see sidebar for website link) DeNoise was used. Topaz Glow was used on a stamped layer above and my SJ Graph III preset was applied – layer was set to Overlay blend mode at 65% layer opacity. (Here are the settings: Primary Glow: Glow Type Dark, Glow Strength 0.17, Effect Sharpness 0.09, Electrify 0.23, Simplify Details 0.25, Edge Color 0.20, Detail Strength 18, Detail Size 0.24, Brightness 0.23, Contrast 0.17, Sat 0.01, Line Rotation 0.09, and Glow Spread 0.20; Secondary Glow: Glow Type Light, Glow Strength 0, Effect Sharpness 0.47, Electrify 0.17, Simplify Details 0, Brightness 0.36, and Contrast 0.62; Color Red Sat 1.00; Orange Sat 0.27; Yellow Sat 0.20 and Lightness 0.09; Aqua Sat 0.78 and Lightness -0.26; and Blue Sat 0.49; Finishing Touches: Effect Coverage 0, Smudge 0.00, Sharpness 0.25, Sharp Radius 0 and Vignette Size 0.) Also in the Layer Style, the sky was brought back using Blend If Underlying Layer slider and splitting the white tab (ALT+drag on tab to split) with settings of 122/145. Topaz Lens Effects Reflector filter was used to lighten up the face of the buildings (Type Golden, Strength 0.28, Transition 0.31, Position 0.49, and Angle 208.5). By adding a layer mask, the sky was painted black so the effect only applied to the buildings. Next on a stamped layer used Nik Color Efex Pro using Tonal Contrast, Brilliance/Warmth, and Vignette Lens. A vintage frame was added on top and set to Overlay blend mode. I love working on images from Scotland!…..Digital Lady Syd
My Glowing Porch Flowers!
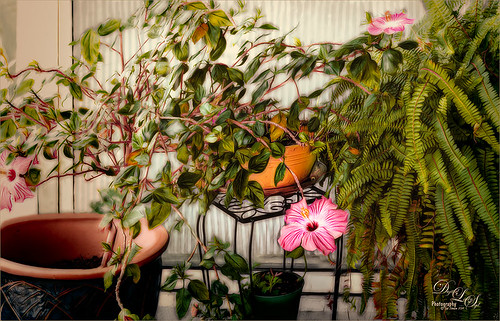
These are more flowers on my porch – Painted Lady Hibiscus and a Boston Fern. Clean up was done, Topaz (see sidebar for website link) DeNoise set to Overall 0.09, and Topaz Clarity (My John Barclay Basic Settings preset-Micro Contrast 0.36, Low Contrast 0.20, Medium Contrast -0.11, and High Contrast -0.23; then Tone Level Black Level 0.14, Midtones -0.30, and White Level -0.20; Hue Yellow -0.58 and Green -0.19; Sat Green 0.27 and Blue -0.34; and Lum Red -0.08, Orange -0.52, Green 0.11, and Blue -0.42). On a stamped layer (CTRL+ALT+SHIFT+E) Topaz (see sidebar for website link) Glow was applied. (SJ Painterly Wonderland preset-Set to Overlay. Primary Glow change Effect Sharpness to 1.00, Electrify 0.38, Secondary Effect Sharpness 0.48, Brightness 0.23, and Contrast -0.01; Color – Overall Hue -0.29, Orange Sat 0.43, Yellow Hue 0.14 and Lightness 0.50, Green Sat -0.77 and Lightness -0.44, Aqua Sat -1.00, and Blue Sat -0.50. Set back to Normal to take into PS – then adjust there.) Topaz Black and White Effects was applied. (SJ Soft Color Effect preset – Conversion section – Basic Exposure Contrast 0.04 and Brightness 0.05; Adaptive Exposure 0.24, Regions 16, Detail 0.98 and Detail Boost 1.05; Creativity Effects Diffusion Softness 0.71, Diffusion 0.67, and Diffusion Transition 0.56; Finishing Touches section – Silver and Paper Tone Tonal Strength 0.85, Balance 0.22, Silver Hue 27.00, Silver Tone Strength 0.61, Paper Hue 45.00, and Paper Tone Strength 0.42; Quad Tone Color Region 1 black set to 7.46, Color Region 2 set to Color (R67/G48/B32) and 77.12, Color 3 Region to Color (R173/G148/B104) and 181.6, and Color Region 4 set to white and 255.0; Vignette Strength -0.28, Vignette Size 0.61, Vignette Transition 0.83, and Vignette Curvature 0.83; and Transparency Overall 1.00. In Local Adjustments set to Detail – Brush Size 254, Opacity 0.25, Hardness 0.05 and Edge Aware to 0.50 – painted back the front flower and the orange colored dish so that it was a focal point. The Overall Strength was set to 1.00. Set same brush to Color and painted back the pink flowers. Vignette Strength set to -0.32, Vignette Size to 0.68, Vignette Transition to 0.63, and Vignette Curvature 0.82 – center vignette on just above the center pink flower. Changed Overall Transparency to 0.75.) On another stamped layer the Camera Raw Filter Radial filter was applied to adjust the focus on the orange pot and center pink flower. That was it. Lots of Topaz on this one!…..Digital Lady Syd
Leaking Some Light on Calton Hall in Scotland
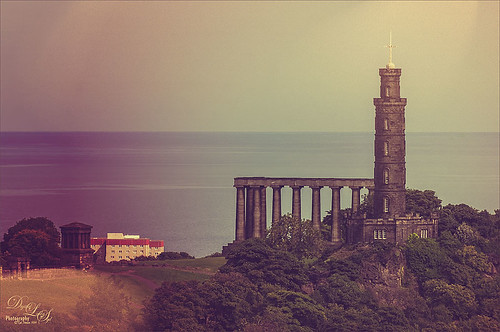 Not sure how I missed processing this image in my Scotland shots, but I really like the light leak effect on Calton Hall as taken from Edinburgh Castle in Scotland. First used Seim’s Power 4 Workflow (see sidebar for website link) Lightroom preset Harsh Sun Fixer. In Photoshop applied both Topaz (see sidebar for website link) Detail 3 and Topaz DeNoise before adding the light leak. Learned a little technique this week from a very nice website called FX-Ray -there are some wonderful light leak jpg’s that can be downloaded for free (this image used Light Leak 03) along with a short video tutorial that explains how to use them. Really loved the results!…..Digital Lady Syd
Digital Lady Syd Related Blogs:
How to Create/Use a Light Leak
A Dr. Seuss Topiary

This image is another one of the adorable topiaries growing at Universal Studios-Orlando in Dr. Seuss Land. This photo was just a fun image to work on – loved the colors. An an old Trey Radcliff preset called Cross-Into the Sky from his Lightroom Presets Volume 1was applied first – liked the slightly vintage look it had. In Photoshop Topaz (see sidebar for website link) Detail 3 was selectively applied where the Highlights were emphasized and shadows were weakened. A black layer mask was added and only the edges of the topiary and the eyes were left sharpened. A Curves Adjustment Layer with the mask converted to black (CTRL+I in mask) was placed on top to the lower part of the topiary. Next Topaz DeNoise 5 set to Overall 73 and Highlights 69 (these are the highest settings I have ever used in this program) were set and on a white layer mask only the lower topiary and the eyes were painted out to keep them sharp. On a New Layer the Sharpen Tool was used again on just the eyes. A Levels Adjustment Layer was added and applied to lower part of the topiary by painting in a black layer mask. Finished up created a stamped (CTRL+ALT+SHIFT+E) layer and added my free SJ Double Edge Frame layer style – sampled an outside color from the image for the frame. Really love this part of the park – very colorful and fun!…..Digital Lady Syd


