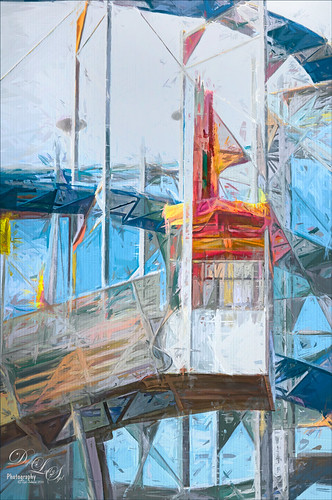
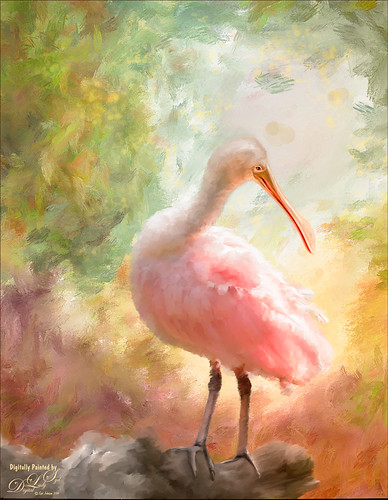
Anything Photoshop or Photography

Latest

Little White Convertible

Image of a Little White Car
This is just a pretty little white car next to an old British Phone Booth in downtown Savannah, Georgia. Don’t know why I took the picture, but the car was so cool looking. This image really need to have a lot of background clutter removed, so one of my favorite texture people, 2 Lil’ Owls (see sidebar for website link) had a texture from their Mosiac Set called darcy. I also created an Oak Tree in Photoshop using the Filter -> Render -> Trees command. The Dream lettering is from Kim Klassen’s Dreamy Brush set. On layers above some paint splatters were added. The last step was to open a stamped layer (CTRL+ALT+SHIFT+E) and applied Topaz (see sidebar for website link) ReStyle, one of my favorite Photoshop plug-ins! Wish I owned that car!…..Digital Lady Syd

Putting Your Best Side Forward

Image of a painted Roseate Spoonbill
This lovely Roseate Spoonbill is totally enjoying a beautiful morning. This type of bird always seems to have a happy expression on their face – totally a joy to watch them. This image was taken at my favorite bird place, the St. Augustine Alligator Farm. Not much new with the painting workflow – just a painted background I did in Corel Painter and some Mixer brushes and Regular brushes in Photoshop. As you know I am a big fan of Fay Sirkis’s Photoshop Mixer brushes and this image used her Palette Knife Tap n Blend brush to get the fluffy effect on the body. The only place I know where her brushes are available is over at KelbyOne, and sometimes at Photoshop World when she is presenting. The light effect was created using Topaz (see sidebar for website link) Lens Effects’ Reflector filter set to Gold Right preset – gives a soft subtle light effect. Used Nik Viveza 2 to bring the face in focus. Totally enjoyed painting this beautiful bird!…..Digital Lady Syd

A Little Birdie Told Me So!


Image of a little bird

Just having some fun with this image – wanted to try out the technique I am seeing everywhere of taking an object and putting some kind of image inside it. This little bird I got from a Design Cuts deal with a shape from Nicky Laatz. These people have such good deals for creatives and graphics folks – I could spend all my time just doing this type of thing! What I did was use a Pattern Fill Adjustment Layer using a pretty watercolor pattern and just clipped it to the bird form (ALT+click between the layers to clip). Then you can drag around the pattern in your image to get the effect just the way you want it. Otherwise just using my Frostbo Grass Set 2 brush 009 to put in some grass and Aaron Blaise Water brushes to create the water. The background are some clouds I painted a long time ago in Painter. Through in some spatter brushes on a different layer. On top of the image 2 Lil’ Owls Workshop 5 – tex 2 (see sidebar for website link) overlay on top. Last step was a Canvas Vignette from John Derry. Just lots of fun!…..Digital Lady Syd

All Aboard the Bumble Bee Express!

Image of the Bumble Bee Express!
Had to post this wonderful Bumble Bee Express pix (the link is a pretty lame short clip of a zombie riding the train) before the holidays are too far gone! This wonderful train runs every day at the Volusia Mall in Daytona Beach, FL, for all the kids to ride. When I was 5, I wanted one of these as they had one at the local park where I grew up – I got a Lionel Train set instead and was extremely disappointed.

This image used Topaz (see sidebar for website link) Clarity to sharpen it up first, then the train was removed from the background using Topaz ReMask. One of my Corel Painter backgrounds was added – it was stretched out and turned to fit the train, and a couple Hue/Saturation Adjustments Layers were linked to it to get the colors I wanted in the image. Next on a stamped layers (CTRL+ALT+SHIFT+E) Topaz Glow was opened and my Mysterious II preset was applied with just a change to Red, Orange and Yellow Lightness sliders to adjust the color and set to Normal at 80% layer opacity. (The settings are listed in my Happy New Year With Some Topaz Tricks blog.) Two more stamped layers were created,  and Topaz Impression’s Ethereal Background by Blake Rudis preset was applied and set to Normal at 100% layer opacity on the first layer. Then on the top layer Topaz Impression’s same preset was applied except the Blue Lightness slider was set to 0.45 to calm the blue in the sky down some. The layer mask created using ReMask was copied (ALT+drag up to this layer) and inverted (CTRL+I in the layer mask). This layer was then set to Normal with the layer opacity adjusted to 41%. A text layer was applied using the free Playbill Regular font,and the letters were stretched up some (vertical scale set to 152%) and spread out (tracking set to 80). A yellow watercolor Pattern Overlay was added in the Layer Style for the text to make the colors pop. A Black and White Adjustment Layer set to Luminosity blend mode was added on top to get the color tones just right. Totally fun and brought back a lot of memories!…..Digital Lady Syd

Happy New Year!

Image of an Egret celebrating New Years
Just one of my favorite birds, the Great Blue Heron, celebrating along with everyone the coming new year. Actually a lot of was done to this image that was taken at the St. Augustine Alligator Farm. He was painted in Photoshop with mixers and regular brushes and the background was painted in Corel Painter. Just my basic painting workflow. Separate layers used Confetti and Streamer brushes from Morgan BW on Deviant Art. The last step used Nik Viveza 2 – always the perfect final touch. Happy New Year from Digital Lady Syd…..See ya next year!

Santa Believing!

Santa Believe Ornament image
Had to post this little image of a Santa ornament that is very appropriate while I am struggling to get my new computer loaded up and ready to use. Windows 10 is really turning out to be a big learning experience for me after coming from Windows 7. Anyway, this guy is how I am feeling – I Believe I will get it up and running!!!

I actually did this as my first image on my new computer with practically nothing added to PS CC. All I did on this image was to use the ACR in the Bridge to do the initial image adjustments since I do not have Lightroom going yet. Next one of my Corel Painter textures was added in layer above and a layer mask applied. By using a watercolor brush set a soft edge and low opacity (20%), the Santa was softly painted back using a black foreground color in the mask. A Curves Adjustment Layer was used to adjust contrast, and on a New Layer a Glitter brush was used to add some structural interest into the background (see end of my Some Christmas Cheer and Resources blog for settings to make brush). The image was sharpened using a High Pass Filter set to 5.8 radius and then on a New Layer above, the Sharpen Tool was applied just to his face. Last step was to use two Radial Filters in the Camera Raw Filter to get soft vignette effect and direct focus to the Santa. Felt good to get back to working on images!…..Digital Lady Syd

Merry Christmas!

Painted Christmas Card of a winter scene
Merry Christmas and hope everyone is having a wonderful holiday! Enjoy the season!…..Digital Lady Syd

Underwater Fantasy

Underwater image with fish
This image took a lot longer than I expected to complete – but still a lot of fun to do. I had the image of some coral in a case at a SeaWorld Orlando store and wanted to use it in an underwater adventure image. It turned out totally different from what I expected but that still is a lot of fun to just see what happens!

Basically the coral was cut from the image using Topaz (see sidebar for website link) ReMask 5. It did a fair job and a lot of touch up of the layer mask had to be done once back in Photoshop due to the complexity and similar background color to the coral in the image. My next step was to add a couple PixelSquid fish into the image (see my How To Use the PixelSquid Add-On in Photoshop blog). One of my spiral textures was used for the background and the layer was taken into Topaz Impression where the Turner Sunset II preset was applied. The fish and coral layers were grouped, duplicated and top group merged to create a single layer. This layer was then taken into Topaz Impression and Edward Hopper II preset was applied to it. Some bubbles were added using using the Glitter Brush created in my Some Christmas Cheer and Resources blog was used to add some softening effect around the coral, and on some separate layers, Fay Sirkis’s Bubble Wrap Highlights Mixer brush was used to add in the more obvious bubbles. Next the eyes were sharpened using the Exposure Adjustment Layers. On a stamped layer (CTRL+ALT+SHIFT+E), Topaz Lens Effects was opened and the Reflector filter brightening the left side of the image and the Graduated Neutral Density Filter to darken the bottom part of the image was applied. Last step used Nik Viveza 2 to direct focus to the main fish. Whew! Hope you have a wonderful holiday!…..Digital Lady Syd

Viera Wetlands

Image of Viera Wetlands
This image was taken at the beautiful Richard Grissom Memorial Wetlands (also known as the Viera Wetlands) in Brevard County, Florida. In Lightroom very little was done except to apply Trey Ratcliff’s  free preset called Venice Canalman that came December 2015 preset package (scroll down) he gave away with his newsletter  – I have used this preset a couple of times and really like it. The focus point could be adjusted by going to the Radial Shift that he used in the preset, and moving it a little right to include the birds.

In Photoshop Jai Johnson’s free Flying Birds png was added as a layer on top. Since the birds looked flat in the image, a Pattern Fill Adjustment Layer was clipped to the image (ALT+click between the layers) – tried several and ended up using a gold and reddish watercolor pattern, which matched the tones of the LR preset that was applied. This pattern can be dragged around in the image to make the birds look just right and the adjustment layer was set to 62% layer opacity. An Outer Glow Layer Style (double click on layer to open) was set to Normal Blend Mode, white color, Opacity of 34%, Noise 13%, Spread 8% and Size 144 Px – this softened the birds so they blended into the sky just right and the layer was set to 68% layer opacity. The last step was to apply Topaz (see sidebar for website link) Impression’s Seurat Afternoon III without any changes to the whole image. His pointillism strokes added a really interesting effect to this image. Impression is really a fantastic plug-in that can add such a beautiful effect to an image as in this case…..Digital Lady Syd

Deserted Roller Coaster

Image of a roller coaster at Daytona Beach, Florida
I guess this image definitely indicates winter is on its way – very desolate looking Roller Coaster at the beach in Daytona Beach, Florida. Wanted to show another example of Topaz (see sidebar for website link) Texture Effects using the preset I created and uploaded onto the Community site. (See my Digital Lady Syd Reviews Topaz Texture Effects Fun Photoshop Blog.) In Lightroom Dave Delnea’s Custom Tone oo2 was used and the DeHaze slider in the Adjustment Brush added a little foggy effect at the top of this image. In Photoshop Topaz Detail 3 was applied to darken and soften the image a little. Then on a stamped layer, Topaz Texture Effects was opened and my SJ Soft Pastel Effect preset with some changes (Basic Adjustments turned off; Diffusion – in Mask brushed out the center of the large palm and part of the wood structure in top of the roller coaster with brush Strength of 55. Vignette – Strength 0.42, Size 0.01, Transition 0.32, Roundness 0.18, Color Black and set Center towards the right; Split Tone – removed; Border second row first border – Size 1.09 with Keep Aspect Ratio on No.) I am starting to really enjoy this plug-in!…..Digital Lady Syd