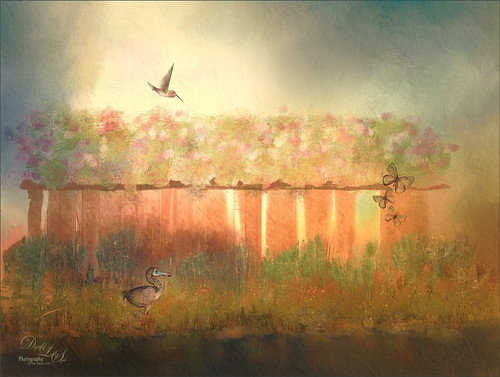
Just having some fun here. Created the original image in Corel Painter – got stuck and came into Photoshop to finish up the image. The basic structure, flowers and plants were created in Painter using various brushes. In Photoshop the DoDo bird Hummingbird were from a scrapbook set called HappyUnBday by Mischief Circus (this is one of my favorite sets) and the Butterflies are from a set called Intermixture Elements & Papers by Algera Designs. A texture called Clouds Over the Pasture from Jai Johnson was added underneath and set to Hard Light blend mode – it gives the beautiful light around the bird. Several layers were added where some texture was added in using plant brushes and texture brushes. Nik Viveza 2 was used twice and Topaz (see sidebar for website link) Lens Effects three times to get this final result. Also some Impasto layers were used on the plants to give a little 3-D effect to the image. This actually took quite a while as I just could not get the feel I liked. I think it is now complete!…..Digital Lady Syd

Latest
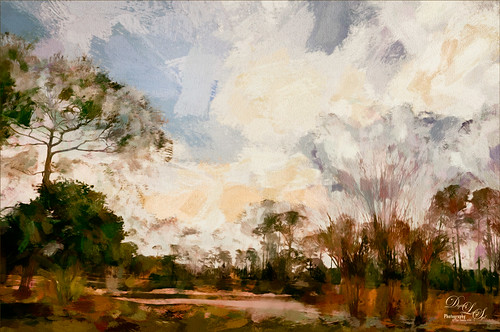
In the Country
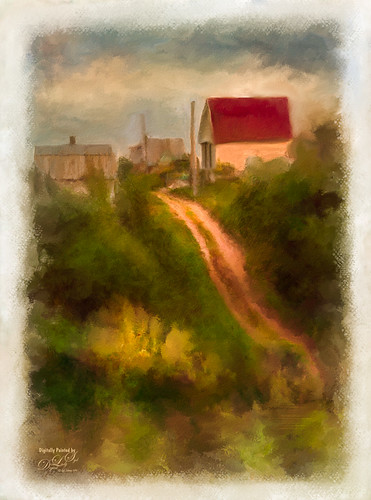
This is an image taken several years ago of the Belarusian countryside. I just watched on the Corel Painter website an older set of videos by John Derry (see Workflow 1, Workflow 2 and Workflow 3 videos) and decided to try his technique. It involves using several layers of auto-painting with different brush sizes and then adding layer masks to target your focus area. I had a little trouble following all the steps at the end, so I went into Photoshop to use my favorite brushes for cleaning up paintings. Overall I liked the final effect but I am not too sure if I liked the auto-paint results. This is definitely one you need to play with the different Painter brushes to get a pleasing effect. …..Digital Lady Syd
Looking Glamorous!
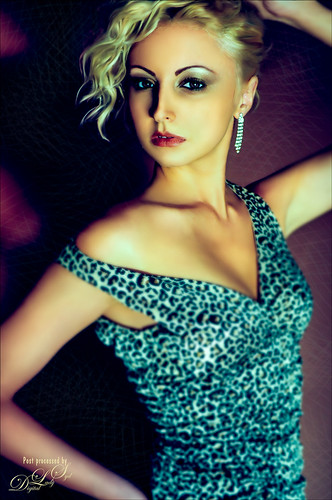
Just practicing a little light face painting – this time giving a bit of a glamour look to the image. Lots of liquify and dodging and burning to get the effect besides blending skin with mixer blenders in Photoshop. The original image had a brownish tone to it, but I changed it with a Color Balance Adjustment Layer to get this blue and pinkish effect. Not a whole lot to this, just some light painting fun…..Digital Lady Syd
Reflection of Blue Trees

This is what I consider is a rather unusual image of tree trunks and branches painted blue on several trees at the Jacksonville Zoo’s Asian Bamboo Gardens. There was a lot of bamboo around, but not in this reflection shot. This image took a while for me to figure out what I wanted to do with it as I really wanted to give that beautiful reflection justice in the image. Did basic adjustments in Lightroom, then in Photoshop added Topaz (see sidebar for website link) Clarity’s Sunny Day Blue Sky preset. Next the Spot Healing brush was used to clean up a lot of little bits of stuff floating in the water. On a stamped layer (CTRL+ALT+SHIFT+E) the Topaz Black and White Effects plug-in was opened. What made this different is that the Transparency was set to 0.89 so almost 50% of the image in color through the black and white setting. In the Creative Effects section, Simplify as is and Diffusion set to a fairly high setting of 0.97. In PS a layer mask was added and the effects were painted out gently over the reflection which was soft and diffused already. On another stamped layer Topaz Impression’s Palette Knife II preset was added with no texture. In a layer mask, once again the reflection was painted out so it applied only to the top portion of the image. On a New Layer the Mixer brush was used to blend some of the harsh edges in the top part of the image – this evened out the colors a little. On yet another stamped layer, Nik Viveza 2 was used to draw the eye to the blue tree area. Two textures were added on top – one of mine that is a lot of light yellows painted in Painter and was set to Multiply at 70% layer opacity and one of Jai Johnson, Soulful Sea Breeze, set to Set to Multiply at 70% layer opacity. On top texture a layer mask was added and the top area was painted out so a vignette feel was created at the top. That was it. Just a lot of experimenting!…..Digital Lady Syd
The Hidden Boat
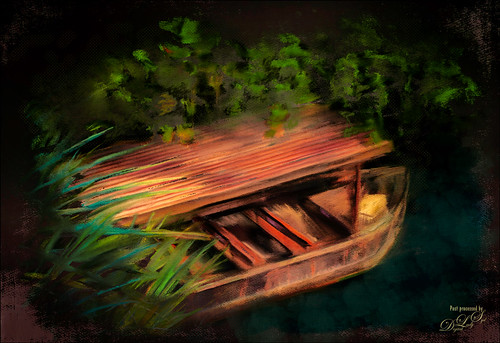
Loved this stock photo I found on pixabay.com of this boat hidden in the shade. Decided it would be a good practice painting so that is what I did. Use Topaz (see sidebar for website link) Simplify’s BuzSim preset to start as an underpainting. Still using Lori Jill’s instructions from her Turn Photographs Into Digital Paintings Using Photoshop videos and using the PS Mixer Brush Cloning Paint Setup action. A lot of painting, 3 textures and some brush clean up layers. Just a lot of fun to paint – very relaxing! …..Digital Lady Syd
Just Being a Little Abstract
This image shows a local golf course view seen when playing. I had some fun with a couple of Topaz (Stroke: Brush Type 04, Brush Size 0.91, Paint Volume 0.42, Paint Opacity 0.87, Stroke Rotation 0, Stroke Color Variation 0, Stroke Width 0.33, Stroke Length 0.89, Spill 0.23, Smudge 0.26, and Coverage 1.00; Color: Overall Hue 0.15, St -0.20, and Lightness 0.06; Red Sat 0.47 and Lightness 0.14; Orange Sat 0.60 and Lightness -0.42; Yellow Sat -0.33 and Lightness 0.13; Green Sat 0.20 and Lightness -0.32; and Blue Sat 0.36; Lighting: Brightness -0.04, Contrast 0.39, and Light Direction x0.33 and y0.06; and Texture: Strength 0.78, Size 0.30, Canvas IV, Background Type Solid, and Background #d38967 (soft melon color).)
see sidebar for website link) Labs newer plug-ins. The initial layer was duplicated and Topaz Impression was added using my SJ WC like effect on bldgs preset. This preset is sort of crazy but gives some wonderful results at time. (Settings for preset: On a New Layer, some clean up was done where the paint went that did not look good. On a stamped layer (CTRL+ALT+SHIFT+E) Nik Analog Efex Pro 2 was applied using just the Basic Adjustments 5 control points were added to adjust the Detail in different parts of the image. Also Film Type Warm (Row 2 Col 2) was added to the stack. Now the image was brightened up quite a bit. Last step using Topaz ReStyle’s Warm Tones Contrasted preset. That was it. I just liked the rather abstract feel that Impression gave to the image……Digital Lady Syd
Tower on the Mall

This is an older image I did several years ago of some building roofs on The Mall in Washington, DC. On a couple extra layers, Obsidian Dawn clouds were painted in the sky. On a stamped layer (CTRL+ALT+SHIFT+E) Nik Color Efex Pro was opened and Film Efex Vintage (Film Type 15), Pro Contrast (just Dynamic Contrast 28%), and Darken/Lighten Center filters. The last step was a Curves Adjustment Layer to increase contrast. Pretty simple for what I consider a nice High Key image with interesting architectural lines…..Digital Lady Syd
Only in Florida!
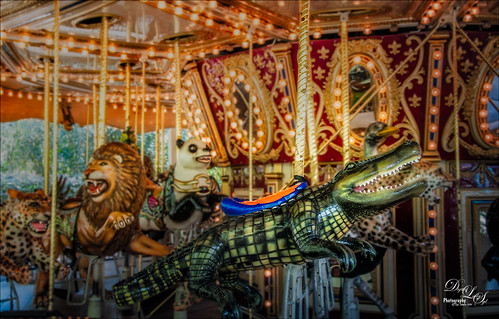
Had to take this image of the alligator that can be ridden on the Jacksonville Zoo‘s Merry-Go-Round in Florida. I had to take it quick when it was stopped. I could not get the angle I wanted, but the lion and polar bear look kind of nice behind my main subject, so I think it actually looks like a zoo carousel. This took a lot more work than I wanted since in the original image it looks like the alligator is swallowing a jaguar whole with an ostrich head coming out of the top of his head. What a disaster! About all I could do was to blur the background with a Gaussian Blur set to Radius of 5 and paint the foreground back in. Got the nice color effect using Nik Color Efex Pro 4 using Darken/Lighten Center, Glamour Glow, and Pro Contrast filters. Had to do some selective dodging and burning using layers set to Overlay blend mode and using black and white brushes set to 12% brush opacity. Last step was using Nik Viveza 2 to direct attention to his head. I really wanted to ride that alligator!…..Digital Lady Syd
Here’s Looking at You!
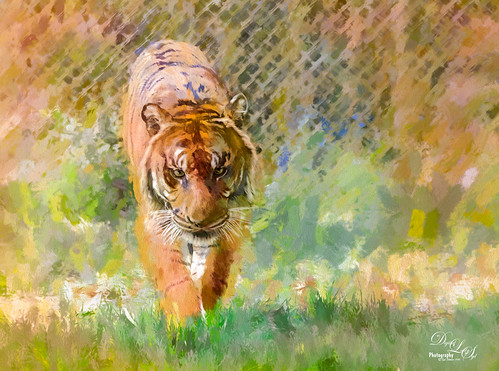
This beautiful tiger decided to saunter towards a window I was standing behind, so I had to take a few shots at the Jacksonville Zoo. This time I did not hand paint him, although it would have been fun to paint, but instead added several Topaz (see sidebar for website link) filters to get this effect. First used Detail 3 to sharpen image all over. Then on a stamped layer used Topaz Impression and applied and my SJ WC like effect on bkgds preset with just some color adjustments (see settings below). Used a 50% Gray Fill Layer set to Overlay blend mode to dodge and burn in some details to separate his ears and eyes from the colors behind. On another stamped layer (CTRL+ALT+SHIFT+E), Lens Effects’ Neutral Density filter was used to darken foreground slightly, Reflector filter Gold Left preset to lighten his side a little, and a light orange Vignette. Did a couple clean up layers and a Camera Raw filter in PS to soften the background. I really like the way he looks!…..Digital Lady Syd
Preset settings for Topaz Impression: Stroke: Brush Type 04, Brush Size 0.91, Paint Volume 0.42, Paint Opacity 0.87, Stroke Rotation 0, Stroke Color Variation 0, Stroke Width 0.33, Stroke Length 0.89, Spill 0.23, Smudge 0.26, and Coverage 1.00; Color: Overall Hue 0.15, St -0.20, and Lightness 0.06; Red Sat 0.47 and Lightness 0.14; Orange Sat 0.60 and Lightness -0.42; Yellow Sat -0.33 and Lightness 0.13; Green Sat 0.20 and Lightness -0.32; and Blue Sat 0.36; Lighting: Brightness -0.04, Contrast 0.39, and Light Direction x0.33 and y0.06; and Texture: Strength 0.78, Size 0.30, Canvas IV, Background Type Solid, and Background #d38967 (soft melon color).
The Mighty Jaguar
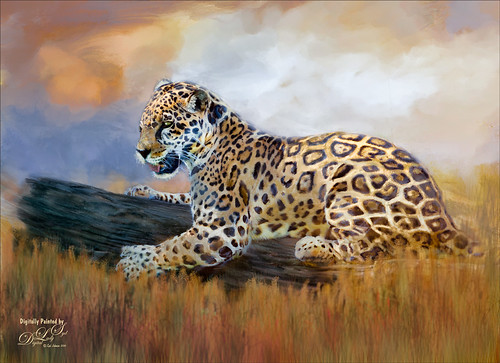
Took this image at the Jacksonville Zoo a couple days ago – the original is totally unremarkable and I did not think it would turn out nice at all. Just thought it would be a good challenge to see what I could do with it. I will actually post some much better pictures of these beautiful cats later. Normally I would give you step-by-step, but this was a pretty heavy workflow so I will just tell you what all it took. The biggest problem was the chain-length fence that went through his body. Since I could not get close enough to the fence to get rid of the distortion, I had to paint it away. The fence was selected and a Curves Adjustment Layer was used to reduce the effect. Then three more Curves Adjustment Layers before I was ready to paint him. Topaz (see sidebar for website link) Adjust using French Countryside (my favorite) preset and several slider adjustments to get the color in the cat that I liked. Then I went into Corel Painter and painted a background that matched his colors. Put the background on top of the cat and painted the cat in with a layer mask. Next painted using 7 layers and both mixers and regular brushes (my SJ Pastel 3 painting brush mainly – do a search at my Fun Photoshop Blog for settings). Used Nik Viveza 2 to emphasize his face. Used Blur Gallery to soften the foreground, Liquify Filter to make his eye a little larger, Topaz Lens Effects for some special reflector and graduated filter effects, and Camera Raw Filter to bring out the orange effect just a bit more. Last step, Topaz Restyle using the Tawny Tint. That about did it but it was a pretty big process. I just love painting the big cats!…..Digital Lady Syd
Topaz Labs AI Gigapixel
Check out AI Gigapixel stand-alone software for upsizing your images. It’s incredible! And it can now be used as a plugin when in Photoshop. Also Topaz Labs Photo AI has some great sharpening and denoise tools along with Photo Video AI.

Luminar Neo
Click here to visit Luminar for more info and check out their new AI Filters.

GRUT BRUSHES – Photoshop Brushes for Digital Artists
Click here to visit GrutBrushes.com
And be sure to check out his Free Brush of the Week and Brush Sampler! These are the best brushes you can find!

Topaz Studio 2 and Legacy Topaz Labs Filters
Unfortunately Topaz Studio 2 and other Topaz Lab filters are no longer available for sale as of 2020. If you had bought these filters and would like to put them back on, here is a link to the Legacy Apps where they can be downloaded again. Below is an example of the wonderful Remix AI Filter from Studio 2. The wonderful Impression still works fine in Photoshop right now along with Adjust (all versions), ReStyle, and even PhotoFXLab!

On1 Photo Raw
Wonderful software to use as a substitute for or plugin with Photoshop. Many great filter effects and lots of AI capabilities!
