
Merry Christmas and hope everyone is having a wonderful holiday! Enjoy the season!…..Digital Lady Syd

Latest
Underwater Fantasy
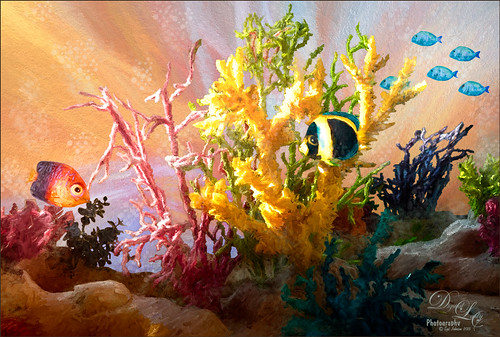
This image took a lot longer than I expected to complete – but still a lot of fun to do. I had the image of some coral in a case at a SeaWorld Orlando store and wanted to use it in an underwater adventure image. It turned out totally different from what I expected but that still is a lot of fun to just see what happens!
Basically the coral was cut from the image using Topaz (see sidebar for website link) ReMask 5. It did a fair job and a lot of touch up of the layer mask had to be done once back in Photoshop due to the complexity and similar background color to the coral in the image. My next step was to add a couple PixelSquid fish into the image (see my How To Use the PixelSquid Add-On in Photoshop blog). One of my spiral textures was used for the background and the layer was taken into Topaz Impression where the Turner Sunset II preset was applied. The fish and coral layers were grouped, duplicated and top group merged to create a single layer. This layer was then taken into Topaz Impression and Edward Hopper II preset was applied to it. Some bubbles were added using using the Glitter Brush created in my Some Christmas Cheer and Resources blog was used to add some softening effect around the coral, and on some separate layers, Fay Sirkis’s Bubble Wrap Highlights Mixer brush was used to add in the more obvious bubbles. Next the eyes were sharpened using the Exposure Adjustment Layers. On a stamped layer (CTRL+ALT+SHIFT+E), Topaz Lens Effects was opened and the Reflector filter brightening the left side of the image and the Graduated Neutral Density Filter to darken the bottom part of the image was applied. Last step used Nik Viveza 2 to direct focus to the main fish. Whew! Hope you have a wonderful holiday!…..Digital Lady Syd
Viera Wetlands
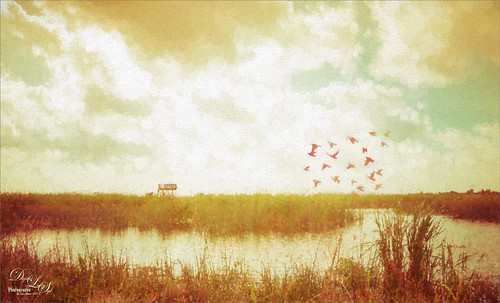
This image was taken at the beautiful Richard Grissom Memorial Wetlands (also known as the Viera Wetlands) in Brevard County, Florida. In Lightroom very little was done except to apply Trey Ratcliff’s free preset called Venice Canalman that came December 2015 preset package (scroll down) he gave away with his newsletter – I have used this preset a couple of times and really like it. The focus point could be adjusted by going to the Radial Shift that he used in the preset, and moving it a little right to include the birds.
In Photoshop Jai Johnson’s free Flying Birds png was added as a layer on top. Since the birds looked flat in the image, a Pattern Fill Adjustment Layer was clipped to the image (ALT+click between the layers) – tried several and ended up using a gold and reddish watercolor pattern, which matched the tones of the LR preset that was applied. This pattern can be dragged around in the image to make the birds look just right and the adjustment layer was set to 62% layer opacity. An Outer Glow Layer Style (double click on layer to open) was set to Normal Blend Mode, white color, Opacity of 34%, Noise 13%, Spread 8% and Size 144 Px – this softened the birds so they blended into the sky just right and the layer was set to 68% layer opacity. The last step was to apply Topaz (see sidebar for website link) Impression’s Seurat Afternoon III without any changes to the whole image. His pointillism strokes added a really interesting effect to this image. Impression is really a fantastic plug-in that can add such a beautiful effect to an image as in this case…..Digital Lady Syd
Deserted Roller Coaster
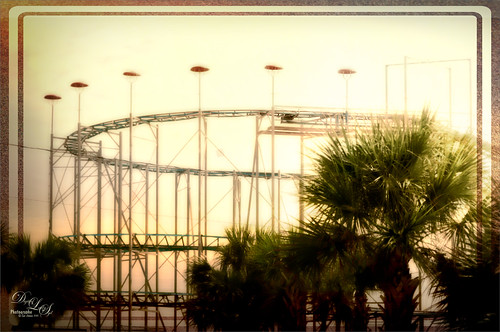
I guess this image definitely indicates winter is on its way – very desolate looking Roller Coaster at the beach in Daytona Beach, Florida. Wanted to show another example of Topaz (see sidebar for website link) Texture Effects using the preset I created and uploaded onto the Community site. (See my Digital Lady Syd Reviews Topaz Texture Effects Fun Photoshop Blog.) In Lightroom Dave Delnea’s Custom Tone oo2 was used and the DeHaze slider in the Adjustment Brush added a little foggy effect at the top of this image. In Photoshop Topaz Detail 3 was applied to darken and soften the image a little. Then on a stamped layer, Topaz Texture Effects was opened and my SJ Soft Pastel Effect preset with some changes (Basic Adjustments turned off; Diffusion – in Mask brushed out the center of the large palm and part of the wood structure in top of the roller coaster with brush Strength of 55. Vignette – Strength 0.42, Size 0.01, Transition 0.32, Roundness 0.18, Color Black and set Center towards the right; Split Tone – removed; Border second row first border – Size 1.09 with Keep Aspect Ratio on No.) I am starting to really enjoy this plug-in!…..Digital Lady Syd
Foggy Day on the ICW

Can you tell whose Lightroom preset this is? It looks so classic Trey Ratcliff to me and yes, it is one of his new ones called Venice Canalman that came in a free December 2015 preset package he gave away with his newsletter. I bought some of his presets a couple years ago and have used them frequently. This image was taken in the park across the street of The Casements on the Halifax River (Intracoastal Waterway). In Photoshop a person was removed from the walkway on a separate layer. Topaz (see sidebar for website link) Clarity was used to just sharpen the piers in the distance – layer mask filled with black and just the piers were painted back in white. Nik Viveza 2 was used to draw the focus to the far right boat cover. Anyway, I really loved the way this preset worked on this image……Digital Lady Syd
Full Moon Rising
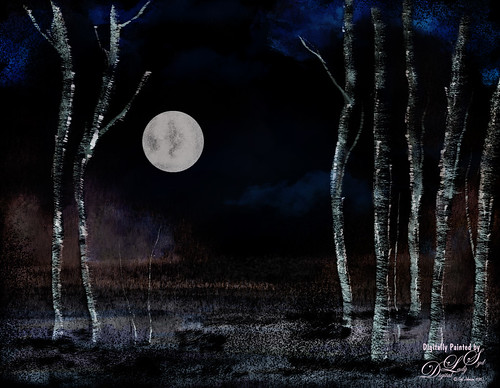
This image was painted using some of Karen Bonaker’s Painter 2016 Holiday brushes that she is graciously giving away to us Corel Painter lovers! I have to be honest and say I had to tweak the brushes quite a bit to get the correct effect (in her downloaded brush she had the Damping set to 60%, not 33% like the default in the Options Bar) – mainly changed in the Liquid Ink panel the Ink Type to Ink Plus Color from Ink Only and tried different settings for the various slider like the Volume and Jitter sliders. Also unchecked Continuous Time Deposition box and set the Boost to 38%. Went into the Particles-Common panel and tried different settings for the Chaos, Smoothness and Damping sliders. Several brushes were created using different settings and I think I finally got some decent trees! A background I had created in Painter was added behind the image. The image was saved as a psd file and taken into Photoshop where I got this night effect – set an adjustment curve to the Negative (RGB) preset. The moon was stamped in using Fantasy Brushes Moon 2 brush. Did a lot of manipulation to get the moon to look correct. Some clone clean up and that was it. Lots of fun to do and I wish to thank Karen for always giving us the most fun brushes during the holidays!…..Digital Lady Syd
The Lemonade Cart

I have been wanting to use this image of a Lemonade Cart taken a couple years ago at the Annual Turkey Run in Daytona Beach, Florida, but it was too hard to select all the “stuff” around it. That was until Topaz (see sidebar for website link) ReMask 4/5 was released. This time, it took a little effort, but overall it came out pretty fast. Once I had the cart on its own layer, it was opened in Topaz Impression and the Renoir II preset was selected with no changes. This blended the cart nicely into my Corel Painter background. On a stamped layer (CTRL+ALT+SHIFT+E), the layer was opened in Topaz ReStyle and the Native Dancer preset was once again applied (see my How to Use a Topaz ReStyle Trick for Improving Your Image blog.) Several layers of painting with both regular and mixer brushes were used to make sure it did not look like a “canned” painting – I am very sensitive to this so I always try to add some of my own strokes if I use Impression. The bird is from Midnightstouch Egret brushes – these are great for that little extra touch – just be sure to paint them some to blend them into the image……Digital Lady Syd
Feeling Spiffy!
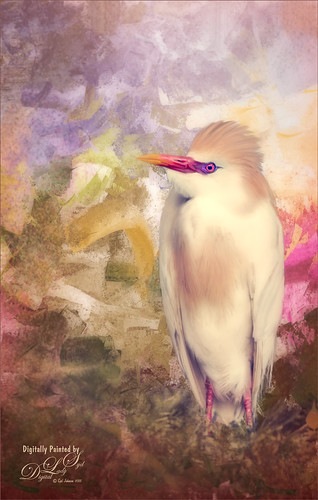
The reason I like this photo is that it was really sharp out of camera even though this Cattle Egret was trying to stay a little hidden in a very green tree covered area. He just seemed to need a nice background, so here it is. It was painted Corel Painter and matched the color in his beautiful beak. Since I wanted some of the original background to show through around his feet, the texture was placed above the bird and the bird’s layer mask (from Topaz – see sidebar for website link – ReMask 5) was used so the bird appears. Then I could use a low opacity brush on the bottom of the bird layer mask to paint in some of the grass detail where he was standing. Several layers of painting before Topaz Texture Effect’s Soft Warm Breeze preset was applied on a stamped layer (CTRL+ALT+SHIFT+E). (I changed the Overlay color from orange to black and Diffusion Strength to 0.62.) The eyes and beak were sharpened and Nik Viveza 2 was used to finish up the overall effect. Really fun to paint!…..Digital Lady Syd
Visiting with a Friend
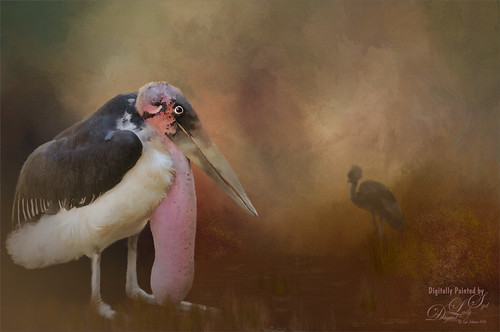
This Marabou Stork resides at the St. Augustine Alligator Farm in Florida. He and the West African Crowned Crane are there to greet you when you visit the Birds of Africa section. I so enjoy painting the birds that do not have a very distinguished look about them and give them a more beautiful place to enjoy. I get the sense this guy is totally content living in St. Augustine although far away from his normal habitat.
Just followed my regular painting workflow from previous blogs. This time added some grain in Topaz (see sidebar for website link) as it gave it sort of a magical old feel. The hardest part about this image was how sharp he appears – very hard to soften his edges and look natural, especially his feet. Topped off the image using my favorite plug-in of all time – Nik Viveza 2……Digital Lady Syd
Living the Good Life
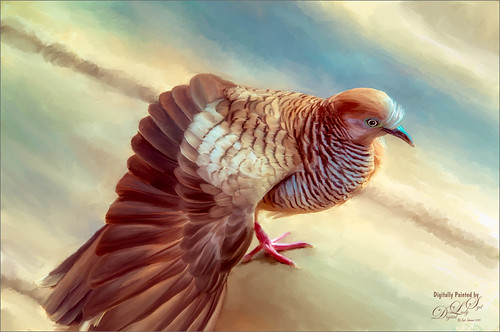
Just enjoyed painting this lovely pigeon, or if you prefer dove, from an image taken in Hawaii at the Hilton Waikoloa Village on the Hawaiian Island. Not much new here in the workflow, except that Nik Color Efex Pro was opened and the Detail Extractor, Bi-Color Filters, Sunlight, and Film Efex Nostalgic filters were used to get the color effect I liked. Otherwise several of Fay Sirkis’s Pet Photoshop Brushes were used to get the final result. Just love painting birds!…..Digital Lady Syd
Topaz Labs AI Gigapixel
Check out AI Gigapixel stand-alone software for upsizing your images. It’s incredible! And it can now be used as a plugin when in Photoshop. Also Topaz Labs Photo AI has some great sharpening and denoise tools along with Photo Video AI.

Luminar Neo
Click here to visit Luminar for more info and check out their new AI Filters.

GRUT BRUSHES – Photoshop Brushes for Digital Artists
Click here to visit GrutBrushes.com
And be sure to check out his Free Brush of the Week and Brush Sampler! These are the best brushes you can find!

Topaz Studio 2 and Legacy Topaz Labs Filters
Unfortunately Topaz Studio 2 and other Topaz Lab filters are no longer available for sale as of 2020. If you had bought these filters and would like to put them back on, here is a link to the Legacy Apps where they can be downloaded again. Below is an example of the wonderful Remix AI Filter from Studio 2. The wonderful Impression still works fine in Photoshop right now along with Adjust (all versions), ReStyle, and even PhotoFXLab!

On1 Photo Raw
Wonderful software to use as a substitute for or plugin with Photoshop. Many great filter effects and lots of AI capabilities!
