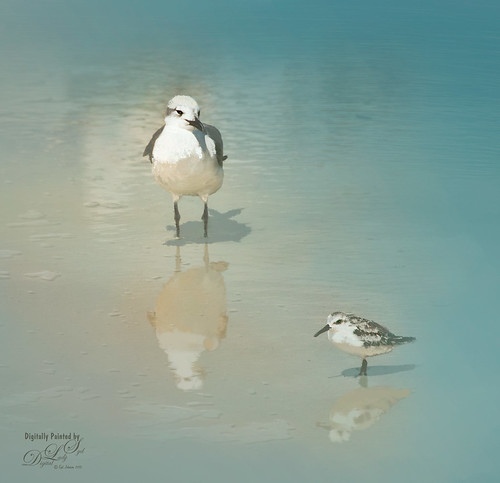
These little guys were enjoying the tidal waters at Daytona Beach, Florida. I believe the bigger bird is a Laughing Gull and smaller one a Sanderling from the Sandpiper family. These birds were all over the place and seemed quite tame on the beach. These birds were painted in Photoshop. Added a solid color turquoise layer and in a layer mask painted back area to be seen. Used one of my Corel Painter textures that was a very smooth beige tone. Then used Fay Sirkis’s Photoshop Erodible Tip Pastels to paint the birds and reflections. Used Topaz (see sidebar for website link) Lens Effects Reflector Filter to add some directed light and warm up the scene. The beaks and eyes were sharpened. A little Nik Viveza 2 to finish up so the focus is on the birds and less on the reflections. Very simple process but fun to do!…..Digital Lady Syd

Latest
Basking in the Sun
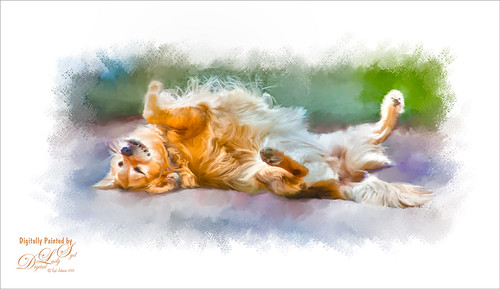
This beautiful golden retriever dog was totally enjoying the warm sun in a park in Savannah, Georgia. I had a very similar looking dog a long time ago so I just had to paint him as my first dog painting I have tried. It is hard to find people doing Photoshop training. I learned from Corel Master Fay Sirkis and her Photoshop Pet Portraits Webinar from several years ago. Since she was using CS6, the downloadable brushes and techniques worked out great! If you are a KelbyOne member, you have access to this webinar that is currently on the old NAPP website. (They will be closing this website at the end of the month so I am not sure if it will be available after that.) All the webinars in her Portrait Series a very good. As a final step, I used Nik Viveza 2 to direct the attention to the face just a bit more. This was a little more of a challenge than my bird images as the dog had a lot more hair and I did not extract him from his surroundings. Overall this was a lot of fun to do!…..Digital Lady Syd
Enjoying the View!
 \
\
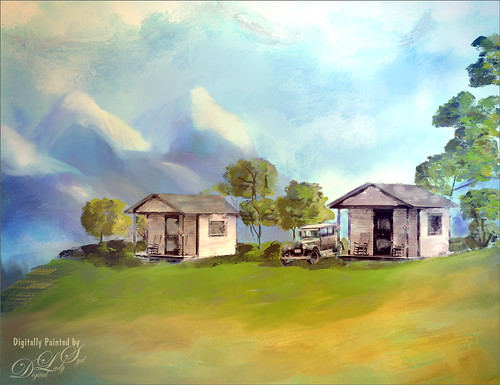
This is an image from a black and white photo that I found on Shorpy‘s, one of my favorite websites of old-time photos. These are tourist cabins in Georgia from March of 1936. I spent a lot of time painting this image – used lots of Fay Sirkis’s mixers from her Four Seasons set and used several regular brushes. One of my textures created in Corel Painter was used for the background. Topaz (see sidebar for website link) Lens Effects Toy Camera Filter was applied using the Awesomeness I with the camera shake turned off. Otherwise that was about it. Just lots of fun to do!…..Digital Lady Syd
Looking for Dinner
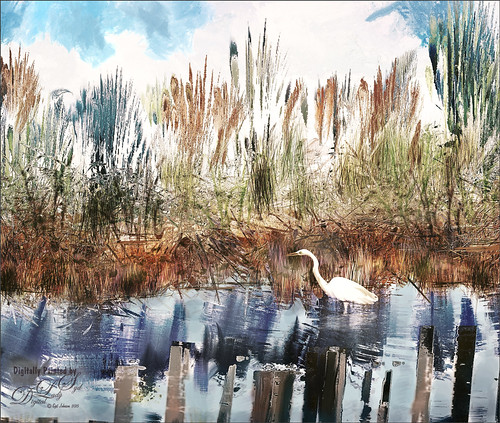
This is an image I created mainly in Corel Painter using John Lowther’s Landscape brushes – still learning how to use them but they are beautiful brushes! I have done a couple different iterations of this image, but I think I like this one the best. My birds are always my favorite subjects so here is another one. I did have to use Photoshop to add the egret (in the set called rEgrets I’ve Had A Few by Midnight Touch that are really nice egret brushes). Once the bird was added, used the Mixer brush to add detail and color to the face and body. Frostbo Grass Set 2 brushes (my favorite Photoshop grass and reed brushes!) were used on individual layers and a Gaussian Blur filter set to a Radius of 3 was used to soften the strokes to fit in with Painter reeds and grasses. Topaz (see sidebar for website link) Lens Effects was opened and the Single Tone Filter set to Morning preset was applied to warm it up. Topaz ReStyle was opened and the Zambezi Zest preset was used to bring out some more autumn looks – in ReStyle the Color Style was set to Soft Light Blend Mode and then back in Photoshop the layer was set to 65% opacity. A Solid Color Adjustment Layer was set to medium gray, Color blend mode, and 55% layer opacity -the areas I wanted to appear a little more vivid was painted back in the layer mask. That was it! It took a while to get this the way I wanted it. Just takes some experimentation. Lots of fun!…..Digital Lady Syd
Showing Off My New Hairdo
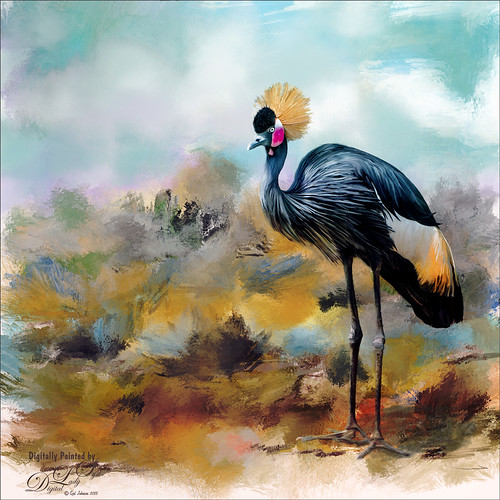
Just enjoying painting another beautiful bird. They are so much fun to do! This is a West African Crowned Crane taken a while ago at the St. Augustine Alligator Farm and is one of the regular exhibits so he can be seen anytime. He just sort of match this Corel Painter texture I had made, so there he is. In his document Topaz (see website link in sidebar) Clarity, Detail, and ReMask were used to adjust the bird itself. Then the ReMask layer was moved into the texture to place it where I wanted him to be. After that just painted the bird on several different layers using the Mixer Brush. Used two different Exposure Adjustment Layers, one for the eye and one for the beak to bring out some sharpness. Then duplicated the original texture twice and set on top – set one to Color Burn at 46% layer opacity and the other to Soft Light at 32%. Created a stamped layer (CTLR+ALT+SHIFT+E) on top and added the Topaz Lens Effects’ Toy Camera filter set to Awesomeness I preset with changes. Back in Photoshop that was set to 39% layer opacity. The last step was to add Nik Viveza 2 to really drill in on the birds face and head feathers. Hope you enjoyed my little bird painting…..Digital Lady Syd
Flagler Beach in the Fall
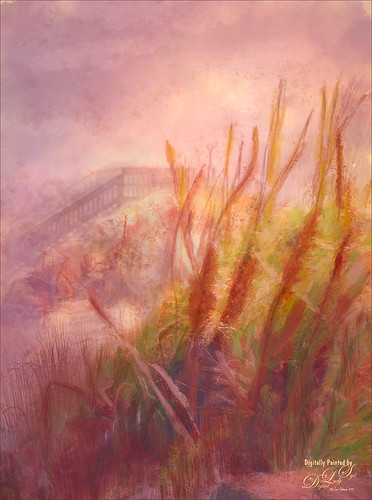
Flagler Beach, Florida, is so beautiful all the time (see blog links below for more Flagler Beach images), but this week the waves and water were really impressive. There is a bit of a fall feel in the air. These Sea Oats are everywhere along the edge of the beach. They are important for preventing beach erosion during hurricanes. I did a lot of adjustment to this image – Topaz (see sidebar for website link) Glow and Topaz Impression before painting on top. One of my Corel Painter textures was added and Photoshop’s Lighting Effects Filter were also used. It took a long time to get this the way I wanted it to look, but overall this is how I see Flagler Beach……Digital Lady Syd
Digital Lady Syd’s Related Blogs:
How to Add a Little Retro to Your Shots
Trying Out Some New Techniques!
Using Pattern Overlay Layer Style to Get a Retro Feel
Hogwarts at Halloween
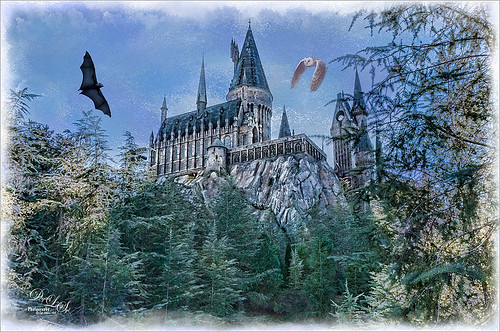
This image of Hogwarts School of Witchcraft and Wizardry at Universal Studios-Orlando was used to show how to get a bit of an illustrative look to an image using Topaz (see sidebar for website link) Adjust and Clarity and a Watercolor Texture for the sky. I actually just followed a really great tutorial by Leslie Nicole at French Kiss Textures (see sidebar for website link) that gave the exact steps and layers used. See her Before and After – Using a Watercolor Texture to see how it was done. (And check out her textures while visiting.) Both birds were by Midnights Touch – To the Bat Cave collection and Who Gives a Hoot collection to add a little holiday effect. I also added a watercolor border painted using my SJ WC Salt Brush set to 69 px to create. Lot of fun here and I really like the results!…..Digital Lady Syd
Red Fish Taking a Break from Universal Studios
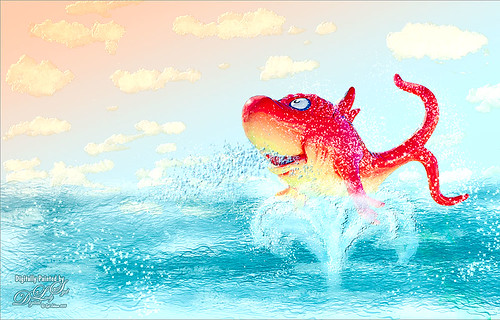
Just another image taken at the Universal Studios-Orlando, this time featuring the Red Fish at one of the Seuss Landing rides. Got a little carried here but it was a lot of fun! Basically all I did was extract the fish from the original image and paint in some elements to make him look like he was swimming in the water. Actually there were several paint layers to get the effect and Topaz (see sidebar for website link) Simplify’s Cartoon preset was applied to just the fish. Also, when done painting, a stamped layer was placed on top and Topaz Lens Effects was opened. The Toy Camera Awesomeness II was applied with the Toy Camera Aberrations sliders turned off. Adjusted some of the other sliders a little. That was it! Love how happy this guy looks!…..Digital Lady Syd
Rookery Security Guard
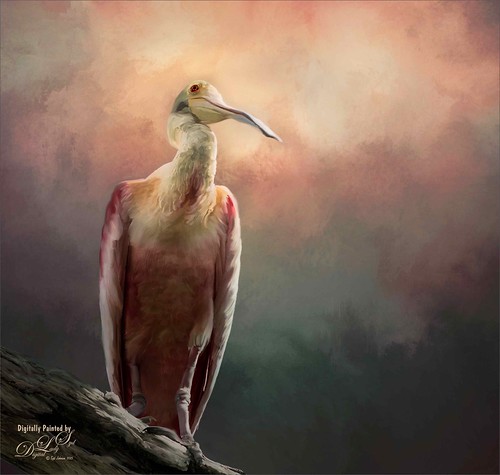
Just another one of the beautiful birds at the St. Augustine Alligator Farm Rookery – this time a rather elderly looking Roseate Spoonbill who seems to be keeping a careful watch over everything going on. I love the color in this type of bird. Pretty much my standard workflow – using Topaz (see sidebar for website link) ReMask to cut out the bird from its original surrounding; then placing a texture underneath; adding a New Layer on top and painting over the bird with a Mixer Brush; stacking more texture on top trying different blend modes; adding an Exposure Adjustment Layer to sharpen up the eye; applying Nik Viveza 2 to get the correct tone in the sky around his head; and finally adding a Curves Adjustment Layer for contrast. I never seem to get tired of painting my bird buddies!…..Digital Lady Syd
Beetle Bailey Taking a Snooze!
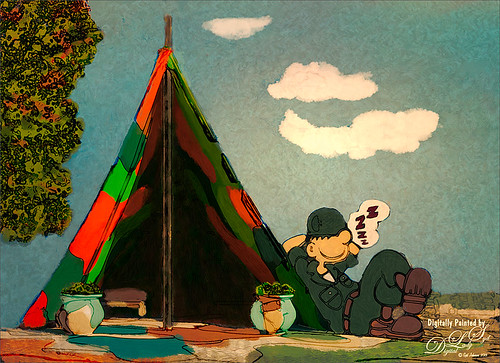
Just a loosely painted image of a photo I took at Universal Studios-Orlando a while back. One of the brushes had some great texture effects that can be painted right onto the sky instead of adding a texture and painting it away in a layer mask where you do not want it. There were several painted layers in a group underneath a sketch of the image. I did use one of my smooth Corel Painter textures set to Linear Light blend mode at 61% layer opacity to add a small spotlight on Beetle. That was it – lots of fun to paint!…..Digital Lady Syd
Topaz Labs AI Gigapixel
Check out AI Gigapixel stand-alone software for upsizing your images. It’s incredible! And it can now be used as a plugin when in Photoshop. Also Topaz Labs Photo AI has some great sharpening and denoise tools along with Photo Video AI.

Luminar Neo
Click here to visit Luminar for more info and check out their new AI Filters.

GRUT BRUSHES – Photoshop Brushes for Digital Artists
Click here to visit GrutBrushes.com
And be sure to check out his Free Brush of the Week and Brush Sampler! These are the best brushes you can find!

Topaz Studio 2 and Legacy Topaz Labs Filters
Unfortunately Topaz Studio 2 and other Topaz Lab filters are no longer available for sale as of 2020. If you had bought these filters and would like to put them back on, here is a link to the Legacy Apps where they can be downloaded again. Below is an example of the wonderful Remix AI Filter from Studio 2. The wonderful Impression still works fine in Photoshop right now along with Adjust (all versions), ReStyle, and even PhotoFXLab!

On1 Photo Raw
Wonderful software to use as a substitute for or plugin with Photoshop. Many great filter effects and lots of AI capabilities!
