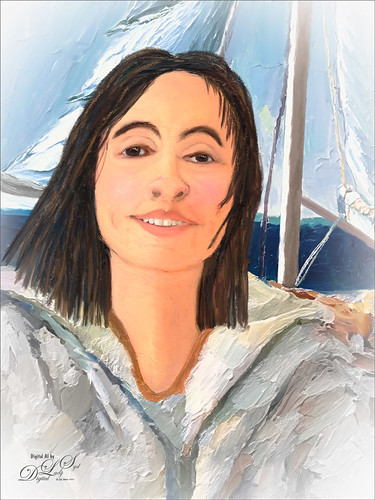
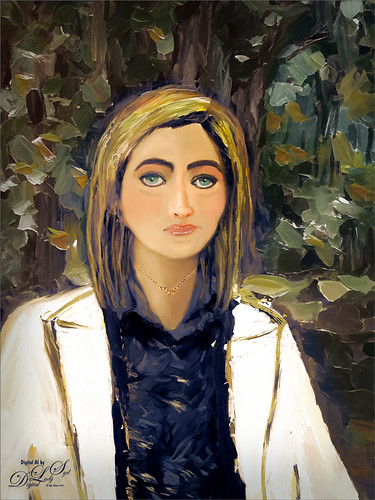
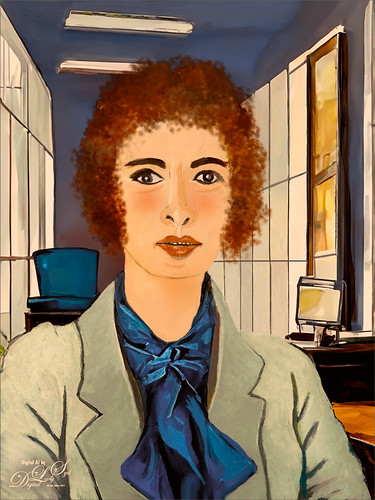
Anything Photoshop or Photography

Latest

Turtle and Child Sculpture

Digital Art painting of a sculpture of a turtles with a child swimming along.

This image was taken on the Big Island in Hawaii at a small shopping center near Waimea – I wish I knew who did the original piece of sculpture as it is quite striking and beautiful. The photo background was very busy so I decided to try some digital effects to the image. It really is a faux digital painted image as the background painted effect used Topaz Studio (AI Remix – 0.69 opacity and Normal mode, Velvet Abstract preset set to Style Strength High, Brightness 0, Contrast 1.00, Sat 0.75, Hue 0, Smooth Edge 0.20, Sharpness 0.47, and Suppress Artifacts 0; Impression – 1.00 opacity and Normal mode, Type 16 Stroke, Number of Strokes Med, Stroke Length 0.56, and Painting Progress 0.16 – painted out the turtle and child and Texture – and Background Type Original; and Precision Detail – 1.00 opacity and Normal mode, Overall Small 0.60, and Lighting Midtones -0.47). Then on various layers in PS, different parts were painted using PS brushes to add more defined strokes and to clean up some of the Studio stroke overlap. One brush used was Kyle’s Real Watercolor-80 Round brush set to Normal brush mode to paint the face and body of the child. Black & White, Curves, and Levels Adjustment Layers were added on top. The Sharpen Tool was used on a separate layer to sharpen up the eyes a little. A Color Lookup Adjustment Layer using On1’s Loyalty Reward for May 2022’s Fun in the Sun6 LUT was added and set to 27% – really brightened up the image. Last step involved adding darken and lighten layers using Sam Peterson’s colors and brush to draw attention to the boys face. (See my Fun Photoshop Blog A Few Photoshop and Lightroom Tips and Tricks – Step 2 for info on this – really easy to do and look great on images!) That was it – it was really fun and relaxing to do!…..Digital Lady Syd

The Lifeguard

Cartoonish image of a Lifeguard

Just downloaded this week’s free brush from GrutBrushes – each Monday he gives you a new one some of them are fabulous. He has some great brushes (I love his cloud set for starters!) This week’s brush is an ink brush called Citrose and I really like it! Everything painted or draw in this image used this brush. For example, just for sketching the brush was set to 13 pixels. The Color Tones were added with the brush set to 70 pixels which made a very smooth color. The water was set to 400 pixels, white splashes and birds were set at a very small size. The only extras were a Gradient Fill Adjustment Layer used on the background at 76% layer opacity, and a Texture layer using Pro Casanova from the Adobe Paper Panel (not sure it is available anymore but try this link if you are interested) set to Overlay blend mode. The font is one called Zahra Inline Grunge – has a stroke layer style added and set to the outside. I was not going to do an image with the brush, but it turned out to be such a nice brush so I started doodling and came up with this crazy image using it. …… Digital Lady Syd

Early Morning Tree Jumping

Image of an egret flying

This image was taken at the St. Augustine Alligator Farm. The sky was bright and clear so I decided to try adding some fog into the image. It was actually a lot of fun – just followed Glen Dewis’s video called Try This for Adding Smoke, Fog, Mist and Clouds into Your Pictures Using Photoshop. It is a pretty simple technique. Also, to get the color I wanted, a Color Lookup Adjustment Layer using the Late Sunset preset set 88% layer opacity was used. On some of the areas that did not have blur on them, a large soft Mixer Blender brush was used (could have used a Smudge Tool instead) to paint over, and then immediately after stroking, went to Edit -> Fade to bring back some of the detail from underneath. Really helped balance out the fog spots. The font is Argentina Script…..Digital Lady Syd

The Pirate

Image of a pirate at Disney World

Am I the only one who photographs mannequins – yep this guy was in the gift shop at Universal Studios-Orlando. They have some wonderful displays if you look around. Of course, he was not exactly a pirate – I added the hat, hook and map from PixelSquid to make him look authentic. Otherwise pretty normal post-processing. Topaz Sharpen set to Out of Focus was used to really sharpen him up. Sam Peterson Shadows and Highlights layers were used first to even out the lighting (See My Fun Photoshop Blog A Few Photoshop and Lightroom Tips and Tricks, Tip 2 for info on how to do this). Then Viveza was used for adjusting everything. Three textures were added: Kim Klassen’s Pinitonly and Stay textures (not sure these are still available), and 2 Lil’ Owls Workbook texture from forever ago. Some of the texture was masked out using Kyle’s Megapack Drawing Box-Shady Graphite Fat Dry brush – really nice for when you want a little grain. A Color Lookup Adjustment Layer was added using On1’s Urban Explorer preset and set to 83%. PS Camera Raw Filter was used to create a slight vignette effect. The Font is called Fratello Nick. That is about all that was done. I have a couple other images like this one for a set……Digital Lady Syd

Living in the Abstract

Image of a lioness drawing and then digitally painted in PS

Just a short blog – I thought I would show you the results using this drawing I created of a lioness turned into a painted image using Kyle T. Webster’s Spring 2022 brush set. The drawing is one I did following Aaron Blaise’s Digital Painting for Photoshop – Getting Started-Sketching in Photoshop video. (See my recent Fun Photoshop A Little Aaron Blaise Digital Drawing Practice blog for more info on this.) I used one of Aaron’s resource images – it is not an exact representation but I felt he should get credit for the original drawing idea. Then, just following Kyle T. Webster’s YouTube called Illustration Masterclass: Draw Stylized Portraits with Custom Brushes to paint the lioness. This video used many of his newly released Spring 2022 brushes, which can be found in PS by clicking on the Hamburger icon in the top right corner of the Brushes Panel and clicking “Get More Brushes” – if you have any recent version of PS and are on a monthly plan, it will be listed at the top of the page, after logging if needed. There appear to be 37 brushes in this set. If you want to see how each works, watch his Brush Hour with Kyle T. Webster: Check Out the Spring 2022 Brush Set! video. This image mainly used his Woodchuck Joey, Pellets and Old Blue brushes with a few other ones thrown in. I actually changed the Pellets-Alt brush to a Spacing of 98 and a smaller size of 45 pixels to get a really nice texture effect when the stylus is pressed lightly and really smooth when pressed hard. To select the colors, a color palette layer was created by following Kyle’s video called Illustration Masterclass: Choosing the Right Colors for Your Digital Illustrations which is very helpful when trying to get colors that blend nicely. The splatter effect is a PNG overlay file that was downloaded from Creative Market in a set called 48 Subtle Grunge Textures Vector by Anastasia Autumn. It has PNGs, JPGs, ABRs PS brushes, and Vector AI files with the 48 textures in each file format. By adding a layer style to the PNG texture 01 layer and in Layer Styles selecting the Gradient Overlay, all these colors would be added (not sure which gradient, but it had a lot of horizontal gradient colors in it). It was set to 59% layer opacity. Major Cool! Viveza was used to fine tune the final image. Overall, this was just major fun to do!…..Digital Lady Syd

Handsome Fellow

Image of an Iguana taken at the Palm Beach Zoo

Love how this beautiful Iguana looks up close – he lives at the Palm Beach Zoo in Florida and I think it may be a juvenile since it was so colorful. It took a lot of manipulating to get this image post-processed, but I really like the final results. Two images had to be stacked and aligned in Photoshop as some parts were more in focus in one image than the another. A black layer mask was added to the top image and just the parts needing to be sharper were added painted back in. Topaz Sharpen AI was tried on a stamped layer, but some bad haloing appeared so this filter was removed. On a stamped layer the Iguana was selected using a layer mask. On a duplicate stamped layer placed underneath the subject layer, the Tilt Shift Filter in the Blur Gallery was applied to smooth out the background. I had to reload PS2021 as the pins were not showing for these filters on my computer in PS2022. Not sure what the issue is here! Used Viveza to sharpen up photo and the new Spectrum Neo for the lighting-love the relight effect in this filter. Then a Color Lookup Adjustment Layer and two Levels Adjustment Layers (one for a vignette) were used to finish up. It took a while, but well worth effort……Digital Lady Syd

Waiting for Sunset

Drawing of a deer waiting for a sunset

Just had some fun creating a little atmospherics image. Following Aaron Blaise’s Digital Painting videos – these are from 2017 but they are still really relevant. One of the sections is called Creating Atmospheric Perspective using Layers. It was a lot of fun to do and pretty easy. Just used a Hard Round PS brush with Transfer on for the mountains layers and with a lighter color added using the Gradient Tool for atmosphere layers. Can make as many mountains and as much atmosphere as you want. The foreground flowers are from Maddy Bellwoar Hand Painted Gouache Brushes Plant and Flower set – Wildflower Stamp 9 – really nice. The deer shape is from a Photoshop set by Timoes Animal Shapes from 2002 and the grass reeds were created in Aaron’s class. Lots of fun. And Aaron has just released a new digital class but I have not tried it yet. I am sure it is also great!…..Digital Lady Syd

Missing You

Portrait using Art History Brush

Just had some fun using the Unsplash photo to create an interesting portrait effect using the Photoshop’s Art History Brush. If you have not tried this, you should as it can give some really nice results without really painting much. I will admit that I used my sketch brush to clean up her eyes and mouth especially. The background texture is from Kim Klassen called Hellodecember-0312. If you want to learn how to use the Art History Brush, follow a 5-minute YouTube video by Brady at Texturelabs called Ultra-realistic Sketches in Seconds! He gives you a link to the two Art History brushes that were used on this image. (If you are interested in more of Brady’s info and some more free brushes, check out another excellent video called Anyone Can Create Incredible Paintings in Photoshop with a Single Tool.) I recommend you give this type of painting a try if you want to try something different on your image…..Digital Lady Syd

Playing Lionfish

Image of two lionfish taken at Sea World, Orlando

Yes, these two rather vicious looking lionfish are probably friends. I had one for several years that was very tame. He would follow me around the tank when I was in the room. Who knew? (Check out Ray Hunziker’s book on Marine Aquarium Basic Setup and Maintenance on pg. 67 – he had similar experiences!) Had to take some pix of my Leo the Lionfish relatives when I had the chance. Since they were both moving and the tank itself gave some pretty weird shadows, it was a challenge. Using Topaz DeNoise AI and Sharpen AI totally saved the image – that is why it was never post-processed before due to the high level of noise. Many steps were involved, but probably the most important thing was the lighting on the two fish. Overlay and Multiply layers were used to create the shadow and highlight effects…..Digital Lady Syd

The Bubble Creature

Digital Art image of a geometric creature

This is a little creature I created following Adobe Evangelist Julieanne Kost’s How to Create a Smoke-Flake in Photoshop short video and written tutorial. There is an action used to created the basic geometric flake that can downloaded if you scroll to the end of the linked site. It was created from a smoke image and totally surprised me as to how easy it was to do. My flake was Free Transformed and a background was created. A few items were added and the bubbles painted on were from a PS brush set called bubble_brushes_by_jennyle88-d7bl6zd from DeviantArts. When doing this technique, make sure your image is not too big. My initial image came out to be over 4 Gigs (Yikes!). To compensate, the smoke image was changed to an 8 bit mode, and 6 inches X 6 inches at 200 res in the Canvas Size dialog. This is just a fun thing to play with in PS!…..Digital Lady Syd