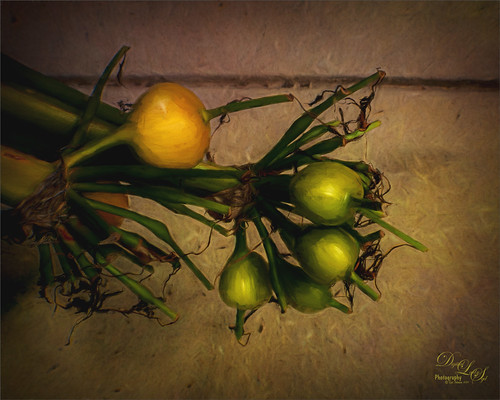
Anything Photoshop or Photography

Latest

Ahh! That Feels Good

Image of a Jaguar at the Jacksonville Zoo in Florida

This sweet Jaguar resides the Jacksonville Zoo and seems a lot more relaxed than her crazy “cagemate” who spends most of his time prancing around his exhibit and roaring at anyone who looks at him. (See my Don’t Take My Picture!!! Tidbits Blog.) She sat posing for me and then I got this rather cute image – she looks just like a large domestic cat. Don’t think I would test this theory though! Not much was done to the image. In Lightroom the regular basic adjustments were done. In PS tried out an interesting new technique presented by Unmesh Dinda in his Free 100+ Amazing Duotone Presets for Photoshop! video. I liked the colors resulting from this technique. Used Viveza to sharpen up her face. Used a Levels Adjustment Layer to create a vignette and ended up with a Curves Adjustment Layer to add a little more contrast to the image. That was it!…..Digital Lady Syd

On Duty at the Zoo

Image of a Cardinal Bird taken at the Smithsonian National Zoo in Washington, DC

This beautiful male Northern Cardinal just sort popped in front of my while I was visiting the Lion exhibit at the Smithsonian National Zoo in Washington, DC recently. I decided to give him a better location as he was right in the middle of a bunch of us tourists. He was painted with mixer brushes and I believe an older Jai Johnson texture, with the colors and size of the texture changed to fit the scene. You do not have to keep a texture exactly the way it was when you got it. That is what makes it fun! Topaz (see sidebar for website link) Impression was used to paint in the foreground rocks – just the default settings with Brush 06 using the Graduated Filter to line it up on the front. The background birds are a brush from Jenteva Plant Brushes. Last step was a Curves Adjustment Layer. It is so relaxing to paint birds!…..Digital Lady Syd

Along the Road to Hilo

Image taken along the road to Hilo on the Big Island in Hawaii

Hawaii – what can you say – total eye candy for a camera. Had fun painting and playing with this image. It was not one of my better images but with a little persistence (almost stopped working on it twice), I am pretty happy with it. Yep, this image used Topaz (see sidebar for website link) Sharpen AI, Luminar (see sidebar for website link) Flex, Color Efex Pro, and Topaz ReStyle – hard to believe, but each filter had something special to add. That is an important point – sometimes only one filter in a program is needed combined with several other different types of filters. And with this image, the final was painted using a brush by G. Rutkowski called SB-9 Texture. Several other adjustment layers were added – just lots of fun to do!…..Digital Lady Syd

Just Saying Hello

Sumatran Tiger just saying Hello at the National Zoo in DC

This beautiful Sumatran Tiger was enjoying his afternoon in the shade and greeting everyone who came by at the Smithsonian National Zoo in Washington, DC. He was so much fun to photograph – a real photo cat! In Lightroom used Serge Ramelli’s Animal Safari Vignette Cold Strong preset as a starting point and did a lot of sharpening in his face with an Adjustment Brush. Used Photoshop’s Blur Gallery Tilt-Shift twice at diagonals to each other and Blur 15 to soften the background naturally. On a New Layer the Spot Healing Brush was used to remove extraneous grass and a Color Lookup Adjustment Layer set to the Edgy Amber preset at 23% opacity was applied. An Exposure Adjustment Layer was used on the eyes and a Curves Adjustment Layer was used to add contrast. No other changes were done. He had such a wonderful natural color!…..Digital Lady Syd

Bird of Paradise Bark

Image of the bark on a Bird of Paradise tree

Took this image of a Bird of Paradise tree growing in my front yard – it is huge and has some great textures in its bark. The little spike in the middle is the beginning of a flower. This image was taken in manual mode (200 mm, F/13, 1/160 sec, ISO 200, and 0.5 EV) and just Basic work was done in Lightroom before bringing it into Photoshop. Topaz AI Clear was used to remove a little noise and sharpen it up a bit. A Gradient Map using pink and blue tones was added and set to Soft Light blend mode at 88% opacity. More blue color was added into the image on a New Layer. On a stamped layer Viveza 2 was used to sharpen up the focal point before a Curves Adjustment Layer was used to add back contrast. Very simple. Lots of fun to work with colorful patterns!…..Digital Lady Syd

Queen Emma Lily Bulbs

Image of Queen Emma Crinum Lily bulb seeds

The image above is an image taken of the large seeds from my large Queen Emma Crinum Lily plant. They are laying on my sidewalk which gave a great background texture for the image. Very little was done to this image in Lightroom. In PS an Adobe Paper Texture Pro texture called Brushed Rose was added and set to Multiply blend mode at 70% layer opacity. Then the image was taken into Topaz Studio 2 and Impression was applied. I used settings by Shannon Rose in her blog called Created Imagery Driven by Imagination with Topaz Studio a while back which gave an acrylic effect (these settings were saved as a preset with the Impression filter). The only change made was to increase the Yellow Saturation a little more to 0.62. Back in Photoshop a Color Lookup Adjustment Layer using the Crisp Warm Look at 62% opacity was added. Finished off with both a Levels and a Curves Adjustment Layers. Not a whole lot here but the Impression gave a great painterly feel!…..Digital Lady Syd

A Busy Place

Image of a Bird of Paradise with a few visiting ants.

Not a whole lot done to my beautiful Bird of Paradise bloom that I photographed yesterday. Looks like the ants are taking over – eish! In Lightroom just did some basic adjustments and used an Adjustment Brush to sharpen up the ants. In Photoshop Luminar’s Flex was used to further sharpen up the blooms and ants and a Vignette was used to darken the background. Then on another layer, used Topaz Studio 2 and applied AI ReMix – a BW filter preset from Greg Rostami was applied (uses Neon Feathers, Style Strength High, Brightness 0.56, Contrast 1.97, Smooth Edge 0.14, Sharpness 0.44, and Suppress Artifacts 0.79.) and set to Luminosity blend mode to give a colored sketch look (check out Greg Rostami’s Topaz webinar AI Magic with ReMix and Clear). In Photoshop a black layer mask was added and painted the effect back in a few places with a low opacity brush on the ants and some of the texture was added in the petals. That was it……Digital Lady Syd

Where is This?

Image taken at the Infinite Space art show in Washington, DC

This is another image from the totally fabulous art show called Infinite Space in Washington, DC until September 2nd. The art is by Refik Anadol and is an exceptional virtual experience. For another example, check out my recent Star Wars on Steroids Tidbits Blog.

Very little was done in post-processing for this image. Only a little texture added in Lightroom. In Photoshop, just some cropping to even out the edges, Luminar Flex was used to sharpen it up a little using their Structure, Details Enhancer,and Microstructure filters – then selectively adding them with a Masking brush. And of course AI Clear to remove Noise – but is was masked out so in the black areas but left in the colored areas as I liked the natural grainy effect it created. last step was a Curves Adjustment Layer. That was it! I really love this art!…..Digital Lady Syd

Woodpecker on Guard

This little male Downy Woodpecker was visiting one of his favorite snack spots in a beautiful shaded yard. Not much was done with this image as the bokeh effect was from the 70-300 mm lens shot at 300 mm and set to f/7.1 at ISO 200, 1/50 sec and EV -1/2. In Photoshop Topaz (see sidebar for website link) Sharpen AI was used to really popped the bird (Processing Mode Stabilize, Remove Blur 0.50, and Suppress Noise 0.20). Otherwise not a lot here. Viveza 2 was used to further sharpen the bird and a Curves Adjustment Layer was added to add some contrast. What a wonderful little bird!…..Digital Lady Syd

Bison Buddies

Two Bison located at the Smithsonian National Zoo

These two Bison were trying to find a nice shady place to hide from the exceptionally hot day in Washington, DC. Since the original color in the image was so beige and brown already, it was an easy choice to make the image a sepia tone. I started with the color tones from one of the best wildlife photographer’s, Nick Brandt, creating a Lightroom very subtle preset (Split Tone section: Highlights Hue 23/Sat 6 and Shadows Hue 41/Sat 6). There was a large fence line through the bison and two different methods to remove it were used. For Wilma, just a Curves Adjustment Layer and a Hue/Saturation Adjustment Layer clipped to it. Zora was a little harder – had to select and feather the fence line and then put the selection on its own layer. Again a Curves Adjustment Layer was used, but the edges were still showing so several painting layers using Coyotemange fur and poodle curl brushes were used to sample and match the regular fur. The light color was just harder to match so you do what you have to do! Then a little text and some Viveza 2 to finish them off. ….. Digital Lady Syd