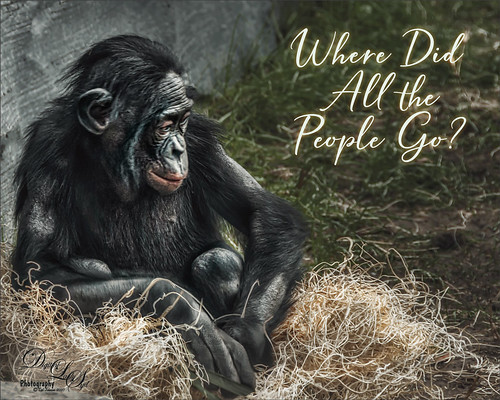
Anything Photoshop or Photography

Latest

The Beautiful Queen Emma Entertains a Visitor

Image of a beetle in a Queen Emma blossom

Yes, since I am stuck at home, I decided to practice some of my macro photography by starting with one of my favorite subjects, a Queen Emma plant in my front yard. This beauty had a beetle of which I have no idea what kind it is, tromping around, but it did not seem to be hurting the blossom. There is also a photo-bombing ant – oh, my! I will keep an eye on the Queen from now on. Not much was done with this image other than using a profile in Lightroom called Artistic 02 at an Amount of 76 and a little sharpening on the beetle with the Adjustment Brush. In PS the file was duplicated and Luminar 4 was opened to sharpen up the beetle a little more – just used the AI Enhance Tool at 50%, and Structure on and Detail Enhance Tools on just the beetle, using a mask to do this. Used Viveza 2 to really adjust the color and lighting in the final image. That was it. What an intriguing visitor…..Digital Lady Syd

Bathing Beauties

Image of the Pink Flamingos at the Jacksonville Zoo.

These beauties were enjoying all the attention they got at the Jacksonville Zoo. I learned one thing about Flamingos – it is hard to get an image where they are all in a “descent” grouping. They are just like taking pictures of groups of people. For some reason I decided to give them a magical background by using one of 2 Lil’ Studios great textures set to 40% layer opacity – a mask was added to painted a bit of the middle. Also the birds were taken into Topaz (see sidebar for website link) Studio 2 and a basic dose of Impression was added to give them a bit of a painterly look. It was painted softly off their faces though. And yes, one of the Flamingos had to be brought in from another image because someone decided to show a not very interesting area of their bird body to the camera. Sort of like the “class clown!” A Color Lookup Adjustment Layer was added using the Foggy Night preset. That was it. This was a lot of fun to do!…..Digital Lady Syd

Keeping an Eye on the Gorilla in the Premises!

Image of a Guereza Colobus Monkey at the Jacksonville Zoo

This is a Guereza Colobus Monkey that resides at the Jacksonville Zoo along with several Gorillas, in fact one was roaming around him while he was sitting there. He was definitely keeping an eye on the big guy. What gives this monkey such an interesting background is the Topaz (see sidebar for website link) Studio 2 ReMix filter that was applied. The Beige Sketch Style was used along with the Glow filter to add the interesting line texture. The Edge Filter was also used to do the same. Then a little painting had to be done on the image back in Photoshop just to clean up edges and lines. Also his face had to be painted in as it was lost in all the line work from Studio. Last step was to enhance the texture a little more with the now defunct Luminar Flex – still love the results it gives so I use it a lot. I have a similar image that contained Toucan birds – it is a fun look for kids!…..Digital Lady Syd

Monkey Deep in Thought

Image of a Black Howler Monkey at the Jacksonville Zoo

This guy is an example of why I love to go to the Jacksonville Zoo – almost always there is a different type of animal to photograph that was not noticed before. This is a male Southern Black Howler Monkey from Argentina and Bolivia. The texture is one I created in Corel Painter and a Hue/Saturation Adjustment Layer was used to give it the matching blue tones of the monkey. The monkey was selected from his background by using the Quick Selection Tool and the Select & Mask panel. A Color Lookup Adjustment Layer was used using a free LUT called SS (SparkleStock) Bleak Trellick preset – I really like this set of LUTs. Viveza 2 was used to even out the lighting in the image and adjust it to his face. A Spotlight Effect layer was added and last a Curves Adjustment Level. I love they way this image turned out – a lot different than the Zoo image!…..Digital Lady Syd

Isn’t She Beautiful!

Recently went to the Florida Museum’s Butterfly Rainforest in Gainesville. There were several of these Blue Morpho beauties flitting around – and not standing still for very long – but little one had a ripped wing and was having a some trouble. It games me a chance to get a great photo of both the gorgeous iridescent blue on the back side of her wings and the camouflaged brown on the bottom side. These butterflies were just spectacular to see! And not much was done to get the color – mainly just some Topaz (see sidebar for website link) Sharpen AI and Viveza to some extra sharpness and adjust the color. Also the Camera Raw Filter was used to adjust color on the brown of the wings. These butterflies were definitely the hit of the season at the museum. …..Digital Lady Syd

A Vintage Gas Station

Historic image from Shorpy.com that has been colorized.

Had a lot of fun colorizing this vintage image taken in 1941 in Minneapolis, Minnesota, using mostly the settings from my recent blog called How to Convert Black and White Images to Colorful Paintings with Topaz Studio 2. Click here to see the black and white photo at Shorpy.com. In the Look I settings I provided, the unchecked ReMix AI was turned on and the Eye of the Storm style set to a High strength and the Overlay blend mode (Brightness -0.41, Contrast 1.42 and Hue -1.00 sliders). The Quad Tone Filter was added on top and the Strength was set to 0.65 – this added a little color in the sky and reduces the color around the flags. Back in Photoshop Viveza 2 was added and the attendant was highlighted to emphasize him a little. On a stamped layer Topaz (see sidebar for website link) Restyle was added using the Butterfly Wings preset – the ReStyle Opacity was set to 30% and the blend mode to Multiply. Give this a try if you have Topaz Studio!…..Digital Lady Syd

Introducing the Magnificent Great Orange Tip Butterfly

Image of a Great Orange Tip Butterfly from Japan taken at the Butterfly Rainforest at the Florida Museum in Gainsville.

Yes, brought in all the way from Japan is this little beauty, one of many exotic butterfly species that were entertaining visitors at the Florida Museum’s Butterfly Rainforest exhibit in Gainesville, Florida. She was totally enjoying all the bright colored flowers as she zoomed around the exhibit. I did use a free Lightroom preset, which I do not usually do, to get the really darkened down effect – it was called KP01-Lone Pine from the Explorer Pack at Adobe, then added a bit of Texture and Clarity to it. Very little was done to this image other than sharpen it up a little – used both Topaz Sharpen AI and Luminar Flex to do this. (see sidebar for links to both of their websites.) The Spot Healing brush and a soft round brush at 30% opacity was used to clean up a few rough edges and halos on the foreground yellow flowers. Otherwise that was it. I love combining two of my favorite subjects – butterflies and flowers – in one image!…..Digital Lady Syd

A Happy Giant Otter

Image of a Giant Otter swimming at the Jacksonville Zoo

I love it when I go to a zoo and the animals seem happy. The Giant Otter exhibit at the Jacksonville Zoo is one area where the all the otters seems so happy and were totally enjoying themselves. A great place to relax and just watch them while at this Zoo. It is very hard to photograph these fast moving animals, but if you are persistent, a good image can be achieved. Not a lot was done on this image but there was a lot of reflective glare from the water spectral highlights. That is why I decided to use Topaz (see sidebar for website link) Studio 2’s Impression – applied a preset created by Jai Johnson (a fabulous wildlife photographer and texture creator) called Just Paint Hummingbird Scene. (Check out her Artistry Beyond the Camera Episode 1 video for settings – she uses Topaz photoFXlab software, but the Topaz Impression settings are the same.) I made a few changes to the strokes in the Impression filter. Back in Photoshop opened up Luminar Flex – like it to sharpen when Topaz Sharpen AI does not work. Their Detail, Clarity, Structure and Microstructure filters are terrific for this. (These are the same filters as Luminar 4 – see sidebar for website link.) A little line clean up and a free Rain Overlay (from Book Cover Mockup Rain Overlay by Design Cuts) was added at Screen blend mode at 56% layer opacity. A Levels Adjustment Layer was used to add contrast. That was it. What a cute little fellow!…..Digital Lady Syd

Just Gulliver Saying Hi

Image of a Coquerel Sifaka (a type of Lemur)

Gulliver is a Coquerel’s Sifaka, a medium-sized Lemur. What a character – I could hang out with Gulliver all day at the Jacksonville Zoo. Not a lot was done to the image – it just looked better in black and white to me. Used Topaz (see sidebar for website link) Sharpen AI first, then painted some of his hairs a little darker using some of the brushes noted in my recent blog called Getting the Joel Sartore Look on Your Zoo Images. Little bit of Spotlight Effect on his face and that was about it. He is so photogenic and seems to love to have his picture taken. Go visit him if you get a chance to go the Jacksonville Zoo – he will put on a little show for you……Digital Lady Syd

Looking for his Valentine

Jaquar Valentines Card

My Valentine Jaguar buddy from the Jacksonville Zoo was caught looking into what looked like a little window is all dressed up in his holiday pajamas. I thought this image would make a nice Valentine’s Day card so that is what I did. He was actually turned into a sketch using a tutorial called 5 Easy Steps to Create a Realistic Little Drawing from a Photo in Photoshop by Jesus Ramirez. Just followed the steps and painted in some heart shapes on the rocks using a Color blend mode to give the painted effect. Painted the heart pattern out of his spots using an 8-pixel soft round brush and Gruts H Hatch Wren brush (if you have not checked out Gruts brush website, take a look-it’s great). It took awhile but was lots of fun to do. Happy Valentine’s Day!…..Digital Lady Syd