
Who’s Looking Out the Window?
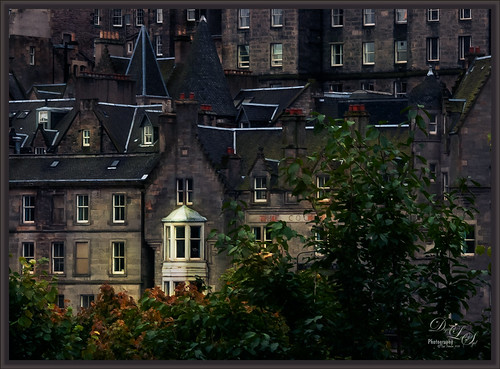
This is an image taken in Edinburgh, Scotland – not sure what is in the window. Just did a little post-processing on this since it was in pretty good shape already. A Curves Adjustment Layer was added to darken the overall image. Then three New Layers set to Overlay blend mode and white, yellow and orange red was painted in the areas that had those colors to bring out the color more – basically just a spotlight effect. A Dodge and Burn Layer was used to make some of the roofs stand out. These layers were all part of painting with light in the image. A vignette was applied and a frame added as a last step. Pretty easy and no filters!…..Digital Lady Syd
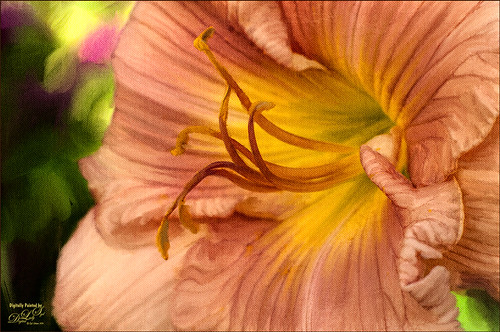
Pink Carnation
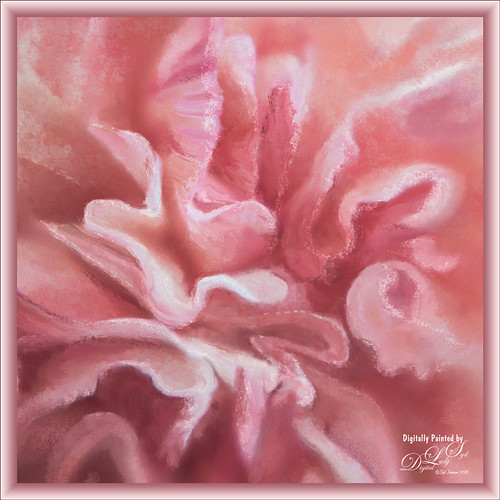
This flower was in a group from some birthday flowers – tried a few macro shots on them and got some really nice results. I decided I wanted to go through some of my brushes and pick some specialty mixers for painting. Most of the brushes were from Fay Sirkis, a Corel Painter Master. If you have a chance to get hold of some of her mixer brushes, they are still some of the best around even though they are older. Photoshop has not updated their actual brush engine except for the Smoothing section in many years so they work just fine. Her Four Seasons brushes, which is a really good set, can still be downloaded at KelbyOne if you are a member – just do a search for Fay and several webinars will appear with the brushes as a download set. A Curves Adjustment Layer was added along with French Kiss Feb 2018 Bonus texture (she give out many goodies during the year in her E-mails and this was one – website link is in sidebar). A Red Channel Luminosity Curves Adjustment Layer was applied (see my How to Use a Red Channel to Create a Nice Blended Image Effect blog) see my and one of my frame layer styles was added (see my How to Create a Quick Layer Style Border or Frame blog). I love some of the nice effects these brushes gave – not bad for Photoshop!…..Digital Lady Syd
Teacher and Student
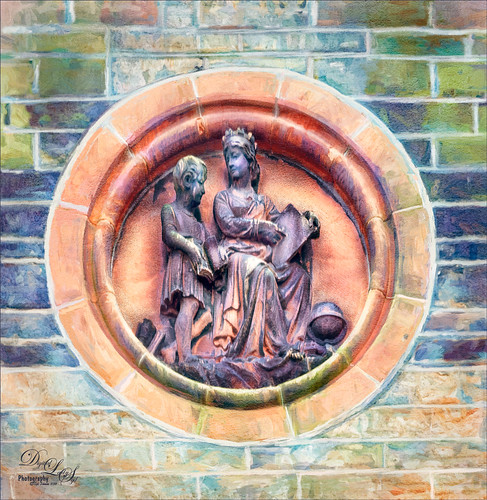
Am planning on taking a few weeks off from blogging to get some things done around the home – blogging takes up a lot time, so this will be it for a few! This image is of some architectural sculpture associated with the “Castle School” building connected to the Camera Obscura building in Edinburgh, Scotland, near the castle. I thought the sculpture was really charming of a teacher and her student. In LR the image used a Profile by VoxColor called NC to get the interesting tones. In Photoshop just did some normal clean up, used a Black and White Adjustment Layer, a Curves Adjustment Layer, and a Dodge and Burn layer. On a stamped layer, opened up Topaz Studio (see sidebar for website link) and applied the Impression Adjustment and Topaz AI ReMix Adjustment at 0.14 to add some painterly effect into the image. Then added several painting layers using my SJ Pastel 3 brushes (see my How to Create my Favorite Brush Blog and my Painting Fun in Photoshop Blog) to smooth out some of the paint strokes from the Impression filter. A New Layer set to Overlay was used to add a little spotlight effect on the figures. French Kiss (see sidebar for website link) Solstice Initiation texture was set to Color Burn blend mode at 59%. A Hue/Saturation Adjustment Layer was clipped to it and the Saturation was reduced to -43 to reduce the color effect of the texture. Finished off with Nik Viveza 2 to draw focus a little more into the sculpture. Last step was to create a vignette using Matt Kloskowski’s technique (see my How to Create a Subtle Vignette blog). That was it – lots of fun here! Will try to add some more blogs as time allows!…..Digital Lady Syd
Posing for my Portrait
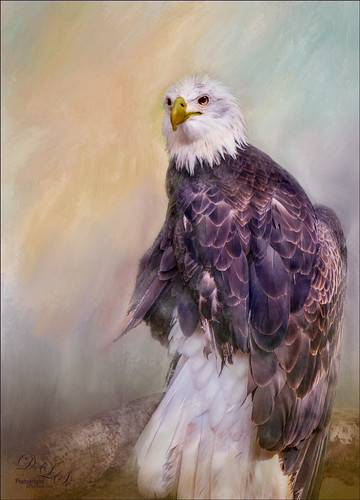
I love this shot of the Bald Eagle – he looks like a king posing for his portrait. I have no idea how he got his feathers this way – I took the image at the Jacksonville Zoo and he was sitting on an old tree stump I think. It is interesting to see his white feather plume. In Lightroom the Adobe Vivid profile was used. Then in Photoshop this guy was separated from the background using Topaz (see sidebar for website link) ReMask 5 as I could not get PS’s Select and Mask to give a good result. I usually can get a better result with ReMask if the selection is complicated. I used two of my own textures behind the eagle but could not quite get the look I wanted. So I took the Eagle layer into Corel Painter and created this soft version for a background. Back in PS the the other two textures were blended in. Used a couple Exposure Adjustment Layers for the eyes and the beak. Curves Adjustment Layers were clipped to each Exposure Adjustment Layer to get the right color in the eyes and beak. Several layers were created for painting out the edges a little with different mixer brushes. On a stamped layer Nik Viveza 2 was used to set the focus on the Eagle’s head and to clarify the feather detail. A Black and White Adjustment Layer set to Luminosity blend mode was used to further adjust the overall color. This is not really a painted image, but it has a painterly feel to it. …..Digital Lady Syd
Blowing in the Wind
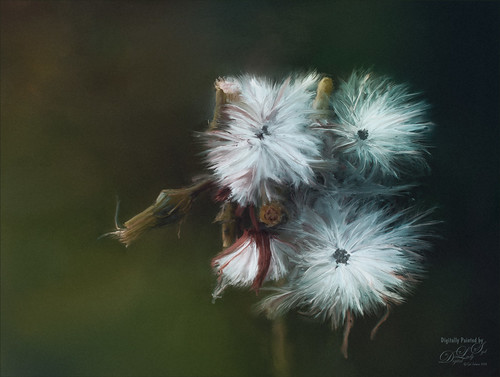
Got back to basics and painted this image of what I believe is some variety of dandelion. Painted using three main parts: a background layer to begin, then blocked in the main subject on a middle layer, and detail was added on top, which took several layers and different brushes. Mainly used Fay Sirkis’s (a Corel Painter Master) PS mixer brushes. (These brushes are pretty hard to find now but worth it if you paint in PS – KelbyOne still has them if you are a member – just search for her name.) Hypothermia action was applied at 24% layer opacity (See Chris Spooner’s 10 Free Winter Blues Photo Effect Actions for Adobe Photoshop blog). And another fabulous action by Blake Rudis was applied – got to check out How to Use the 5 Tone Heat Map in Photoshop video and try this. Last step added a grain layer I built a while ago and put in my Library in PS. Lots of fun to paint again…..Digital Lady Syd
Room with a View
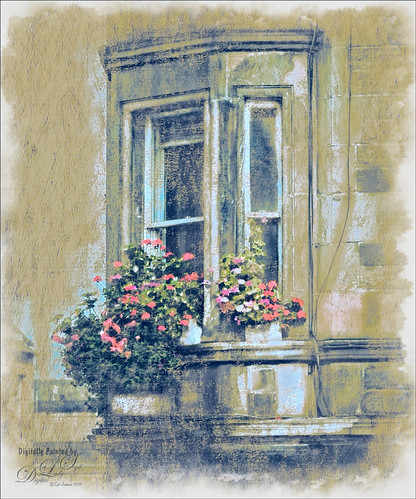
Decided to do a little watercolor painting in Photoshop of these flowers sitting on a window ledge that looks at Edinburgh Castle in Scotland. Basically cleaned up the image using Topaz (see sidebar for website link) ReStyle to set some colors, and then used Melissa Gallo’s method to paint the image using her watercolor brushes. I took her class several years ago, but the method still works. (If you are interested in purchasing her Painting with Photoshop class, it is still available. There are so few really good PS painting classes, but Melissa’s may be the best of the bunch.) Topaz ReStyle was actually applied again at the end to create a more interesting color palette. The last step used my watercolor border frame. Lot of fun to paint again…..Digital Lady Syd
Merry Christmas from Digital Lady Syd!
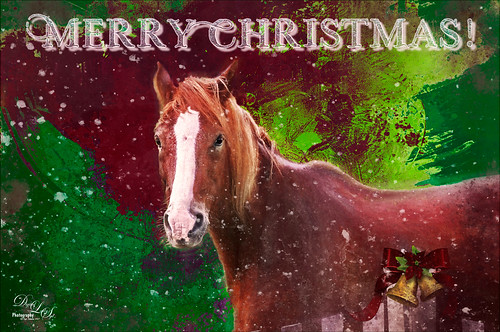
Wishing everyone a Merry Christmas here at Digital Lady Syd’s Tidbits Blog! This lovely horse image was taken in Belarus a while ago – for some reason I felt like adding some painterly Christmas effects to him. He definitely was checking me and my camera out. Normal LR changes and then in PS, Lucis Pro was used to sharpen the image. On a duplicate layer above, Topaz Studio was opened and a Topaz Impression preset called Chalk Smudge was applied. Next I did a selection of the horse. Underneath one of Jai Johnson’s Unpredictable PNG’s was added. A Hue/Saturation Adjustment Layer was used to create the Christmas colors. And under that, a solid blue-filled New Layer was added above the the background from keep white from showing through. On top a New Layer using Kyle’s Spatter Brush Beautiful Mess (comes with PS CC) was used in darkish red to create a subtle vignette. The eyes were sharpened with a Curves Adjustment Layer. A Black and White Adjustment Layer was set to Luminosity at 82% layer opacity. Texture Mate’s original starfield texture was added for the snow effect – set to Screen blend mode at 68%layer opacity. The Font is called Winter Holidays with a Bevel & Emboss, Outer Glow, and Drop Shadow Layer Styles added. That is about it. Hope everyone has a wonderful holiday season!…..Digital Lady Syd
Visiting My Castle
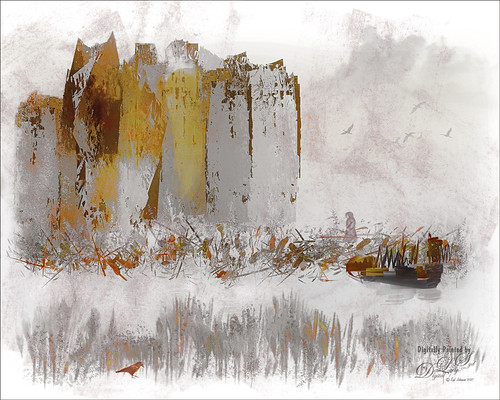
This image was totally painted in Photoshop CC using several elements created originally using different brushes in both Corel Painter and PS, then saving the results down as a PNG objects. Several bird, cloud, plant and grit brushes were used. Different adjustment layers clipped the elements to adjust the colors and tones. The person was just painted in. Topaz (see sidebar for website link) ReStyle’s Silver and Ivory Cloak preset was used to add the colors into the overall image. It was just a lot of fun to put everything together into something creative…..Digital Lady Syd
Enjoying a Flower
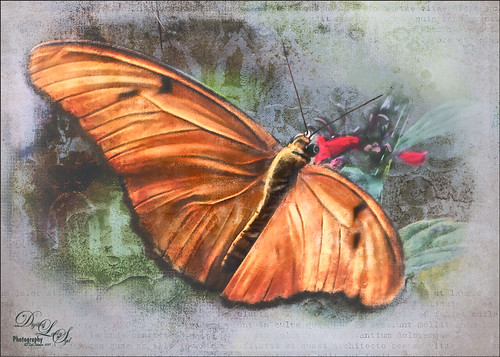
Love this Julia Longwing Butterfly – have never seen one like this around my home. The image was taken at the Palm Beach Zoo which is much further south in Florida. This male butterfly actually lives several months and loves the Passion Vine. The image was cropped way down to emphasize the butterfly. Then Lucis Pro (no longer available) was opened to sharpen up just the butterfly. On separate layers the wings were painted mainly using Gruts (see sidebar for website link) NM Pans Attic brush. 2 Lil’ Owls (see sidebar for website link) Dream freebie texture was set to Hard Light at 70% layer opacity. In a layer mask the butterfly was painted back. Kim Klassen’s 2170 with Script texture (not sure it is available anymore) was used around the butterfly. Nik Viveza 2 was applied to adjust the coloring in the image. Next Topaz (see sidebar for website link) Lens Effects’s Diffusion filter set to Moderate was applied. A black layer mask was added and just the diffusion effect was applied to the wings and flowers. A Color Lookup Adjustment Layer was added and the Crisp Winter preset was selected. It was set to Hard Light and 27% layer opacity. I decided the color palette was not quite right, so on a stamped layer Topaz Restyle was opened up. A preset was made of the image and then the colors in the palette were just slightly adjusted to get the final look. (See my How to Use a Topaz ReStyle Trick for Improving Your Image blog.) Wish these little beauties were in our local…..Digital Lady Syd
Checking Out the Buds
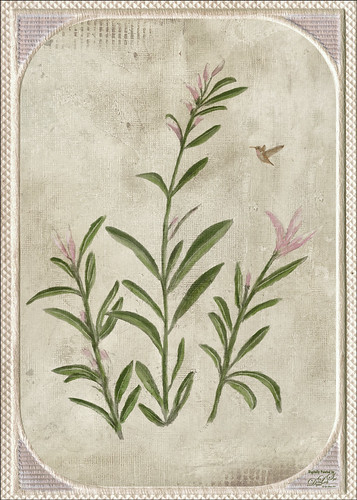
Still practicing drawing and painting. This image I just followed the same workflow from my Some Flower Power blog which created an original sketch layer and several painting layers for the flowers. Next the Hummingbird was painted on a layer using a bird brush created by just turning an old bird image into a black and white and defining as a brush preset – actually used two different colors and softened the edges a little. Kim Kassen’s Stay texture (not sure it is still available) was placed on top and really gives the vintage feel to the image. A Hue/Saturation Adjustment Layer was clipped to it (ALT+click between layers) to desaturate the texture color a little. The border is from On1 Hundred Borders set. The three final steps were performed that I almost always use at the end of my workflow: a Red Channel Luminosity Adjustment Layer, Nik Viveza 2, and a Black and White Adjustment Layer. I am starting to enjoy creating the flower paintings……Digital Lady Syd
Bird of Paradise
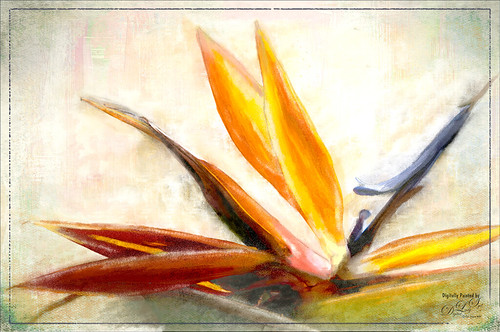
I currently have a couple Bird of Paradise blooms on my plant so had to get a few images. This one was extracted in Photoshop and then painted in Corel Painter before bringing back into Photoshop and finishing up the detailing of the flower and adding texture. One of my Pastel textures created in Painter was placed under the flower. Then several layers were placed above using several of my SJ-3 Pastel brush variations (see my How to Create My Favorite Brush blog) and Grut I Qwillo brush (or see sidebar for link to all his brushes) to create the outline. 2 Lil’ Owls (see sidebar for website link) Color Bokeh Grunge Set-3 was added and the flower painted out on a layer mask. On a stamped layer (CTRL+ALT+SHIFT+E) Nik Viveza 2 was used to emphasize the focal point. Did not like the painted strokes completely, so added a few more layers and used Grut NM Tick Tumble to smooth out color in several places. A Sebastian Michaels edge was added. It is fun to paint these beautiful blooms!…..Digital Lady Syd
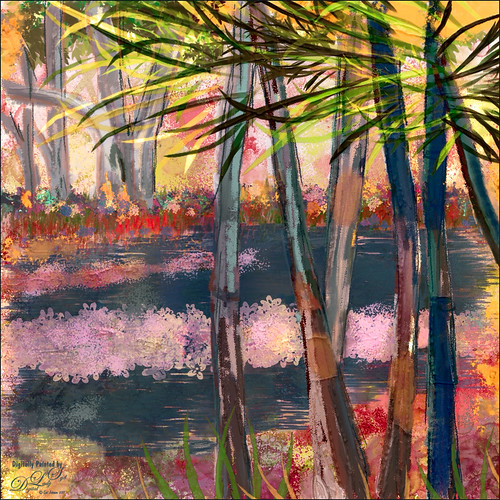
Light Dawning in the Forest
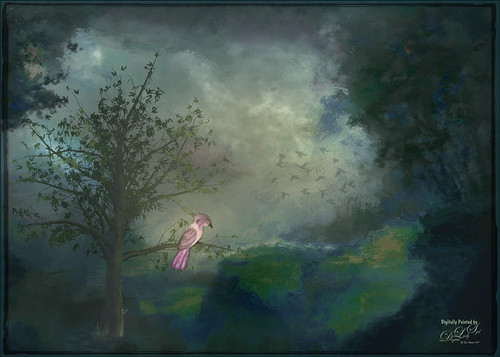
Just created this little image for fun. I started image by opening up the Tree Generator in Photoshop (Filter -> Render -> Tree – not available in CS6 unfortunately) and created a 16 Young Robina tree and just playing with all the fun sliders. If you have not tried out this fun little sub-program inside PS, you should give it a spin – lots of fun! Behind the tree one of my Corel Painter textures was placed and the Hue adjusted with a Hue/Saturation Adjustment Layer. The bird is from some clip art that I had and it was painted and liquified. The flying birds in the background are a free download from Jai Johnson. Not much to this image. I liked the colors that resulted…..Digital Lady Syd
Smiling Wolf
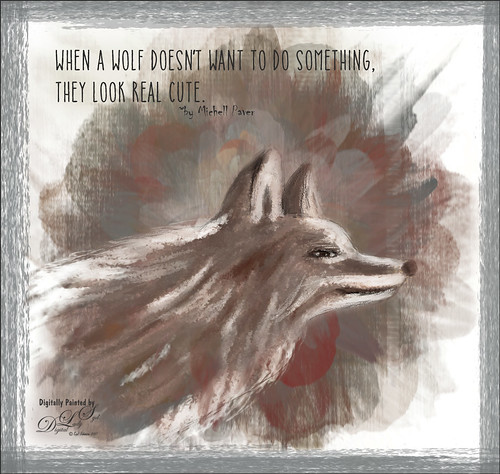
This is my attempt at drawing a wolf. It actually looks a lot like a dog so I am not sure what I was really drawing here. Used a tutorial in the Digital Painting Techniques book on Painting Fur by Richard Tilbury. First a thin black brush was used to the original sketch of the wolf on it own layer to begin the drawing. On layers underneath, the wolf was painted using the Pastel Scratchy Photoshop brush from Corel Painter Master Melissa Gallo’s Painting with Photoshop class to paint the hair. (Her class and PS brushes are terrific even though it is a few years old.) A couple of Fay Sirkis’s (another great painter and Corel Painter Master) Pet PS brushes were also used but they are hard to run down now – these are still some of the best around. (KelbyOne has her very good Four Seasons PS Painting tutorials with brushes to download if you are a member.) Topaz (see sidebar for website link) Impressions was opened and a preset created using the steps in a great video by Topaz Labs called RAW to Envisioned with Bobbie Goodrich (third example). The main text is Catalina Anacapa Sans from Creative Market and by Kimmy Design – a really nice clean font. The small text is in called Chiller. The last step was creating a border using a my Pencil Thin Vertical Lines brush (pencil lines were scanned and a brush was created – then in Brush Panel set the Angle to 90 degrees and Roundness to 12%) by changing the Angle and adding around the edges in a brown color. I will be practicing more animal drawings so look out!…..Digital Lady Syd
Getting Ready for Spring
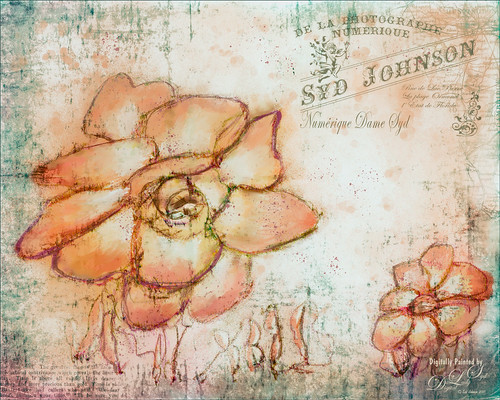
This started with just a little sketching in Corel Painter and ended up like this in Adobe Photoshop! The basic sketch was done with a real small sized brush I had created from a Corel Painter video. Then just used a basic oil brush to add in some color strokes on the petals – it actually started as pinkish tones. It was saved down as a PSD file and opened in Photoshop. Started by cleaning up the petals’ color a little but wanted keep it a little messy. A stamped layer (CTLR+ALT+SHIFT+) was added and a black texture from Kim Klassen called Magic Map was placed on top and set to Subtract blend mode at 47% layer opacity. Next a personal overlay created a while back was placed on top at 69% layer opacity that gave it a bit of a Parisian feel. (See my How to Create an Overlay Out of a Texture Fun Photoshop Blog for more on this.) A Solid Color Fill Adjustment Layer set to a pink color was clipped (ALT-Click between the two layers) and set to 71% layer opacity. Topaz (see sidebar for website link) ReStyle was applied using a preset I had created a while back and set it to 85% layer opacity – this turned the color scheme to the above. Several Splatter brush layers were created at different layer opacities. Some clean up and a Levels Adjustment Layer was added to finish up the image. This turned out to be a lot of fun to create…..Digital Lady Syd
The Valentine Trees

Happy Valentines Day! Just had some fun painting my Valentine Trees – started in Corel Painted and ended up in Photoshop. Lots of layers here a few filters – used Topaz (see sidebar for website link) Impression (true – used after painting the image), Topaz ReStyle, Topaz Lens Effects Reflector, and Nik Viveza 2. Lots of layers for the grass and valentines added. Overall lots of fun to do. Have a great day!…..Digital Lady Syd
High Tide at the Sand Dunes
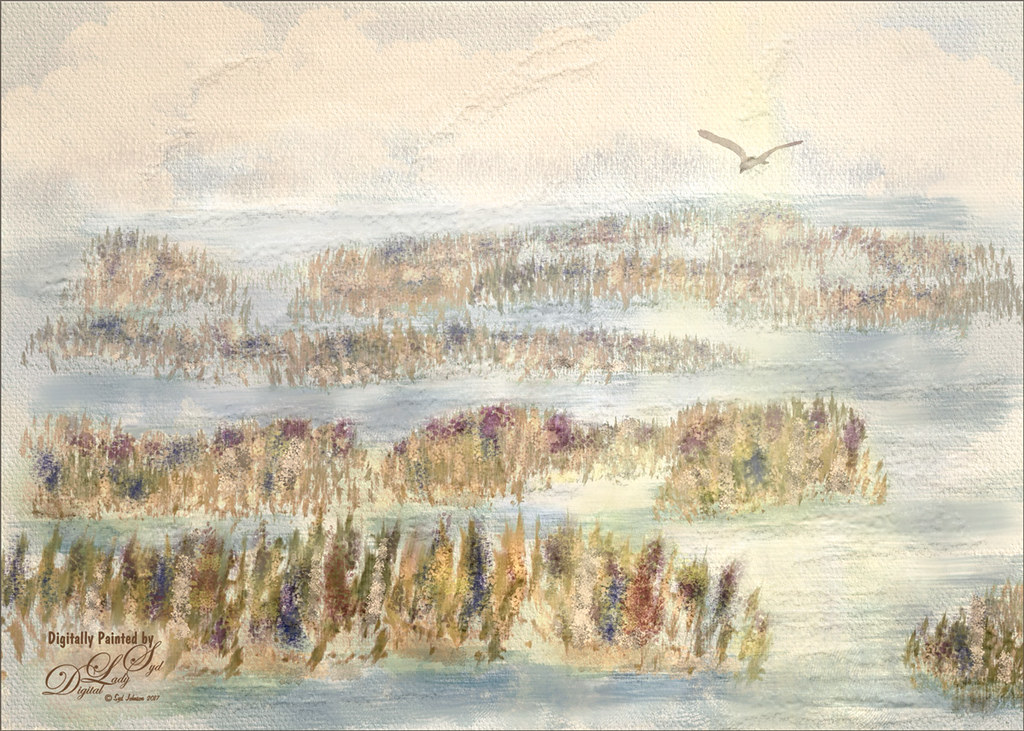
Back into my painting mode with what I envision the Sand Dunes in Indiana would look with a high tide. This image was completely painted in Photoshop using a basic white Canvas Texture as the background above my Background layer and set to the creamy cloud color using a Color Fill Adjustment. Layer. Next the ground areas were painted in using the various flower brushes, including several I created. On a layer below the flowers, the water was painted in. A bird from Obsidian Dawn was added – actually 4 birds were in the group but 3 were masked out. It looked pretty good at this point. Then Topaz (see sidebar for website link) Restyle Lavender gray preset was applied on a stamped layer on top (CTRL+ALT+SHIFT+E) to create a little bit different color palette. Duplicated the layer opened Topaz Texture Effects 2 – just added Diffusion section and used a mask to only apply the effect to the background plants; and Texture section using one of my own textures and removed effect from water with a mask. On layer above filled in a few more plants and added some color the the sky with a fog brush. To add a little warmth to the water, used a Sunbeam brush set to a low opacity. On another stamped layer, Topaz Lens Effects Fog 1 Filter was applied to soften the middle ground of image just a little. Last step was to add Kyle T. Webster’s Gentle Glaze layer style with Fill set to 0 and painted over the water areas to give a really nice painted effect in the water and sky areas. Painting in Photoshop is really fun!…..Digital Lady Syd
Colorful Leaves
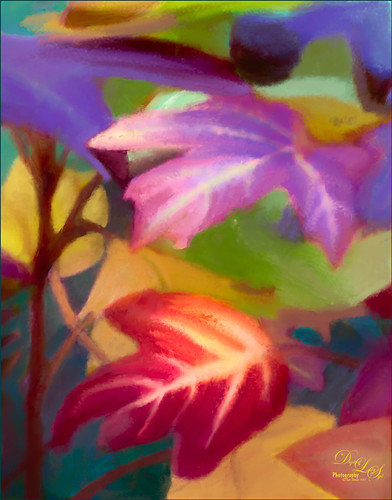
These colorful leaves were taken a year ago at the Jacksonville Zoo – near the entry way. I could not believe how colorful they were in January! Cropped in close to really emphasize the colors and not so much the details. In Photoshop Topaz (see sidebar for website link) Detail 3 was opened – used one of my presets (SJ Ldsp Underpaint2 preset: Detail Overall Small Details -1.00, Medium Details -1.00, and Large Details -1.00: Tone – Exposure 0.10, Contrast 0.24, Highlights 0.76, Blacks 0.31, Cyan-Red -0.61, Magenta-Green 0.11, and Yellow-Blue -0.16; Color – Temperature 0.16, Tint 0.21, Sat -0.27, and Sat Boost 0.19.) Instead of adding detail, the edges are all softened and the colors dominate the image for painting. Topaz Impression 2 was opened and a preset called Abstract Settings-Blake Rudis was applied as is. Back in PS the layer was set to Overlay blend mode and 50% layer opacity. The original background layer was duplicated and placed on top. A black layer mask was added (hold down ALT and click icon to add mask at bottom of Layer Panel to make black) and some of the leave’s details were painted back in. Both the Regular brushes and Mixer brushes were used to paint over all the leaves on lots of different layers – paint colors were sampled from the image. I like to use individual layers for each brush and color. Nik Viveza 2 was opened and control points were placed on the two main leaves where the focal points are. Still a few more clean up layers and that was it. I loved the abstract feel and bright colors of these leaves!…..Digital Lady Syd
The Waters Edge in Florida
This image was painted completely in Photoshop. Lots of different brushes here. My SJ Playing with Grut’s Inky Leaks FX brushes texture gave a lot of the pretty background colors. (Click here to see original texture.) I drew in the basic image before painting in the foreground trees. Then painted in the background trees, water and flowers with several brushes. Nik Viveza 2 was used to adjust the emphasis in the image. John Derry’s Impasto Smooth Heavy layer style was used to add some painterly effects. Topaz (see sidebar for website link) ReStyle’s Zambezi Zest was used to give the image a better color scheme. On layer above, some light yellow sunbeams were painted in and the foreground was masked out with the overall layer set to 29% layer opacity. A Red Channel Luminosity Curves Adjustment Layer (see my How to Use a Red Channel to Create a Nice Blended Image Effect blog) was added as a last step. Just a lot of painting and fun!…..Digital Lady Syd
Contemplating Life
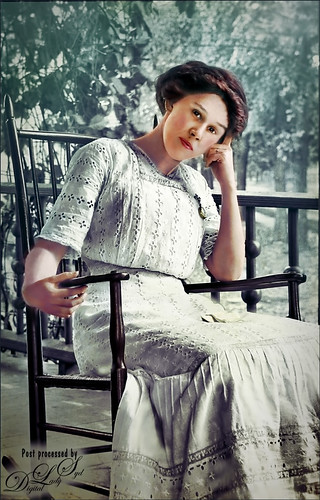
This was a black and white image from one of my favorite websites, Shorpy’s Historic Picture Archive (click on link to see original image). This image just sort of struck me as one I would really like to colorize. The first step was to sharpen up the image using the now free Nik Silver Efex Pro 2 to add some natural contrast to the overall image. Next I used two different methods in this image, although I probably should have stayed with just one, but here are links to my blogs on these techniques: How To Hand Tint a Vintage Image and Create a Brush To Do This blog and How To Colorize an Old Photo blog. A Red Channel Luminosity Curves Adjustment Layer was used to add in more contrast. (See my How To Use a Red Channel To Create a Nice Blended Image Effect blog.) On a stamped layer above (CTRL+ALT+SHIFT+E), opened Topaz (see sidebar for website link) Texture Effects 2. My Crisp Morning Run preset was run (this used the original Topaz Crisp Morning Run preset and switched out the Texture to a bright turquoise one half-way down the list and the Opacity was set to 0.29; also changed Vignette Strength set to 0.60 and Size 0.53.) Then in Light Leaks section, the Enable Masking was turned on. Brush tab was selected, and the woman was painted out with a brush around the head area (brush settings: Radius 0.50, Strength 0.59, and Hardness 0.30). In the Split Tone section, used the Enable Masking feature with the Spot tab to just hide the face area – set sliders to Transition 0.84 and Color Aware 0.86. Nik Viveza 2 (also free) was used to sharpen up the texture on her dress using a Control Point and the Structure slider. Added a Black and White Adjustment Layer set to Luminosity blend mode to balance the contrast. (See my How To Use a Black & White Adjustment Layer To See Contrast in an Image blog.) I just did not like the way her arm and hand on the chair looked too large so the Liquify Filter was used to adjust. Frooze the dress sleeve and chair behind and under the arm, then reduced the size and straightened the arm with Forward Warp Tool set to Size 300, Density 50, Pressure 100, and Rate 0 – just moved a little. Next PS’s Liquify Pucker Tool was set to Size 200, Density 50, Pressure 1 and Rate 80 – dabbed on hand a couple times. To enlarge the eyes just slightly, used the Bloat Tool set to Size 70, Density 50, Pressure 1, and lowered Rate to 32. Clicked once on each eye to just gently enlarge. Now all I could see was the red moire in the shadows of her arm skin and around eyes. Used Topaz DeNoise 6 set to overall Strength of 0.14, adjust Shadow 0.37, and adjust Color Red 0.69 to remove – set this layers opacity to 87%. I could paint these old vintage images all day long – really relaxing to do!…..Digital Lady Syd
On a Mission
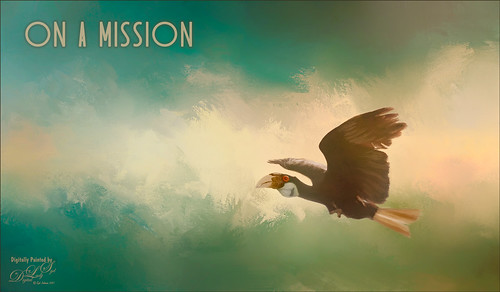
Felt like doing a bird painting – have not done one in a while. I felt a connection with this guy at the Jackonsville Zoo a while back. This Hornbill was showing off by flying back and forth in his cage for me. I think he would rather be flying free as I visualized in my painting, but he and his buddies seemed to be very happy and healthy at the Zoo. It always amazes me that a chained fence and shadows can be removed from a photo when it is painted. The bird was selected using the Select and Mask filter in Photoshop – it did a really good job. It did not hurt to have a beautiful texture to put behind him – this was a free texture from Jai Johnson called Captured Light at Sea 4 and just suited the lighting on the bird and his coloring. Some textures just did not blend well so several had to be tried. Then basically lots of blending and painting with the Mixers and the Regular Photoshop brushes. Just do a search on my blogs to find my favorite brushes. Topaz (see sidebar for website link) Lens Effects Reflector filter was added to give a more pronounced lighting effect on the right side of the image and Nik Viveza 2 was added to smooth out the whole effect. This basically was just a lot of fun to paint and very relaxing!…..Digital Lady Syd
Sunny Winter Trees
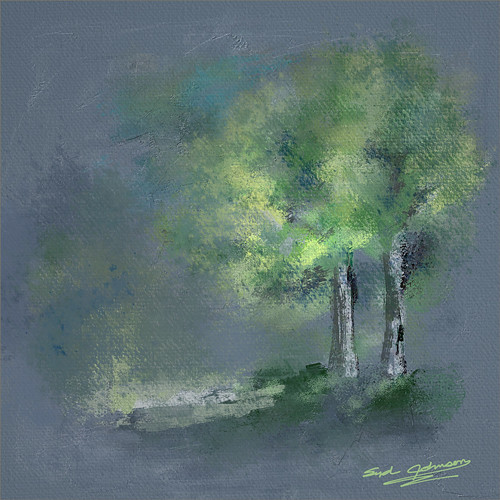
Just having some fun painting trees, my favorite thing to paint. This image was painted for starters in Corel Painter with a solid color light gray color for the background and using several different brushes. Then Photoshop was used and mainly Aaron Blaise’s Photoshop Canvas Texture brushes were used to add more leaves and color into the image. Then I decided I did not like the image but did not know why so I walked away for a couple of weeks. Today I decided to try again and decided the overall color was not what correct. A Hue/Saturation Adjustment Layer was used to change the background to a bluish color which I prefer. A Red Channel Adjustment Layer (see my How to Use a Red Channel to Create a Nice Blended Image Effect Fun Photoshop blog) was used to pop the original tree luminosity and it turned out much better. I am really enjoying getting back into Painter again, but I still have to have my PS brushes to help out!…..Digital Lady Syd
Just a Flower
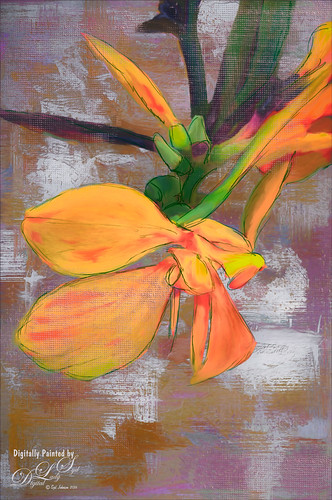
Had some fun painting this Canna Lily growing in my front yard. Used Topaz (see sidebar for website link) Clarity and ReMask (to select the flower) before adding one of my textures behind it. Then on a New Layer above, just painted the lily using Jack Davis’s Wow C Oil Blender 2 Mixer Brush that can be downloaded from his Facebook page. Topaz ReStyle was used to soften the color a little using a preset called Cotton Cloud set to Luminosity blend mode at 38% layer opacity. Some lines were added on a layer above and the last step was to add some texture using Just Jaimee Summer 2012 Brush Sampler 4 with a Bevel & Emboss layer style. It was set to Pin Light Blend Mode at 64% layer opacity. Last step used Nik Viveza 2 to emphasize the focal point. Pretty simple and lots of fun!…..Digital Lady Syd
Peach Hibiscus
This peach hibiscus that was growing on my back porch in Florida and was painted in Photoshop. The technique used is presented in the November Issue of Photoshop User Magazine on KelbyOne, so if you are a member, check it out. It gives you directions for creating 3 mixer brushes and basically makes the effort a lot easier than using the built-in Photoshop Mixer Brush Cloning Paint Setup default action. A Canvas Texture was added on top for a more painterly overall effect. I will be experimenting more with this technique using some of my own brushes and see what happens……Digital Lady Syd
St. Trinity Church in Mir, Belarus
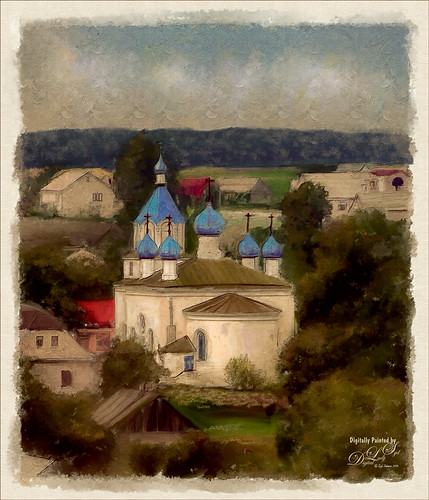
This is an image of the St. Trinity Church as taken from a window at Mir Castle in Belarus. The spire color is fabulous! This image was also painted using Jack Davis’s painting action as discussed in my More Jack Davis Painting! Fun Photoshop Blog last weekend. Very similar steps as the other two images in my original blog. This time I kept the sketch layer turned on and set to Multiply blend mode at 90% layer opacity. Topaz (see sidebar for website link) ReStyle’s Winter Hazel & Wood Bark preset was used to get the vintage effect. I am really starting to enjoy painting using this action…..Digital Lady Syd


