
Watching the Sea
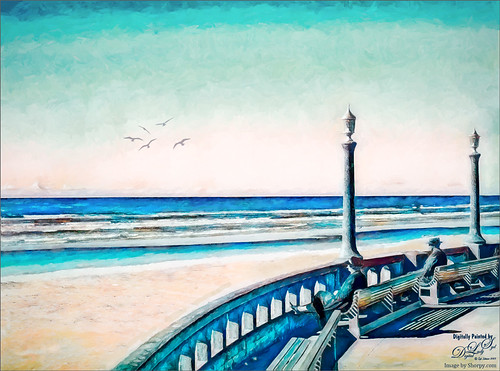
Had some fun revisiting this vintage image from Shorpy.com called By the Pacific Ocean, Seaside Oregon – September 1941. The date made me think maybe these people were thinking about their children or friends serving in World War II. Topaz Studio 2’s Impression filter was applied in my SJ BW to Painted Color preset: changed AI ReMix to Paper Frost swatch, turned on second AI Remix and used Eye of the Storm at 37% opacity. (For preset settings check out my blog called How to Convert Black and White Image to Colorful Paintings with Topaz Studio 2.) To clean up this image, used Kyle T. Webster’s Bowie Set (located in the Adobe Cloud-search for Bowie Toolkit) Heroes Heavy and Hunky brushes, and Kyle’s Megapack Drawing Box-Graphic Control 2 brush (good blender). Used them in the masks a lot also. Also used the Lasso Tool to pin point exact areas to paint in to even out colors around people. It is too bad that Topaz has stopped supporting it creative filters, especially Impression…..Digital Lady Syd
Ready for a Snack

These Delicious Muscat Beauty Grapes really are quite delicious! I also loved the color and texture in the grapes themselves so I had to photograph them. Used my regular workflow in Lightroom. Then in Photoshop opened up Topaz Studio and applied the Impression filter’s default preset with a few tweaks, the Dehaze Filter, and the Precision Contrast filter. Back in Photoshop added Curves Adjustment Layer for additional contrast, smoothed out the background with a large blender mixer brush, and did a little edge softening by painting over the edges of some of the grapes at a low opacity. Used the Camera Raw filter to adjust the final color as it was too blue. Last step was to add a spotlight effect on some of the grapes to draw the eye. The font for the text is called Agatha. These grapes did really make a great snack!…..Digital Lady Syd
Bathing Beauties

These beauties were enjoying all the attention they got at the Jacksonville Zoo. I learned one thing about Flamingos – it is hard to get an image where they are all in a “descent” grouping. They are just like taking pictures of groups of people. For some reason I decided to give them a magical background by using one of 2 Lil’ Studios great textures set to 40% layer opacity – a mask was added to painted a bit of the middle. Also the birds were taken into Topaz (see sidebar for website link) Studio 2 and a basic dose of Impression was added to give them a bit of a painterly look. It was painted softly off their faces though. And yes, one of the Flamingos had to be brought in from another image because someone decided to show a not very interesting area of their bird body to the camera. Sort of like the “class clown!” A Color Lookup Adjustment Layer was added using the Foggy Night preset. That was it. This was a lot of fun to do!…..Digital Lady Syd
A Happy Giant Otter

I love it when I go to a zoo and the animals seem happy. The Giant Otter exhibit at the Jacksonville Zoo is one area where the all the otters seems so happy and were totally enjoying themselves. A great place to relax and just watch them while at this Zoo. It is very hard to photograph these fast moving animals, but if you are persistent, a good image can be achieved. Not a lot was done on this image but there was a lot of reflective glare from the water spectral highlights. That is why I decided to use Topaz (see sidebar for website link) Studio 2’s Impression – applied a preset created by Jai Johnson (a fabulous wildlife photographer and texture creator) called Just Paint Hummingbird Scene. (Check out her Artistry Beyond the Camera Episode 1 video for settings – she uses Topaz photoFXlab software, but the Topaz Impression settings are the same.) I made a few changes to the strokes in the Impression filter. Back in Photoshop opened up Luminar Flex – like it to sharpen when Topaz Sharpen AI does not work. Their Detail, Clarity, Structure and Microstructure filters are terrific for this. (These are the same filters as Luminar 4 – see sidebar for website link.) A little line clean up and a free Rain Overlay (from Book Cover Mockup Rain Overlay by Design Cuts) was added at Screen blend mode at 56% layer opacity. A Levels Adjustment Layer was used to add contrast. That was it. What a cute little fellow!…..Digital Lady Syd
Happy Thanksgiving!
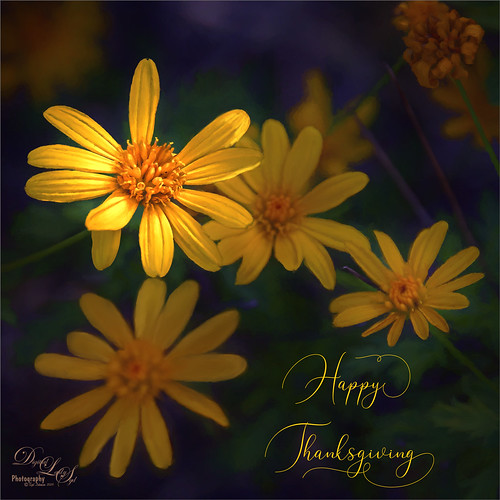
I still have a few yellow daisies blooming in my yard so they decided they would like their picture taken to wish everyone a wonderful Thanksgiving Day. What I like the most is the pretty font in this image – it is called Argentina Script. It lots of different Glyph settings to make your text look fancy. Also used Topaz (see sidebar for website link) Sharpen AI and Topaz Impression (for just the background – painted back the flowers), PS Color Lookup Adjustment Layer using Crisp Winter preset, a red Photo Filter set to 27% Density, and Nik Viveza. Great fun with this one!
Have a Happy Thanksgiving from Digital Lady Syd!
First View of Land

This was a pretty exciting moment when land is first seen after sailing across the Gulf Stream all night. There was a sailboat off in the distance in this image, but we did not see another one until Spanish Cay – the ocean is very empty around here. To post process the image, very little was done. The water was adjusted in Topaz (see sidebar for website link) Studio 2 by adding a little bit of the Impression filter set to the default to tone down all the white reflection on the water – it was masked off the sky. This is exactly how the clouds looked – totally incredible. A Color Lookup Adjustment Layer was added using the free SparkleStock’s Wedding LUT called Airy 01 set to 58% layer opacity. A Curves Adjustment Layer was added on top where the RGB curve was set to a little S curve for contrast and the Red Channel was used to lighten up the Cyan just a little. That was it. ….. Digital Lady Syd
The Purplepassion Flower

This Purplepassion Flower image was taken at the Harry P. Leu Gardens in Orlando, Florida a while ago. It is a very beautiful bloom and there is a little bee hiding in it. Mainy did the clean up in Luminar (see sidebar for website link) Flex with their wonderful Structure, Detail Enhancer, Image Radiance, Microstructure, and HSL filters. In Photoshop used a Gradient Map tAdjustment Layer to emphasize the color a little. Then used Topaz (see sidebar for website link) Studio 2’s fabulous Impression filter – just adjusted the default settings a little to smooth out the background. Then used Mixers brushes back in Photoshop to further blend in the effect. Finally used Topaz Lens Effects Fog filter to lighten the top slightly. Viveza 2 was used to adjust the focal point and the last step was a Curves Adjustment Layer. The text is a font called Brettany ….. Digital Lady Syd
On Duty at the Zoo
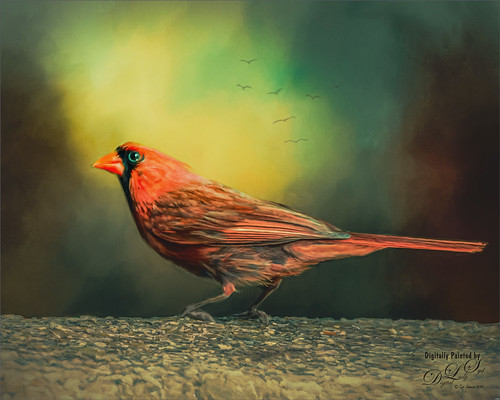
This beautiful male Northern Cardinal just sort popped in front of my while I was visiting the Lion exhibit at the Smithsonian National Zoo in Washington, DC recently. I decided to give him a better location as he was right in the middle of a bunch of us tourists. He was painted with mixer brushes and I believe an older Jai Johnson texture, with the colors and size of the texture changed to fit the scene. You do not have to keep a texture exactly the way it was when you got it. That is what makes it fun! Topaz (see sidebar for website link) Impression was used to paint in the foreground rocks – just the default settings with Brush 06 using the Graduated Filter to line it up on the front. The background birds are a brush from Jenteva Plant Brushes. Last step was a Curves Adjustment Layer. It is so relaxing to paint birds!…..Digital Lady Syd
Early Morning Yoga Session
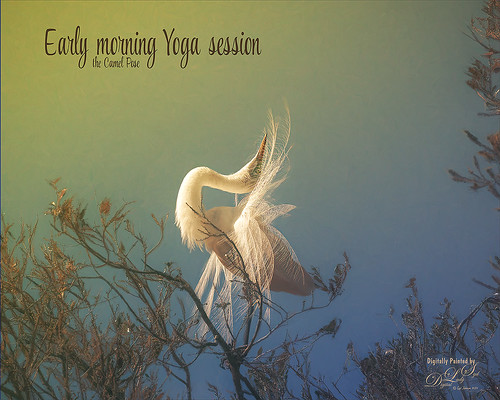
This beautiful feathery Snowy Egret is getting up early and doing a few Yoga exercises to get ready for a full day of finding a mate. Image was taken at the St. Augustine’s Alligator Farm’s fabulous rookery. Tried out the new Lightroom Texture slider which made the feathers just pop out really nicely. In Photoshop, Topaz (see sidebar for website link) Studio where AI Clear was added first. Then the Default setting for Impression was used, but this time the Painting Progress was set to 0.31 so only a bit of paint was added to the tree branches which looked really bad. The paint was removed from the bird using a Luminosity mask and painting out some more at 0.42 Mask Transparency. Then some Mixer painting clean up was done in Photoshop to smooth out some of the edges around the bird. A yellow light leak was added to make the sky look warm and to match the lighting on the bird. The text used the font called Style Casual. That was about it. …… Digital Lady Syd
Living in a Jungle Painting
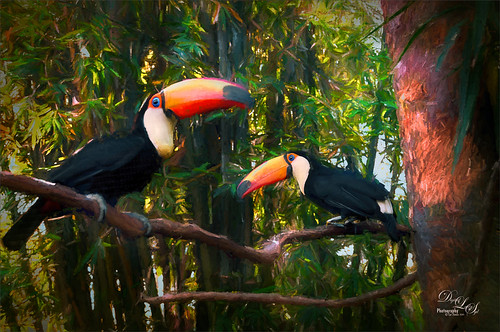
Yes, my friends at the St. Augustine Alligator Farm are making another appearance, this time showing off their painted jungle background. This is their favorite place to be. How did this happen? Well, if its a painted background, it is probably Topaz’s (see sidebar for website link) wonderful Impression plug-in, now in Topaz Studio. Yes, this time the Edward Hopper I preset was used and then the Toucans were painted out somewhat – left a few strokes around them. While in Studio, a Glow Adjustment using the Soft Liquid preset was applied and the Primary Glow was changed to 0.90 – used the same mask as in the Impression Adjustment so the birds were not affected. Also used AI Clear Adjustment to sharpen up their eyes and bodies. Several PS adjustment layers were used, a Clone Stamp layer to clean up the strokes, and Nik Viveza 2 to adjust the vignette effect. These birds are such happy creatures – no wonder they are the first exhibit you see when entering the Alligator Farm. ….. Digital Lady Syd
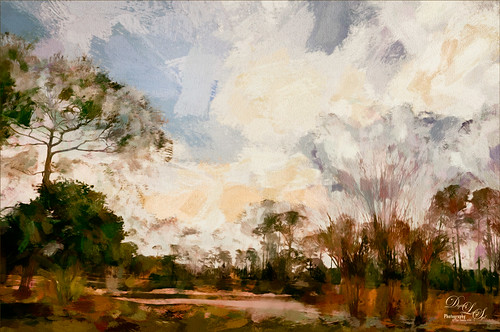
Graham Swamp
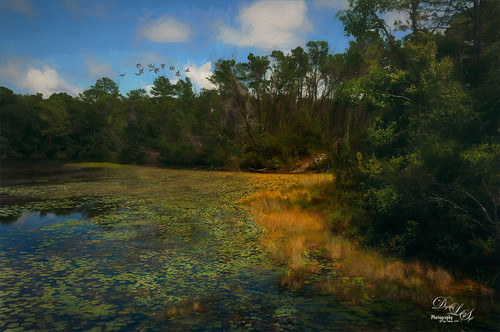
Graham Swamp is a place I have photographed many times. It is not really that pretty most of the time, but this fall it contained just enough color to create this image. And Topaz (see sidebar for website link) came to the rescue for me. In Studio, the new AI Clear Adjustment was terrific on this type of image. Really helped sharpen up all the little details without over-sharpening them. Learned a new workflow from a Topaz Webinar by Joel Wolfson called The Simple Path to Stunning Images with Topaz. Not sure it is posted yet, but do check out the Topaz webinars – there are some really informative ones like this one. Basically it uses Topaz Adjust to adjust exposure without losing the Shadows or Highlights in the image. I had forgotten this and it is a very useful tip. So here is the tip: since the Adaptive Exposure slider is connected to the Regions slider, use them in together – the higher the Adaptive Exposure amount is, the more Regions should be set. Used the Dehaze, Precision Contrast, Precision Detail Adjustments, and somewhere in the mix some Impression and the ReStyle Plugin. Turned this rather dreary image into a beautiful autumn look…..Digital Lady Syd
White Abstract Flowers
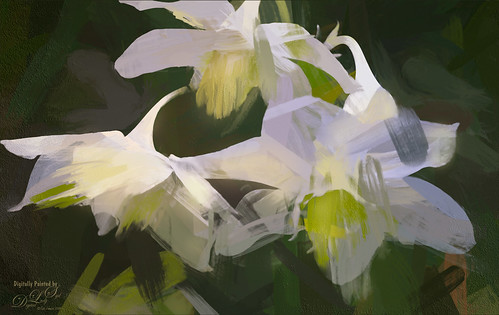
Love the results of this abstract applied to a rather ordinary grouping of white flowers. Applied a basic Topaz (see sidebar for website link) Impression Abstract preset to the flowers to remove the details. Then took the image into Corel Painter to paint in more of the flowers. Saved as a PSD file and opened up in Photoshop to further paint in details with Mixer Brushes. To get the interesting texture effect, added a rather light edged painted border in white and in the layer style, set the Bevel & Emboss to one created by John Derry. At this point I could not find a link where these can be purchased (I got them several years ago) but try playing around with this layer style effect. The opacity of this layer was set to 44% and the Fill amount set to 5% to get the interesting painting look. Used Nik Viveza 2 and added some color for lighting effect……Digital Lady Syd
Planet X
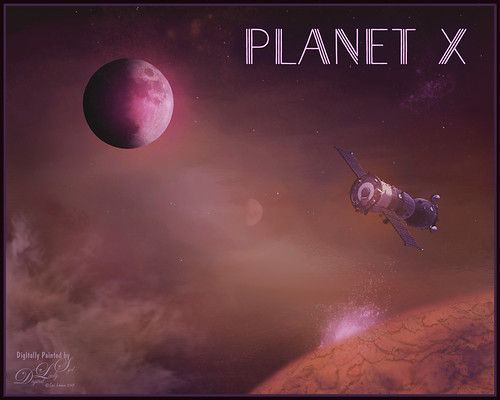
Just had some fun creating this. Design Cuts gave everyone a freebie pack called Vintage Style 3D Lettering Moon Phase Graphic and Sunbeam Photo Overlay (Phew!). It contained the moon in the above and got me thinking about what I could do with it since Astronomy is one of my major hobbies. Created an New Image and added the Moon image into it. Next added a Solid Fill Adjustment Layer set to black on the white background layer since it is a space scene. Decided to use the Starfield png in the pack and put it behind the moon. Then added one of the smoke layers from the psd in the pack. Then just started adding in elements. Used one of my Corel painted backgrounds that created the lighting effect for the whole image by placing it just above the Solid Black Fill Adjustment Layer. The satellite was from the space satellite in orbit image from Free design file.com. Some brushes called Galaxies by LoRdaNdRe were used to add in little elements to the sky. The foreground Planet X was created by first just painting an orange corner into the image. Then took just this layer into Topaz Studio and applied the Impression adjustment (settings: Darker Color blend mode, Stroke Type 16, Number of Strokes Medium, Brush Size 0.89, Paint Volume 0.93, Large Brush Volume 0.58, Print Opacity 0.60, Stroke Rotation 0.26, Rotation Variation 0.22, Stroke Color Variation 0.18, Stroke Width 0.18, Stroke Length 0.04) which created the interesting cracks on the surface. The spewing fountain on the planet was created by using another galaxy brush and then adding a watery flume to it with a sparkle brush. The moon in the distance is in the Moon Brush Set by EMelody – changed the angle of the moon to fit the image. A Color Grading Action called Blackberry Stain by Chris Spooner was also used to get a little bit of a cinematic effect. The font is Naive Deco Sans. That was it – just a lot of fun to put together!…..Digital Lady Syd
Harvesting Orange
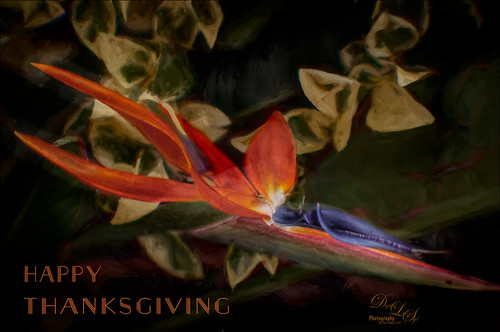
Wishing everyone a very Happy Thanksgiving in the US with this perfectly colored Bird of Paradise bloom that was growing in my front yard. Used setting from Urban Walk 15 Vintage Street preset in Lightroom. In Photoshop just practiced some of the things I have been learning about the various plug-ins filters. This image used Topaz Studio’s (see sidebar for website link) Impression default with some slider changes including the Painting Progress slider at 0.60 – then painted out most of the effect off the flower. Then the Precision Contrast filter was applied at 0.84 opacity and the Lighting Shadow set way down to give it a very dark background. Back in PS, On1 Photo Raw 2018 (see sidebar for website link) Effects was opened and their Glow Filter Orton Hear a Who preset at 75% opacity and the Noise Reduction filter Shadows preset was applied. A little burning was done on a layer above to emphasize some of the flower lines a little. (See my How to Create a Subtle Dodge and Burn Effect blog.) Some selective sharpening was done with a 50% gray layer and painting was done on the flowers using my SJ Pastel 3 Brush (see my How to Create my Favorite Brush blog). On a layer on top, a Spotlight Effect was created on the flower (see my How to Add a Spot of Light blog). The last step added the text using Naive Deco Sans font. Enjoy the holiday!…..Digital Lady Syd
A Pink Orchard
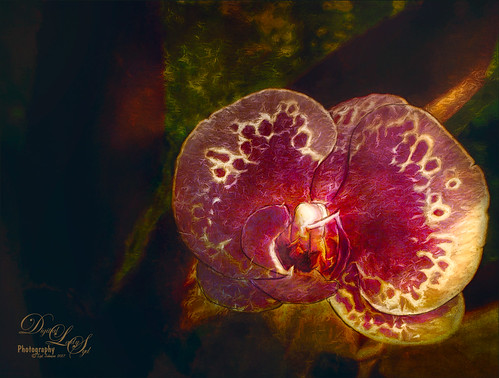
This orchard image was taken at the Harry P. Leu Gardens in Orlando, Florida – a wonderful place to take flower images if you are in the area. This image was started several weeks ago so I am not completely sure what I wanted as an end result. This flower began as a purple orchard, but Topaz (see sidebar for website link) Texture Effects 2 was opened and the Citronella Lily was applied with several adjustments. On a stamped layer (CTRL+ALT+SHIFT+E) Topaz Impression’s Fine Brush Scumble was applied. On another stamped layer, Topaz Detail 3 was applied, another composite layer and Lucis Pro was applied, and finally on yet another stamped layer, Topaz ReStyle’s Rustic Red and Orange preset. Sort of amazing all the Topaz effects in this little flower! I used my favorite line brush, Grut’s Ink Pin Clinger – to actually draw around just a little around the petals. Two textures were added: Kim Klassen’s August Trio Traverse blend mode set to Vivid Light at 18% and her Fav Collection Cinnamon set to Multiply blend mode at 65% layer opacity. A couple Curves Adjustment Layers and a Color Lookup Adjustment Layer set to Foggy Night at 55% layer opacity. Another stamped layer was created and Nik Viveza 2 was used to adjust the lighting in the image. A Red Channel Luminosity Curve was applied as a final step. Lots going on here……Digital Lady Syd
St. Giles Cathedral Entranceway

This image of St. Giles Cathedral in Edinburgh, Scotland is of the West Doorway and contains many interesting carvings that were done by John Rhind in 1884. I am still trying to figure out who the sculptures are of – they represent historical people of Scotland – the middle guy is named Alexander, maybe the king who erected the first church at this location in 1120. Also the Gargoyle surprised me as he was rather prominent in the image (they are used as waterspouts and protect the church from evil spirits). I still wonder who all the people are that are just carved faces in the wall. The workflow is basically the same one used in the my Adding a Creating Painting Effect Fun Photoshop Blog. Lucis Pro was used to sharpen it up a bit. Topaz (see sidebar for website link) Impression’s Abstract Settings Blake Rudis set to 63% layer opacity. A white layer with many parts painted out in a mask. A frame was added with a Pattern Adjustment Layer clipped to give the soft pink tones. Some clean up, a little dodging and burning, and Nik Viveza 2 to finish off. Would love to get back to Scotland and see who all these carvings are. ….. Digital Lady Syd
Let’s Hear It for the Mighty Fern!
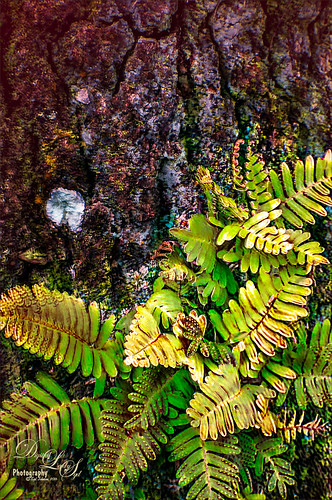
Took this image at the Harry P. Leu Gardens in Orlando, Florida, recently. These are Resurrection Ferns living in the bark of an Oak Tree. The bark was so detailed and colorful and competing with the ferns that both Lucis Pro (see my Digital Lady Syd Reviews Lucis Pro 6.0.9 (Now Affordable!) blog and Topaz ((see sidebar for website link)) Impression) were used to get a more pleasing effect. There were several adjustments layers used and lots of masking done to get the detail back into the leaves. Also used a Red Channel Curves Adjustment Layer to help blend total image. (See my How to Use a Red Channel to Create a Nice Blended Image Effect blog.) I really liked the darker colors in the bark – these filters embraced the color without overtaking the image with detail. These plants were so pretty in the sunlight……Digital Lady Syd
Feeling Peachy

Just felt like playing with one of my beautiful peach colored hibiscus blooms that are growing on my back porch. In Lightroom’s Basic Panel, just pressed Auto and reduced the Exposure slider a little (usually the Auto button tends to over-expose the image), added some Clarity, and used the Adjustment Brush to paint in some of the flower focal point details using the Clarity and Sharpness sliders. In Photoshop, Topaz Impression’s Watercolor IV preset was applied with no changes to the image. A layer mask was added and using Grut’s Natural Media Knit Pin brush, small lines were painted to bring the original color from underneath – looks like a light outline in places. Really liked this effect and it is easy to do. On a New Layer above, Grut’s Charcoal Dale Haze brush set to 35 pixels was used to blend away areas that were drawing attention from the focal point, mainly the bud and some of the edges had bright colors in them. Check out Grut.com brushes – each week he offers a free brush to try out and that is how I got the two used here. Nik Viveza 2 (now free) was used to add a slight vignette on the outside edges and to add a little more detail to the focal point. These flowers are so beautiful!…..Digital Lady Syd
Swimming in Circles
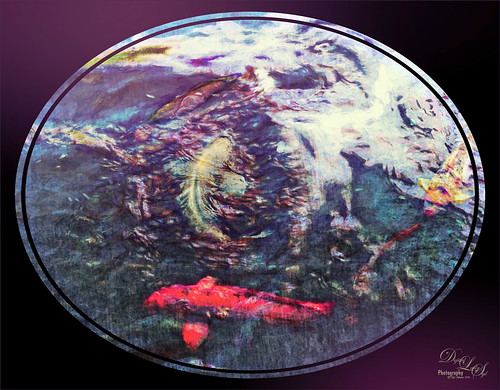
Lots of fun playing with this image of some Hawaiian fancy fish (koi) that was not that great – wanted to see what I could do with it since it had an abstract feel to begin with. In Lightroom, used the Basic Auto button, then backed off the Highlights to -12. Painted with the Adjustment Brush set to Clarity (60), Dehaze (45), and Sharpness (71) on the fish to bring them out just a little. Got to watch the Dehaze brush setting as it can overcook the results if too much is used. Topaz (see sidebar for website link) Glow Graphic Sketch II preset was applied and the layer was set to Overlay blend mode at 77%. On a duplicate layer (CTRL+J) applied Topaz Impression’s Cezanne I preset with changes to the Orange Hue and Saturation sliders. Created a New Layer and set to Overlay – used a black brush set to 12% brush opacity and burned in parts of the image where areas are blending too much together. On a stamped layer (CTRL+ALT+SHIFT+E) used Topaz Texture Effects’s Burning Effect preset. Changed the border to create the pretty oval effect. Finally applied Nik Viveza 2 (now free) to draw attention to the two middle fish. I thought it turned out to be an interesting effect…..Digital Lady Syd
Taking a Break!
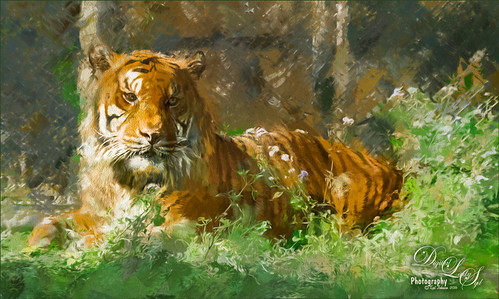
Just another of my tiger pictures from the Jacksonville Zoo. This guy so looked so relaxed. This time used On1 (see sidebar for website link) Effects 10 and the following filters: Tone Enhancer, Color Enhance, Sunshine, and HDR Look. This made a huge difference in the color and contrast! I am still experimenting with the updated and more stable plug-in. On a stamped (CTRL+ALT+SHIFT+E) layer, Topaz (see sidebar for website link) Impression was opened and used my SJ Building preset on it. Then I used the Spot Healing brush to remove the chain effect behind him but leave a little bit of effect. I really liked the results. (See my How to Use the Spot Healing Brush – Really Improved Now! blog.) A little Nik Viveva 2 (remember it is free now) and that was about it. Need to get back to the zoo and take some more pics of these beautiful animals!…..Digital Lady Syd
Taking a Cat Nap!

This was one of my favorite images when I went to the Jacksonville Zoo a while back. This guy just reminds me of any cat taking a little snooze during the day, but keeping one eye slightly opened just to make sure he doesn’t miss anything! And those paws! Anyway, not sure it is the best image, but loved it anyway. Not much was done in PS – Jai Johnson‘s DT-Emerald texture was applied first and set to 64% layer opacity and the cat was lightly brushed out on a layer mask. A Hue/Saturation Adjustment Layer was used to reduce the Saturation to -39 and Lightness to -8 so it was not so green. Then opened Topaz (see sidebar for website link) Impression set to Rembrandt II preset with a few settings adjusted which gives it the dreamy look. Used a layer mask to bring detail back to the tiger . This was a lot of fun to do!…..Digital Lady Syd
Reflection of Blue Trees

This is what I consider is a rather unusual image of tree trunks and branches painted blue on several trees at the Jacksonville Zoo’s Asian Bamboo Gardens. There was a lot of bamboo around, but not in this reflection shot. This image took a while for me to figure out what I wanted to do with it as I really wanted to give that beautiful reflection justice in the image. Did basic adjustments in Lightroom, then in Photoshop added Topaz (see sidebar for website link) Clarity’s Sunny Day Blue Sky preset. Next the Spot Healing brush was used to clean up a lot of little bits of stuff floating in the water. On a stamped layer (CTRL+ALT+SHIFT+E) the Topaz Black and White Effects plug-in was opened. What made this different is that the Transparency was set to 0.89 so almost 50% of the image in color through the black and white setting. In the Creative Effects section, Simplify as is and Diffusion set to a fairly high setting of 0.97. In PS a layer mask was added and the effects were painted out gently over the reflection which was soft and diffused already. On another stamped layer Topaz Impression’s Palette Knife II preset was added with no texture. In a layer mask, once again the reflection was painted out so it applied only to the top portion of the image. On a New Layer the Mixer brush was used to blend some of the harsh edges in the top part of the image – this evened out the colors a little. On yet another stamped layer, Nik Viveza 2 was used to draw the eye to the blue tree area. Two textures were added on top – one of mine that is a lot of light yellows painted in Painter and was set to Multiply at 70% layer opacity and one of Jai Johnson, Soulful Sea Breeze, set to Set to Multiply at 70% layer opacity. On top texture a layer mask was added and the top area was painted out so a vignette feel was created at the top. That was it. Just a lot of experimenting!…..Digital Lady Syd
Just Being a Little Abstract
This image shows a local golf course view seen when playing. I had some fun with a couple of Topaz (Stroke: Brush Type 04, Brush Size 0.91, Paint Volume 0.42, Paint Opacity 0.87, Stroke Rotation 0, Stroke Color Variation 0, Stroke Width 0.33, Stroke Length 0.89, Spill 0.23, Smudge 0.26, and Coverage 1.00; Color: Overall Hue 0.15, St -0.20, and Lightness 0.06; Red Sat 0.47 and Lightness 0.14; Orange Sat 0.60 and Lightness -0.42; Yellow Sat -0.33 and Lightness 0.13; Green Sat 0.20 and Lightness -0.32; and Blue Sat 0.36; Lighting: Brightness -0.04, Contrast 0.39, and Light Direction x0.33 and y0.06; and Texture: Strength 0.78, Size 0.30, Canvas IV, Background Type Solid, and Background #d38967 (soft melon color).)
see sidebar for website link) Labs newer plug-ins. The initial layer was duplicated and Topaz Impression was added using my SJ WC like effect on bldgs preset. This preset is sort of crazy but gives some wonderful results at time. (Settings for preset: On a New Layer, some clean up was done where the paint went that did not look good. On a stamped layer (CTRL+ALT+SHIFT+E) Nik Analog Efex Pro 2 was applied using just the Basic Adjustments 5 control points were added to adjust the Detail in different parts of the image. Also Film Type Warm (Row 2 Col 2) was added to the stack. Now the image was brightened up quite a bit. Last step using Topaz ReStyle’s Warm Tones Contrasted preset. That was it. I just liked the rather abstract feel that Impression gave to the image……Digital Lady Syd
Desolate Roller Coaster
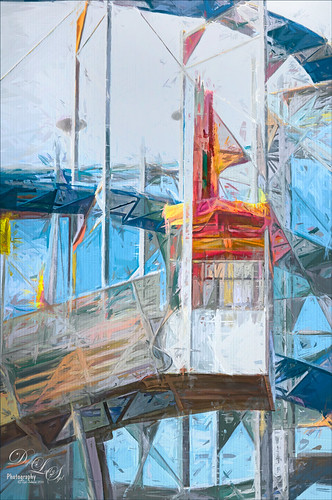
I really enjoyed doing this image – lots of structure and texture in this coaster image. Just Basic slider adjustments in Lightroom before opening up in Photoshop and duplicating the layer. Topaz (see sidebar for website link) Simplify was opened and the BuzSim preset was applied with a couple of changes (Simplify Size 0.76, Feature Boost 1, and Structure 2.38). This caused lots of webbing up in the track that really looked good – usually don’t but it made this picture more interesting. This layer was duplicated and Topaz Impression was added. I created a new preset to get this effect called SJ Illustrative Painting Effect (SJ Illustrative Painting Effect preset – Settings: Brush Type 01, Brush Size 0.70, Paint Volume 0.42, Paint Opacity 0.72, Stroke Rotation 0, Stroke Color Variation 0, Stroke Width -0.65, Stroke Length 0.20, Spill 0.48, Smudge 0 and Coverate 1.00; Color only – Red Sat 0.38 and Lightness 0.10; Orange Sat 0.75, Yellow Sat 0.68, Aqua Hue -0.15, Sat -0.47, and Litness -0.60; and Blue Hue 0.10, Sat -0.34, and Lightness 0.41; Lighting 0.25, Contrast 0.04, Vignette 0.18, Vignette Transition 0.34, Vignette Center x: 0.32 and y: -0.03; and Light Direction x: 0.59 and y: -0.01; and Texture Metal Sheet Strength 0.60, Size 0, Background Type solid white, and Background white.) A layer mask was added to remove some of the paint in areas that did not look quite right using a low opacity and flow black brush. The last step was to use Nik Viveza 2 to emphasize the focal point where the loading area is. That was it – just liked the sort of grungy painterly look that resulted. Lots of fun here!…..Digital Lady Syd


