
My Magical Garden

This Spanish Moss image was photographed at Ravine Gardens in Palatka, Florida. Since the trees do not have their leaves yet, the Moss is just hanging off the bare branches and with the sun was just rising, it gave a sort of magical feel. This image took a lot of post processing. Topaz (see sidebar for website link) Studio’s AI Clear was applied and this time the Exposure was set up to 0.53 and Clarity to 0.36 to lighten up the whole image. And a little bit of Topaz Detail was used to really sharpen up the moss effect. Some lighten and darken Curves Adjustment Layers were used to add some contrast. On a stamped layer Topaz ReStyle”s Polo Blue and Pink Lace preset was applied at 62% opacity using the Color blend mode. Another stamped layer was created and Luminar’s (see sidebar for website link) Image Radiance (this creates a really nice effect) and Cross Processing using the Auckland preset at Amount of 20 finally gave me the result I liked when set to 53% opacity. Nik Viveza 2 was used to even out all the coloring and adjust the focal point. Who knew all these filters would be needed to get this magical effect???……Digital Lady Syd
I’m Just a Little Kitty Cat
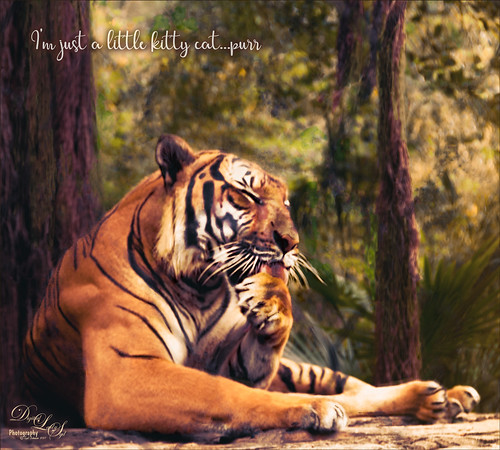
I just love to photograph the big cats – they are so interesting and beautiful! This tiger image had fencing all over it and the Healing Brush in Topaz Studio (see sidebar for website link) actually took almost all of it out of the image – I was totally surprised. They have just recently added it into the program. For me to get it to work well a very small size of 0.03 was used and by dragging the brush first over the color that you want added in, it tends to fill in with that color. Then just a Curves Adjustment Layer for color adjustment and then a Levels Adjustment Layer for contrast correction for a bit of a vintage matte feel. A Color Look Up Table set to the TealOrangePlusContrast preset and the opacity to 29%. Topaz Detail was used to sharpen the face. A Red Luminosity Curve was used to add a little more contrast. A left side yellow-orange light leak was added to the image to lighten it up a little. Created a composite layer on top (CTRL+ALT+SHIFT+E), made it a Smart Object (right click on menu and select), and opened the Camera Raw Filter. Went to the HSL sliders and adjusted mainly the orange and yellow colors in all the sections to get the tiger color and background just right. Last step was to add the text – used the Streetlight script font. What a cool tiger!…..Digital Lady Syd
Screaming On the Coaster!
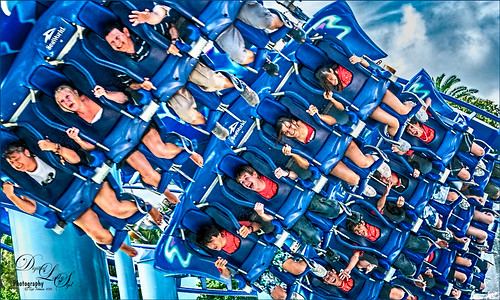
This image definitely represents that so recognizable Lucis Pro look. Loved all the expressions on the riders – the older group on the top row and youngsters having a blast below! This was taken a few years ago of the Manta Roller Coaster at SeaWorld, Orlando, Florida – short video of actual ride. Lots of filters here – Topaz (see sidebar for website link) Adjust on just the sky edge, Topaz Clarity on the people, Lucis Pro 6.0.9 for overall sharpness, Topaz Detail for a final sharpening, and the now free Nik Viveza 2 to reinforce the focal point. Lots of fun here!…..Digital Lady Syd
Showing Off My New Hairdo
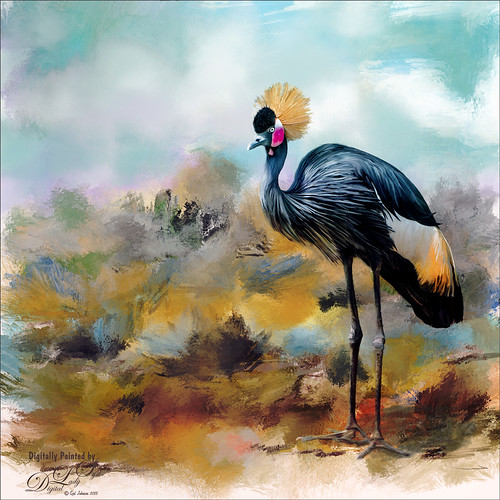
Just enjoying painting another beautiful bird. They are so much fun to do! This is a West African Crowned Crane taken a while ago at the St. Augustine Alligator Farm and is one of the regular exhibits so he can be seen anytime. He just sort of match this Corel Painter texture I had made, so there he is. In his document Topaz (see website link in sidebar) Clarity, Detail, and ReMask were used to adjust the bird itself. Then the ReMask layer was moved into the texture to place it where I wanted him to be. After that just painted the bird on several different layers using the Mixer Brush. Used two different Exposure Adjustment Layers, one for the eye and one for the beak to bring out some sharpness. Then duplicated the original texture twice and set on top – set one to Color Burn at 46% layer opacity and the other to Soft Light at 32%. Created a stamped layer (CTLR+ALT+SHIFT+E) on top and added the Topaz Lens Effects’ Toy Camera filter set to Awesomeness I preset with changes. Back in Photoshop that was set to 39% layer opacity. The last step was to add Nik Viveza 2 to really drill in on the birds face and head feathers. Hope you enjoyed my little bird painting…..Digital Lady Syd
Bear Checking You Out!

This image is of the bearskin that is usually at the Native American Festival in Ormond Beach, Florida, this year. In Lightroom Seim’s (see sidebar for website link) Magic Harsh Sun Fixer preset was used. In Photoshop on a duplicate layer, Topaz (see sidebar for website link) Detail was applied to overall sharpen. Topaz Impression was applied using Oil Painting by Jim Salas (light direction was changed to fit image and Texture Strength slider set to 0 since textures were added to image outside of plug-in). A couple of Flypaper Textures were applied. Then I really cropped image in to get a close up of the face. The final step involved adding my favorite filter Nik Viveza 2. Control points were placed on the nose to enhance the color and sharpen it a little to draw the eye to that part of the image. This was originally a great big image that I could not get a look I liked so the crop really made the image…..Digital Lady Syd
Hiding Out with a Red-Winged Blackbird

This beautiful bird was hiding in the brush at the Ritch Grissom Memorial Wetlands in Brevard County, Florida. I had not seen one in a long time. Not that much post-processing on this one. In Lightroom applied Seim’s (see sidebar for website link) Classic Holga preset. Opened in Photoshop and Topaz (see sidebar for website link) Detail 3 was used to give the photo a little more depth of field feel and the bird was painted out in a layer mask. The Sharpen Tool was used on the bird. Added Topaz Glow set to Soft Light. Nik Viveza 2 was used on the bird and Photoshop’s Camera Raw Radial filter was used to get the pretty vignette. Pretty standard workflow here……Digital Lady Syd
Birding at Viera Wetlands

This man is taking photos at the Ritch Grissom Viera Wetlands which is in Brevard County, Florida. It was a beautiful day to see the birds in their natural habitats and this guy had this huge lens – he was actually shooting to an equivalent of 1400 mm! Totally amazing! This image used 2 Lil’ Owls Studio’s (see sidebar for website link) Matte Glam 17 preset in Lightroom along with a Gradient Filter to increase the blue color slightly in the upper water. Brought the image into Photoshop and ran Topaz (see sidebar for website link) Detail 3 to slightly sharpen the overall image using my Little Med Large Detail preset – (Set to Overall, Medium Details 0.38, Large Details 0.16, and Tone Contrast 0.30). Created a duplicate layer and created a Smart Object where the Liquify Filter was used to slightly slim the man down. A Curves Adjustment Layer was applied and the Layer Mask was filled with black. Just the water area was painted back to give the background a little more contrast that I wanted. That was it. Wish I had a lens like that!!!!!…..Digital Lady Syd
Leaking Some Light on Calton Hall in Scotland
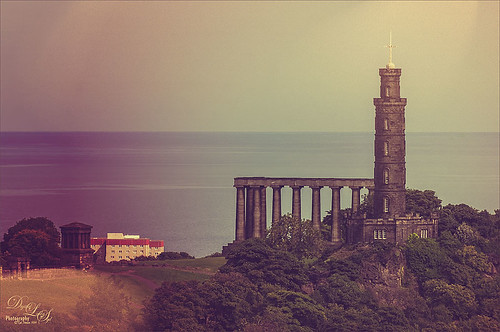 Not sure how I missed processing this image in my Scotland shots, but I really like the light leak effect on Calton Hall as taken from Edinburgh Castle in Scotland. First used Seim’s Power 4 Workflow (see sidebar for website link) Lightroom preset Harsh Sun Fixer. In Photoshop applied both Topaz (see sidebar for website link) Detail 3 and Topaz DeNoise before adding the light leak. Learned a little technique this week from a very nice website called FX-Ray -there are some wonderful light leak jpg’s that can be downloaded for free (this image used Light Leak 03) along with a short video tutorial that explains how to use them. Really loved the results!…..Digital Lady Syd
Digital Lady Syd Related Blogs:
How to Create/Use a Light Leak
The Old and the New
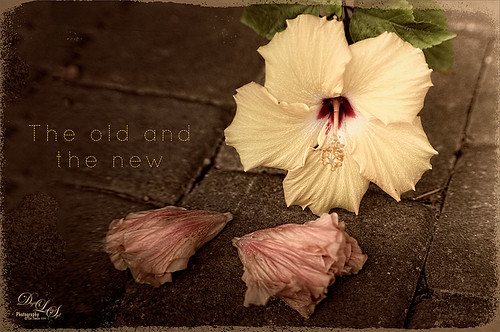
Just a set up image of my beautiful yellow hibiscus blossom and two spent Painted Lady pink blossoms. In Lightroom using Seim’s Power 4 Workflow (see sidebar for website link) Dreamscape preset and Dave Delnea’s LR Develop Custom Tone 002 preset were applied before going into Photoshop. The image size was extended using the Crop Tool: then the Magic Wand Tool to select extra canvas: then Select -> Modify -> Expand 4 pixels; and finally Edit -> Content Aware Fill. Got pretty good results! Used Topaz (see sidebar for website link) Detail 3 to overall sharpen the image, and then OnOne (see sidebar for website link) Perfect Effects 8 and Nicol S. Young’s Daydream preset set to 68% layer opacity. The text font is Quicksand. Just a little grunge frame added on top. I love the soft pastel colors of the blooms……Digital Lady Syd
Where Am I?

OK – the owls in the birdcages should be the big clue if you are a Harry Potter fan! Just another shot taken at the Wizarding World of Harry Potter in Universal Studios Orlando, Florida. Even though this window shot of the owl and school supply store was not the greatest, I really liked it. Some of the reflections in the panes actually show the high tops of the buildings on the other side of the street – so Harry Potterish! Felt this image needed a quick fix with the newly updated Nik Analog Efex Pro 2 since the whole Harry Potter feel is rather dark and vintage. In Lightroom just some basic adjustments and Seim Effects PW4 (see sidebar for website link) Sampler Magic Shade Fixer preset – a free download of some marvelous presets. Since I was going to use the Adaptive Wide Angle Filter in Photoshop, the Lens Profile was turned off. In Photoshop my go-to filter, Topaz (see sidebar for website link) Detail 3 was used and then the Adaptive Wide Angle filter was opened to straighten up all the unsquare window panes – did a pretty good job I think. Next Nik’s Analog Efex Pro 2 was applied using Basic Adjustments, Light Leaks, Lens Vignette, Film Type, Frames, and Levels & Curves which really gave the image the real vintage feel. Back in Photoshop a vignette was created by using a Curves Adjustment Layer to darken the image overall and then paint back with a large soft white brush the lower center focal point to direct the eye. The last step involved using the Sharpen Tool on a New Layer to sharpen up the owls just a little. Done! Love this new update from Nik!…..Digital Lady Syd
Digital Lady Syd Related Blogs:
How to Use the Adaptive Wide Angle Filter
How About That Update to Nik Analog Efex Pro 2?
A Blast from the Past!
Got an E-mail from an old lake friend yesterday so I thought I would post this shot for him and my old “lake” family of a place I will always remember as “home.” If you are in the vicinity in Indiana, check out Lake Wawasee – a beautiful fresh water lake. This image was taken with my old 2 mg Casio QV-2900 UX Digital Camera – my first digital camera. It actually did a pretty good job. Trey Radcliff’s Friday Night of Regrets Lightroom preset was applied first before opening Photoshop. Topaz (see sidebar for website link) Detail 3’s Feature Enhancement II was applied next. A Selective Color Adjustment was used to add a little more green color into the background trees that look washed out. The mask was filled with black and just the trees painted back with a very low opacity brush. Two New Layers were created and both set to Overlay blend mode. The tree edges were painted in the dark areas with a black brush on one layer and a white brush was used to paint in tree highlights on the other layer using a brushes set to 12% layer opacity. The layer opacities were then lowered. The Sharpen Tool was used on the houses on the shoreline and a Curves Layer Adjustment Layer was added and set to 50% layer opacity. Probably more info than you ever wanted to know, but it is nice to see that some of the newer Photoshop technology and tricks can perk up those older digital photos!…..Digital Lady Syd
Digital Lady Syd Related Blogs:
The Best Dodging and Burning Technique!
Turning the Old into the New
Vase of Spring Flowers
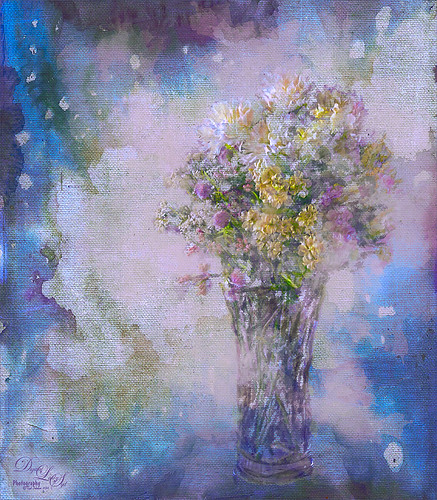
Just a vase of spring flowers that I decided to paint using Photoshop’s mixer brushes. I first increased the contrast of the flowers so they showed up sharp using Topaz (see sidebar for website link) Detail 3 – I do this a lot when I want a nice overall sharpness to an image. Also used a Curves Adjustment Layer to add some contrast to the image. 2 Lil’ Owls Stained Glass 25 (see sidebar for website link) was added on top and the flowers painted back in a layer mask. Next a new layer was added where some soft pink color was lightly brushed onto the layer to add a little more color around the flowers. The last major step was going into Topaz ReStyle and using the Light Pastel Daisies preset which changed the texture color from turquoise to more bluish tones. Love the result. …..Digital Lady Syd
Topaz Simplify and Topaz Detail Together

Recently I watched a video, this time for Topaz plug-ins (see sidebar for Topaz website and more blog links below), and learned a couple new things I thought I would share. If you have read my blogs before you know that I am a big fan of Topaz products – they may not be the most sophisticated, but they do some very cool effects the other major companies can’t achieve. Scott Stulberg did a lengthy video called “Memorable Travel and Stock Photography” where he covers Topaz Adjust, Detail and Simplify. I tried to incorporate a few of these tips in this image of sun-lighted grass growing on the road to Waipi’o Valley on the Big Island in Hawaii. Gosh it is hard to take a bad picture in Hawaii!
To begin with, Topaz Simplify was used. Scott suggested this plug-in is great to use on a shot that is a bit soft from a gentle breeze or a not-so-great lens – this effect can save an image and turn it into something very nice. There are two color space choices – RGB (more vivid colors) or YCbCr color space (more muted colors). This image used the YCbCr color space. Scott mainly uses the BuzSim preset – the trick is to move the Simplify Size slider to the left from the default setting (0.33) and you will see the detail return but the color stays saturated. On this image the Simplify Size slider was set to 0.05, Details Boost slider set to 0.79 (default is 1.00), and Details Size set to 0.13 (default is 0.20). It is a very similar result to using Vibrance in Photoshop but Simplify has much better color saturation. In the Adjust section, the Saturation was toned down a bit to 0.96 (default 1.31) and Saturation Boost set to 1.00 (default 1.15). He is basically lowering or turning off all the artistic settings and leaving the saturation turned on. One small problem I seem to have with Topaz products is that sometimes I have trouble retrieving the settings when using a Smart Object layer, which is supposed to retrieve the plug-in settings used on the image. Therefore, create a preset and name it something that will remind you of the image if you liked the result.
Next Topaz Detail was used. Scott feels that this plug-in makes it appear you were using a better lens than you really were. Basically you want to move the Medium Detail slider, then the Small Detail and Large Detail sliders until you get a sharper feeling image. He does very little sharpening to his photos but uses Detail to do the sharpening – it is like using the Clarity slider in a realistic way. That is how the plug-in was used for this image.
The final touch I added was a Hue/Saturation slider boosting the yellow saturation up quite a bit. Then I filled the layer mask with black (CTRL+Backspace) and painted with a very low opacity soft brush in to give just a soft yellow tone. OnOne’s Dave Cross 14 frame (see sidebar for website link) was added using a color sampled from the shot.
Sometimes it feels like I harp on all these these plug-ins, but they really are fun to use and they can take your images to a new level…..Digital Lady Syd
Digital Lady Syd Related Posts:
Simplifier and Simplify Filters
Topaz Plug-Ins – Same Image Trying Each! – this blog has many of my Topaz blog links at the bottom if you would like more information on any Topaz products


