
Skiing Selfie

Another one of my selfie AI-generated portraits – this time put me in a skiing background scene using the Generative Fill prompt “Oil Painting of Ski Slopes in Background” – it took several variations and had to use one background with trees and one with the skiers which was reduced in size and moved. Used the same generating process that I discussed in the last several blogs (see blog links below). Parts of the coat had splashy colors which I did not like. I found a great brush that covers without being too heavy with the paint in Kyle T. Webster’s new Winter 2024 set called Thinner Oil (this set is free to download with Adobe Photoshop subscription members – just go to the Brush Panel upper right hamburger icon’s drop down and click Get More Brushes – it is at the top). The brush Size was changed to 25 pixels and in the Dual Brush section changed the Size to 17 pixels – then saved the brush to use for painting. On a New Layer the snow was painted in using Snow Large & Heavy-use Motion Blur -70/33 brush, one of the 9 nice brushes of Serge Ramelli’s that he gives away in his How to Create Snow in Photoshop CC tutorial from several years ago. I like how the snow can be placed exactly where I want it and removed in a layer mask off parts of the face. Also added my Snow Overlay slight blur png – a black layer mask was added (ALT+click in added white layer mask) and just painted back in the smaller sized snow into the trees on the right and on the brown distant trees. To get the skin tone right, used a Gradient Fill Adjustment Layer set to Linear and white to gold to clear gradient. Added a layer mask to remove from the gold from the trees. Could go on and on – it does take a while. Each time I do one, I learn something else. Lots of fun…..Digital Lady Syd
Digital Lady Syd Additional Blogs:
Same Natural Bridge with Different AI Oil Paint Results

This digital AI oil painting was created by following Marty at Blue Lightning’s steps in his video Photoshop AI Transform Photos into Oil Paintings and it created this interesting photo from my original Natural Bridge image. Can you see the frog? For more info on the AI was created, see my AI Digital Oil Painting – How To Do This Fun Photoshop Blog. The Generative Fill prompt said “very spring oil painting.”
This blog is giving all the particulars as to how this image was post-processed after the Photoshop Beta Generative Fill layer was created. A Color Lookup (PS’s Foggy Night preset at 52 % layer opacity) Adjustment Layer; two textures (still using the obsolete Adobe Texture Pro panel even in the Beta!-used Sakura Skies set to Overlay at 100% layer opacity and Masque set to Color Burn blend mode at 28% layer opacity) for the more pastel look; a Levels Adjustment Layer in the Blue and Red Channels (followed Aaron Nace’s video called Make Amazing Photoshop Composites Quickly-part 1 at the 22-minute point – really interesting technique); a Remove Tool layer for getting rid of some of the artifacts that Generative Fill seems to add sometimes; some painting to create the frog – the eyes were already there (used my SJ Pastel-3 Painting brush that I have used forever – it is set to 67% opacity most of the time – see my How to Create My Favorite Brush Fun Photoshop Blog for the settings); and some Darken and Highlight layers using Sam Peterson’s brush and colors – See my A Few Photoshop and Lightroom Tips and Tricks Fun Photoshop Blog – Tip 2. I really like the dreamy effect the AI digital oil created. …..Digital Lady Syd
Modigliana Guy
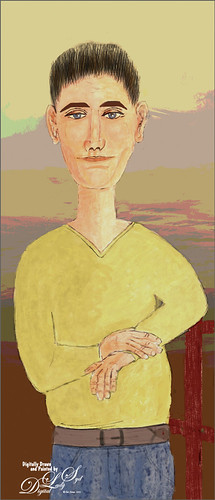
Totally had fun creating this sort of cowboy-looking guy while trying to do another Modigliana figure as in my recent Fun Photoshop Blog (A Few Photoshop Digital Painting Tricks You May Not Know). Been following some of the tips in Aaron Blaise’s class on Clear Expression to learn face object placement (watch for great sales on his various classes). The painting took a long time to do, but eventually it was drawn to get a Modigliana perspective. The background was created with one of my Painter backgrounds and setting 9 Levels in a Posterize Adjustment Layer. A Kyle T. Webster Tilty Pencil Variant (from Winter 2022 set) Mixer was converted to a regular brush (changed Erodible Tip to Small Round and 9 px Tip; added Shape Dynamics Size Jitter 11%; Texture Scale slider changed to 28%, Brightness 60, Contrast 10, and Texture Each Tip checked; and Transfer With Opacity Jitter also checked – use all other settings from the Mixer and it turns into a really nice sketch brush). Also Kyle’s the Hunky and Heroes Heavy brushes from the free Bowie Set (located in the Adobe Cloud-search for Bowie Toolkit) were used to paint his clothes. Aaron Blaise’s favorite brush was used for the face and skin. Used The Etherington Brothers various tips for the face and hands – lots of good information here. He may not be the best thing I have ever drawn, but I am learning a lot about drawing!…..Digital Lady Syd
Some Fancy Text
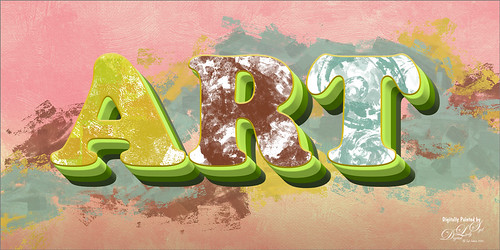
This is an example of a Sam Peterson Challenge from a few months ago called Fancy Text. It was a lot of fun to do. The painting effect was created using Brushes from Kyle T. Webster’s Fall 2021 brush set (these are all part of the PS collection of brushes that can be downloaded for free with a PS membership). The Boxit, Circlez, and Rippolo brushes were used to create the painted look on the letters. From his Summer 2020 set the Brix Brush was used for the splashed-paint background. Overall just a lot of fun to do. Check out Sam Peterson at the Adobe Creative Cloud site for more challenges. …..Digital Lady Syd
The Tiger

Watched the Kyle T. Webster (the Adobe Brush Evangelist) video called Brush Hour: Digital Pastels. I thought he would go over his various pastel brushes he has created for Adobe Photoshop, but instead he demonstrated how to create a relatively interesting pastel painting using just a few. This was my first attempt at trying a pastel painting, but it was a lot of fun – and a little bit challenging. The tiger is the actual sketch created using an Aaron Blaise tutorial (see my A Little Aaron Blaise Digital Drawing Practice Fun Photoshop Blog). I also adjusted one of my own pastel brushes to get the nice pastel background effect as I had trouble getting the correct pressure with Kyle’s brush. It has been a long time since I used traditional pastels and doing this digitally is definitely a lot less messy!…..Digital Lady Syd
Turtle and Child Sculpture

This image was taken on the Big Island in Hawaii at a small shopping center near Waimea – I wish I knew who did the original piece of sculpture as it is quite striking and beautiful. The photo background was very busy so I decided to try some digital effects to the image. It really is a faux digital painted image as the background painted effect used Topaz Studio (AI Remix – 0.69 opacity and Normal mode, Velvet Abstract preset set to Style Strength High, Brightness 0, Contrast 1.00, Sat 0.75, Hue 0, Smooth Edge 0.20, Sharpness 0.47, and Suppress Artifacts 0; Impression – 1.00 opacity and Normal mode, Type 16 Stroke, Number of Strokes Med, Stroke Length 0.56, and Painting Progress 0.16 – painted out the turtle and child and Texture – and Background Type Original; and Precision Detail – 1.00 opacity and Normal mode, Overall Small 0.60, and Lighting Midtones -0.47). Then on various layers in PS, different parts were painted using PS brushes to add more defined strokes and to clean up some of the Studio stroke overlap. One brush used was Kyle’s Real Watercolor-80 Round brush set to Normal brush mode to paint the face and body of the child. Black & White, Curves, and Levels Adjustment Layers were added on top. The Sharpen Tool was used on a separate layer to sharpen up the eyes a little. A Color Lookup Adjustment Layer using On1’s Loyalty Reward for May 2022’s Fun in the Sun6 LUT was added and set to 27% – really brightened up the image. Last step involved adding darken and lighten layers using Sam Peterson’s colors and brush to draw attention to the boys face. (See my Fun Photoshop Blog A Few Photoshop and Lightroom Tips and Tricks – Step 2 for info on this – really easy to do and look great on images!) That was it – it was really fun and relaxing to do!…..Digital Lady Syd
Living in the Abstract

Just a short blog – I thought I would show you the results using this drawing I created of a lioness turned into a painted image using Kyle T. Webster’s Spring 2022 brush set. The drawing is one I did following Aaron Blaise’s Digital Painting for Photoshop – Getting Started-Sketching in Photoshop video. (See my recent Fun Photoshop A Little Aaron Blaise Digital Drawing Practice blog for more info on this.) I used one of Aaron’s resource images – it is not an exact representation but I felt he should get credit for the original drawing idea. Then, just following Kyle T. Webster’s YouTube called Illustration Masterclass: Draw Stylized Portraits with Custom Brushes to paint the lioness. This video used many of his newly released Spring 2022 brushes, which can be found in PS by clicking on the Hamburger icon in the top right corner of the Brushes Panel and clicking “Get More Brushes” – if you have any recent version of PS and are on a monthly plan, it will be listed at the top of the page, after logging if needed. There appear to be 37 brushes in this set. If you want to see how each works, watch his Brush Hour with Kyle T. Webster: Check Out the Spring 2022 Brush Set! video. This image mainly used his Woodchuck Joey, Pellets and Old Blue brushes with a few other ones thrown in. I actually changed the Pellets-Alt brush to a Spacing of 98 and a smaller size of 45 pixels to get a really nice texture effect when the stylus is pressed lightly and really smooth when pressed hard. To select the colors, a color palette layer was created by following Kyle’s video called Illustration Masterclass: Choosing the Right Colors for Your Digital Illustrations which is very helpful when trying to get colors that blend nicely. The splatter effect is a PNG overlay file that was downloaded from Creative Market in a set called 48 Subtle Grunge Textures Vector by Anastasia Autumn. It has PNGs, JPGs, ABRs PS brushes, and Vector AI files with the 48 textures in each file format. By adding a layer style to the PNG texture 01 layer and in Layer Styles selecting the Gradient Overlay, all these colors would be added (not sure which gradient, but it had a lot of horizontal gradient colors in it). It was set to 59% layer opacity. Major Cool! Viveza was used to fine tune the final image. Overall, this was just major fun to do!…..Digital Lady Syd
Missing You
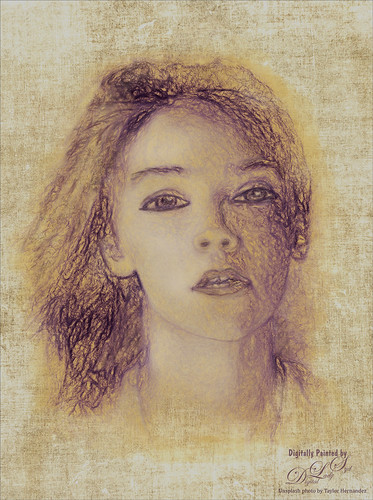
Just had some fun using the Unsplash photo to create an interesting portrait effect using the Photoshop’s Art History Brush. If you have not tried this, you should as it can give some really nice results without really painting much. I will admit that I used my sketch brush to clean up her eyes and mouth especially. The background texture is from Kim Klassen called Hellodecember-0312. If you want to learn how to use the Art History Brush, follow a 5-minute YouTube video by Brady at Texturelabs called Ultra-realistic Sketches in Seconds! He gives you a link to the two Art History brushes that were used on this image. (If you are interested in more of Brady’s info and some more free brushes, check out another excellent video called Anyone Can Create Incredible Paintings in Photoshop with a Single Tool.) I recommend you give this type of painting a try if you want to try something different on your image…..Digital Lady Syd
Winter in Indiana

Just practicing my painting and decided to do an abstract from one of my childhood haunts. The originals of this image were really of the lake trying to freeze but I decided to add a little more drama for my image. In this case, the lake has frozen and melted several times to get this rough edge.
One reason this image was done was to try out a couple Smudge brushes created since I discovered I don’t have any in my favorite painting tool set. Basically followed the older Digital Painting Techniques Volume 1 from Brian Recktenwald tutorial. It served the purpose and several brushes were made and used on this image. Also a lot of painting was done with my SJ Pastel 3-Painting (have used this brush forever – great for just painting in solids with a little texture in it.) I also downloaded Daarken’s brushes and used one called Texture Sample Brush 45 3 to add the icy feel to the image. Used Carlos Cabrera’s brush for the overcast clouds from the same book. The bird set is called Bird Brushes by Canmax Stock-SB 3. Lots of other brushes were used like Kyle’s Animator Pencil 2016 and his Glide Sketch Pencil and David Belliveau Mixer Brush. Last step used Viveza 2 to get a nice focal point to the birds……Digital Lady Syd
Let’s Have a Little Chat

Going to make this short and sweet. Been practicing my digital painting and thought I would post this guy whose image is from a pack from ISO Republics 30 Free Images (be sure to change Image Size from 72 ppi to 300 ppi before starting so image is of a manageable size). The real trick is to find the right brushes to use – mainly the Mixers, Regular Brush and Smudge Brushes. The main Mixer Blender brush is from one I brought into Photoshop from Corel Painted and just make a bunch of iterations of regular, smudge and mixers from the tip. (See my older blog called How to Bring a Corel Painter Brush into Photoshop – it still works!) Most of the painting effect was placed on a layer above the original painting (Option Bar setting were Load the Brush After Each Stroke off, Wet 100%, Load 50%, Mix 80%, Flow 100% and Sample All Layers check on. Then used several layers to do whiskers, eyes, nose, etc. A Shadow and a Highlight layer was added to distribute the lighting correctly. Added an Autumn Colors Color Lookup Adjustment Layer at 63% and a Gradient Map set to light yellow to white, Multiply blend mode, and 47% opacity. That’s about it. Lots of fun here!…..Digital Lady Syd
Some Sunshine when It Is Raining

Had some fun painting these wonderful sunflowers in Corel Painter. If you have Painter, I hope you are following Karen Bonaker who has a great website on how to use the program. Last week she shared the image and several brushes and taught us how to paint the flowers. It has been a long time since using Painter so it felt good to get back to it. And of course for me, I have to finish up in Photoshop and do my same adjustments on photos to my digital art. Anyway, it felt great to be painting again……Digital Lady Syd
A Distinguished Forefather Lemur
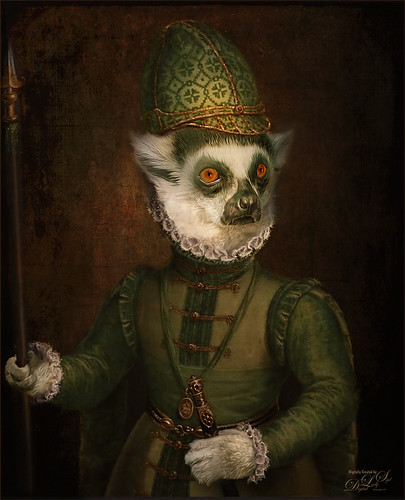
I have always wanted to try this and I finally found a really great Photoshop tutorial on how to do it. This image started with a wonderful painting by Sofonsiba Anguissola called Portrait of a Spanish Prince from 1567 (it is probably an image of Prince Phillip III – the link gives some interesting perspective on this guy). Anyway, I will not go into all the steps since I pretty much just followed the steps presented in Chris Spooner’s video called How to Make a Fun Oil Painting Pet Portrait in Photoshop. This effect is especially popular with people’s pet images. The trick is to find an image that works with your pet image. It took a lot of manipulation using the Free Transform Tool with the Warp in the Options Bar to get it looking correct. And in this case, I had to use two other images of lemurs for the hands. The colors can be matched using the video after the images are combined. 2 Little Owl’s Carnevala 23 texture was added on top and set to Vivid Light at 65% layer opacity to get the illuminated effect in the background. If you want to have some fun, give this a try……Digital Lady Syd
Visiting My Castle
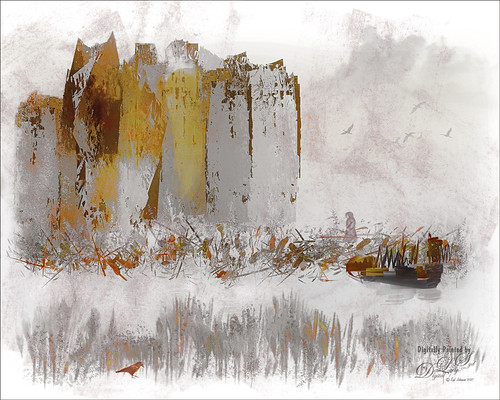
This image was totally painted in Photoshop CC using several elements created originally using different brushes in both Corel Painter and PS, then saving the results down as a PNG objects. Several bird, cloud, plant and grit brushes were used. Different adjustment layers clipped the elements to adjust the colors and tones. The person was just painted in. Topaz (see sidebar for website link) ReStyle’s Silver and Ivory Cloak preset was used to add the colors into the overall image. It was just a lot of fun to put everything together into something creative…..Digital Lady Syd
Checking Out the Buds
Still practicing drawing and painting. This image I just followed the same workflow from my Some Flower Power blog which created an original sketch layer and several painting layers for the flowers. Next the Hummingbird was painted on a layer using a bird brush created by just turning an old bird image into a black and white and defining as a brush preset – actually used two different colors and softened the edges a little. Kim Kassen’s Stay texture (not sure it is still available) was placed on top and really gives the vintage feel to the image. A Hue/Saturation Adjustment Layer was clipped to it (ALT+click between layers) to desaturate the texture color a little. The border is from On1 Hundred Borders set. The three final steps were performed that I almost always use at the end of my workflow: a Red Channel Luminosity Adjustment Layer, Nik Viveza 2, and a Black and White Adjustment Layer. I am starting to enjoy creating the flower paintings……Digital Lady Syd
What Happened to My Yellow Rose?
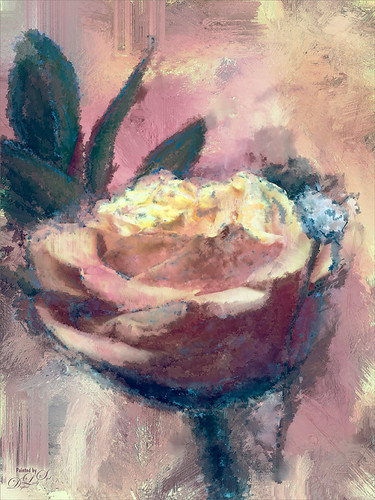
This is an alternate image of the yellow rose posted last week – see Mid-Year – Painting Project Progressing! I just wanted to let you see what using the wonderful Topaz (see sidebar for website link) ReStyle can do to an image – not sure which image I like best since I love the pink tones. Basically the yellow rose was opened into ReStyle and the Cream and Plum preset was selected. I use this preset a lot since it does have the color palette I love. The changed settings were: Hue Secondary -0.44 and Third -0.28; Sat Fifth -0.25; and Lum Primary 0.15, Third 0.03, Fourth 0.41, and Fifth -0.53; Basic Tone Black Level 0.03, Midtones -0.12, and White Level 0.41; and Detail Structure 0.45 and Sharpness 0.56. In Basic Mask painted in this effect in a black mask at the top of flower with Brush Strength 0.42, Brush Size 0.10 and Hardness 0.30. A New Layer was added above and the Mixer Brush was used to clean up the petals, but I did not like the way it looked, so I turned it off. The grungy look seems appropriate with this image and the blue specs look nice. The last step was adding a Curves Adjustment Layer to add more contrast. Not sure but I think I like it better than the yellow one. Decisions! Decisions!…..Digital Lady Syd
Mid-Year – Painting Project Progressing!
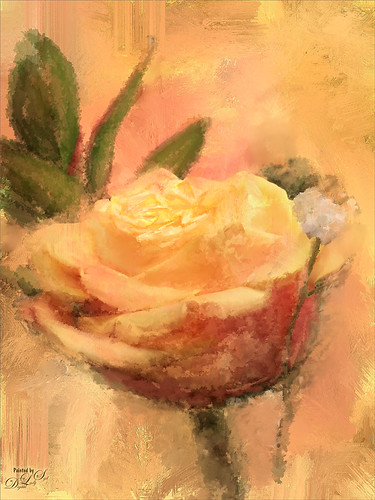
I am over halfway on my journey to achieving my New Years Resolution of learning to paint and here is an example of where I am at. This image was taken at the grocery store on my cell phone. Therefore I had a little sharpness issue, but with painting, you can do a little improvising. The texture was from Melissa Gallo at Painted Textures called Sunrise Canvas. This beautiful texture is one of several provided in her Painting with Photoshop workshop – this workshop is the first time it has really “sunk in” on how to do this. Melissa is an artist and Corel Master, but she teaches the Photoshop painting techniques very thoroughly. This image used her brushes. Anyway, I really am getting into this painting thing and it is totally fun! Oh yes, and how did I improvise that little bit of detail I wanted in the top of the flower? Well I used a technique covered in my blog called The Best Dodging and Burning Technique! and created a burn layer set to Overlay to sketch in a few lines with a small round brush at 12% brush opacity. Very subtle!…..Digital Lady Syd
Just Painting!
This is one of my first recent major efforts using Corel Painter – I am still trying to understand this program. Basically I painted this image using a brush I created after listening to Melissa Gallo‘s video on the Corel Painter website – her video is Reason #2 – Cloning Feature. Since Melissa is absolutely one of my favorite texture people, I was totally absorbed with what she did. This image of my miniature mums is pretty basic, but I thought it turned out nice. I created the Luscious Oil Paint brush she used and find I am it a lot on other images. Then I took the image back into Photoshop where I added Topaz (see sidebar for website link) ReStyle to really get a pop in the colors. (Here are the settings if you are interested: Sandy Butterflies preset. ReStyle Opacity 55%; Color Style Hue Fifth 0.13; Sat Primary 0.50, Secondary -0.37, Third 0.38, and Fourth 0.78; and Lum Primary 1.00, Secondary 0.30, Third -0.25, and Fifth -0.30; Texture Strength -0.66; Basic Opacity 55%; Color Temperature 0.19, Tint 0.17, and Sat 0.02; Tone Black Level 0.53, Midtones 0.14, and White Level -0.16; and Details Structure 0.25 and Sharpness 0.36.) A little clean up and a Layers Adjustment Layer was done and that was it. Painter really is a lot of fun!…..Digital Lady Syd
Digital Lady Syd Related Blogs:
Topaz ReStyle with Corel Painter and Nik Analog Efex Pro
Think Pink! Rally for the Cure Pink Rose
 |
Since October is Breast Cancer Awareness month in the United States, last week I participated in a “Rally for the Cure” golf tournament. This beautiful pink rose came from this event. I am really pleased with the results for the above image that used the new Mixer Brush panel from one of my favorite Photoshop gurus, Russell Brown. Hover over the image to see the before photograph used to create this painterly effect.
One of the best new features in Adobe Photoshop CS5 are the Mixer Brushes. (See my Fun Photoshop Blog “Adobe Photoshop CS5’s Mixer Brushes” where I talk about how to use and create your own Mixer Brushes.) Dr. Brown created a new panel to load into Photoshop called the Painting Assistant that makes the whole painter process much simpler. I was able to create the above in very little time using this new panel. Basically it contains six button steps with very clear instructions listed – just click each button after you finish each step. This is pretty ingenious in my mind, but then that is what Dr. Brown is known for! To download the panel and a video, click here and scroll down to the 6th item. A text layer using the “Old Script” font was created and set on a slant using Free Transform – then a layer mask was used to paint out the lettering from the rose.
Give this technique a try, especially if you like the painterly look. It is very easy to do since the Mixer Brushes are already set up for your use. And if you get a chance to participate in a “Rally for the Cure” event, please do – they are always lots of fun and the proceeds could not go to a better cause!…..Digital Lady Syd


