
Painted Flowers
Just had fun painting – I like to practice a bit each week so I do not forget how to do this. Topaz (see sidebar for website link) Sharpen AI was used to sharpen the image. Actually used a plugin I got recently, Perfectly Clear, to brighten up the image – just used Tone, Color and Preprocessing panels. Had to clean up a little and then put together several brushes in a group to use for painting -mainly mixers, blenders, and a couple regular brushes. A bevel and emboss layer style was added on top to get the canvas effect…..Digital Lady Syd
Practicing in Painter

Just got an updated version of Corel Painter so decided to try out a few of the new Thick Paint Brushes. I will not go thru all the steps but the thick paint was used on the sails and parts of the boat reflections. I have to admit most of the real post work ended up in PS where I did more sketch work and added the textures. Overall it was just a lot of fun to do – and that is what it is all about. Check L. S. Lowry‘s art work as he did some beautiful paintings – and his original looks a lot different (and better) than this one. ….. Digital Lady Syd
On Duty at the Zoo
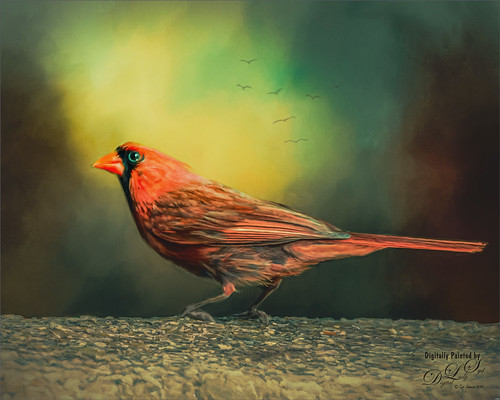
This beautiful male Northern Cardinal just sort popped in front of my while I was visiting the Lion exhibit at the Smithsonian National Zoo in Washington, DC recently. I decided to give him a better location as he was right in the middle of a bunch of us tourists. He was painted with mixer brushes and I believe an older Jai Johnson texture, with the colors and size of the texture changed to fit the scene. You do not have to keep a texture exactly the way it was when you got it. That is what makes it fun! Topaz (see sidebar for website link) Impression was used to paint in the foreground rocks – just the default settings with Brush 06 using the Graduated Filter to line it up on the front. The background birds are a brush from Jenteva Plant Brushes. Last step was a Curves Adjustment Layer. It is so relaxing to paint birds!…..Digital Lady Syd
A Rose Hanging In There

This once beautiful rose was trying its best to show pretty even though its outer ring of leaves were pretty much spent. I decided to paint it since it had some pretty leaves and nice central rosebud. Several painting layers were created using Photoshop’s Legacy Brush called the Fan Flat Blender. I created a couple variants so color could be added easily, but it is pretty much the same brush. What is so nice is that it has a texture in the brush which adds a great effect to the mixer brush. Also Color Efex Pro 4 was added using the Darken/Lighten Center, Film Efex Vintage, and Detail Extractor filters. In PS On1’s Moody 5 Color Lookup preset was added at 61% layer opacity. And the last step was to use Viveza 2 to emphasize the center of the flower and give a slight vignette effect…..Digital Lady Syd
Hibiscus Stamen

This interesting stamen was part of a huge Hibiscus flower at the Harry P. Leu Gardens in Orlando, Florida. Luminar (see sidebar for website link) Flex was used to sharpen up a stacked macro image. Then PS mixer Flat Blender was used to paint and add texture into the strokes. A variation was created to add color using the same brush. One of my Corel Painter Textures was added on top – the Blend If sliders were used to add a little more texture effect in the background. It took a while to finish up, but it was a lot of fun to create!…..Digital Lady Syd
Wanted: Female Interested in Long Relationship

This handsome specimen of a Vulture (he really is not that grumpy when you meet him) was really fun to paint. A couple of textures were used, one I painted in Corel Painter and another containing a heart bokeh effect, an Evelyn Flint Flickr Texture. The bird was separated from his background and then my newly created Flat Fan mixers were used to paint in his feathers. Some spotlight effect was used on his face and the text font is called Parkway Lush. Lots of fun to do!…..Digital Lady Syd
Posing for a Portrait

This Ring-Tailed Lemur looks like he has been posing for portraits before – he does have a bit of that Star Wars Yoda look going for him. Biggest problem I had with this image was a really large black fence across his body. Had to get a little creative but it was not really that hard. Mainly used the Clone Stamp Brush and Spot Healing Brush to paint over the bars and remove any patterning. In a couple places some new hair needed to be added so using an older free Wildlife Texture Brush Pack by Coyote Mange, several fur brushes were used to add it in – these are terrific brushes so if you do need animal hair brushes in PS, try them out. Otherwise just the basic PS workflow to get the final result. Really love this image…..Digital Lady Syd
I Am Feeling So Sleepy!

This beautiful Caribbean (or American) Flamingo was just an example of the many beautiful flamingoes strutting around the enclosure – it looks like he had a very busy evening the night before. It was a lot of fun to post process this guy but it was a bit of a challenge. The behind of another bird was in the image so I decided to just pull the bird head out of the image and start from scratch. No filters were used this time – and only a little sharpening and noise removal was done in Lightroom. Then I just painted around the bird and added in the grass and plants from PixelSquid. Put a sky background in as a texture taken from the Fantasy Text Effect file, and just added in some spotlight effects, a Color Lookup Adjustment layer, a French Kiss Pencil Frame (not sure it is still available), Curves and Levels Adjustments Layers, and some text (Zing Rust Line Horizontals and Vild Scrapes fonts). That was it but it took awhile to get this all looking right. ….. Digital Lady Syd
A Little Wintry Guitar Playing
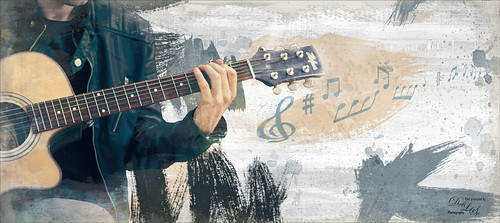
Well here is one of my favorite ISORepublic images called Guitar Man that I often choose when trying out a new technique. I used to play guitar and I think that is why I like it. This time I liked the result so well I decided to post it. I spent a lot of today watching a video (unfortunately it was not a talky), but it was so good I took notes and worked along with the basic steps anyway. The video is on You Tube and called Technical Dost/Digital Painting/Smudge Painting/Photoshop Tutorial by Nikhil Shirkar – some of the technique just did not work for this image like a lot of the smudging, which seems to apply to portraits more than this type of image. What I did like were the brushes he linked for the download. I especially liked the Danger Pig Strokes 01 free brush set and there was also a nice white watercolor grunge texture to use. I decided to use my own background texture, but his is quite nice. Otherwise it is just adding in elements and strokes to get a nice grunge feel. I used a watercolor border at low opacity to give a little vignette effect. The notes were created from some sheet that was downloaded and made them into brushes – I use them all the time. Overall just a lot of fun to do and the only filter used was Topaz (see sidebar for website link) AI Clear to sharpen the image. And also beware that when using some free images (including this image), the resolution is set to 72 dpi. Need to adjust this by going to Image -> Image Size and setting the Resolution to 300, then uncheck the Resample – the Width and Height will readjust – and recheck. That will give you a normal size image with the correct Resolution. ….. Digital Lady Syd
Color of the Wind
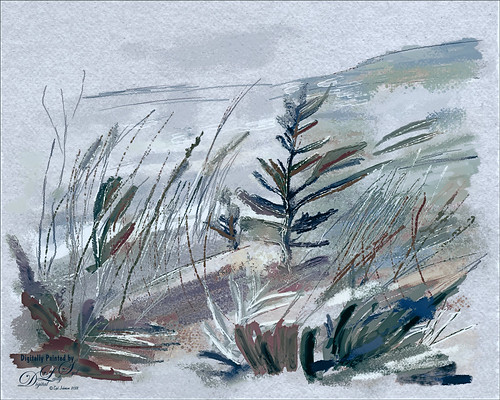
Once again just had some fun – this time painting with Grut’s Ink Brushes and paper. Decided to try and create an image somewhat like an Andrew Wyeth. (Right, like I could paint like Andrew Wyeth – I would be in heaven!) He is one of my favorite painters. It also gave me a chance to go through all the wonderful Ink Brush Nicolai has created at his Grut Brush site. There were so many I wanted to use but stayed instead to these brushes: Gone Coral, Coven Sloth, Pensive Linny, Bed Kelp, Bone Soak, Holy Slips, Go Folly, Raggedy Tag, and Wain Pip. (These were all placed into a brush Group named SJ Grut Ink Brush Favs – and backed up in the Preset Manager.) I also used his Oil Impasto Chip Gimble brush for ground cover. All these were used on separate layers so they could be adjusted and the opacity set correctly. Nicolai also has some marvelous papers – this one started with SP Espaloaf which gave the beautiful overall texture. To finish up, Topaz ReStyle was opened up and the Peppermint Gray preset applied for a very cool feeling to the image. Last step was to use Nik Viveza 2 to bring in the focus to the main tree. If you like ink brushes I suggest you check the Grut Brush Site – lots to choose from and for a low price, you can get all his brushes including these ink brushes. And the best deal is he gives away a free brush each week under his Freebies tab – all different kinds. I can’t tell you how many brushes I have gotten from this free downloads. …..Digital Lady Syd
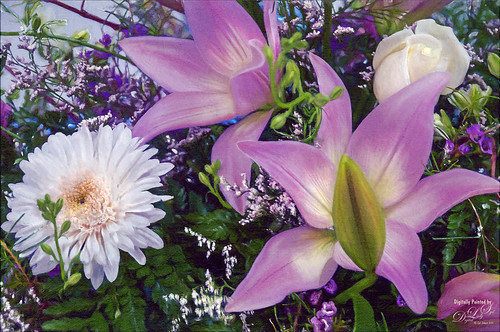
White Abstract Flowers
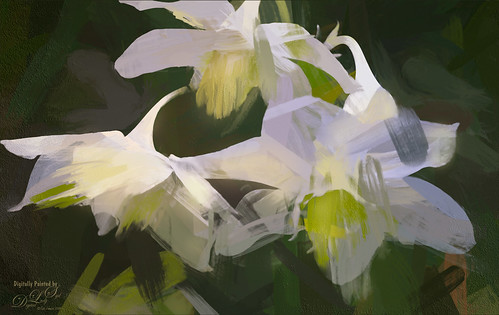
Love the results of this abstract applied to a rather ordinary grouping of white flowers. Applied a basic Topaz (see sidebar for website link) Impression Abstract preset to the flowers to remove the details. Then took the image into Corel Painter to paint in more of the flowers. Saved as a PSD file and opened up in Photoshop to further paint in details with Mixer Brushes. To get the interesting texture effect, added a rather light edged painted border in white and in the layer style, set the Bevel & Emboss to one created by John Derry. At this point I could not find a link where these can be purchased (I got them several years ago) but try playing around with this layer style effect. The opacity of this layer was set to 44% and the Fill amount set to 5% to get the interesting painting look. Used Nik Viveza 2 and added some color for lighting effect……Digital Lady Syd
Posing for a Portrait
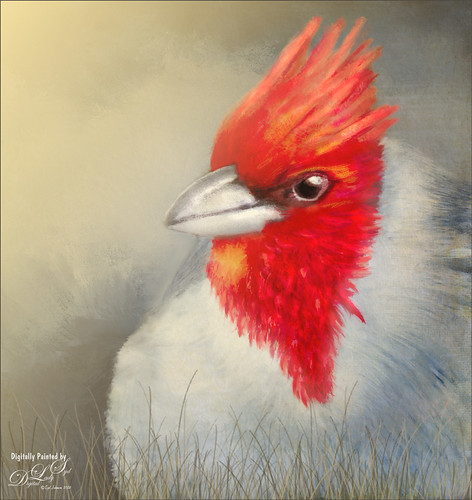
This guy is a Red Crested Cardinal and is not related to the beautiful red cardinals in the US. Although not native to Hawaii either (his image was taken at a park in Oahu), they are quite common. He was not very large in my image so the image was cropped in closely and run through my new favorite program, Topaz (see sidebar for website link) AI Gigapixel. Then I had a great image to work with. In Photoshop the same basic steps were followed that I did with my Wolf and Fox images completed recently. (See my Learning to Draw a Wolf! blog and Introducing the Beautiful Fox blog.) Since the image could be used as a guideline, I first started by sketching on a New Layer called Rough Drawing. Local Color, Shadows, Highlights, and Detail layers were added before working on the fur, textures, and overall lighting effects. Lots of layers, brushes, and time. Need to check out Aaron Blaise’s videos (links in Wolf blog) to learn the workflow. Anyway, I find it very relaxing to paint my bird buddies…..Digital Lady Syd
Introducing the Beautiful Fox
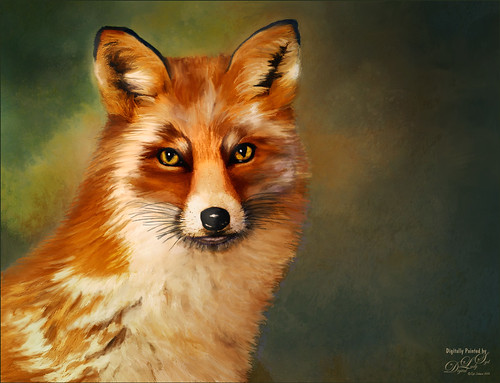
Enjoyed painting this beautiful fox – used Unsplash image by Linnea Sandbakk as a base for the painting. This follows pretty much the same painting process as used in my Wolf image except the body was not sketched first. This image contains 64 layers, so it took quite a bit of effort to get this result. Three textures were used to get the result and numerous brushes. I would go into more detail, but it is basically just finding a workflow and some brushes that work, and then painting. This is really so relaxing and fun to do!…..Digital Lady Syd
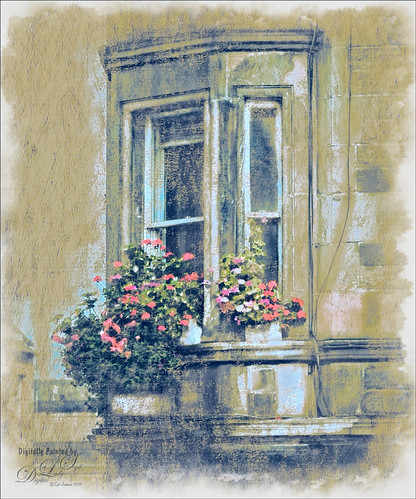
Who’s Looking Out the Window?
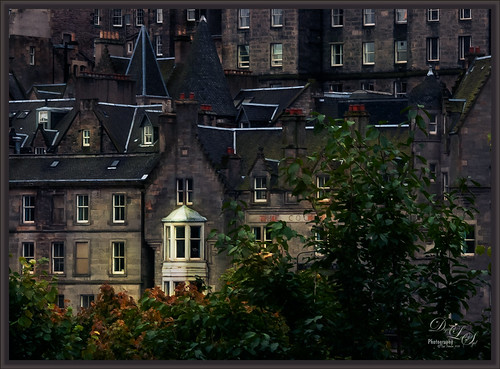
This is an image taken in Edinburgh, Scotland – not sure what is in the window. Just did a little post-processing on this since it was in pretty good shape already. A Curves Adjustment Layer was added to darken the overall image. Then three New Layers set to Overlay blend mode and white, yellow and orange red was painted in the areas that had those colors to bring out the color more – basically just a spotlight effect. A Dodge and Burn Layer was used to make some of the roofs stand out. These layers were all part of painting with light in the image. A vignette was applied and a frame added as a last step. Pretty easy and no filters!…..Digital Lady Syd
Pink Carnation
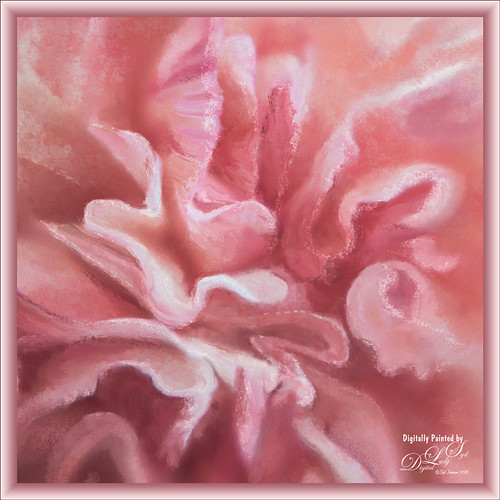
This flower was in a group from some birthday flowers – tried a few macro shots on them and got some really nice results. I decided I wanted to go through some of my brushes and pick some specialty mixers for painting. Most of the brushes were from Fay Sirkis, a Corel Painter Master. If you have a chance to get hold of some of her mixer brushes, they are still some of the best around even though they are older. Photoshop has not updated their actual brush engine except for the Smoothing section in many years so they work just fine. Her Four Seasons brushes, which is a really good set, can still be downloaded at KelbyOne if you are a member – just do a search for Fay and several webinars will appear with the brushes as a download set. A Curves Adjustment Layer was added along with French Kiss Feb 2018 Bonus texture (she give out many goodies during the year in her E-mails and this was one – website link is in sidebar). A Red Channel Luminosity Curves Adjustment Layer was applied (see my How to Use a Red Channel to Create a Nice Blended Image Effect blog) see my and one of my frame layer styles was added (see my How to Create a Quick Layer Style Border or Frame blog). I love some of the nice effects these brushes gave – not bad for Photoshop!…..Digital Lady Syd
Teacher and Student
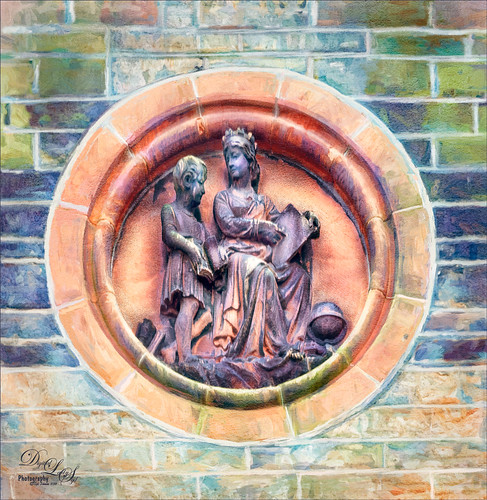
Am planning on taking a few weeks off from blogging to get some things done around the home – blogging takes up a lot time, so this will be it for a few! This image is of some architectural sculpture associated with the “Castle School” building connected to the Camera Obscura building in Edinburgh, Scotland, near the castle. I thought the sculpture was really charming of a teacher and her student. In LR the image used a Profile by VoxColor called NC to get the interesting tones. In Photoshop just did some normal clean up, used a Black and White Adjustment Layer, a Curves Adjustment Layer, and a Dodge and Burn layer. On a stamped layer, opened up Topaz Studio (see sidebar for website link) and applied the Impression Adjustment and Topaz AI ReMix Adjustment at 0.14 to add some painterly effect into the image. Then added several painting layers using my SJ Pastel 3 brushes (see my How to Create my Favorite Brush Blog and my Painting Fun in Photoshop Blog) to smooth out some of the paint strokes from the Impression filter. A New Layer set to Overlay was used to add a little spotlight effect on the figures. French Kiss (see sidebar for website link) Solstice Initiation texture was set to Color Burn blend mode at 59%. A Hue/Saturation Adjustment Layer was clipped to it and the Saturation was reduced to -43 to reduce the color effect of the texture. Finished off with Nik Viveza 2 to draw focus a little more into the sculpture. Last step was to create a vignette using Matt Kloskowski’s technique (see my How to Create a Subtle Vignette blog). That was it – lots of fun here! Will try to add some more blogs as time allows!…..Digital Lady Syd
Posing for my Portrait
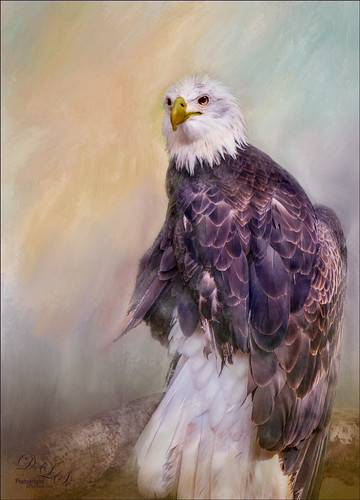
I love this shot of the Bald Eagle – he looks like a king posing for his portrait. I have no idea how he got his feathers this way – I took the image at the Jacksonville Zoo and he was sitting on an old tree stump I think. It is interesting to see his white feather plume. In Lightroom the Adobe Vivid profile was used. Then in Photoshop this guy was separated from the background using Topaz (see sidebar for website link) ReMask 5 as I could not get PS’s Select and Mask to give a good result. I usually can get a better result with ReMask if the selection is complicated. I used two of my own textures behind the eagle but could not quite get the look I wanted. So I took the Eagle layer into Corel Painter and created this soft version for a background. Back in PS the the other two textures were blended in. Used a couple Exposure Adjustment Layers for the eyes and the beak. Curves Adjustment Layers were clipped to each Exposure Adjustment Layer to get the right color in the eyes and beak. Several layers were created for painting out the edges a little with different mixer brushes. On a stamped layer Nik Viveza 2 was used to set the focus on the Eagle’s head and to clarify the feather detail. A Black and White Adjustment Layer set to Luminosity blend mode was used to further adjust the overall color. This is not really a painted image, but it has a painterly feel to it. …..Digital Lady Syd
Blowing in the Wind
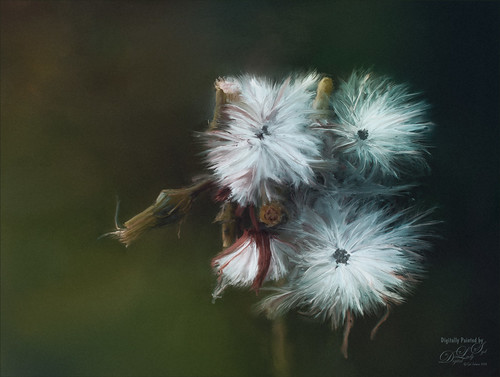
Got back to basics and painted this image of what I believe is some variety of dandelion. Painted using three main parts: a background layer to begin, then blocked in the main subject on a middle layer, and detail was added on top, which took several layers and different brushes. Mainly used Fay Sirkis’s (a Corel Painter Master) PS mixer brushes. (These brushes are pretty hard to find now but worth it if you paint in PS – KelbyOne still has them if you are a member – just search for her name.) Hypothermia action was applied at 24% layer opacity (See Chris Spooner’s 10 Free Winter Blues Photo Effect Actions for Adobe Photoshop blog). And another fabulous action by Blake Rudis was applied – got to check out How to Use the 5 Tone Heat Map in Photoshop video and try this. Last step added a grain layer I built a while ago and put in my Library in PS. Lots of fun to paint again…..Digital Lady Syd
Room with a View
Decided to do a little watercolor painting in Photoshop of these flowers sitting on a window ledge that looks at Edinburgh Castle in Scotland. Basically cleaned up the image using Topaz (see sidebar for website link) ReStyle to set some colors, and then used Melissa Gallo’s method to paint the image using her watercolor brushes. I took her class several years ago, but the method still works. (If you are interested in purchasing her Painting with Photoshop class, it is still available. There are so few really good PS painting classes, but Melissa’s may be the best of the bunch.) Topaz ReStyle was actually applied again at the end to create a more interesting color palette. The last step used my watercolor border frame. Lot of fun to paint again…..Digital Lady Syd
Merry Christmas from Digital Lady Syd!
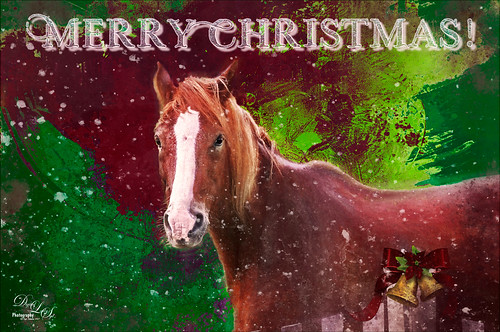
Wishing everyone a Merry Christmas here at Digital Lady Syd’s Tidbits Blog! This lovely horse image was taken in Belarus a while ago – for some reason I felt like adding some painterly Christmas effects to him. He definitely was checking me and my camera out. Normal LR changes and then in PS, Lucis Pro was used to sharpen the image. On a duplicate layer above, Topaz Studio was opened and a Topaz Impression preset called Chalk Smudge was applied. Next I did a selection of the horse. Underneath one of Jai Johnson’s Unpredictable PNG’s was added. A Hue/Saturation Adjustment Layer was used to create the Christmas colors. And under that, a solid blue-filled New Layer was added above the the background from keep white from showing through. On top a New Layer using Kyle’s Spatter Brush Beautiful Mess (comes with PS CC) was used in darkish red to create a subtle vignette. The eyes were sharpened with a Curves Adjustment Layer. A Black and White Adjustment Layer was set to Luminosity at 82% layer opacity. Texture Mate’s original starfield texture was added for the snow effect – set to Screen blend mode at 68%layer opacity. The Font is called Winter Holidays with a Bevel & Emboss, Outer Glow, and Drop Shadow Layer Styles added. That is about it. Hope everyone has a wonderful holiday season!…..Digital Lady Syd
Visiting My Castle
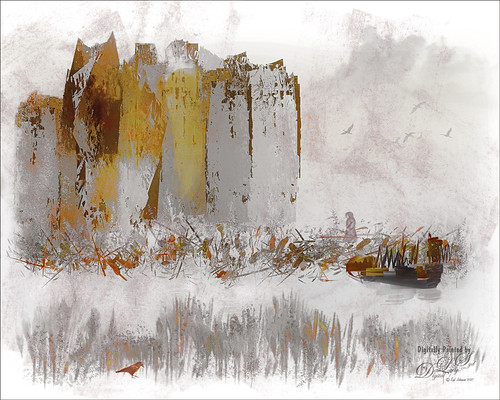
This image was totally painted in Photoshop CC using several elements created originally using different brushes in both Corel Painter and PS, then saving the results down as a PNG objects. Several bird, cloud, plant and grit brushes were used. Different adjustment layers clipped the elements to adjust the colors and tones. The person was just painted in. Topaz (see sidebar for website link) ReStyle’s Silver and Ivory Cloak preset was used to add the colors into the overall image. It was just a lot of fun to put everything together into something creative…..Digital Lady Syd
Enjoying a Flower
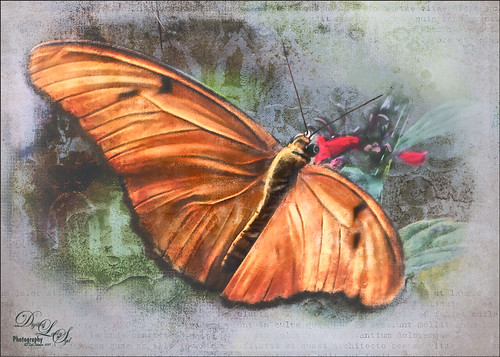
Love this Julia Longwing Butterfly – have never seen one like this around my home. The image was taken at the Palm Beach Zoo which is much further south in Florida. This male butterfly actually lives several months and loves the Passion Vine. The image was cropped way down to emphasize the butterfly. Then Lucis Pro (no longer available) was opened to sharpen up just the butterfly. On separate layers the wings were painted mainly using Gruts (see sidebar for website link) NM Pans Attic brush. 2 Lil’ Owls (see sidebar for website link) Dream freebie texture was set to Hard Light at 70% layer opacity. In a layer mask the butterfly was painted back. Kim Klassen’s 2170 with Script texture (not sure it is available anymore) was used around the butterfly. Nik Viveza 2 was applied to adjust the coloring in the image. Next Topaz (see sidebar for website link) Lens Effects’s Diffusion filter set to Moderate was applied. A black layer mask was added and just the diffusion effect was applied to the wings and flowers. A Color Lookup Adjustment Layer was added and the Crisp Winter preset was selected. It was set to Hard Light and 27% layer opacity. I decided the color palette was not quite right, so on a stamped layer Topaz Restyle was opened up. A preset was made of the image and then the colors in the palette were just slightly adjusted to get the final look. (See my How to Use a Topaz ReStyle Trick for Improving Your Image blog.) Wish these little beauties were in our local…..Digital Lady Syd
Checking Out the Buds
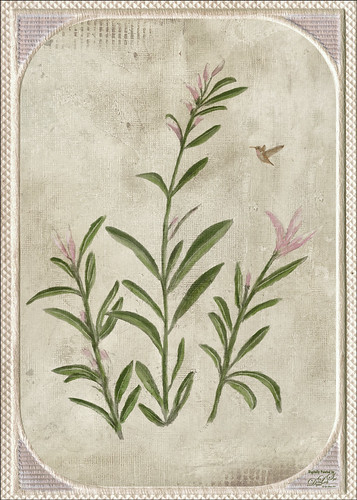
Still practicing drawing and painting. This image I just followed the same workflow from my Some Flower Power blog which created an original sketch layer and several painting layers for the flowers. Next the Hummingbird was painted on a layer using a bird brush created by just turning an old bird image into a black and white and defining as a brush preset – actually used two different colors and softened the edges a little. Kim Kassen’s Stay texture (not sure it is still available) was placed on top and really gives the vintage feel to the image. A Hue/Saturation Adjustment Layer was clipped to it (ALT+click between layers) to desaturate the texture color a little. The border is from On1 Hundred Borders set. The three final steps were performed that I almost always use at the end of my workflow: a Red Channel Luminosity Adjustment Layer, Nik Viveza 2, and a Black and White Adjustment Layer. I am starting to enjoy creating the flower paintings……Digital Lady Syd
Bird of Paradise
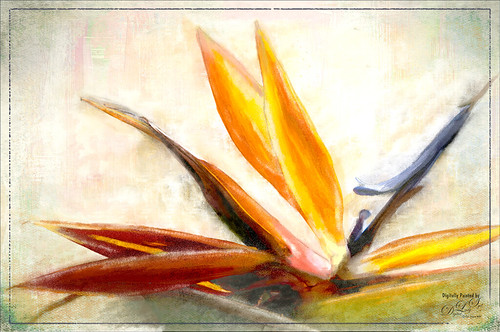
I currently have a couple Bird of Paradise blooms on my plant so had to get a few images. This one was extracted in Photoshop and then painted in Corel Painter before bringing back into Photoshop and finishing up the detailing of the flower and adding texture. One of my Pastel textures created in Painter was placed under the flower. Then several layers were placed above using several of my SJ-3 Pastel brush variations (see my How to Create My Favorite Brush blog) and Grut I Qwillo brush (or see sidebar for link to all his brushes) to create the outline. 2 Lil’ Owls (see sidebar for website link) Color Bokeh Grunge Set-3 was added and the flower painted out on a layer mask. On a stamped layer (CTRL+ALT+SHIFT+E) Nik Viveza 2 was used to emphasize the focal point. Did not like the painted strokes completely, so added a few more layers and used Grut NM Tick Tumble to smooth out color in several places. A Sebastian Michaels edge was added. It is fun to paint these beautiful blooms!…..Digital Lady Syd


