
Showing Off My New Hairdo
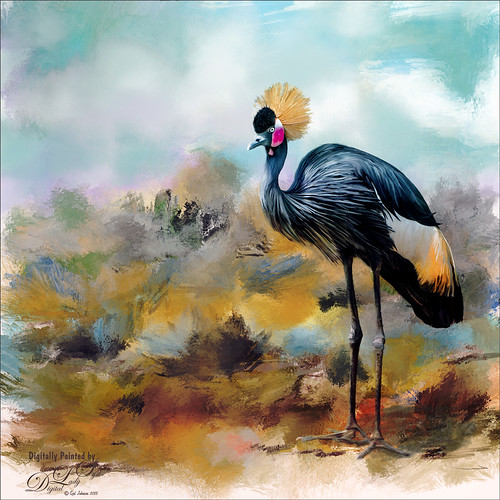
Just enjoying painting another beautiful bird. They are so much fun to do! This is a West African Crowned Crane taken a while ago at the St. Augustine Alligator Farm and is one of the regular exhibits so he can be seen anytime. He just sort of match this Corel Painter texture I had made, so there he is. In his document Topaz (see website link in sidebar) Clarity, Detail, and ReMask were used to adjust the bird itself. Then the ReMask layer was moved into the texture to place it where I wanted him to be. After that just painted the bird on several different layers using the Mixer Brush. Used two different Exposure Adjustment Layers, one for the eye and one for the beak to bring out some sharpness. Then duplicated the original texture twice and set on top – set one to Color Burn at 46% layer opacity and the other to Soft Light at 32%. Created a stamped layer (CTLR+ALT+SHIFT+E) on top and added the Topaz Lens Effects’ Toy Camera filter set to Awesomeness I preset with changes. Back in Photoshop that was set to 39% layer opacity. The last step was to add Nik Viveza 2 to really drill in on the birds face and head feathers. Hope you enjoyed my little bird painting…..Digital Lady Syd
Some Texturing Fun!
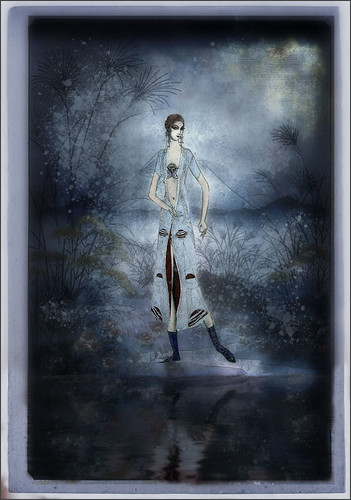
This image started out being what I thought would be just simple little layering image and instead turned into this rather complicated final image. I basically got the idea from reading one of my favorite blogs, First Night Design, where Sarah shared where she gets some of her images for doing her marvelous texturing – Ida Rubinstein as Istar by L. Bakst from 1924 and Kai Outsuki no hara from 1858. Basically cut out the lovely lady and put her in the oriental image. Used 2 Lil Owls (see sidebar for website link) Mosaic Sets Darcel Grunge texture twice – one set to Linear Light using the Blend If sliders to get the effect I wanted, and the second time set to Linear Burn at 67% layer opacity using Blend If sliders again. The elegant lady (extracted from her image using Topaz ReMask 5) was set on top. On a stamped layer Topaz Lens Effects (see sidebar for website link) Generous Diffusion preset was applied, and then Flaming Pear’s Flood plugin was applied to give the reflection. On a New Layer a speckle regular brush was used to create the painterly snow look on the image. That was the major work done on this image. I really liked the feel in the image……Digital Lady Syd
A Wintry Day
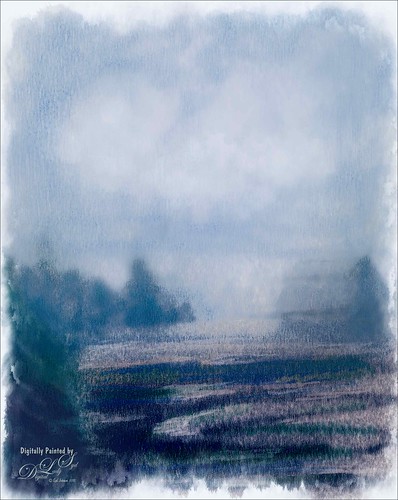
Just trying out the Watercolor category in Corel Painter. Usually use Photoshop to do the watercolor effects, but I finally got around to watching Jason Maranto’s videos on the Painter 2015 brush engine and learned how to use them. This image mainly used a Painter 2016 brush in the Watercolor category called Speckle Wash with the opacity changed for the various areas of the image. In Photoshop Topaz (see sidebar for website link) Lens Effects was opened and used the Graduated Neutral Density Filter, and Topaz ReStyle using the Tierra Frost preset. Really enjoyed doing this image!…..Digital Lady Syd
So What Are You Looking At!
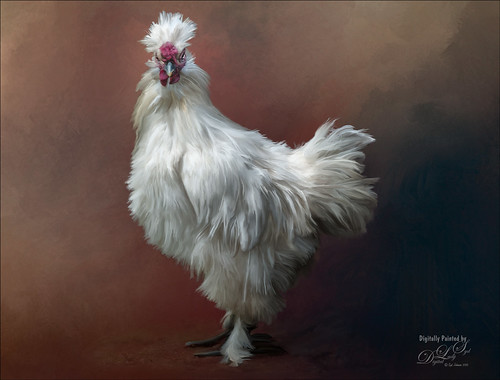
This image is of a White Silkie Rooster was photographed at The Old Village of Ayaymku in Belarus some time ago. (See my Center Stage – Introducing the Wild Turkey Tidbits Blog for another unusual bird image from the same place.) Used my regular Photoshop painting workflow. Selected the bird using Topaz (see sidebar for website link) ReMask 5, then placing Jai Johnson’s Filly in the Field texture underneath the bird. The edges were blended with one of Fay Sirkis’s Pet Mixer Brushes on a New Layer above. (Can download at KelbyOne if you are a member.) This image used a Topaz Lens Effects Neutral Density filter applied (Brightness -0.19, Amount 0.13, Transition 0.11, Angle 180.0, and Effect Position: (1824,2687) ) to even out the bottom and give him a defined area for standing. I also added two Exposure Adjustments Layers, one for the eyes and one for beak area. A Curves Adjustment Layer was used to add a little contrast back into the image. The workflow is pretty consistent but the results are always a surprise. These birds all have such personality!…..Digital Lady Syd
Sharing the Good News!
This image was taken at The Old Village of Ayaymku in Belarus on her wedding day. This image was just a snap that I had forgotten I had taken. The scenery from the doorway was changed to more of a seaside effect using one of the texture I created in Corel Painter. The door was first selected using Topaz (see sidebar for website link) ReMask 5 in the duplicated image, and the texture was placed behind the image. The Subtract blend mode was selected on a stamped (CTRL+ALT+SHIFT+E) layer at 51% layer opacity to get the nice light on her dress. A Gaussian Blur was applied to the layer and set to a Radius of 250 px – a layer mask was applied and the lighted edge of her dress was lightly painted back with a black brush. (See my How to Use the Subtract Blend Mode as a Spotlight). Topaz Lens Effects Toy Camera Memories preset was used to adjust the colors on duplicated layer. Then Topaz ReStyle’s Zambezi Zest preset was applied to get the overall warm tone. A little bit of a different look for me, but it is fun to try different effects……Digital Lady Syd
My Imaginary Landscape
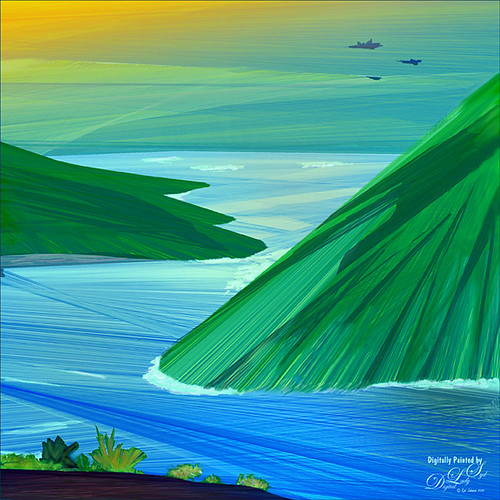
This image was my first created in the new Corel Painter 2016. This used a Spring Particle brush that Corel Master Winifred Whitfield is giving away to use with the her video called Watercolor Spring Particles. This brush can be very addictive, especially if you follow her instructions and make a few variants of your own. Most of the image was created in Painter which can put each color and stroke on different layers if you want. The surf effect was created using the Eraser Tool in Painter. In Photoshop some of the sharp edges on those painted patterned layers were cleaned up where the Painter strokes overlapped a little too much. On a stamped layer (CTRL+ALT+SHIFT+E) on top, Topaz Lens Effects was opened. A Dual Tone filter was applied using the Top Left Red Leak preset and changing a few of the sliders to get a more pronounced sunset feeling in the sky. The last step was to use Nik Viveza 2 to help guide the eye through the image. Both of these filters could have been applied in Painter. That was it. Lots of fun with this brush and the new Painter version……Digital Lady Syd
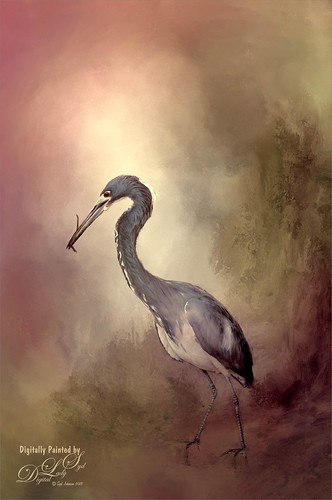
Testing the Water
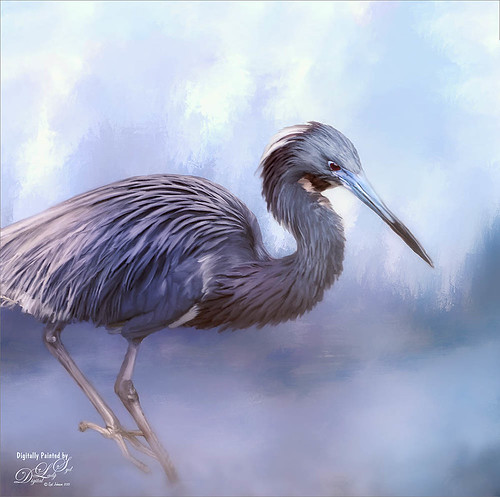
This is a sleepy Tricolored Heron reluctantly taking a step into the water on a beautiful hazy morning. Okay, he was really in a very cluttered background and I had to use Topaz (see sidebar for website link) ReMask 5 to cut him out. Then he was placed on one of my Corel Painter textures whose colors were changed using Topaz ReStyle’s Ice Cool and Fresh preset to match the bird colors and Free Transformed (CTRL+T) to fit the bird perfectly. I then proceeded to paint the bird with a Mixer brush to smooth out the grainy feathers. A duplicated copy of the texture was added on top and set to Multiply blend mode at 50% layer opacity. On a stamped layer (CTRL+ALT+SHIFT+E) on top, Topaz Lens Effects Fog (Fog Ground Fog IV preset – Amount 0.20, Region Size 0.10, Transition 0.20, Angle 138.1, and Diffusion 0.40) was added to give a sort of early morning mist in the water. Next the Reflector filter was applied (Golden Left, then Strength 0.20, Transition 0.40, Position 0.59, and Angle 76.63) before going back into PS. The eyes and beak were sharpened using the Exposure Adjustment Layer. On another stamped layer, Topaz Adjust’s Brilliant Warm preset was applied to get the nice gray color back on the bird. A little Curves Adjustment Layer was added and he was done! Still loving my birds!…..Digital Lady Syd
Macaws Being Macaws
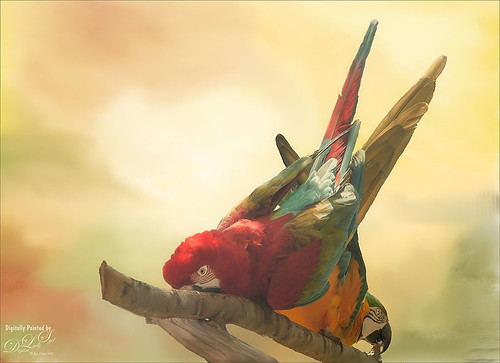
This rather unique image of these two Macaws, a Scarlet and a Blue and Yellow, was taken at the St. Augustine Alligator Farm a while ago. Not sure how I get such funny pictures of birds! I really wanted to take Topaz (see sidebar for website link) ReMask 5 through its paces and it worked really great on this image. (See my Digital Lady Syd Reviews Topaz ReMask 5 blog.) After creating a layer mask in ReMask, one of my Painter backgrounds was placed underneath the birds. A Regular brush layer and a Mixer brush layer were used to paint some of the feathers and the branch they were on. Then the texture was duplicated twice and placed above the birds. One was set to Multiply blend mode at 59% layer opacity and one to Overlay blend mode at 60% layer opacity. A stamped layer was placed on top. I felt the birds looked too bright before this was done. Therefore Topaz Lens Effect’s Fog I preset was applied (Amount 0.19, Angle 135.4, and Diffusion 0.14) to get the softer color effect, especially in the lower part of the image. That is all that was done to get this soft feel to these interesting birds…..Digital Lady Syd
Building a Home
This beautiful Tri-Colored Heron was posing at the St. Augustine Alligator Farm Rookery, where he was actually building a nest as seen by the twig in his mouth. These birds are all over Florida and I probably see one at least once a day. This image used the same techniques from my recent blog called How to Get a Painterly Effect for Wildlife and Birds, especially as done with the Wood Stork image. This time two of my Painter textures were combined to get the sort of magical background effect. Topaz (see sidebar for website link) Adjust’s Summer preset was applied to a stamped (CTRL+ALT+SHIFT+E) version on top and on another stamped version Topaz Lens Effects Toy Camera Memories preset was applied. The Saturation was actually reduced a little in this section. It was pretty much the same workflow, just trying different textures and painting the bird on several layers. I really love my birds!…..Digital Lady Syd
A Victorian Visit
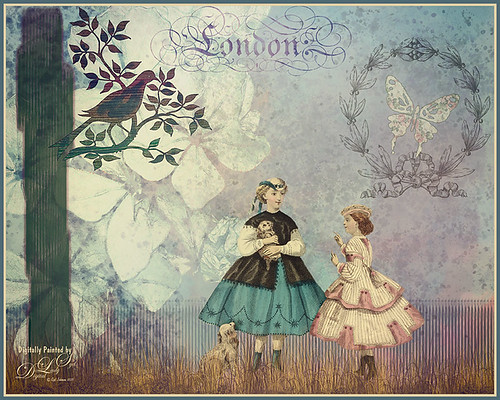
This is just a little composite of various elements that I put together for the fun of it. I love the little girl clip art that was from Mary Bailey, I believe as a magazine download – I could not find a link to her. Thought I would mention the use of Axeraider70 Edge Brushes to make the fence and tree trunk. Lots of splatters and one of my painted backgrounds were used. The butterfly shape was from Nicky Laatz and the wreath and London text were from Graphics Fairy. The bird was from the Old Design Shop. The flowers are from another one of my images. The foreground grass was from brushes by Aaron Blaise. Topaz (see sidebar for website info) Len Effects Toy Camera filter using the Memories preset with no vignette, than applying Polarization Filter set on High to brighten the image up. Nik Viveza 2 was used to direct focus to the girls. It was a lot of layers and step, but a lot of fun to do……Digital Lady Syd
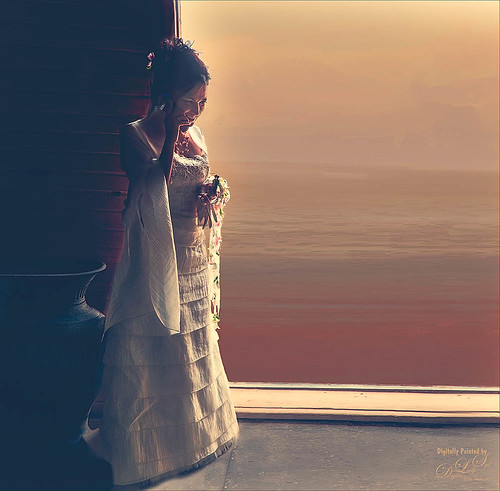
The Blushing Bride
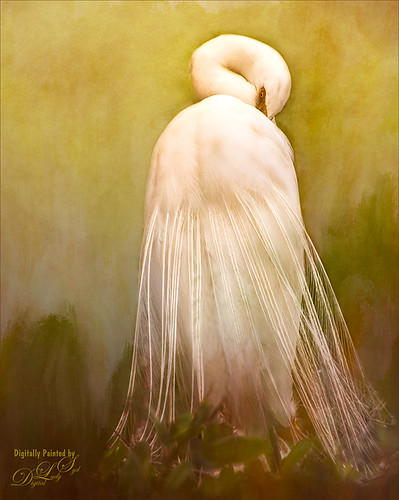
This lovely Snowy Egret with her magnificent plumage was another bird shot taken at the St. Augustine Alligator Farm rookery a few months ago. She was placed above Jai Johnson’s Emerald Green Canvas free texture (all her textures are fabulous) and with a black mask, was painted into the texture. This texture was chosen since the bird had lots of dark green foliage around her – the thin feathers could be seen better. Next a Corel Painter texture I created showing some soft plant-life in the background was placed on top and set to Hard Light blend mode at 39%. On a stamped layer (CTRL+ALT+SHIFT+E), Topaz (see sidebar for website link) Lens Effects was opened and two filters were applied: Reflector (Settings: Gold Top – Type Golden, Strength 0.65, Transition 0.37, Position 0.36, and Angle 176.4) and Add Vignette-Selective – Burnt Sienna (Settings: Placement Adjustments Focus Width 0.66, Focus Height 0.48 and Effect Center: (1751,806); Tonal Adjustment – used default sienna color, Vignette Strength 0.35, Transition 0.75, Contrast 1.63, Brightness 131.2, and Opacity 47.03). On a duplicate layer Nik Viveza 2 was used to bring out the sharpness of the eye a little more and the structure in the bird’s back. A black and white Adjustment Layer was used to adjust the focus just right and then set to Luminosity blend mode at 44% opacity. Then on another stamped layer, Topaz ReStyle’s Tuscany Memories was applied and set to Hard Light at 45% for the ReStyle section. That was it!…..Digital Lady Syd
Jumping Whales
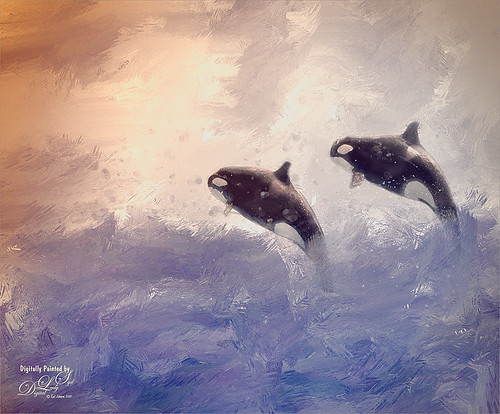
These Killer Whales were performing a few years ago at SeaWorld Orlando. I decided to place them in a water texture created in Corel Painter. I wanted them to look like they are in their natural environment. The biggest problem I had with this image was getting the lighting to look natural on the sharper whales. First the whales were painted through a black mask on top of my SJ Stormy Weather at Sea texture. Several adjustments layers were used to even out the tonal contrast and color. Then Topaz (see sidebar for website link) Lens Effects was used on a stamped layer (CTRL+ALT+SHIFT+E) and the Vignette Selective using the Golden Halo preset was used. Nik Viveza 2 was used the get rid of the color cast and turn the spots on the whale white. The texture was copied twice and placed on top of the layers – first set to Multiply blend mode at 49% layer opacity, and then set to Hard Light at 21% layer opacity. Some water splatter layers were created to get the water splashing effect using Aaron Blaise Water Splatter Brushes (all his brushes are fabulous!). On yet another stamped layer, Topaz Lens Effects was opened up again and the Toy Camera effect was chosen – used the preset Awesomeness for starters and tweaked it to get the correct sunlight effect. The last step was a Levels Adjustment Layer to even out the contrast. This was really a lot of fun to do!…..Digital Lady Syd
Horses Checking Me Out
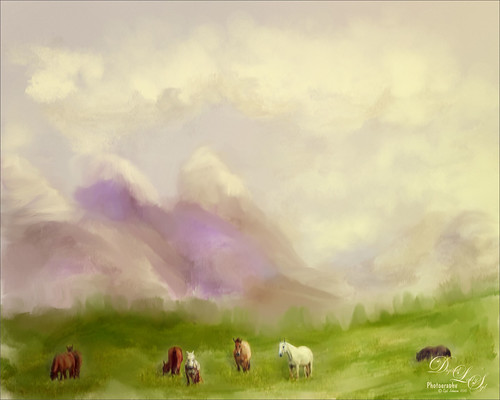
Created this image using a texture I painted in Corel Painter and a horse image from Belarus. This is basically just painting the horses into the texture by using a black layer mask on the horse image above. Then used Topaz (see sidebar for website link) Lens Effects Toy Camera filter Awesomeness I preset as a start, then applied the Reflector filter to lighten up the whole image. On a stamped layer Topaz Restyle was used and just the bottom colors were changed to darker tones. Then mainly just some clean up – love the the results……Digital Lady Syd
Cattle Egret Looking for Love

Loved this beautiful Cattle Egret who was checking out a group of egret ladies (they are more colorful during this time of year) at the St. Augustine Alligator Farm. Jai Johnson’s free texture called antiquebrownlight-canvas was used on this image. Lots of painting, Topaz (see sidebar for website link) Lens Effect and Topaz Impression were used to get this final image. I really love the mystical result……Digital Lady Syd
A Little Scottish Architecture
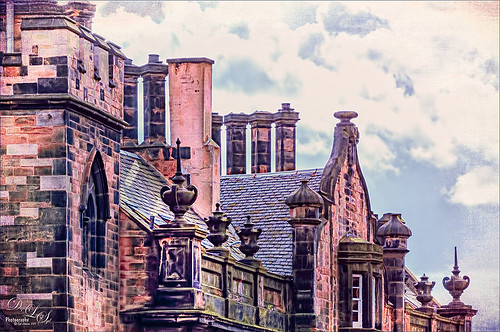
Just an image of the beautiful architecture taken near Edinburgh Castle in Scotland. The original image in Lightroom was major dark – not sure why. Used the Basic sliders to brighten up the image, but the noise was pretty bad. Therefore , in Photoshop Topaz (see sidebar for website link) DeNoise was used. Topaz Glow was used on a stamped layer above and my SJ Graph III preset was applied – layer was set to Overlay blend mode at 65% layer opacity. (Here are the settings: Primary Glow: Glow Type Dark, Glow Strength 0.17, Effect Sharpness 0.09, Electrify 0.23, Simplify Details 0.25, Edge Color 0.20, Detail Strength 18, Detail Size 0.24, Brightness 0.23, Contrast 0.17, Sat 0.01, Line Rotation 0.09, and Glow Spread 0.20; Secondary Glow: Glow Type Light, Glow Strength 0, Effect Sharpness 0.47, Electrify 0.17, Simplify Details 0, Brightness 0.36, and Contrast 0.62; Color Red Sat 1.00; Orange Sat 0.27; Yellow Sat 0.20 and Lightness 0.09; Aqua Sat 0.78 and Lightness -0.26; and Blue Sat 0.49; Finishing Touches: Effect Coverage 0, Smudge 0.00, Sharpness 0.25, Sharp Radius 0 and Vignette Size 0.) Also in the Layer Style, the sky was brought back using Blend If Underlying Layer slider and splitting the white tab (ALT+drag on tab to split) with settings of 122/145. Topaz Lens Effects Reflector filter was used to lighten up the face of the buildings (Type Golden, Strength 0.28, Transition 0.31, Position 0.49, and Angle 208.5). By adding a layer mask, the sky was painted black so the effect only applied to the buildings. Next on a stamped layer used Nik Color Efex Pro using Tonal Contrast, Brilliance/Warmth, and Vignette Lens. A vintage frame was added on top and set to Overlay blend mode. I love working on images from Scotland!…..Digital Lady Syd
Viera Wetlands

Decided I wanted a different look for this image. I was upset that I did not bring my wide-angle lens when I went to the Ritch Grissom Memorial Wetlands in Viera, Brevard County, Florida. The sky is actually what I saw – it was not replaced. Nik Color Efex 4 helped give the image this effect by using two of my favorite filters in the plug-in: for the diffused effect the Monday Morning filter was applied, and for the slight Nostalgic feel the Film Efex Vintage filter. The real trick to this image was to use Topaz (see sidebar for website link) Lens Efex and the Fish Eye Adjustments with the Distortion set to 0.26. Totally loved the result even without ever using my wide angle lens!…..Digital Lady Syd
Topaz Lens Effect Tilt & Shift with a Zoom!

These are a few of the kayaks that can be rented at the Waikoloa Beach Marriott Resort and Spa on the Big Island in Hawaii. I was listening to a webinar presented by Nicole Paschal at Topaz Labs called “Isolating Subjects with Lens Effects” – this webinar should be posted soon at Topaz Labs-YouTube. She presented six or seven different ways to use selective focus on your images using this plug-in.
For this image Topaz Adjust (see sidebar for website link) was first applied just to brighten up the image a little – added the Spicify preset. Next Topaz Lens Effects was opened. Nicole really likes to use the Camera Tilt & Shift effect to selectively isolate her subjects. That is what is applied here. The Tilt Shift Adjustment were set to: Focus Area Width to 0.20, Transition to 0.59, Blur Amount to 0.08 and Angle to 0.89 so that the blur runs across the back of the kayaks. The Image Adjustments were set to Brightness 0.11, Contrast 0.15 and Saturation to 0.03. In the Distortion Adjustments section, Tangential was clicked, and a 1.89 Distortion Scale was applied – this cropped the image centering it on the Tilt Shift Adjustments Blur point in Focus Area section. Each time the blur point is moved, you get a different result. This image ended up with the Effect Position at 560, 612.
There are several other effects discussed in this webinar which are fun to try. Listen to the webinar for more good tips. The above effect may give some very interesting results on different types of images. I will definitely be checking this out…..Digital Lady Syd
Digital Lady Syd Related Blogs:
Topaz Lens Effects Plug-In
Topaz Simplify and Lens Effects Saves an Image!
Combining Plug-ins – Double the Effect!
Topaz Lens Effect’s Artistic Flair!
Topaz Simplify and Lens Effects Saves an Image!
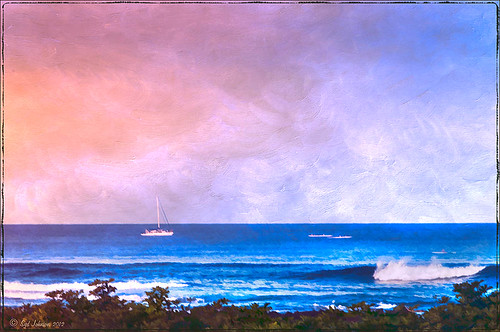 |
The catamaran is one of the whale watching boats you can take while on the Big Island in Hawaii (see Hawaii Ocean Sports for more information on this). This image was taken the day before my adventure and it was not a good at all (hover over image to see original RAW image) – but I really wanted a shot of the boat on the water. Therefore some improvisation had to be employed. After cropping and doing some RAW adjustments in Lightroom, Topaz (see sidebar for website link) came to the rescue. Topaz Simplify 3 was applied first to get rid of the focus issue – the BuzzSim preset was used as a starting point with these changes: Simplify Size slider was changed to 0.15, Brightness slider changed to 0.08, Saturation slider to 1.27, Edges: Color Edge Fine, and Edge Strength slider 1.50. Next Topaz Lens Effects was applied using the Filter Dual Tone Effect to create the warm feel in the sky with a preset I previously created called Sunrise Effect. (See below if you would like the settings for the preset.) Next Flypaper’s Paper Texture Creme Anglaise (one gorgeous texture!) was used via Russell Brown’s Paper Texture Panel for Photoshop CS5 and CS6 (see my blog Russell Brown’s Paper Texture Panel – A Real Winner!) and set to Divide Blend Mode at 100% opacity. A Curves Adjustment Layer was added to fix the contrast. Finally OnOne’s Photoframe grunge 09 was added (see sidebar for link). An image I would normally have trashed has now been turned into a beautiful picture that I really love. Give this technique a try if you own the Topaz plug-ins. The combination works great together, especially if you want to save an image!…..Digital Lady Syd
My Topaz Lens Effects Sunrise Preset contains these settings: Transition Adjustments – Region Size 0.45, Transition 0.35, and Angle 149.7; Region A Adjustments – Cyan Cast 0, Red Cast 0.20, Magenta Cast 0.01, Green Cast 0.03, Yellow Cast 0.70, and Blue Cast 0.24; Region B Adjustments – Cyan Cast 0.15, Red Cast 0.10, Magenta Cast 0.15, Green Cast 0.05, Yellow Cast 0, and Blue Cast 0.05; and Image Adjustments – Brightness 0.05, Contrast 0.08, and Saturation 0.07.
Digital Lady Syd Related Blogs:
Topaz Simplify and Topaz Detail Together
Simplifier and Simplify Filters
Russell Brown Texture Panel Landscape Image
Topaz Lens Effect’s Artistic Flair!

This is a real Tidbit – just playing around in Topaz Lens Effects. I have not used this plug-in as much as I thought I would so I decided to try some things on a so-so image. Overall I am really happy with the results from using this plug-in. Three Lens Effects were applied in this order: Vignette with a lighter dark edge centered on the blue cover over the door; Lens – Motion using Zoom in the Motion Blur section – centered again on the top of the door and the Motion Amount adjusted from there; and Filter – Dual Tone with the Region A having a fairly strong Yellow Cast and Region B using a small Magenta Cast (you can see this in the image), and adjusting the image Contrast and Saturation sliders. Back in Photoshop, a layer mask was added to the Lens Effects layer and black painted in to bring back the clean lines of of the door area – the Sharpen Tool was then applied. The orange brick and blue canvas awning were brought out using a Selective Color Adjustment Layer and a Curves Adjustment Layer. An OnOne PhotoFrame was added (see sidebar for website link). A Shadowhouse Creations Used Canvas 4 texture was added to give it the darker canvas feel (check out the textures at this site – they are all free and great!). A final Curves Adjustment Layer was added and the layer mask converted to black (highlight mask and press CTRL + I) and white painted to increase contrast on the door area.
Here are the layers I used to create this image to help you see how it all goes together.

I really loved the final result – but definitely it has more of an artistic feel than realistic. Try this plug-in and see if you can get some interesting results too……Digital Lady Syd
See related Digital Lady Syd’s blogs on Topaz Lens Effects:
Little Nighttime Fun from Topaz!
Topaz Lens Effects Plug-in
Little Nighttime Fun from Topaz!

Just listened to another interesting video from Topaz Labs on “Creating Striking Night Images.” If you are using or trying any of their Photoshop plug-ins, Topaz always has some interesting videos for creative uses at their Topaz Lab site. I followed the referenced video steps for processing this nighttime image taken on the Las Vegas Strip of Margaritaville. The video suggests that you first use their DeNoise Filter (this image did not require it), Topaz Adjust where they suggest using the Photo Pop preset was used with Shadow slider setting changed to 0, contrast slider moved left a little, and checking Process details independent of exposure box; and finally Topaz Lens Effects using the Single Tone – Hint of Blue Light and then adding some yellow cast to the mix. (See sidebar to get to Topaz’s site to download trials of these products.) The video also discussed taking long exposure nighttime photos. Since this was not a true long exposure night image, I used my Rick Sammon Spicify Soft Artsy preset using settings from the Topaz video “Rick Sammon’s Top Topaz Tricks, Tips and Techniques.” An OnOne PhotoFrame was added to finish off the look.
This image was a lot of fun to work on and pretty easy to do! I am looking forward to trying this processing technique on a serious nighttime image. Give this video a listen if you want some great nighttime tips…..Digital Lady Syd


