
Lots of Bikes at Flagler College

This is a different angle of some of the colorful bikes taken at Flagler College (the old Ponce de Leon Hotel) in St. Augustine, Florida. In Lightroom used the Auto button to tweak the original image and added a little more color into the bike colors. In Photoshop had to use the Adaptive Wide Angle filter to straighten the walls and then used Topaz Studio (see sidebar for website link) and applied SJ Subtle Colored Pencil which is up in the Community for your use. Back in Photoshop a Red Channel Luminosity Curves Adjustment Layer was used to increase contrast. Nik Viveza 2 was used to add a slight vignette. Last step was to add a Levels Adjustment Layer with the black Output Levels set to 27 and the Midtone slider set to 0.81 to get that flat matte Instagram effect. Really love these bikes!…..Digital Lady Syd
Statue of Queen Anne
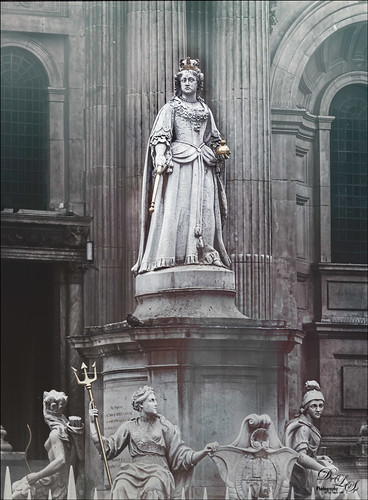
I was pretty pleased with how this image of the statue of Queen Anne in St. Paul’s Churchyard in London turned out as the RAW file was not too great. I actually did a lot of the toning in On1 (see sidebar for website link) Photo Raw 2018 Effects module using the Tone Enhancer, Sunrise, and Dynamic Contrast filters – I am finding I really like the Dynamic Contrast filter for sharpening up the images. It did a really good job on the statue. In Topaz Studio (see sidebar for website link) two textures were added on the image. Used Blake Rudis’s 5 Tone Heat Map to adjust the tone. The Foggy Night preset in the Color Lookup Adjustment Layer was set to 23% on a layer on top. Nik Viveza 2 was used to brighten the Queen up a little. A little reddish tone was used to give a vintage feel to the image. Lots of fun to try these different filters together……Digital Lady Syd
Flowers on an Old Spanish Home
This is the Arrivas House located at 46 St. George Street in St. Augustine, Florida and was built cc 1760. (Click on link for some interesting history on this site). It is now home of the Panama Hat Company store. Used the HDR command in Lightroom to create an image from three images exposed at -1 1/2, -1/2, and +1/2. The sky was totally washed out so had to bring in a sky image taken from my backyard – it was so overcast a sky with similar attributes had to be selected. Then two Curves Adjustment layers were added, one for tone and one for color. A Dodge & Burn layer using a 50% gray layer was created – painted with white and black at low opacity to sharpen up the blues in the flag and color on the flowers. A New Layer set to Overlay blend mode was used for a little spotlight effect placed on the little flowers to brighten them up a bit more. Last step was using Nik Viveza 2 to pull the whole image together. St. Augustine is a great place to visit if you get a chance…..Digital Lady Syd
Deer on a Fountain
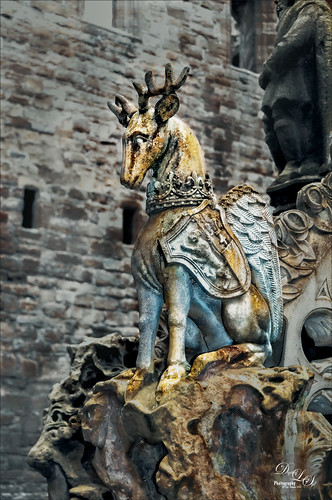
This image is of a a fountain built in 1538 by James V at the old Linlithgow Palace in Scotland – it has been known to flow with wine on a few occasions. This actual center fountain is not this colorful, but these colors came from the image itself so I imagine at some time it was quite beautiful. I loved the regal look of this deer statue on the fountain. On1 (see sidebar for website link) Photo Raw Effects 2018 made this image really nice and sharp – used Overall Settings filters of Dynamic Contrast (which really adds the nice detail to just the deer), Glow (47% opacity) and Color Enhancer, and Local Adjustments of Vibrance to just the deer at 57% layer opacity. On a stamped layer, Topaz ReStyle (see sidebar for website link) Zambezi Zest preset was applied. Nik Viveza 2, a Black and White Adjustment Layer and several Curves Adjustment Layers were used to get the final look. On a New Layer a white Spotlight Effect was added to the deer head to draw the eye. That was it. Wonderful place to visit and explore!…..Digital Lady Syd
Festive Water Lilies

These water lilies were shot at the Philip Hulitar Sculpture Garden in Palm Beach, Florida. I decided to add a little color to them so this is how I did it. First did just the basic adjustments and a little highlighting on the leaves in Lightroom. In Photoshop, Luminar 2018 (see sidebar for website link) was opened on a duplicate layer and the Silver Fade preset was selected. (These settings were then changed: Color Temp: Temp 49, Tint 42; Tone: Contrast 11; Smart Tone 35, Highlights -41, Shadows 20, White -13, Blacks 20; Sat/Vibrance: Sat -30, Vibrance 58; HSL – Hue Yellow -21 and Green -20/Sat Red 7, orange 4, Yellow -25, Green -25, Aqua 16, Blue 5, Magenta -7; Lum Red 7, orange 7, Yellow -2, and Blue 5; Filters Amount 61.) A New Layer was created in Luminar and the Details Enhancer filter was added (Small Details 44, Medium Details 42, and Large Details 27). On another New Layer in Luminar, the Dodge and Burn Brush Filter was selected (Amount 100; used the Darken brush at 50% and then 16% to paint in dark areas within the whole image; used Lighten at 16% Strength to paint in the light parts of the pin flowers). Thought I would give you the detailed info so you can see that Luminar 2018 can build up some interesting effects by using different filters on different layers within their own software interface. Back in PS, the Luminar layer was set to Overlay blend mode at 50% layer opacity. On a stamped layer (CTRL+ALT+SHIFT+E), Topaz (see sidebar for website link) ReStyle was used to give the beautiful overall color scheme – it was from one of the presets I had created a long time ago so I am not sure what original preset was used. On another stamped layer, applied Nik Viveza 2 which really lit up all the colors. One of my free Double Edged Frames – Photoshop Layer Styles was used to finish up – the frame colors were sampled from the image.
St. Giles Cathedral
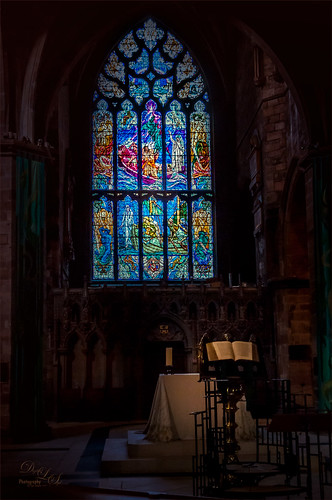
This beautiful stained glass image was taken at St. Giles Cathedral in Edinburgh, Scotland. In Lightroom used Serge Ramelli’s Bad Weather 9 preset as a starting point and added my own highlights and gradients. Not much was done in Photoshop – just some clean up, Nik Viveza 2 where 4 control points were placed in image with 2 on the glass and 1 on the Bible. A little noiseware was used on the image and a Gradient Fill Layer to darken the top slightly. That was it. There really is a lot of detail in the shot if seen at a larger size……Digital Lady Syd
A Beautiful View
Loved this view of the Scottish countryside taken from a window in Linlithgow Palace – this is the palace where Mary, Queen of Scots was born in 1542 and lived for 7 months but did not return for another 20 years. Lots of interesting history here. Started adjusting this image in Lightroom doing Basic Panel adjustments. In Photoshop on a duplicate layer, Lucis Pro (no longer available) was applied, then a black mask added and painted back just areas that needed more definition. On a stamped layer (CTRL+ALT+SHIFT+E) On1 Photo Effects was opened and the Color Enhancer filter, Tone Enhancer, and Textures was used to help especially in the sky area. On another stamped layer Nik Viveza 2 was applied to even out the lighting in the front foreground and midground areas. That was it!…..Digital Lady Syd
Looking for a Dragon Slayer
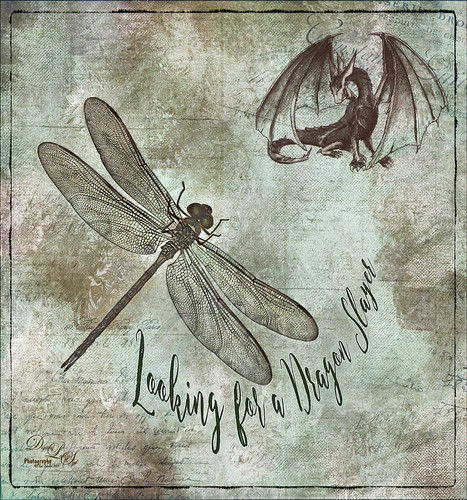
This is an image of a dragon fly that was sleeping upside down on the roof of my front porch. These bugs are huge – like 4 or 5 inch wing span! Anyway, got a good image so decided to play with it and see what effects I could get. What really surprised me is that the background actually came out inside the wings. The fly was selected using the Quick Selection Tool and then taken into Refine and Mask where this really nice detailed selection of the wings was created. A lot of textures were created. These textures were used: 2 Lil’ Owls (see sidebar for website link) Sea Storm Canvas and French Brocante 10 set to Soft Light, and Daily Texture Exploration 7 set to Multiply blend mode at 60% layer opacity. The Sharpen Tool was also used to sharpen the wings. The Dragon is a brush by Rob Marks. Nik Viveza 2 filter was used to even out the background. The font is called Enchanted Brush. Lots of fun to create!…..Digital Lady Syd
Trick or Treat!

Happy Halloween to everyone! Just thought I would post a little Halloween cheer using a photo taken at the local Lowe’s Garden Center. Sometimes the displays are more creative than what you see in the neighborhood! I am not sure what this little guy is but he sure is scary! So had some fun with this image. Started by selecting the subject and putting him on his own layer. Then underneath used Shadowhouse Creations Halloween Pattern 3 HP3 and topped it with Julia Dreams Halloween icons Pattern 1 – actually used the Blend If slider to get the strips to show up underneath by setting This Layer black tabs split to 131/174. It gave a really nice effect. Add the Machovka_bat and text – the Adrenaline Brush font with a Stroke Layer Style- were added. Color was added to the letters by clipping Pattern Fill Adjustment Layers to the three text files. Had to replace the font on the bowl as it was not very sharp and added the Old English Text MT font – a layer style was added using a Stroke, Inner Shadow and Outer Glow effects. On a Stamped Layer (CTRL+ALT+SHIFT+E), Nik Viveza 2 was applied to adjust the focal point of the image. Then a 50% Gray Fill Layer was used to Dodge and Burn with just a black or white brush. The cobwebs were placed in the subject’s eyes – Obsidian Dawn’s Halloween Vector Cobweb 10 brush was used. Last step involved add Halloween Cats Brush by altergromit (love this cat) – added a mask to pop him out of the bowl and added an orange Outer Glow Layer Style around him. That was it – check out some of these resources for other interesting Halloween items…..Digital Lady Syd
Happy Halloween

This Halloween grouping was taken at a local Lowe’s Garden Center on my Android – just could not resist the cuteness of these guys. I would love to have one of those straw looking characters but we do not get many Trick-or-Treaters here so no need to put outside. Anyway, since it was just a JPEG taken on the fly, the image itself needed some work. Only basic adjustments were done in LR, then in Photoshop the first thing done was to run the Shake Reduction Filter to try and sharpen up the edges a little. Next the background was removed using the Quick Selection Tool and Mask and Select command. One of my textures was placed underneath for a background. To further sharpen the image, it was taken into Lucis Pro (no longer available) and it really helped. On a stamped layer, Nik Color Efex Pro 4 using one of the Flypaper recipes presets to get this overall vintage feel – I forgot to write down which preset. So many of them looked good. Two inches were added to the bottom of the image and the Naive Deco Sans font was selected for type. On a New Layer a Mixer blender brush was used to smooth edges. Nik Viveza 2 was applied on a stamped layer to draw focus to the center pumpkin. Last step was to add a Curves Adjustment Layer for a little vintage feel to the overall image. Happy Halloween Everyone!…..Digital Lady Syd
Countryside Contentment
This image was take on the highway to Bath, England. I did not realize what a beautiful sky was in the image so I had not looked at it in Photoshop. Now I think it looks rather idyllic. This image actually took a lot of layers to get it looking the way I wanted: Topaz (see sidebar for website link) Studio was used to bring the contrast into the image and the Radiance Adjustment was used to get some very precise lines. Some spotlight effect was used to direct the eye and Nik Viveza 2. To warm the sky a Light Gradient using clear, yellow and pink colors was added to warm up the whole image. Blake Rudis’s gradient map vignette technique was used to finish up the image. (See my Yet Another Great Way to Create a Vignette! blog.) Overall a lot of fun to do!…..Digital Lady Syd
Smokestacks in New York City

The above image is from the Library of Congress and is an image taken of the Business District in Manhattan, New York City, cc1900. Shorpy.com showed it as a blog image and has posted some really interesting info about what buildings were in this original image. What intrigued me is the smoke from all the smokestacks and all the American Flags (I counted at least 160), most flying on top of the buildings. A lot of clean up was done first and the image had to be converted to RBG from Grayscale and reasonable size needed to be set. On a cleaned up stamped image (CTRL+ALT+SHIFT+E), Topaz Studio was opened and one of my uploaded Community presets (SJ Building Sharp) was applied. I did go through and tweak the four adjustments (Basic, Precision Contrast, Precision Detail, and Dehaze) in this preset, but it is pretty much the same settings. The last step in Topaz was to reduce the total effect in the sky – used a Mask Transparency of 0.33 with a brush and then added a Feather of 0.23 in the More Mask Options section. In Photoshop a Color Lookup FoggyNight preset added at 11% layer opacity and Linear Burn blend mode. Two textures from Flypaper were added: Alice set to Overlay blend mode and 100% layer opacity and Villa Adriana set to 36% layer opacity and Overlay blend mode. Last step was to open Nik Viveza 2 and add a little lightness on the buildings facing the sun and in the corners for a subtle vignette effect. Really fun picture to work with……..Digital Lady Syd
Going to Windsor Castle
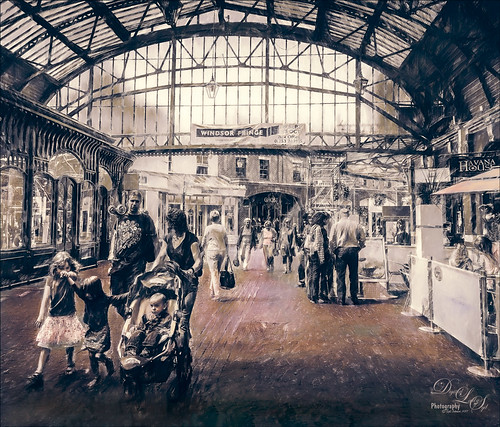
Enjoyed working with this image of a little shopping and restaurant area that led into Windsor Castle in England – lots of different tourists. I find this kind of image totally entertaining! Will just go over the basics as a lot of work went into this image. Mainly did basic adjustments in Lightroom including converting it to black and white. In Photoshop the image was taken into Topaz (see sidebar for website link) Studio where Precision Detail, Color Theme where some color was added back in some different gray color tones, and Impression where the default was used and the Painting Progress slider set to 0.43 – that is why it is not overly painterly. Added a little pink color, a Nik Viveza 2 filter to clean up some of the lighting issues, several Curves Adjustment Layers, and a Color Lookup to add more pink tones in. On a stamped layer applied Topaz ReStyle’s Wedgewood Blue and Tan preset set to Color blend mode and a Levels Adjustment Layer for final adjustment of contrast. It took a lot of tweaking as the people looked too crisp with some of the settings. I just really liked the feel created by the glass dome and all the activity. Lots of fun…..Digital Lady Syd
On Safari
This image was taken at Universal Studios-Florida in a gift shop. I thought it was a very interesting display. Just followed one of my basic image workflows for this one. First selected the display from the background. Then added underneath a Texture from 2 Lil Owls (see sidebar for website link), a texture I created a long time ago set to Darker Color at 46%, and an object of just vertical lines on top of it set to 46%. The actual cut-out layer was opened in Lucis Pro to get the almost illustrative effect. Then some clean up layers and Nik Viveza 2 to direct the eye properly. A Red Channel Luminosity layer, Topaz (see sidebar for website link) ReStyle’s Ash Gray and Eggshell on another layer, and a Camera Raw Filter to add grain were the final steps. That was it. I really like the overall effect…..Digital Lady Syd
Abandoned Texaco Station
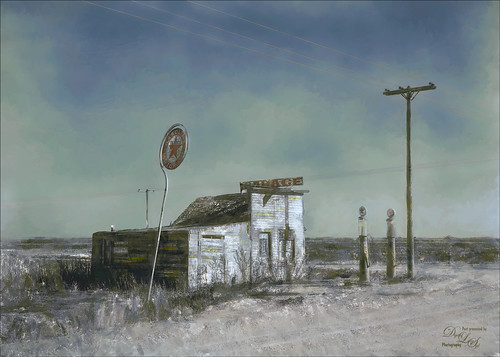
I found this image of an abandoned gas station in 1937 on Highway No. 2 in western North Dakota at Shorpy’s Historic Photo Archive but downloaded the original as a tif file from the Library of Congress. Seemed like a perfect candidate for colorizing in the new Topaz (see sidebar for website link) Studio. When working with these vintage black and white images, you always need to first adjust the resolution and resize it in Photoshop by going to Image -> Image Size command – set to a resolution of 300 by unchecking the Resample button, inserting 300, then rechecking the button to change the size. Next duplicated the layer in PS and opened up Topaz (see sidebar for website link) Studio and selected my SJ Colorize Black and White Image preset (it is up on the Community Site). Then added: Reduce Noise Adjustment and painted out the foreground in a mask so it only affected the sky; Dehaze Adjustment set to a Strength of 0.39 and Suppress Artifacts to 0.82; and Impression Adjustment using the Default settings changing the Stroke type to Stroke 09 and set the Painting Progress slider to 0.27. Back in Photoshop just did my normal workflow although it took a little more work. Used Nik Viveza 2 to adjust the overall image and several painting layers to smooth out the sky. Lots of fun here!…..Digital Lady Syd
Watching the Sky
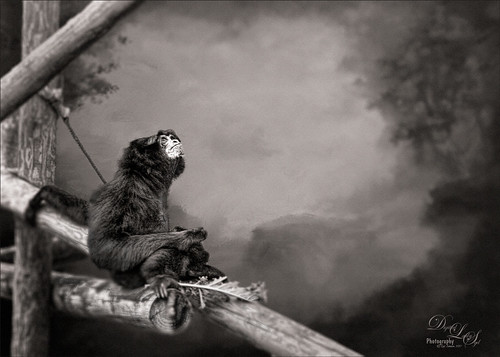
This Siamang Ape lives at the Palm Beach Zoo – he has just finished his breakfast and is getting ready to run to the top of the trees and announce the opening of the Zoo for the other animals. The technique used in this image was presented in a video by Glyn Dewis called Use Photoshop to Take a Picture from Good to Great in 5 Steps – it is based on an effected created by wildlife photographer Nick Brandt. One of my Corel Painter backgrounds was used as a background placed under the ape image. Then used a layer mask to remove the original background. Then basically sharpened the image and then blurred the image in selected areas of the image. Last step involved adding grain into the image. The video goes through most of this. This was a lot of fun to try! Thank you Glyn Dewis for showing us how to do this!….Digital Lady Syd
Beautiful Clouds at Stirling Castle
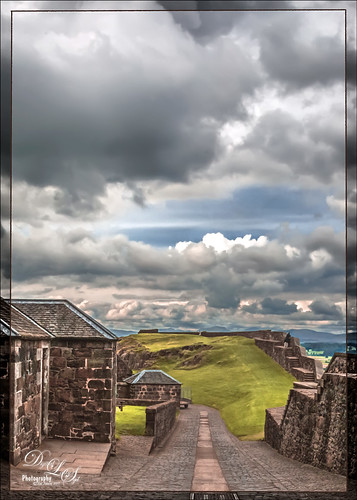
This image was taken at Stirling Castle in Scotland. The sky was so dramatic that there were many different ways to process the clouds, but I settled on a less dramatic and more sunny feel to the image. It was actually quite an overcast day when this image shot. There was not a lot done to this image. Biggest problem was some noise – both Luminance and Color so Adobe Camera Raw was used to clean it up. I can’t remember the last time I had color noise so this was unusual. On a stamped layer, Lucis Pro was applied and the clouds were painted out in a layer mask to keep them from being too crisp. Nik Viveza 2 and a Red Channel Luminance Adjustment Layer was added. Then I realized I had a slightly crooked image so PS Adaptive Wide Angle Filter was used to straighten it up just a little – worked perfectly! (See my How to Use the Adaptive Wide Angle Filter blog.) Then a border was created using single line rectangle, selecting the outside, adding a layer mask to a stamped layer, and clipping a Black & White Adjustment Layer on top. That was it. What a wonderful place to visit!…..Digital Lady Syd
Feeling Happy
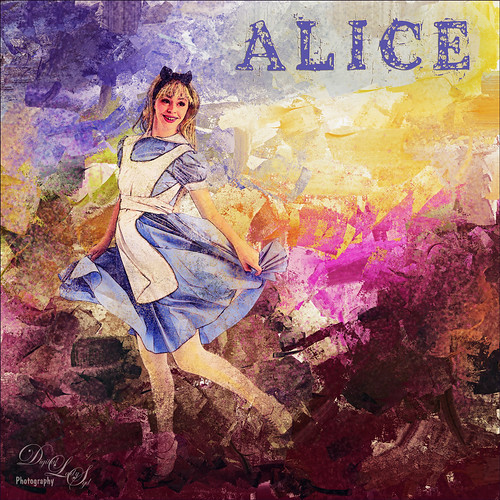
This is a composite image that I created using stock images and a texture I had created in Corel Painter. The beautiful Alice is from Faestock on DeviantArt. The first step was to create a New Document set to 8 inches X 8 inches at 300 dpi. Next the stock image of Alice was added and the girl was selected and removed from the white background. On this cut out image, an effect used by Corey Barker at Creative Live during the 2017 Photoshop Week was applied. I cannot seem to find another source for this effect but Corey has used similar effects in Photoshop User Magazine and a Kelby One blog. Anyway, the basic effect gave Alice a rather gungy look using different brushes in layer masks. The Alice layers were put in a group. Then the texture was added underneath the group. Selective Color Adjustment Layers and a Curves Adjustment Layer were used to blend this all together. Nik Viveza 2 was added to draw focus to her face. The font is the Old Printing Press Free Version. It is fun to make just a care-free image that makes you smile!…..Digital Lady Syd
The Whisker Cactus
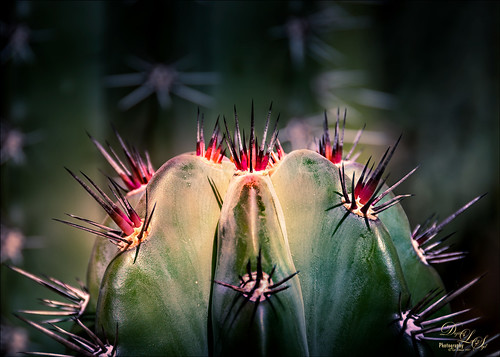
A local hotel in Phoenix, Arizona, labelled this a Whisker Cactus – the red spikes are at the top of the stalk. They had this wonderful cactus garden with several different types. Unfortunately I did not have my macro lens with me, but this image has a pretty nice macro feel to it. A lot of the post-processing was done in Lightroom using the Bad Weather 8 preset by Serge Ramelli with adjustments to the Gradient Filters and Radial Filters. In PS, Lucis Pro (no longer available) was used to just add some texture and sharpening into the cactus only. Nik Viveza 2 was used to emphasize the plant colors. Matt Kloskowski’s technique was used to create a vignette. (See my How to Create a Subtle Vignette blog.) On another layer the Sharpen Tool and Blur Tool was used selectively and a 50% gray Dodge and Burn layer was used on the focal point areas. That was it. These cactus are pretty but incredibly sharp!…..Digital Lady Syd
Enjoying a Flower
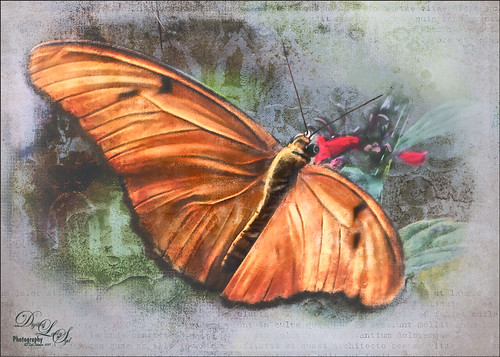
Love this Julia Longwing Butterfly – have never seen one like this around my home. The image was taken at the Palm Beach Zoo which is much further south in Florida. This male butterfly actually lives several months and loves the Passion Vine. The image was cropped way down to emphasize the butterfly. Then Lucis Pro (no longer available) was opened to sharpen up just the butterfly. On separate layers the wings were painted mainly using Gruts (see sidebar for website link) NM Pans Attic brush. 2 Lil’ Owls (see sidebar for website link) Dream freebie texture was set to Hard Light at 70% layer opacity. In a layer mask the butterfly was painted back. Kim Klassen’s 2170 with Script texture (not sure it is available anymore) was used around the butterfly. Nik Viveza 2 was applied to adjust the coloring in the image. Next Topaz (see sidebar for website link) Lens Effects’s Diffusion filter set to Moderate was applied. A black layer mask was added and just the diffusion effect was applied to the wings and flowers. A Color Lookup Adjustment Layer was added and the Crisp Winter preset was selected. It was set to Hard Light and 27% layer opacity. I decided the color palette was not quite right, so on a stamped layer Topaz Restyle was opened up. A preset was made of the image and then the colors in the palette were just slightly adjusted to get the final look. (See my How to Use a Topaz ReStyle Trick for Improving Your Image blog.) Wish these little beauties were in our local…..Digital Lady Syd
Bird of Paradise
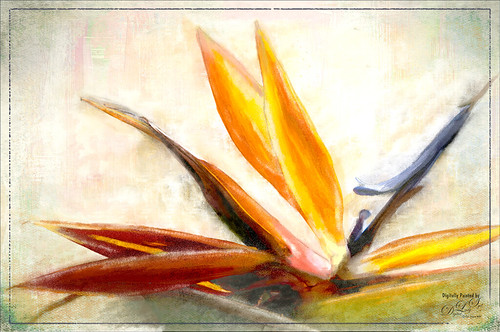
I currently have a couple Bird of Paradise blooms on my plant so had to get a few images. This one was extracted in Photoshop and then painted in Corel Painter before bringing back into Photoshop and finishing up the detailing of the flower and adding texture. One of my Pastel textures created in Painter was placed under the flower. Then several layers were placed above using several of my SJ-3 Pastel brush variations (see my How to Create My Favorite Brush blog) and Grut I Qwillo brush (or see sidebar for link to all his brushes) to create the outline. 2 Lil’ Owls (see sidebar for website link) Color Bokeh Grunge Set-3 was added and the flower painted out on a layer mask. On a stamped layer (CTRL+ALT+SHIFT+E) Nik Viveza 2 was used to emphasize the focal point. Did not like the painted strokes completely, so added a few more layers and used Grut NM Tick Tumble to smooth out color in several places. A Sebastian Michaels edge was added. It is fun to paint these beautiful blooms!…..Digital Lady Syd
The Golden Dragon
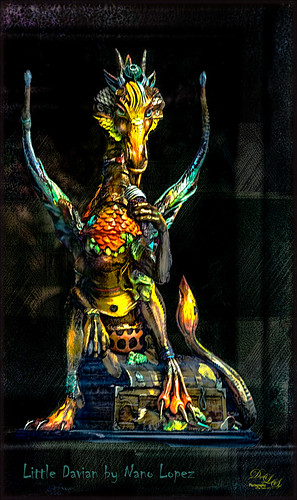
I had never seen a Nano Lopez sculpture until my recent visit to St. Augustine where the James Coleman Gallery had it displayed- this piece is called Little Davian. I shot this beauty through the front window in bright daylight so it took a lot of cleaning up to get rid of the reflections . I thought that the dragon was singing into a microphone but he is actually eating a “Dragon Berry” ice cream cone! Need to check out all Nano’s work – it is amazing! I will give you a quick run down of what was done to the image, but many steps were involved to get an effect I liked. First the dragon was run through Lucis Pro (no longer available) to get the edges defined better – it does not really sharpen but gives a similar look. Then PS Select and Mask command was used to extract the dragon from the background. To get the interesting cyan texture on the right side, a grunge type object created in Corel Painter was placed behind the extracted dragon, set to Soft Light and 52% layer opacity. A Hue/Sat Adjustment Layer was clipped to the layer and set to a Cyan color. A Darken/Lighten 50% gray layer was added. Nik Viveza 2 was used to adjust the color and tone throughout the image – this helped fix the glass reflection problem. Topaz (see sidebar for website link) Clarity was used on just the dragon. A Spotlight Layer set to Overlay blend mode was used on the dragon head. 4 Light Leaks were used on the edges – top and bottom set to a little dark red color, right side cyan and left side a warmish orange. 2 Lil’ Owls (see sidebar for website link) Color Bokeh Grunge Set – overlay 6 was set to Divide blend mode at 40% layer opacity to darken the edge of image. The font is called Chiller. Last step involved adding Topaz Detail 3 – just gave the overall image some sharpening and emphasized the background texture. Obviously my image does not do justice to the actual beautiful piece created by the artist, but it was a joy to work on the image!…..Digital Lady Syd
The Red Lion in the Tower
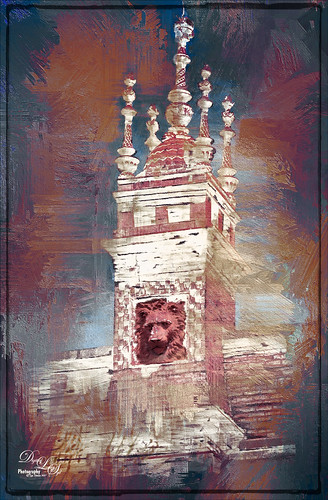
Took this image recently in St. Augustine of the back of the Alcazar Hotel (Lightner Museum) showing one of the beautiful red clay lions. Henry Flagler had these lions placed over both this hotel and the Ponce de Leon Hotel (now Flagler College) exteriors. To begin in PS, a free action by Chris Spooner called Engraved Effect Medium was used on the whole image. Lots of clean up with a mask. Then Topaz (see sidebar for website link) Impressions2 using a Van Gogh preset was applied and the effect was painted off back in PS on the lions face. Melissa Gallo’s Painted Textures Mist on the Lake (no longer available)) was applied twice – one set to Normal and one to Linear Burn at 55% layer opacity. A Hue Saturation Adjustment Layer was used to adjust the color. Then a stamped layer was created (CTRL+ALT+SHIFT+E) was placed on top and taken into Topaz ReStyle using the Cream and Plum preset (one of my favorites) was applied to the image and set to Hue blend mode at 76% layer opacity. On another stamped layer Nik Viveza2 was applied to adjust the contrast just right. Last step added just a simple line border. That was it. I love these beautiful clay lions – they are so striking!…..Digital Lady Syd
Hitching a Ride

This image was taken at the Jacksonville Zoo – this little guy was hitching a ride across the large field for the Lowland Gorillas. The image was first processed in Lightroom using Seim’s Magic – Harsh Sun Fixer preset and then adding Dave Delnea’s Backlight 002 Horiz preset to it to give the interesting lighting effect. Dave’s preset was adjusted before sending the image to Photoshop. Adding this kind of lighting can really pop a boring image. In Photoshop Topaz (see sidebar for website link) Detail 3 was applied using my Little Med Large Detail preset – added a black layer mask and painted back the detail just on the back of the gorilla and the little gorilla. On a stamped (CTRL+ALT+SHIFT+E) layer, Nik Color Efex Pro 4 was added using these filters: Darken/Lighten Center, Color Effex: Vintage set to Film Type 2 and 82% overall opacity, Brilliance/Warmth set only to Warmth at 32%, and Glamour Glow to soften the image a little. Nik Viveza 2 was used to adjust the lighting on the gorillas. I love post processing and painting images from the zoo!…..Digital Lady Syd


