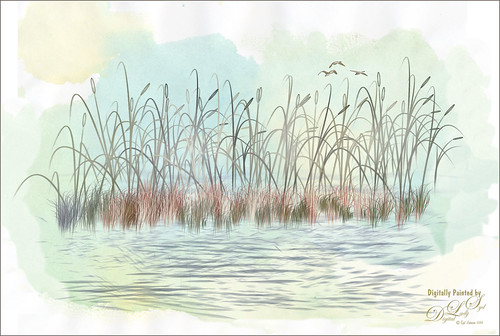
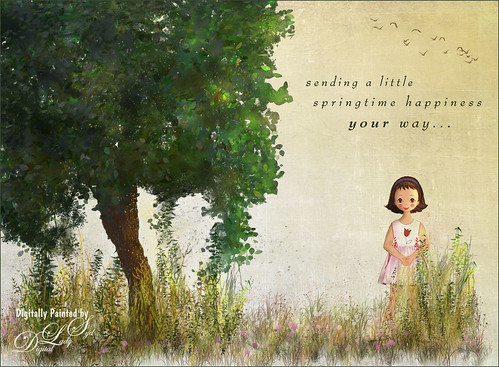
Anything Photoshop or Photography

Latest

A Wintry Scene

Wintry Scene Image I painted
This is just a another image I created using mainly Aaron Blaise’s Foliage and Water brushes in Photoshop. In Painter some of the snow effects were created using Gel’s 2009 Holiday brushes and Fay Sirkis’ blender brushes. The Impasto sky was created using on one of Melissa Gallo’s brushes. In Photoshop three snow layers were added and Shadowhouse Creations Assorted Brush set tree brush 4 for background effect. As you can see, this is made up of a lot of different brushes and a little of my own painting. Not sure why I went wintry today, but it was a lot of fun to do…..Digital Lady Syd.

A Little Watercolor Fun

Image of water painted in Photoshop
Just totally having some fun with this one. Used the brushes from my How to Create A Magical Feel in Photoshop blog – really enjoying both Aaron Blaise‘s brushes and Frostbo’s Brush Grass Set 2 brushes. The birds brush was from Obsidian Dawn and the background water is Sad Monkey Designs Watercolor 22. Just played around and ended up with a pretty little watercolor……Digital Lady Syd

Trying out Very Wet Watercolor Brushes in Painter

Corel Painter image using Wet Watercolor Brushes
This is just a short quick blog to explain the above image. I did a Bob Ross type image using Skip Allen‘s wonderful Working with Very Wet Watercolor Variant Videos as a guide. I had never used watercolor brushes that run like traditional paints – they actually make your computer really “chug-a-long,” but Skip explains how to get around those hurdles. The above pretty much followed his videos, except I switched over to Photoshop to add the textures. I am much more comfortable using PS for this part of the process. The textures used were Frenchkiss Collections (see sidebar for website link) Artiste Autumn Fauve set to Hard Light at 65% layer opacity for the adding in the nice yellow and brown tones, and Painted Textures Olive Canvas (from one of Melissa’s workshops) set to Hard Light at 100% layer opacity which is basically a pretty soft plain greenish texture. A Curves Adjustment Layer was used to add some contrast back into the image. On a New Layer, Kyle’s Real Watercolor Big Rough Textured mod brush was used to darken down the left side of the mountain a little more. It was set to Soft Light blend mode. Just wanted you to see that you can add in a few more strokes in Photoshop to fill out areas that did not stroke correctly in Painter. That was it. Apparently people add chops to this, but I do not know how to do this yet. I would recommend you check out Skip’s tutorials and free brushes if you get a chance…..Digital Lady Syd

Beautiful Maize

Image of Drying Corn from the Native American Festival
Loved this hanging batch of colorful corn or maize taken at the recent Native American Festival in Ormond Beach, Florida. In Lightroom Seim’s (see sidebar for website link) Workflow DreamScape preset was applied. Next Topaz (see sidebar for website link) Detail 3 was applied using just my basic Little Medium Large Detail preset (Medium Details 0.38, Large Details 0.16, and Contrast 0.30) where a black layer mask was added and just the corn was painted back. The background needed to remain soft. On several layers above a lot of clean up was done as the background was full of distractions. On a stamped layer (CTRL+ALT+SHIFT+E), my Topaz Impression Abstraction preset was applied (Stroke Type 12, Brush Size 1.00, Paint Opacity 0.38, Stroke Rotation 0, Stroke Color Variation 0, Stroke Width 0.85, Stroke Length -0.50, Spill 0.72, Smudge 0, and Coverage 1.00; Color Overall Hue 0.14, Sat 0.23, and Lightness 0.06; Red Lightness 0.14, Yellow Sat -0.11, and Green Lightness -0.36; Lighting Brightness 0.13, Contrast -0.23, and Vignette 0, Light direction X 0.34 and Y 0.05; and Texture Strength 0.19, Size -0.43, and Canvas I, Background type white solid and Background White). This layer was duplicated and taken back into Impression where the Ethereal Background by Blake Rudis preset was applied. A white layer mask was added and just the corn was painted out where I did not want the blurred effect to occur. This layer was set to Linear Burn at 53% layer opacity. On a new Stamped Layer, Nik Viveza 2 was applied to further enhance the focal point. It is so much fun to use the different filters to get different effects…..Digital Lady Syd

Digital Lady Syd Related Blogs:
How to Get the Most Out of Your “Not-So-Great” Images – contains link for Topaz Impression’s Ethereal Background by Blake Rudis

Sailing!

Painted image of saiboat on ocean
Totally love these new inexpensive Photoshop brushes I purchased from Aaron Blaise’s (a former Disney artist) website. This image used both his Water Brush Set and his Cloud Brush Set. (Check out his videos as he gives lots of just great digital painting tips throughout his demos.) This image was composed of one Cloud layer using his SB 46-12 brush (a major cool cloud brush) and three Water layers using three brushes: his SB 44-13, a really nice larger waves brush, SB 45-13, smaller sized waves for more distant effects, and SB 50-40, a very flat thin wave effect that could be used for horizons or fill in color waves. The sailboat is from Vector Art Box – set to a 40% layer opacity to give a slightly dimmed look. The layer was set to Multiply at 100% layer opacity, then duplicated and set to 21% layer opacity just to make the boat show just right. Last step was a Curves Adjustment Layer to add a little contrast to the image. Done! This was so easy to create and it is so much fun to use these brushes……Digital Lady Syd

Digital Lady Syd Related Blogs:
Just Some Photoshop Fun This Week!
How to Create a Watercolor/Ink Image in Photoshop

What the Worm Saw

Image of a hibiscus from below
This was a macro image I took for a Photo Club Theme called What the Worm Saw. I did not submit it (got a little over creative actually and tried something not so great). This is the underside of a Red Hibiscus bloom and I just liked the result. Used Topaz (see sidebar for website link) Clarity to sharpen it overall. Used Nik Silver Efex Pro 2 to turn it to black and white. Next a Color Balance Adjustment Layer was used to add a little green in the Midtones. Painted Textures Trees in May texture was added next with a layer mask and the bloom and leaf were painted back in the mask. A Nik Viveza 2 filter was added to emphasize the focal point of the image. To get the pinkish tone on the flower, a light pink gradient layer was placed on top. The last step was a Curves Adjustment Layer to get back a little contrast. Something a little different for me…..Digital Lady Syd

A Little Cherry Tree

Image of a Cherry Tree painted in Corel Painter and Photoshop
Have not painted in a while so decided to give it a go. I wanted to paint a Cherry Tree since I lived in the Washington, DC area for many years and miss seeing them this time of year. The original image was created in Corel Painter 2015 on just the Canvas and using 9 different brushes on a Plaster Paper. This image was brought into Photoshop where a Clean Up layer was created. Three other layers using some of Aaron Blaise Foliage Brushes were added to soften some of the sharp edges mainly around the water and on the plants. A Motion Blur set to 4 was used to soften the graphic look os his brushes. Nik Viveza 2 was used to reinforce the focal area in the tree and a Level Adjustment Layer was added to make sure the contrast was correct. That was it! It was a lot of fun to get back to painting, but I still like to go between the programs……Digital Lady Syd

A Tuscan Blossom

Image of a Yellow Hibiscus Blossom with a touch of a Tuscan Feel
Just loved how this little Yellow Wing Hibiscus blossom image turned out. Did very little to the original image other than apply 2 Lil’ Owls (see sidebar for website link) Spring Whispers 4 preset and sharpening of the shadow stamen. On a duplicate layer of the background, Topaz (see sidebar for website link) Clarity was applied using John Barclay’s Basic Settings preset (see My Glowing Porch Flowers blog for settings). Next went into OnOne’s (see sidebar for website link) Perfect Effects 9 and applied the PE4 Vintage preset. I believe that OnOne gave it away with an earlier version, probably Perfect Effects 4. Next Topaz Impression was opened and the new preset created from Blake Rudis’s blog called Ethereal Background was applied next (see Blake Rudis video called Atmospheric Backgrounds with Topaz Impression). A New Layer and some clean up was done, especially a little Mixer Brush painting on some of the edges to smooth. Painted Textures Creamsicle texture was applied (not sure this texture is still available) set to Linear Burn blend mode at 73% opacity. A Hue/Sat Adjustment Layer was clipped to the layer and the Saturation set to -56 so there was not a lot of color added to the image, just texture. A Curves Adjustment Layer was added to add back some contrast and the last step was Nik Viveza with a control point on the focal point, or for me the stamen shadow. It was fun to experiment with my arsenal of filters!…..Digital Lady Syd

A Reflecting Wood Stork

Image of a Wood Stork at the Viera Wetlands
I guess this is what birds do when they are reflecting on their lives. Hum… Anyway, just the different iteration of an image I posted in my Fun Photoshop Blog recently (see How to Get the Most Out of Your “Not-So-Great” Images blog). I wanted to show how interesting it can be to change up an image just by running the same filter effect twice on the it. I used the same settings from my linked blog for the Flaming Pear Flood filter and Topaz (see sidebar for website link) Detail 3 using the same Soft Leaves preset. But this time the same Detail filter was applied twice using the same preset to get this sort of dreamy, natural effect. It gave the image a totally different feel. So this is just another example of how to change the ordinary to extra-ordinary!…..Digital Lady Syd

Hiding Out with a Red-Winged Blackbird

Image of a Red-Winged Blackbird at Viera Wetlands
This beautiful bird was hiding in the brush at the Ritch Grissom Memorial Wetlands in Brevard County, Florida. I had not seen one in a long time. Not that much post-processing on this one. In Lightroom applied Seim’s (see sidebar for website link) Classic Holga preset. Opened in Photoshop and Topaz (see sidebar for website link) Detail 3 was used to give the photo a little more depth of field feel and the bird was painted out in a layer mask. The Sharpen Tool was used on the bird. Added Topaz Glow set to Soft Light. Nik Viveza 2 was used on the bird and Photoshop’s Camera Raw Radial filter was used to get the pretty vignette. Pretty standard workflow here……Digital Lady Syd