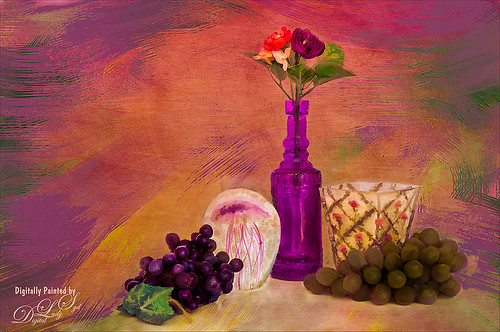
Enjoyed painting in Photoshop this set up still life I put together. Topaz (see sidebar for website link) photoFXLabs was used to add the Painted Works Texture and on separate layers above, the mixer brushes were used. The final texture was placed on top and was Jai Johnson ‘s watermelon-wall set to Soft Light. In the Layer Styles dialog, the Blend If Underlying Layer black tab was set to 88 to get the glowing effect. Nik Viveza 2 was used to direct the focal point, a Levels Adjustment Layer and Curves Adjustment Layer were used to finish it off. I really enjoyed painting this image…..Digital Lady Syd

Latest
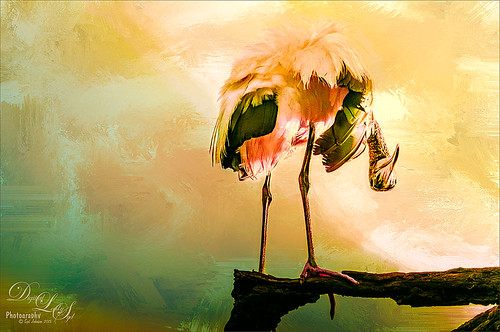
Heron Checking Out the Gathering Crowds
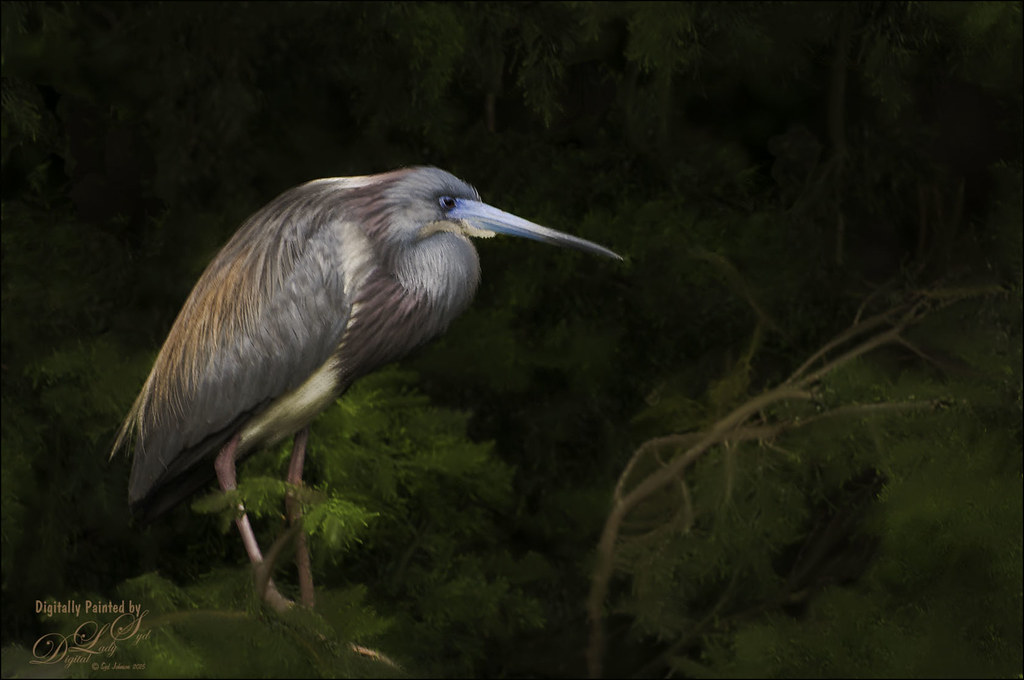
This beautiful bird was standing watch at the St. Augustine Alligator Farm Rookery recently. Had to paint him. Been experimenting with the Photoshop Mixer brushes recently. What was more important than painting the bird was toning down the background so a very basic type Mixer brush was used to smooth out all the patterning behind the bird. The bird was also smoothed out a little, but the feather and face detail was painted back slightly so you can see the detail in them. A Levels Adjustment Layer was the last step to add contrast back into the more flat looking painted version. I love painting the birds from the Rookery!…..Digital Lady Syd
Digital Lady Syd Related Blogs:
How to Use Texture to Remove Distracting Nature Backgrounds
Taking Off From the Rookery Runway
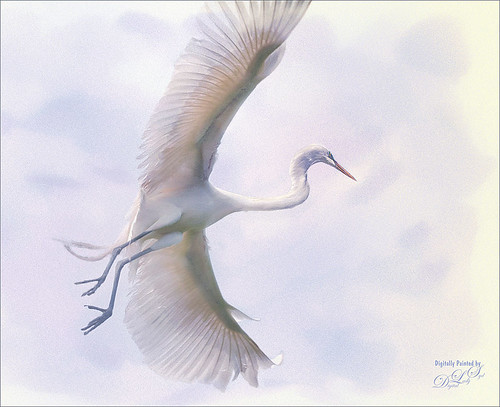
I have photographed similar images to this one of a Great Egret, but I never get tired of it. These birds are just beautiful, and in flight, even grander. This time I used a new technique from one of my favorite texture people and nature photographer. Jai Johnson recently created a video called Peach Blush Texture Demonstration on her techniques for getting her exquisite images. The one caveat is that she uses Topaz (see sidebar for website link) photoFXeffects, which I love, but does not work with CC2014 – therefore you must use CC or CS6 to use the PS interface. She also does not use Photoshop, but does all her work in the stand-alone of this interface. In Jai’s case, it does not matter as she has figured out some incredible ways to get a painterly effect by using basically the photoFX’s mask feature. I had a lot of fun doing this, but it took a while to get this correct effect. The background was one I created in Painter, and the overall grainy effect was created by setting the FX plug-in layer to Dissolve at 64% – it really give the painterly look. I used Nik Viveza 2 and a Curves Adjustment Layer to do final adjustments. Totally love the results I got using her technique. Thank you Jai!…..Digital Lady Syd
Digital Lady Syd Related Blogs:
Digital Lady Syd’s Review of Topaz photoFXlab v1.1
Courting Herons
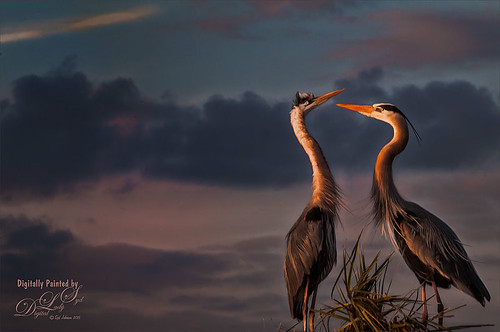
These two beautiful Great Blue Herons were in the middle of a mating ritual in their new nest on top of a palm tree during a recent visit to the Ritch Grissom Memorial Wetlands in Brevard, Florida (also known as the Viera Wetlands). Image was painted with the Mixer Brush – mainly just blending. Since the bird on the left was missing an eye, I had to copy the one from the right over, flip and adjust into the eye socket. Topaz Glow’s Room Glow preset by Blake Rudis (check out Integrating Topaz Glow into Your Workflow for info on this) was applied and set to Multiply blend mode at 48% layer opacity. Nik Viveza 2 was used on the background to even it out just a little. Since the lighting was perfect, there was little else that needed to be done. What beautiful birds!…..Digital Lady Syd
Digital Lady Syd Related Blogs:
How to Get the Soft Glow in Topaz Glow
Thinking of Pink Tulips

This is an abstract I painted from some beautiful tulips that was taken with my phone. It was first painted in Corel Painter using just some very basic strokes. A Karen Sperling texture brush from back when Painter 11 was popular was used. Color were just block in. Then the image was taken into Photoshop and on a New Layer a sketch brush was used to define the form in a few places. A Curves Adjustment Layer was used to add a little contrast. A stamped layer was created and turned into a Smart Object. Nik Viveza 2 was opened and the pink flower in the middle was accentuated to further emphasize the focal point. The last step involved adding a New Layer on top and in white, add a few spatters using Kyle’s Real Watercolor-Spatter Mixed and set to a low layer opacity to add just a little texture in certain places. Very simple to do…..Digital Lady Syd
Where Are My Eyes?
This image was taken at the St. Augustine Alligator Farm website link. I don’t know anything about it, just that it greets you when entering the attraction. Very little was done to this image. In Lightroom Trey Radcliff’s Dramatically Clean Chipmunk preset was applied. In Photoshop Topaz (see sidebar for website link) Impression’s Turner Storm II preset was applied. A white layer mask was added in PS and a little bit of the lighter areas were painted back in the face to draw some focus to it. On a stamped layer (CTRL+ALT+SHIFT+E) that was converted into a Smart Object, Nik Color Efex Pro 4 was opened. The Graduated Neutral Density filter selected (Upper Tonality -25%, Lower Tonality 7%, Blend 27%, Vertical Shift 43%, Rotation to adjust the light 158 degrees, and Highlights 1/4 of the way to right). In the same Smart Object Nik Viveza 2 was applied. A Focal Point was added to the eyes and nose area (Brightness 33%, Contrast 40%, Saturation 38% and Structure 58%). Two Curves Adjustment Layers were added – one a darken curve to separate the head from the busy leaf background, and one to add contrast to the face since an S-shape curve was used. Both layer masks were turned to black (CTRL+I inside the mask) and just localized areas were painted back with a soft white brush at 17% brush opacity. Last step involved adding a New Layer and actually painting in some color where it was needed using a very low opacity brush (12%) and sampling in the image to match areas. That was it. Lots of fun to do!…..Digital Lady Syd
Beautiful Spring Flowers!

Just a little digital fun here with a phone image taken at the local Lowes Home and Garden Center. I recently purchased an inexpensive introductory Corel Painter video on Painting Portraits from Corel Master Karen Sperling. It comes with some of her great brushes – found one I really love! I had to reduce the size of the brushes since the image size was reduced to make Painter run smoother for me. I also added Topaz (see sidebar for website link) ReStyle’s Zambezi Zest preset as a source image before starting as I liked the color palette it gave me. Overall I was very pleased with her video and brushes, and it was fun to try out a new technique. This is a very easy way to get started learning Painter. Also I added afterwards in Photoshop the two Curve Adjustment Layers technique for dodging and burning that I blogged on recently. Loved the results!…..Digital Lady Syd
Digital Lady Syd Related Blogs:
How To Use Curves Adjustment Layers To Dodge and Burn an Image
Bear Checking You Out!

This image is of the bearskin that is usually at the Native American Festival in Ormond Beach, Florida, this year. In Lightroom Seim’s (see sidebar for website link) Magic Harsh Sun Fixer preset was used. In Photoshop on a duplicate layer, Topaz (see sidebar for website link) Detail was applied to overall sharpen. Topaz Impression was applied using Oil Painting by Jim Salas (light direction was changed to fit image and Texture Strength slider set to 0 since textures were added to image outside of plug-in). A couple of Flypaper Textures were applied. Then I really cropped image in to get a close up of the face. The final step involved adding my favorite filter Nik Viveza 2. Control points were placed on the nose to enhance the color and sharpen it a little to draw the eye to that part of the image. This was originally a great big image that I could not get a look I liked so the crop really made the image…..Digital Lady Syd
Here’s Looking At You
I really love these big gentle birds. This wood stork was giving everybody some serious eyeball at the St. Augustine Alligator Park recently. In Lightroom just did the Basic Slider adjustments and applied Dave Delnea’s Backlit Vertical Right and Custom Tone 002 presets. In Photoshop Topaz (see sidebar for website link) Detail 3 was applied next for overall sharpening. Topaz Glow was applied on a stamped layer. A Selective Color Adjustment Layer was added where just the Yellows were changed. Nik Viveza 2 was opened on a stamped layer and a control point was placed on the head to add more detail. Painted Textures Sunrise Canvas texture was set to Linear Burn at 50%. In the Layer Style the Blend If white tab was set and split to 190/212. Some clean up layers were added throughout to sharpen up various areas. I really liked the artsy look this bird ended up having!…..Digital Lady Syd
Singing Spoonbill Duet Takes Rookery by Storm!

Recently our Photo Club took a trip to the St. Augustine Alligator Farm’s Rookery to check out the birds. What a riot, as usual. I had never gone quite this early so the birds were doing a lot of mating and nest building, but not a lot of babies yet. It was total craziness and the Roseate Spoonbills were in all their splendor. I had never had a chance to see this many at one time and they were practically tame! They would get so close you could hardly focus your camera. Needless to say, it was a great time. These two birds were either doing mating clacking song, or totally entertaining the photographers. I was less than 5 feet from them and they were there all morning.
This image was mainly just sharpened up a bit and the basic tonal correction was done in Lightroom. In Photoshop Topaz (see sidebar for website link) Clarity using John Barclay basic settings preset (Micro Contrast 0.36, Low Contrast 0.20, Medium Contrast -0.11, and High Contrast -0.23) was applied. On a stamped layer (CTRL+ALT+SHIFT+E) Topaz Glow was applied using my SJ Mysterious II Water preset (Primary Glow: Glow Type Dark, Glow Strength 0.30, Effect Sharpness 0.63, Electrify 0.14, Simplify Details 0.17, Edge Color 0.28, Detail Strength -0.06, Detail Size 0.20, Brightness -0.56, Contrast 0.44, Saturation 0.00, Line Rotation 0.00, and Glow Spread 0.00; Secondary Glow: Glow Type Light, Glow Strength 0.00, Effect Sharpness 0.22, Electrify 0.03, Simplify Details 0.00, Brightness 0.45, and Contrast 0.64; Color Overall – all set to 0; Red RedSat 0.34; Orange Sat 0.33; Yellow Sat 0.03 and Lightness -0.29; Blue Sat 0.42 and Lightness -0.43; and Magenta Sat 0.75 and Lightness -0.35) set to Strength 64% and Overlay blend mode in the plug-in. A clean up layer was placed on top to clone out a few distracting bush edges and that was it. This was a really fun image to take!…..Digital Lady Syd
Topaz Labs AI Gigapixel
Check out AI Gigapixel stand-alone software for upsizing your images. It’s incredible! And it can now be used as a plugin when in Photoshop. Also Topaz Labs Photo AI has some great sharpening and denoise tools along with Photo Video AI.

Luminar Neo
Click here to visit Luminar for more info and check out their new AI Filters.

GRUT BRUSHES – Photoshop Brushes for Digital Artists
Click here to visit GrutBrushes.com
And be sure to check out his Free Brush of the Week and Brush Sampler! These are the best brushes you can find!

Topaz Studio 2 and Legacy Topaz Labs Filters
Unfortunately Topaz Studio 2 and other Topaz Lab filters are no longer available for sale as of 2020. If you had bought these filters and would like to put them back on, here is a link to the Legacy Apps where they can be downloaded again. Below is an example of the wonderful Remix AI Filter from Studio 2. The wonderful Impression still works fine in Photoshop right now along with Adjust (all versions), ReStyle, and even PhotoFXLab!

On1 Photo Raw
Wonderful software to use as a substitute for or plugin with Photoshop. Many great filter effects and lots of AI capabilities!
