
Just had some fun taking some pictures at Ohe’o Gulch (also called Seven Sacred Pools) on Hana Highway in Maui, Hawaii, a while back. The original image was much larger with people standing on top and swimming below! Very popular place! Note: people are not encouraged to dive or jump into the water here as it is very hazardous and many fatalities have occurred. Just wanted to see if I could get a nice waterfall effect using an old tip on how to smooth out waterfalls. (See my Smoothing Out Those Waterfalls blog.) Two Motion Blur filters had to be used since the water was falling in slightly different directions. To get the soft look in the rocks, used Topaz (see sidebar for website link) Texture Effects 2 and a preset I created called SJ Soft Pastel Effect which uses a Basic Adjustment (need to set to individual image), Diffusion (Strength 0.57, Softness 0.38, Blur 0.39); Split Tone (Highlight Saturation 0.12, Highlight Hue 0.48, Shadow Saturation 0.07, Shadow Hue 0.70, Balance 0.63, and Opacity 1.00), Vignette (use setting to fit your image), Borders (the second row up from bottom on left; Texture – Soft Grunge light beige/gray vertical lines (middle column, 7th row) – Size 1.00, Opacity 0.63, Blending Mode Saturation, Detail 0.07, Saturation 0.08, Color Strength 0.14, Color 0); and Light Leaks (a gold and yellow disk from upper left (2nd row from bottom and left column), Size 1.05, Blending Mode Color Dodge, Saturation 0.68, Color Strength 0.46, Color 0.45). A little burning around the jumper was the last thing done. This was a pretty neat place to visit!…..Digital Lady Syd

Latest
A Guilded Age Bathroom
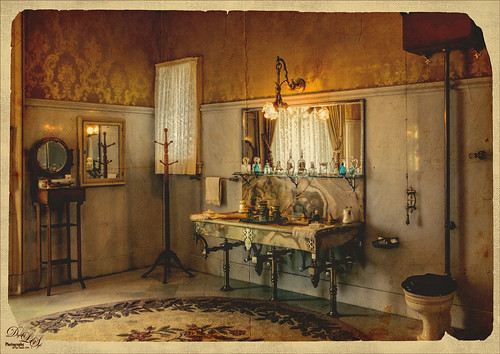
This image was taken at the Flagler Museum (Whitehall) in West Palm Beach, Florida. The image was actually post-processed without the border or vintage effect. Topaz (see sidebar for website link) Clarity, Lucis Pro (no longer available), Topaz ReStyle and Topaz Lens Effects were used to begin the process. I was actually really happy with the results, and then Adobe came out with Photoshop CC2017. If you open a New Document, now a New Document Dialog box opens – select the Photo tab at top and Templates is one of the choices. I scrolled down to Vintage Photo Effects which was downloaded and my image was placed on top. In the template I changed the background layer color and added a grunge overlay set to 47% layer opacity. I also clipped (ALT+click between the layers) a second texture under the Vintage Photo Paper. The Vintage paper texture was set to 47% layer opacity. Last step was to open up the now free Nik Viveza 2 to sharpen up the bottles and detail throughout the pix. The lighting was a little difficult to handle in this image due to the mirrors and the light coming in through a bright window off to the left. Try out Adobe’s free templates if you want a little different look……Digital Lady Syd
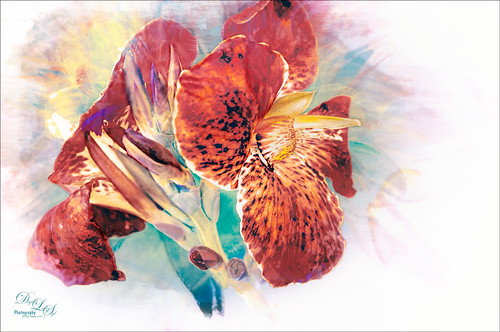
Just a Flower
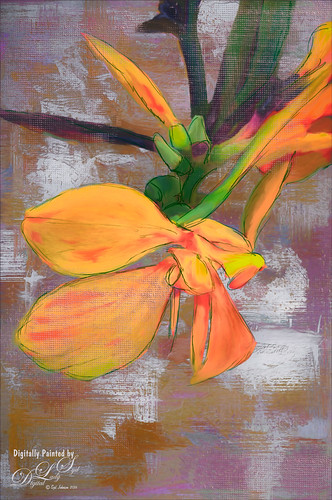
Had some fun painting this Canna Lily growing in my front yard. Used Topaz (see sidebar for website link) Clarity and ReMask (to select the flower) before adding one of my textures behind it. Then on a New Layer above, just painted the lily using Jack Davis’s Wow C Oil Blender 2 Mixer Brush that can be downloaded from his Facebook page. Topaz ReStyle was used to soften the color a little using a preset called Cotton Cloud set to Luminosity blend mode at 38% layer opacity. Some lines were added on a layer above and the last step was to add some texture using Just Jaimee Summer 2012 Brush Sampler 4 with a Bevel & Emboss layer style. It was set to Pin Light Blend Mode at 64% layer opacity. Last step used Nik Viveza 2 to emphasize the focal point. Pretty simple and lots of fun!…..Digital Lady Syd
Peach Hibiscus
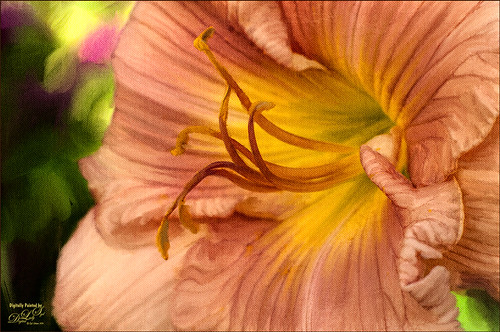
This peach hibiscus that was growing on my back porch in Florida and was painted in Photoshop. The technique used is presented in the November Issue of Photoshop User Magazine on KelbyOne, so if you are a member, check it out. It gives you directions for creating 3 mixer brushes and basically makes the effort a lot easier than using the built-in Photoshop Mixer Brush Cloning Paint Setup default action. A Canvas Texture was added on top for a more painterly overall effect. I will be experimenting more with this technique using some of my own brushes and see what happens……Digital Lady Syd
Fountain Grass
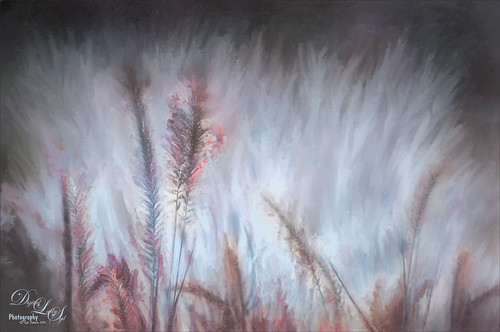
Took this image of fountain grass in my front yard. The original image shows the yard of my neighbor across the street so the first step was to blur the image to get rid of their yard. Used Photoshop’s Blur Gallery set to Iris Blur at Blur of 220 px. Individual stamped layers (CTRL+ALT+SHIFT+E) were created for each of the following filters: Topaz (see sidebar for website link) Black & White Effects was used to give a soft purplish tone, Topaz Clarity was used to sharpened just the foreground stalks, and Topaz Impression (Fine Brush Scumble II preset) was applied and the foreground stems painted back in a mask – then on a New Layer above, the Mixer Brush was used to smooth out the background. On another stamped layer Topaz ReStyle was opened and the Brown and White Pooch preset was used with adjustments – then in a white mask the foreground stem were painted back. Several mixer brush painting layers were added to give the water spray feel. The last step was to use Nik Viveza 2 to give a light vignette effect in the corners. This image was a lot of fun to paint!…..Digital Lady Syd
A Rainbow Tree
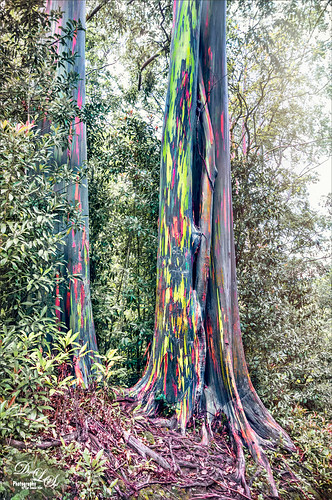
This image is of a beautiful, but unfortunately vandalized, Rainbow Eucalyptus Tree in Maui, Hawaii. Why people would do such a thing is hard to understand! It is a very unusual tree that only grow in frost-free zones. This image a preset in Topaz (see sidebar for website link) Adjust as seen in a Topaz Webinar by by Joel Wolfson called Creative Essential with Topaz Plug-ins Plus the Official Introduction Glow 2. Topaz Glow was used to brighten up the rainbow on the trunk. The last step was using Topaz Texture Effects 2 and the Breaking Down preset. I have never seen this type of tree anywhere else!…..Digital Lady Syd
BFF’s!

These two guys are from different places – not BFF’s at all – the larger elephant is from that wonderful object program called PixelSquid (see my How To Use the PixelSquid Add-on In Photoshop blog), and the other is from an image I took of the elephant at the Jacksonville Zoo. Just a few steps here: the plants are from brushes created mainly from my favorite plant brushes by Frostbo Brush Grass Set2 with a Bevel and Emboss added to it; both elephants were worked on using Lucis Pro (no long available); Topaz (see sidebar for website link) ReStyle was used to get the correct color effect; and the now free Nik Viveza 2 was used to get the correct focus on the elephants. It actually took me several hours to get the effect, but I love the texture…..Digital Lady Syd
Beautiful Flower
The flower in this image was an orange Canna Lily that grow really well in Florida. Topaz Detail 3 was applied to sharpen the image first in Photoshop. On a stamped layer, the Topaz (see sidebar for website link) Impression 2 preset as created in my Adding a Creative Touch in Topaz Impression 2 was applied, but this time the Coverage was set to 0.12, Coverage Transition 0.03, and Coverage Center X -0.13/Y 0.31. In the Masking section, the Spot Transition was set to 0.93 and Color Aware was set to 0.27 and the effect was placed on the center of the flower. The really bright colorful background could be controlled this way. Next a Black & White Adjustment Layer was added and set to Luminosity blend mode to get the tones correct. (See my How to Use a Black & White Adjustment Layer to See Contrast in an Image for more information on this.) On another stamped layer, Topaz ReStyle was applied a preset that used some colors from a previous image I had processed. (See my How to Use a Topaz ReStyle Trick for Improving Your Image blog to do this.) Two Curves Adjustment Layers were used to apply dodging and burning in the image. (See my How to Use Curves Adjustment Layers to Dodge and Burn an Image blog on how to do this.) On top of those, a Color Lookup Adjustment Layer was applied using the Filmstock_50.3dl filter. A light pink Color Fill Adjustment Layer was placed on top and set to Color blend mode. Last step used the now free Nik Viveza 2 plug-in to draw attention to the focal point. Lots of fun to do!…..Digital Lady Syd
The Beautiful Snowbush
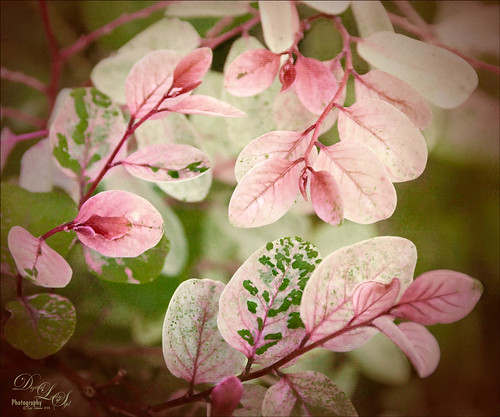
This a beautiful Snowbush growing in my front yard. I just love the colors and patterns in the leaves of this bush. Very simple post-processing here. Duplicated the layer and used Lucis Pro (no longer available) to sharpen the image. A black layer mask was added and just the leaves in the focal point were painted back. One of my Photoshop textures was applied on top (see my Get Rid of That Color! blog that used the same texture and free brush links). A Hue/Saturation Adjustment Layer was clipped (ALT+click between layers to clip) and set to a pinkish color. The texture layer was set to Soft Light blend mode at 68% layer opacity. Topaz (see sidebar for website link) Lens Effects’s Rusty Edges Vignette was applied. A Black & White Adjustment Layer was added on top using a Luminosity blend mode and the sliders were adjusted to get a nice color effect; then it was set to 64% layer opacity. It still needed a little more sharpening – I wanted a more depth in the image so Topaz Detail 3 was opened on a stamped layer on top (CTRL+ALT+SHIFT+E), and the Interior Detail I preset was applied – it looked over the top but there was just the right amount of sharpening in some places. A black layer mask was applied and just those areas that needed were painted back in white. I believe it did add that extra depth that really makes the image…..Digital Lady Syd
Vintage Pottery and Glassware
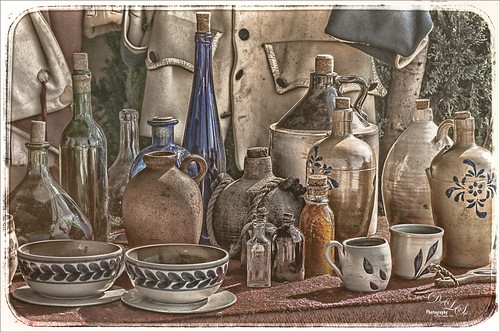
This image was taken at a Native American Festival of a pottery and glassware display. Since the items are so vintage, I decided to a add a vintage feel to the image. After doing some Basic Panel corrections in Lightroom, the image was duplicated in Photoshop and Lucis Pro 6.0.9 (no long available) was used to sharpen the image. A stamped layer (CTRL+ALT+SHIFT+E) was added on top the free Nik Analog Efex Pro plug-in was applied. This filter is really fun to play with and gives some beautiful vintage effects! These filter effects were stacked: Basic Adjustments, Light Leaks, Film Type, Frames, and Levels & Curves which includes a Luminosity curve which is very handy! If you have never used this filter, note that many of the sections allow you to move the effects around within the image. Back in PS, a Red Channel Luminosity Curve Adjustment Layer was created. (See my How to Use a Red Channel to Create a Nice Blended Image Effect blog for more info on this.) On another stamped layer, Nik Viveza 2 was used to emphasize the focal point. It was just slightly too bright for that vintage feel, so a Pattern Fill Adjustment Layer was added using a light cream color pattern set to a Color Blend Mode at 52% layer opacity. That was it! I love the vintage effect!…..Digital Lady Syd
Topaz Labs AI Gigapixel
Check out AI Gigapixel stand-alone software for upsizing your images. It’s incredible! And it can now be used as a plugin when in Photoshop. Also Topaz Labs Photo AI has some great sharpening and denoise tools along with Photo Video AI.

Luminar Neo
Click here to visit Luminar for more info and check out their new AI Filters.

GRUT BRUSHES – Photoshop Brushes for Digital Artists
Click here to visit GrutBrushes.com
And be sure to check out his Free Brush of the Week and Brush Sampler! These are the best brushes you can find!

Topaz Studio 2 and Legacy Topaz Labs Filters
Unfortunately Topaz Studio 2 and other Topaz Lab filters are no longer available for sale as of 2020. If you had bought these filters and would like to put them back on, here is a link to the Legacy Apps where they can be downloaded again. Below is an example of the wonderful Remix AI Filter from Studio 2. The wonderful Impression still works fine in Photoshop right now along with Adjust (all versions), ReStyle, and even PhotoFXLab!

On1 Photo Raw
Wonderful software to use as a substitute for or plugin with Photoshop. Many great filter effects and lots of AI capabilities!
