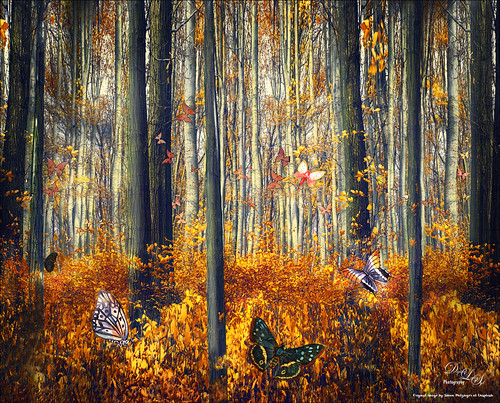
This image was created using an image by Simon Matzinger at Unsplash, one of my favorite images to use for PS experimentation. Creative Live recently had another Photoshop Week and an interesting class was presented by Simon Peter Raible on Using Photoshop to Extend Images. I had to try out some of the technique so here it is the result of one of them. If you look at the original file, it does not have near as many trees in it. Following the technique in the videos, this is how the whole background ended up with a little clean up. Several more trees were added that were rendered in PS and is also explained in the videos. A layer had to be added to adjust sunlight on some of the trees and several layers were used to add the Beautiful Watercolor Butterflies by Knopazyzy. The center butterfly was from a brush set by All Things Precious called Vintage Butterflies Set 1 – just painted underneath to add color the butterfly. The string of small butterflies of different sizes I created using a Butterfly brush my Marrielle P Kokosidou. (Created a paintbrush and setting it to a small size with Spacing at 180%, Shape Dynamics Size Jitter 24% and Angle Jitter 21%, and a Color Dynamics set to 100% Foreground/Background Jitter, a little Hue, and Purity -24%.) Some color was sprayed on them. Topaz (see sidebar for website link) ReStyle was used to get a nice overall color tone to the forest image using the Dark Goldenrod Sunset preset. It was fun to try out the new technique and work with one of my favorite subjects, butterflies……Digital Lady Syd

Latest
Pink Carnation
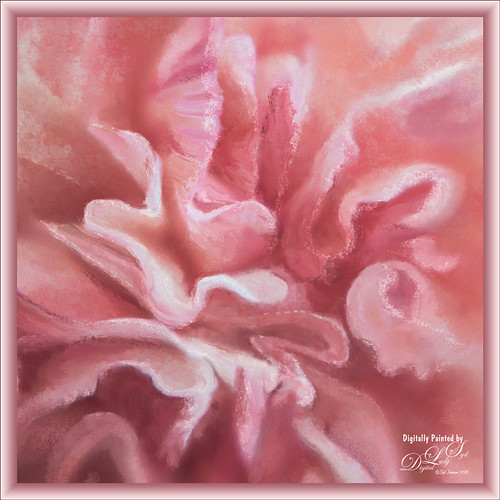
This flower was in a group from some birthday flowers – tried a few macro shots on them and got some really nice results. I decided I wanted to go through some of my brushes and pick some specialty mixers for painting. Most of the brushes were from Fay Sirkis, a Corel Painter Master. If you have a chance to get hold of some of her mixer brushes, they are still some of the best around even though they are older. Photoshop has not updated their actual brush engine except for the Smoothing section in many years so they work just fine. Her Four Seasons brushes, which is a really good set, can still be downloaded at KelbyOne if you are a member – just do a search for Fay and several webinars will appear with the brushes as a download set. A Curves Adjustment Layer was added along with French Kiss Feb 2018 Bonus texture (she give out many goodies during the year in her E-mails and this was one – website link is in sidebar). A Red Channel Luminosity Curves Adjustment Layer was applied (see my How to Use a Red Channel to Create a Nice Blended Image Effect blog) see my and one of my frame layer styles was added (see my How to Create a Quick Layer Style Border or Frame blog). I love some of the nice effects these brushes gave – not bad for Photoshop!…..Digital Lady Syd
Stately Portrait
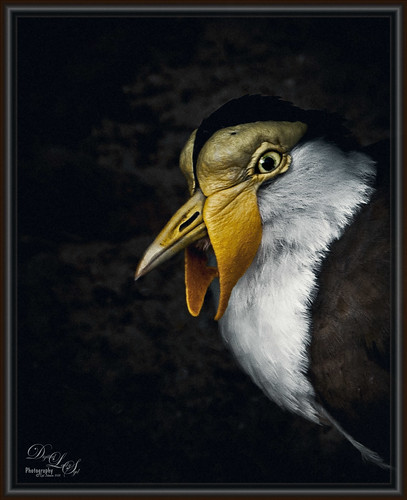
Loved the way this bird looks so stately. I actually started this image in Lightroom using Serge Ramelli’s Black and White Contrast Contrast yellow orange-light photo preset from his Urban Look set . I am major hooked on On1 Photo Raw 2018 (see sidebar for website link) Effect’s Dramatic Contrast filter used with the Sharpening filter. On both filters used a layer mask so only the bird was affected. Back in PS used a Red Channel Luminance Curves Adjustment Layer. (See my How To use a Red Channel to Create a Nice Blended Image Effect blog.) Next a Color Lookup Adjustment Layer using the Foggy Night preset set to 32% was added. On a stamped layer (CTRL+ALT+SHIFT+E) used Topaz (see sidebar for website link) DeNoise 6 and painted in areas that needed attention, mainly around the face. An Exposure Adjustment Layer was used on the eye and set to 88%. (See my The Eyes Have It – How to Make Them Pop in an Image blog.) A Digital Grain Layer was added over the whole image. Last step was to finish up with one of my frames (see my How to Create a Quick Layer Style Border or Frame blog). I love my birds!…..Digital Lady Syd
Ponce de Leon Hotel
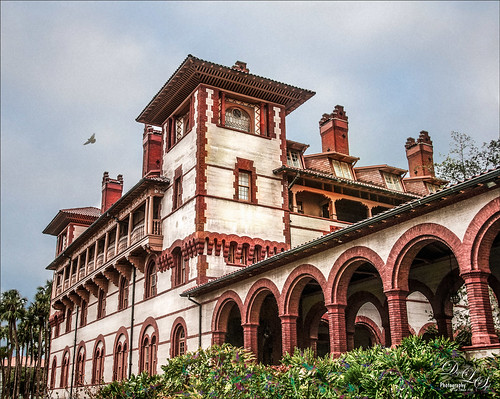
This is an image of Flagler College, or the now defunct Ponce de Leon Hotel that Henry Flagler built back in 1890. It is one of the most striking things to see in St. Augustine, Florida. And they do have tours a couple times a day which is well worth the expense as you get to the see the Tiffany stained glass windows and some of the original rooms with decor from the era. This image was mainly post-processed using On1 Photo Raw 2018 Effects (see sidebar for website link) to add the warmth, replace the gray sky, and add some sharpness to the image. Enough for blogging today……Digital Lady Syd
Teacher and Student
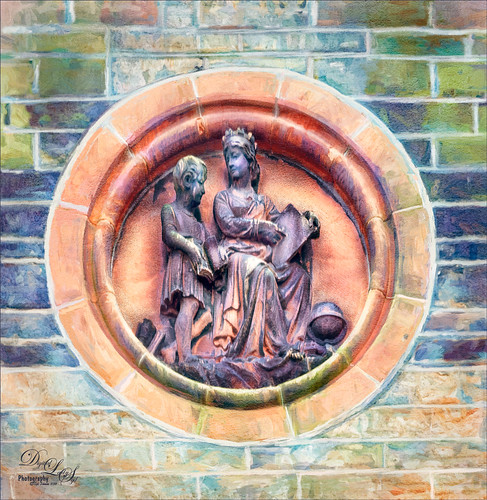
Am planning on taking a few weeks off from blogging to get some things done around the home – blogging takes up a lot time, so this will be it for a few! This image is of some architectural sculpture associated with the “Castle School” building connected to the Camera Obscura building in Edinburgh, Scotland, near the castle. I thought the sculpture was really charming of a teacher and her student. In LR the image used a Profile by VoxColor called NC to get the interesting tones. In Photoshop just did some normal clean up, used a Black and White Adjustment Layer, a Curves Adjustment Layer, and a Dodge and Burn layer. On a stamped layer, opened up Topaz Studio (see sidebar for website link) and applied the Impression Adjustment and Topaz AI ReMix Adjustment at 0.14 to add some painterly effect into the image. Then added several painting layers using my SJ Pastel 3 brushes (see my How to Create my Favorite Brush Blog and my Painting Fun in Photoshop Blog) to smooth out some of the paint strokes from the Impression filter. A New Layer set to Overlay was used to add a little spotlight effect on the figures. French Kiss (see sidebar for website link) Solstice Initiation texture was set to Color Burn blend mode at 59%. A Hue/Saturation Adjustment Layer was clipped to it and the Saturation was reduced to -43 to reduce the color effect of the texture. Finished off with Nik Viveza 2 to draw focus a little more into the sculpture. Last step was to create a vignette using Matt Kloskowski’s technique (see my How to Create a Subtle Vignette blog). That was it – lots of fun here! Will try to add some more blogs as time allows!…..Digital Lady Syd
Just Dazzling
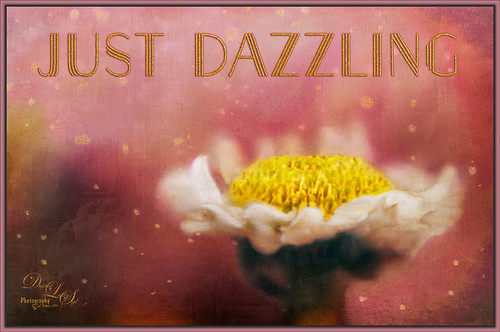
Got some beautiful flowers for my kids this past week so I pull out the old trusty Nikon and added my old LensBaby Composer to it. Got some really nice soft effects like the one shown above using a 2.8 aperture and a +10 Macro 37 mm lens. It is a lot of fun to experiments with this lens – always give surprising results. Used Nicolesy Contempo 02 profile on the image and used a Daylight White Balance in Lightroom. Did a few Basic Panel adjustments and on into Photoshop where the background was cleaned up. Nik Viveza 2 was used on the image to clean up all the edges and sharpen the focus a little. Then some clean up with both my regular SJ Pastel 3 painting brush and a mixer brush. Added two textures: one of my textures that is gray and white and set to Linear Burn blend mode at 44% layer opacity and one of 2 Lil Owls Studio (see sidebar for website link) workshop texture set to Multiply blend mode. Added text using the Naive Deco Sans font with a Bevel & Emboss and Outer Glow layer style. Last step involved adding the frame created in one of my You Tube videos to finish up. I really like the LensBaby effect – still looks good even when using an older version……Digital Lady Syd
Having a Snack
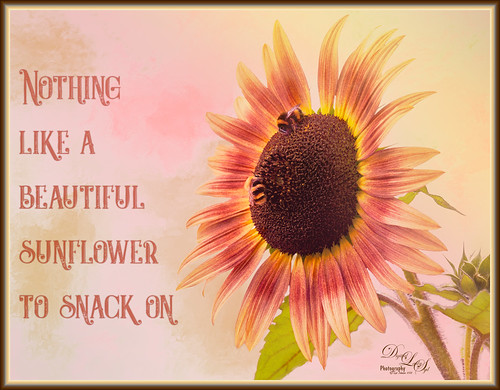
These two little bees were quite happy hanging around with this beautiful colored sunflower at the Old Village of Ayaymku restoration in Belarus. It was really simple to post-process. In Lightroom the new Artistic 02 profile was applied and then just a few Basic panel changes. The flower was selected from the busy background in Photoshop’s Select and Refine dialog. A background was placed behind the flower – one I had painted in Corel Painter that had some nice green and pink strokes. Created a Color Burn blank New Layer and painted with white to emphasize some of the color in the petals and set it to 70% layer opacity. Cleaned up the bees just a little so they stood out a little more. Added the text using the Castile Inline Grunge font. A Light Leak was applied using a pink to yellow leak. A little Nik Viveza 2 was applied and one of my borders using a layer style was added. (See my How to Create a Quick Layer Style Border or Frame blog). That was it. Have a great day!…..Digital Lady Syd
Beautiful Hibiscus
Had fun with this image. This is one of my peach hibiscus that I turned into a beautiful coral color. Used On1 (see sidebar for website link) Photo Raw 2018 Effects Dynamic Contrast on parts of the image by using the filter’s mask, and Sharpening filter. In Photoshop painted on the layer to fill in areas that were blown out. Added a Texture from Melissa Gallo Paints called Garden Canvas (from her Painting with Photoshop Workshop – excellent course and comes with some great brushes) at 26% layer opacity. Duplicated it and set Blend If Underlying Layer white tab split to 30/60. Three colored spotlight effects were painted on the petals. On a stamped layer, Topaz (see sidebar for website link) Studio was opened and the AI ReMix adjustment applied twice and Dehaze adjustment once. The image had a really bright red and orange effect color. Nik Viveza was opened to add some focus. Then applied my SJ Nastalgia profile (from a preset) in Camera Raw Filter. (See my How to Create Profiles in ACR from LR Presets and some PS LUT Files blog for info on this.) Now the colors are this pretty pink color. A couple layer of painting and burning and that was it. …..Digital Lady Syd
Posing for my Portrait
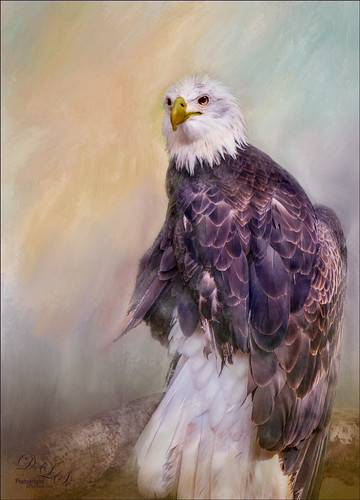
I love this shot of the Bald Eagle – he looks like a king posing for his portrait. I have no idea how he got his feathers this way – I took the image at the Jacksonville Zoo and he was sitting on an old tree stump I think. It is interesting to see his white feather plume. In Lightroom the Adobe Vivid profile was used. Then in Photoshop this guy was separated from the background using Topaz (see sidebar for website link) ReMask 5 as I could not get PS’s Select and Mask to give a good result. I usually can get a better result with ReMask if the selection is complicated. I used two of my own textures behind the eagle but could not quite get the look I wanted. So I took the Eagle layer into Corel Painter and created this soft version for a background. Back in PS the the other two textures were blended in. Used a couple Exposure Adjustment Layers for the eyes and the beak. Curves Adjustment Layers were clipped to each Exposure Adjustment Layer to get the right color in the eyes and beak. Several layers were created for painting out the edges a little with different mixer brushes. On a stamped layer Nik Viveza 2 was used to set the focus on the Eagle’s head and to clarify the feather detail. A Black and White Adjustment Layer set to Luminosity blend mode was used to further adjust the overall color. This is not really a painted image, but it has a painterly feel to it. …..Digital Lady Syd
Bathing Beauties
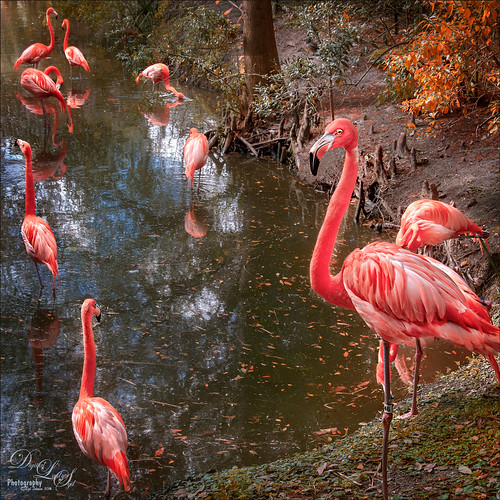
These birds look just like bathing beauties stepping into the water daintily. I just love Flamingos – they are so much fun to watch and photograph. Took this image of some Flamingos a while back at the Jacksonville Zoo and did not think it was that great. After watching a couple videos on On1 Photo Raw 2018 (see sidebar for website link), I decided to give it a go and see if I could get this image to look better and I was pretty pleased. When I did a Fun Photoshop blog on sharpening (see my Comparing Some Sharpening Techniques blog), I mentioned how good both On1 Effects Dynamic Contrast and Sharpening filters were. Well once again, I am pretty pleased with the results. If you have On1 software, check out Colby Brown’s video on Top 5 Tips for Wildlife Photography where he discusses how to use these filters. Then the rest of the image was post-processed in Photoshop. A stamped layer set to Hard Mix blend mode at 6% Fill Opacity was used to add an overall sharpening to the image (this was also mentioned in my sharpening blog). A Spotlight Layer set to Overlay blend mode and white was painted on the feathers (see my How to Add a Spot of Light blog.) Then a little vibrance was added using the Channel Mixer Adjustment Layer – learned this nifty trick from Denny Tang in his Vibrancy Masking Photoshop Tutorial video. Nik Viveza 2 was used to direct the focus, a Black and White Adjustment Layer set to Luminosity blend mode at 36% layer opacity, and a darken/lighten layer to emphasize the eyes and beaks a little. and a Matt K vignette (see my How to Create a Subtle Vignette blog). I might add that I used Artistic Profile 03 in the new Lightroom update to begin working on this image. I love it when I try out a new technique and it works really well……Digital Lady Syd
Topaz Labs AI Gigapixel
Check out AI Gigapixel stand-alone software for upsizing your images. It’s incredible! And it can now be used as a plugin when in Photoshop. Also Topaz Labs Photo AI has some great sharpening and denoise tools along with Photo Video AI.

Luminar Neo
Click here to visit Luminar for more info and check out their new AI Filters.

GRUT BRUSHES – Photoshop Brushes for Digital Artists
Click here to visit GrutBrushes.com
And be sure to check out his Free Brush of the Week and Brush Sampler! These are the best brushes you can find!

Topaz Studio 2 and Legacy Topaz Labs Filters
Unfortunately Topaz Studio 2 and other Topaz Lab filters are no longer available for sale as of 2020. If you had bought these filters and would like to put them back on, here is a link to the Legacy Apps where they can be downloaded again. Below is an example of the wonderful Remix AI Filter from Studio 2. The wonderful Impression still works fine in Photoshop right now along with Adjust (all versions), ReStyle, and even PhotoFXLab!

On1 Photo Raw
Wonderful software to use as a substitute for or plugin with Photoshop. Many great filter effects and lots of AI capabilities!
