
Here’s Looking at You!
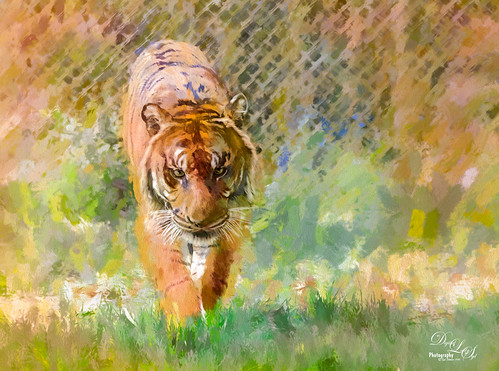
This beautiful tiger decided to saunter towards a window I was standing behind, so I had to take a few shots at the Jacksonville Zoo. This time I did not hand paint him, although it would have been fun to paint, but instead added several Topaz (see sidebar for website link) filters to get this effect. First used Detail 3 to sharpen image all over. Then on a stamped layer used Topaz Impression and applied and my SJ WC like effect on bkgds preset with just some color adjustments (see settings below). Used a 50% Gray Fill Layer set to Overlay blend mode to dodge and burn in some details to separate his ears and eyes from the colors behind. On another stamped layer (CTRL+ALT+SHIFT+E), Lens Effects’ Neutral Density filter was used to darken foreground slightly, Reflector filter Gold Left preset to lighten his side a little, and a light orange Vignette. Did a couple clean up layers and a Camera Raw filter in PS to soften the background. I really like the way he looks!…..Digital Lady Syd
Preset settings for Topaz Impression: Stroke: Brush Type 04, Brush Size 0.91, Paint Volume 0.42, Paint Opacity 0.87, Stroke Rotation 0, Stroke Color Variation 0, Stroke Width 0.33, Stroke Length 0.89, Spill 0.23, Smudge 0.26, and Coverage 1.00; Color: Overall Hue 0.15, St -0.20, and Lightness 0.06; Red Sat 0.47 and Lightness 0.14; Orange Sat 0.60 and Lightness -0.42; Yellow Sat -0.33 and Lightness 0.13; Green Sat 0.20 and Lightness -0.32; and Blue Sat 0.36; Lighting: Brightness -0.04, Contrast 0.39, and Light Direction x0.33 and y0.06; and Texture: Strength 0.78, Size 0.30, Canvas IV, Background Type Solid, and Background #d38967 (soft melon color).
Desolate Roller Coaster
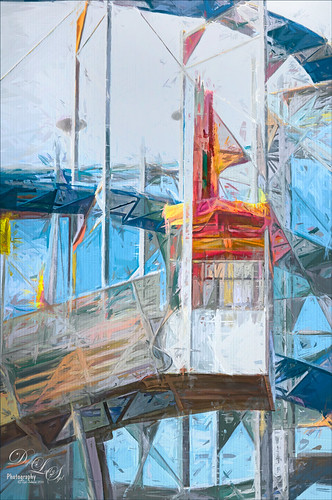
I really enjoyed doing this image – lots of structure and texture in this coaster image. Just Basic slider adjustments in Lightroom before opening up in Photoshop and duplicating the layer. Topaz (see sidebar for website link) Simplify was opened and the BuzSim preset was applied with a couple of changes (Simplify Size 0.76, Feature Boost 1, and Structure 2.38). This caused lots of webbing up in the track that really looked good – usually don’t but it made this picture more interesting. This layer was duplicated and Topaz Impression was added. I created a new preset to get this effect called SJ Illustrative Painting Effect (SJ Illustrative Painting Effect preset – Settings: Brush Type 01, Brush Size 0.70, Paint Volume 0.42, Paint Opacity 0.72, Stroke Rotation 0, Stroke Color Variation 0, Stroke Width -0.65, Stroke Length 0.20, Spill 0.48, Smudge 0 and Coverate 1.00; Color only – Red Sat 0.38 and Lightness 0.10; Orange Sat 0.75, Yellow Sat 0.68, Aqua Hue -0.15, Sat -0.47, and Litness -0.60; and Blue Hue 0.10, Sat -0.34, and Lightness 0.41; Lighting 0.25, Contrast 0.04, Vignette 0.18, Vignette Transition 0.34, Vignette Center x: 0.32 and y: -0.03; and Light Direction x: 0.59 and y: -0.01; and Texture Metal Sheet Strength 0.60, Size 0, Background Type solid white, and Background white.) A layer mask was added to remove some of the paint in areas that did not look quite right using a low opacity and flow black brush. The last step was to use Nik Viveza 2 to emphasize the focal point where the loading area is. That was it – just liked the sort of grungy painterly look that resulted. Lots of fun here!…..Digital Lady Syd
A Windy Beach!
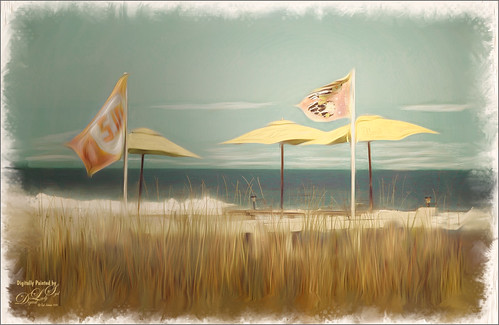
One of my favorite local place, beautiful Flagler Beach on the Atlantic Ocean in Florida, shows a pretty windy day. This image was one I was experimenting on and came up with this effect. The Oil Paint Filter was used on the image and on a layer mask the sky was painted out so the filters only affected the foreground, flags and umbrellas. The original image had red umbrellas and a much brighter blue sky. I wanted to use softer colors so the color palette was changed in Topaz (see sidebar for website link) ReStyle that used the tones from another image. (See How To Use a Topaz ReStyle Trick for Improving Your Image showing which image colors were used here.) On a stamped layer Nik Color Efex Pro 4 was used to further soften and tweak the colors. On several New Layers the mixers were used to create the edges and Nik Viveza 2 was used to add a little focal point emphasis. I really love the final colors!…..Digital Lady Syd
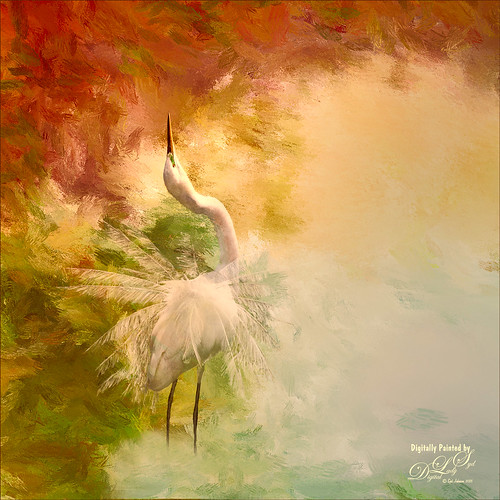
Putting Your Best Side Forward
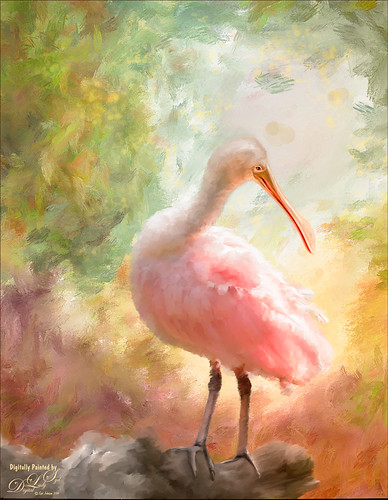
This lovely Roseate Spoonbill is totally enjoying a beautiful morning. This type of bird always seems to have a happy expression on their face – totally a joy to watch them. This image was taken at my favorite bird place, the St. Augustine Alligator Farm. Not much new with the painting workflow – just a painted background I did in Corel Painter and some Mixer brushes and Regular brushes in Photoshop. As you know I am a big fan of Fay Sirkis’s Photoshop Mixer brushes and this image used her Palette Knife Tap n Blend brush to get the fluffy effect on the body. The only place I know where her brushes are available is over at KelbyOne, and sometimes at Photoshop World when she is presenting. The light effect was created using Topaz (see sidebar for website link) Lens Effects’ Reflector filter set to Gold Right preset – gives a soft subtle light effect. Used Nik Viveza 2 to bring the face in focus. Totally enjoyed painting this beautiful bird!…..Digital Lady Syd
All Aboard the Bumble Bee Express!

Had to post this wonderful Bumble Bee Express pix (the link is a pretty lame short clip of a zombie riding the train) before the holidays are too far gone! This wonderful train runs every day at the Volusia Mall in Daytona Beach, FL, for all the kids to ride. When I was 5, I wanted one of these as they had one at the local park where I grew up – I got a Lionel Train set instead and was extremely disappointed.
This image used Topaz (see sidebar for website link) Clarity to sharpen it up first, then the train was removed from the background using Topaz ReMask. One of my Corel Painter backgrounds was added – it was stretched out and turned to fit the train, and a couple Hue/Saturation Adjustments Layers were linked to it to get the colors I wanted in the image. Next on a stamped layers (CTRL+ALT+SHIFT+E) Topaz Glow was opened and my Mysterious II preset was applied with just a change to Red, Orange and Yellow Lightness sliders to adjust the color and set to Normal at 80% layer opacity. (The settings are listed in my Happy New Year With Some Topaz Tricks blog.) Two more stamped layers were created, and Topaz Impression’s Ethereal Background by Blake Rudis preset was applied and set to Normal at 100% layer opacity on the first layer. Then on the top layer Topaz Impression’s same preset was applied except the Blue Lightness slider was set to 0.45 to calm the blue in the sky down some. The layer mask created using ReMask was copied (ALT+drag up to this layer) and inverted (CTRL+I in the layer mask). This layer was then set to Normal with the layer opacity adjusted to 41%. A text layer was applied using the free Playbill Regular font,and the letters were stretched up some (vertical scale set to 152%) and spread out (tracking set to 80). A yellow watercolor Pattern Overlay was added in the Layer Style for the text to make the colors pop. A Black and White Adjustment Layer set to Luminosity blend mode was added on top to get the color tones just right. Totally fun and brought back a lot of memories!…..Digital Lady Syd
Santa Believing!
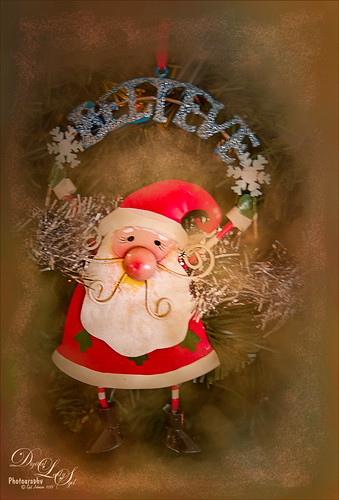
Had to post this little image of a Santa ornament that is very appropriate while I am struggling to get my new computer loaded up and ready to use. Windows 10 is really turning out to be a big learning experience for me after coming from Windows 7. Anyway, this guy is how I am feeling – I Believe I will get it up and running!!!
I actually did this as my first image on my new computer with practically nothing added to PS CC. All I did on this image was to use the ACR in the Bridge to do the initial image adjustments since I do not have Lightroom going yet. Next one of my Corel Painter textures was added in layer above and a layer mask applied. By using a watercolor brush set a soft edge and low opacity (20%), the Santa was softly painted back using a black foreground color in the mask. A Curves Adjustment Layer was used to adjust contrast, and on a New Layer a Glitter brush was used to add some structural interest into the background (see end of my Some Christmas Cheer and Resources blog for settings to make brush). The image was sharpened using a High Pass Filter set to 5.8 radius and then on a New Layer above, the Sharpen Tool was applied just to his face. Last step was to use two Radial Filters in the Camera Raw Filter to get soft vignette effect and direct focus to the Santa. Felt good to get back to working on images!…..Digital Lady Syd
Underwater Fantasy
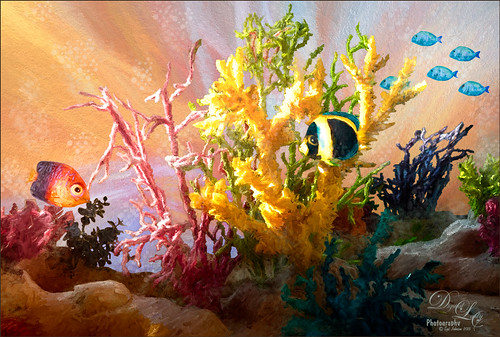
This image took a lot longer than I expected to complete – but still a lot of fun to do. I had the image of some coral in a case at a SeaWorld Orlando store and wanted to use it in an underwater adventure image. It turned out totally different from what I expected but that still is a lot of fun to just see what happens!
Basically the coral was cut from the image using Topaz (see sidebar for website link) ReMask 5. It did a fair job and a lot of touch up of the layer mask had to be done once back in Photoshop due to the complexity and similar background color to the coral in the image. My next step was to add a couple PixelSquid fish into the image (see my How To Use the PixelSquid Add-On in Photoshop blog). One of my spiral textures was used for the background and the layer was taken into Topaz Impression where the Turner Sunset II preset was applied. The fish and coral layers were grouped, duplicated and top group merged to create a single layer. This layer was then taken into Topaz Impression and Edward Hopper II preset was applied to it. Some bubbles were added using using the Glitter Brush created in my Some Christmas Cheer and Resources blog was used to add some softening effect around the coral, and on some separate layers, Fay Sirkis’s Bubble Wrap Highlights Mixer brush was used to add in the more obvious bubbles. Next the eyes were sharpened using the Exposure Adjustment Layers. On a stamped layer (CTRL+ALT+SHIFT+E), Topaz Lens Effects was opened and the Reflector filter brightening the left side of the image and the Graduated Neutral Density Filter to darken the bottom part of the image was applied. Last step used Nik Viveza 2 to direct focus to the main fish. Whew! Hope you have a wonderful holiday!…..Digital Lady Syd
Viera Wetlands
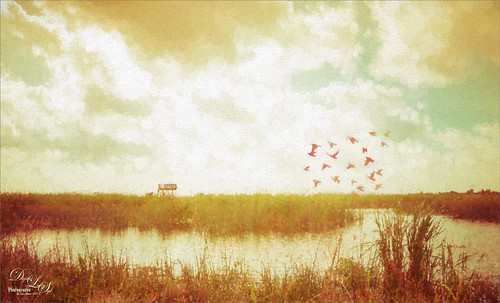
This image was taken at the beautiful Richard Grissom Memorial Wetlands (also known as the Viera Wetlands) in Brevard County, Florida. In Lightroom very little was done except to apply Trey Ratcliff’s free preset called Venice Canalman that came December 2015 preset package (scroll down) he gave away with his newsletter – I have used this preset a couple of times and really like it. The focus point could be adjusted by going to the Radial Shift that he used in the preset, and moving it a little right to include the birds.
In Photoshop Jai Johnson’s free Flying Birds png was added as a layer on top. Since the birds looked flat in the image, a Pattern Fill Adjustment Layer was clipped to the image (ALT+click between the layers) – tried several and ended up using a gold and reddish watercolor pattern, which matched the tones of the LR preset that was applied. This pattern can be dragged around in the image to make the birds look just right and the adjustment layer was set to 62% layer opacity. An Outer Glow Layer Style (double click on layer to open) was set to Normal Blend Mode, white color, Opacity of 34%, Noise 13%, Spread 8% and Size 144 Px – this softened the birds so they blended into the sky just right and the layer was set to 68% layer opacity. The last step was to apply Topaz (see sidebar for website link) Impression’s Seurat Afternoon III without any changes to the whole image. His pointillism strokes added a really interesting effect to this image. Impression is really a fantastic plug-in that can add such a beautiful effect to an image as in this case…..Digital Lady Syd
Deserted Roller Coaster
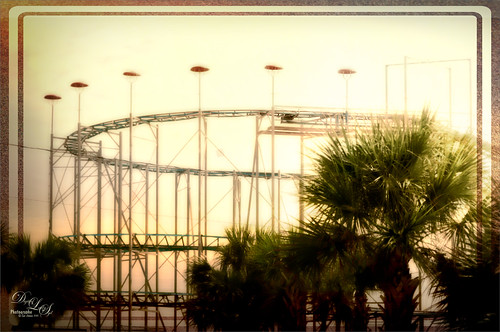
I guess this image definitely indicates winter is on its way – very desolate looking Roller Coaster at the beach in Daytona Beach, Florida. Wanted to show another example of Topaz (see sidebar for website link) Texture Effects using the preset I created and uploaded onto the Community site. (See my Digital Lady Syd Reviews Topaz Texture Effects Fun Photoshop Blog.) In Lightroom Dave Delnea’s Custom Tone oo2 was used and the DeHaze slider in the Adjustment Brush added a little foggy effect at the top of this image. In Photoshop Topaz Detail 3 was applied to darken and soften the image a little. Then on a stamped layer, Topaz Texture Effects was opened and my SJ Soft Pastel Effect preset with some changes (Basic Adjustments turned off; Diffusion – in Mask brushed out the center of the large palm and part of the wood structure in top of the roller coaster with brush Strength of 55. Vignette – Strength 0.42, Size 0.01, Transition 0.32, Roundness 0.18, Color Black and set Center towards the right; Split Tone – removed; Border second row first border – Size 1.09 with Keep Aspect Ratio on No.) I am starting to really enjoy this plug-in!…..Digital Lady Syd
The Lemonade Cart

I have been wanting to use this image of a Lemonade Cart taken a couple years ago at the Annual Turkey Run in Daytona Beach, Florida, but it was too hard to select all the “stuff” around it. That was until Topaz (see sidebar for website link) ReMask 4/5 was released. This time, it took a little effort, but overall it came out pretty fast. Once I had the cart on its own layer, it was opened in Topaz Impression and the Renoir II preset was selected with no changes. This blended the cart nicely into my Corel Painter background. On a stamped layer (CTRL+ALT+SHIFT+E), the layer was opened in Topaz ReStyle and the Native Dancer preset was once again applied (see my How to Use a Topaz ReStyle Trick for Improving Your Image blog.) Several layers of painting with both regular and mixer brushes were used to make sure it did not look like a “canned” painting – I am very sensitive to this so I always try to add some of my own strokes if I use Impression. The bird is from Midnightstouch Egret brushes – these are great for that little extra touch – just be sure to paint them some to blend them into the image……Digital Lady Syd
Feeling Spiffy!
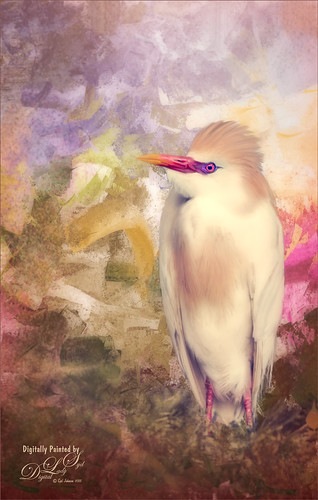
The reason I like this photo is that it was really sharp out of camera even though this Cattle Egret was trying to stay a little hidden in a very green tree covered area. He just seemed to need a nice background, so here it is. It was painted Corel Painter and matched the color in his beautiful beak. Since I wanted some of the original background to show through around his feet, the texture was placed above the bird and the bird’s layer mask (from Topaz – see sidebar for website link – ReMask 5) was used so the bird appears. Then I could use a low opacity brush on the bottom of the bird layer mask to paint in some of the grass detail where he was standing. Several layers of painting before Topaz Texture Effect’s Soft Warm Breeze preset was applied on a stamped layer (CTRL+ALT+SHIFT+E). (I changed the Overlay color from orange to black and Diffusion Strength to 0.62.) The eyes and beak were sharpened and Nik Viveza 2 was used to finish up the overall effect. Really fun to paint!…..Digital Lady Syd
Living the Good Life
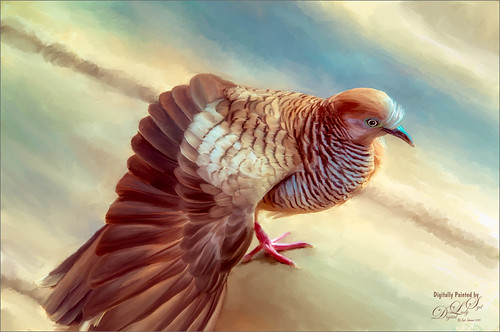
Just enjoyed painting this lovely pigeon, or if you prefer dove, from an image taken in Hawaii at the Hilton Waikoloa Village on the Hawaiian Island. Not much new here in the workflow, except that Nik Color Efex Pro was opened and the Detail Extractor, Bi-Color Filters, Sunlight, and Film Efex Nostalgic filters were used to get the color effect I liked. Otherwise several of Fay Sirkis’s Pet Photoshop Brushes were used to get the final result. Just love painting birds!…..Digital Lady Syd
Wading in the Water
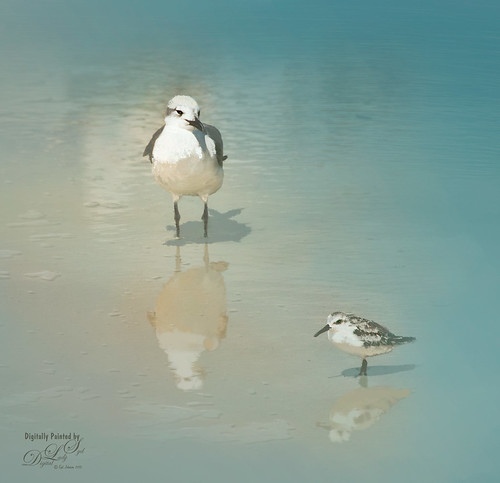
These little guys were enjoying the tidal waters at Daytona Beach, Florida. I believe the bigger bird is a Laughing Gull and smaller one a Sanderling from the Sandpiper family. These birds were all over the place and seemed quite tame on the beach. These birds were painted in Photoshop. Added a solid color turquoise layer and in a layer mask painted back area to be seen. Used one of my Corel Painter textures that was a very smooth beige tone. Then used Fay Sirkis’s Photoshop Erodible Tip Pastels to paint the birds and reflections. Used Topaz (see sidebar for website link) Lens Effects Reflector Filter to add some directed light and warm up the scene. The beaks and eyes were sharpened. A little Nik Viveza 2 to finish up so the focus is on the birds and less on the reflections. Very simple process but fun to do!…..Digital Lady Syd
Showing Off My New Hairdo
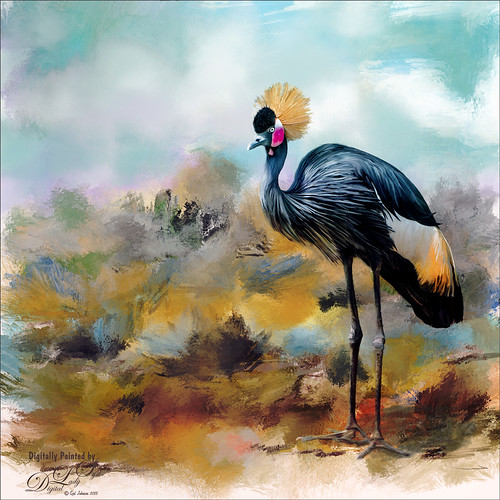
Just enjoying painting another beautiful bird. They are so much fun to do! This is a West African Crowned Crane taken a while ago at the St. Augustine Alligator Farm and is one of the regular exhibits so he can be seen anytime. He just sort of match this Corel Painter texture I had made, so there he is. In his document Topaz (see website link in sidebar) Clarity, Detail, and ReMask were used to adjust the bird itself. Then the ReMask layer was moved into the texture to place it where I wanted him to be. After that just painted the bird on several different layers using the Mixer Brush. Used two different Exposure Adjustment Layers, one for the eye and one for the beak to bring out some sharpness. Then duplicated the original texture twice and set on top – set one to Color Burn at 46% layer opacity and the other to Soft Light at 32%. Created a stamped layer (CTLR+ALT+SHIFT+E) on top and added the Topaz Lens Effects’ Toy Camera filter set to Awesomeness I preset with changes. Back in Photoshop that was set to 39% layer opacity. The last step was to add Nik Viveza 2 to really drill in on the birds face and head feathers. Hope you enjoyed my little bird painting…..Digital Lady Syd
Flagler Beach in the Fall
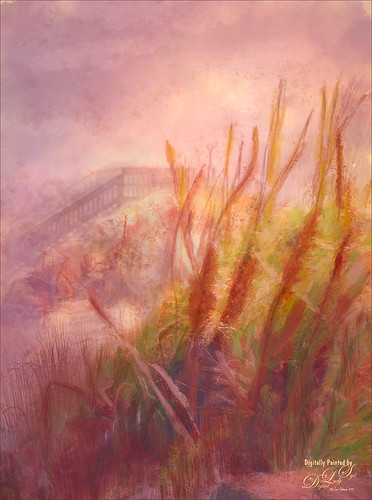
Flagler Beach, Florida, is so beautiful all the time (see blog links below for more Flagler Beach images), but this week the waves and water were really impressive. There is a bit of a fall feel in the air. These Sea Oats are everywhere along the edge of the beach. They are important for preventing beach erosion during hurricanes. I did a lot of adjustment to this image – Topaz (see sidebar for website link) Glow and Topaz Impression before painting on top. One of my Corel Painter textures was added and Photoshop’s Lighting Effects Filter were also used. It took a long time to get this the way I wanted it to look, but overall this is how I see Flagler Beach……Digital Lady Syd
Digital Lady Syd’s Related Blogs:
How to Add a Little Retro to Your Shots
Trying Out Some New Techniques!
Using Pattern Overlay Layer Style to Get a Retro Feel
Hogwarts at Halloween
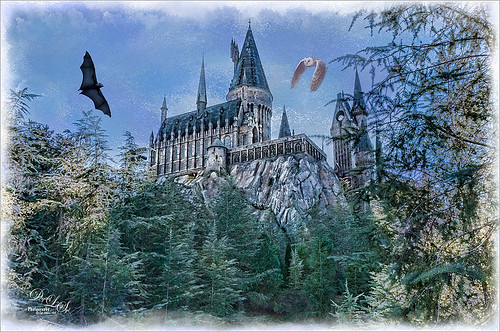
This image of Hogwarts School of Witchcraft and Wizardry at Universal Studios-Orlando was used to show how to get a bit of an illustrative look to an image using Topaz (see sidebar for website link) Adjust and Clarity and a Watercolor Texture for the sky. I actually just followed a really great tutorial by Leslie Nicole at French Kiss Textures (see sidebar for website link) that gave the exact steps and layers used. See her Before and After – Using a Watercolor Texture to see how it was done. (And check out her textures while visiting.) Both birds were by Midnights Touch – To the Bat Cave collection and Who Gives a Hoot collection to add a little holiday effect. I also added a watercolor border painted using my SJ WC Salt Brush set to 69 px to create. Lot of fun here and I really like the results!…..Digital Lady Syd
Red Fish Taking a Break from Universal Studios
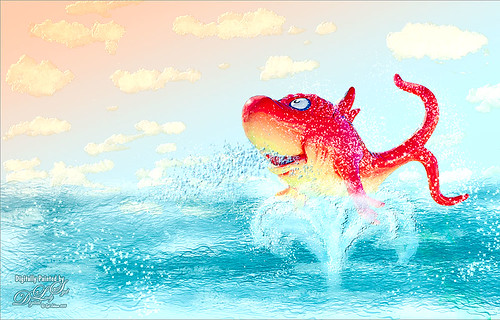
Just another image taken at the Universal Studios-Orlando, this time featuring the Red Fish at one of the Seuss Landing rides. Got a little carried here but it was a lot of fun! Basically all I did was extract the fish from the original image and paint in some elements to make him look like he was swimming in the water. Actually there were several paint layers to get the effect and Topaz (see sidebar for website link) Simplify’s Cartoon preset was applied to just the fish. Also, when done painting, a stamped layer was placed on top and Topaz Lens Effects was opened. The Toy Camera Awesomeness II was applied with the Toy Camera Aberrations sliders turned off. Adjusted some of the other sliders a little. That was it! Love how happy this guy looks!…..Digital Lady Syd
Beautiful Hole 4
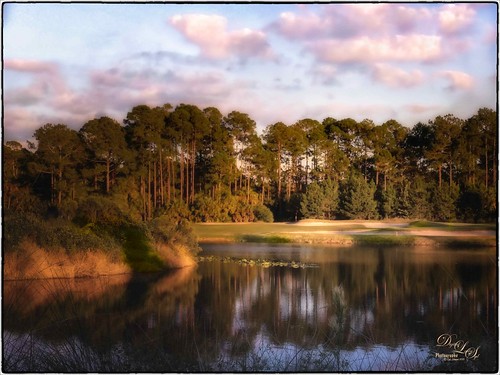 So this is why I play golf. It’s not because I play well but the views are fabulous. This course is one of the most natural looking and it feels like you are walking in a park! This image taken just before the gold hour in late afternoon was first corrected in Lightroom by just adjusting the Basic sliders. It was taken into Photoshop where Topaz (see sidebar for website link) DeNoise 5 was applied just to the sky where most of the noise appeared. On a duplicate layer, Nik Color Efex Pro 4 was used to get this overall effect – filter effects used were: Darken/Lighten Center, Glamour Glow, Monday Morning, and Image Borders. A Curves Adjustment Layer and a Color Balance Adjustment Layer were added and the masks filled with black. With a soft low opacity brush, the clouds were painted back just the cloud areas that were too vivid with the Nik filters applied to them. That is about it. Hope you all are enjoying your Fall season!…..Digital Lady Syd
Some Texturing Fun!
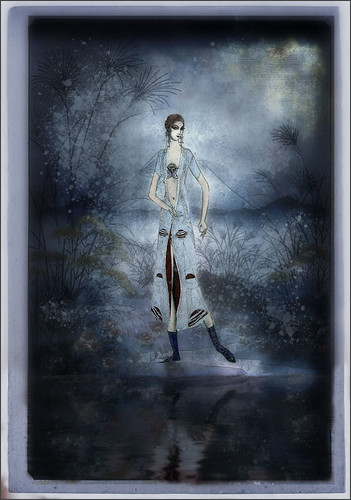
This image started out being what I thought would be just simple little layering image and instead turned into this rather complicated final image. I basically got the idea from reading one of my favorite blogs, First Night Design, where Sarah shared where she gets some of her images for doing her marvelous texturing – Ida Rubinstein as Istar by L. Bakst from 1924 and Kai Outsuki no hara from 1858. Basically cut out the lovely lady and put her in the oriental image. Used 2 Lil Owls (see sidebar for website link) Mosaic Sets Darcel Grunge texture twice – one set to Linear Light using the Blend If sliders to get the effect I wanted, and the second time set to Linear Burn at 67% layer opacity using Blend If sliders again. The elegant lady (extracted from her image using Topaz ReMask 5) was set on top. On a stamped layer Topaz Lens Effects (see sidebar for website link) Generous Diffusion preset was applied, and then Flaming Pear’s Flood plugin was applied to give the reflection. On a New Layer a speckle regular brush was used to create the painterly snow look on the image. That was the major work done on this image. I really liked the feel in the image……Digital Lady Syd
Hey Tiger!
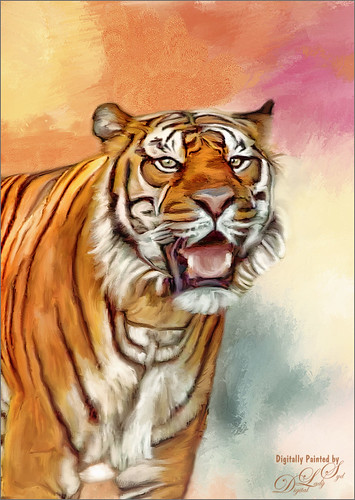
This beautiful image of a Bengal Tiger is a stock image from FreeImages.com. Wish I had taken the image. This image had lots of green leaves behind him. Topaz (see sidebar for website link) DeNoise 5 was used to remove lots of grain and color noise in this image. I used a texture I had created in Corel Painter with oil brushes. It was Free Transformed to make it fit the way I wanted it to look. Topaz Adjust and several mixer brush layers were used to paint the image. Nik Viveza 2 was used on just his face to get the nice sharp effect. That was it. This took probably around 4 hours to complete. Good thing I like to paint!…..Digital Lady Syd
So What Are You Looking At!
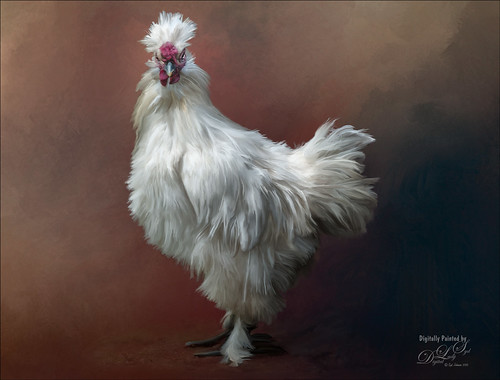
This image is of a White Silkie Rooster was photographed at The Old Village of Ayaymku in Belarus some time ago. (See my Center Stage – Introducing the Wild Turkey Tidbits Blog for another unusual bird image from the same place.) Used my regular Photoshop painting workflow. Selected the bird using Topaz (see sidebar for website link) ReMask 5, then placing Jai Johnson’s Filly in the Field texture underneath the bird. The edges were blended with one of Fay Sirkis’s Pet Mixer Brushes on a New Layer above. (Can download at KelbyOne if you are a member.) This image used a Topaz Lens Effects Neutral Density filter applied (Brightness -0.19, Amount 0.13, Transition 0.11, Angle 180.0, and Effect Position: (1824,2687) ) to even out the bottom and give him a defined area for standing. I also added two Exposure Adjustments Layers, one for the eyes and one for beak area. A Curves Adjustment Layer was used to add a little contrast back into the image. The workflow is pretty consistent but the results are always a surprise. These birds all have such personality!…..Digital Lady Syd
Sharing the Good News!
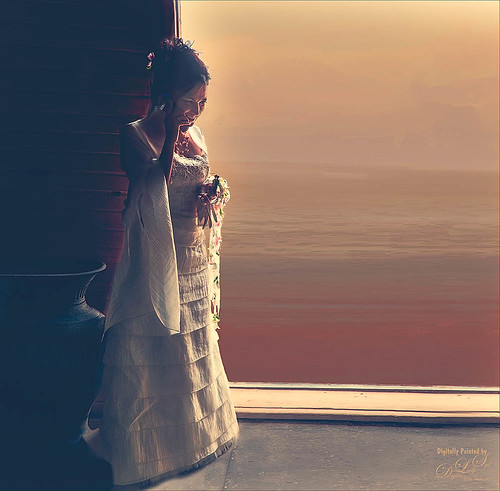
This image was taken at The Old Village of Ayaymku in Belarus on her wedding day. This image was just a snap that I had forgotten I had taken. The scenery from the doorway was changed to more of a seaside effect using one of the texture I created in Corel Painter. The door was first selected using Topaz (see sidebar for website link) ReMask 5 in the duplicated image, and the texture was placed behind the image. The Subtract blend mode was selected on a stamped (CTRL+ALT+SHIFT+E) layer at 51% layer opacity to get the nice light on her dress. A Gaussian Blur was applied to the layer and set to a Radius of 250 px – a layer mask was applied and the lighted edge of her dress was lightly painted back with a black brush. (See my How to Use the Subtract Blend Mode as a Spotlight). Topaz Lens Effects Toy Camera Memories preset was used to adjust the colors on duplicated layer. Then Topaz ReStyle’s Zambezi Zest preset was applied to get the overall warm tone. A little bit of a different look for me, but it is fun to try different effects……Digital Lady Syd
Singing for Her Adoring Fans
I just love painting birds and this Snowy Egret was once again a lot of fun to do. This bird was a bit of challenge as there were tree branches in front of her body and feathers. I was able to clean the image up pretty good with clone stamping and then separated the bird from the background using Topaz (see sidebar for website link) ReMask 5. It was not perfect but since I was painting the bird, I could smooth out the feathers and blend them into the background, which I did in Painter. Exposure Adjustment Layers were used for the eye, green around eye, and beak. The texture was duplicated twice and place on top, one set to Multiply blend mode at 23% layer opacity and the other Overlay blend mode at 51% layer opacity. On a stamped layer (CTRL+ALT+SHIFT+E) on top, Topaz Lens Effect was opened and the Dual Tone filter was used to enhance the reddish fall colors on top and greenish-blue on the bottom. The the Graduated Color filter using the Graduated Green 1 preset as a start to emphasize the green color more in the bottom of the image. That was basically all that was done. Love these birds!…..Digital Lady Syd
Testing the Water
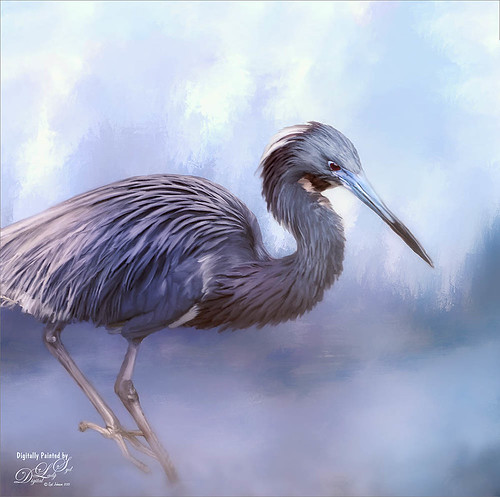
This is a sleepy Tricolored Heron reluctantly taking a step into the water on a beautiful hazy morning. Okay, he was really in a very cluttered background and I had to use Topaz (see sidebar for website link) ReMask 5 to cut him out. Then he was placed on one of my Corel Painter textures whose colors were changed using Topaz ReStyle’s Ice Cool and Fresh preset to match the bird colors and Free Transformed (CTRL+T) to fit the bird perfectly. I then proceeded to paint the bird with a Mixer brush to smooth out the grainy feathers. A duplicated copy of the texture was added on top and set to Multiply blend mode at 50% layer opacity. On a stamped layer (CTRL+ALT+SHIFT+E) on top, Topaz Lens Effects Fog (Fog Ground Fog IV preset – Amount 0.20, Region Size 0.10, Transition 0.20, Angle 138.1, and Diffusion 0.40) was added to give a sort of early morning mist in the water. Next the Reflector filter was applied (Golden Left, then Strength 0.20, Transition 0.40, Position 0.59, and Angle 76.63) before going back into PS. The eyes and beak were sharpened using the Exposure Adjustment Layer. On another stamped layer, Topaz Adjust’s Brilliant Warm preset was applied to get the nice gray color back on the bird. A little Curves Adjustment Layer was added and he was done! Still loving my birds!…..Digital Lady Syd


