
Contemplating Life
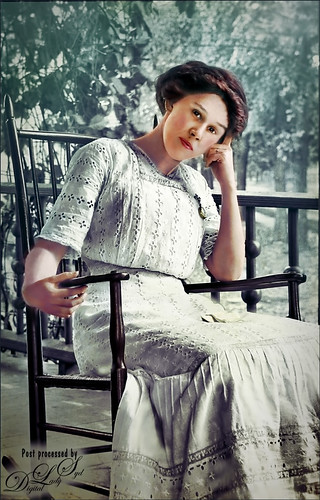
This was a black and white image from one of my favorite websites, Shorpy’s Historic Picture Archive (click on link to see original image). This image just sort of struck me as one I would really like to colorize. The first step was to sharpen up the image using the now free Nik Silver Efex Pro 2 to add some natural contrast to the overall image. Next I used two different methods in this image, although I probably should have stayed with just one, but here are links to my blogs on these techniques: How To Hand Tint a Vintage Image and Create a Brush To Do This blog and How To Colorize an Old Photo blog. A Red Channel Luminosity Curves Adjustment Layer was used to add in more contrast. (See my How To Use a Red Channel To Create a Nice Blended Image Effect blog.) On a stamped layer above (CTRL+ALT+SHIFT+E), opened Topaz (see sidebar for website link) Texture Effects 2. My Crisp Morning Run preset was run (this used the original Topaz Crisp Morning Run preset and switched out the Texture to a bright turquoise one half-way down the list and the Opacity was set to 0.29; also changed Vignette Strength set to 0.60 and Size 0.53.) Then in Light Leaks section, the Enable Masking was turned on. Brush tab was selected, and the woman was painted out with a brush around the head area (brush settings: Radius 0.50, Strength 0.59, and Hardness 0.30). In the Split Tone section, used the Enable Masking feature with the Spot tab to just hide the face area – set sliders to Transition 0.84 and Color Aware 0.86. Nik Viveza 2 (also free) was used to sharpen up the texture on her dress using a Control Point and the Structure slider. Added a Black and White Adjustment Layer set to Luminosity blend mode to balance the contrast. (See my How To Use a Black & White Adjustment Layer To See Contrast in an Image blog.) I just did not like the way her arm and hand on the chair looked too large so the Liquify Filter was used to adjust. Frooze the dress sleeve and chair behind and under the arm, then reduced the size and straightened the arm with Forward Warp Tool set to Size 300, Density 50, Pressure 100, and Rate 0 – just moved a little. Next PS’s Liquify Pucker Tool was set to Size 200, Density 50, Pressure 1 and Rate 80 – dabbed on hand a couple times. To enlarge the eyes just slightly, used the Bloat Tool set to Size 70, Density 50, Pressure 1, and lowered Rate to 32. Clicked once on each eye to just gently enlarge. Now all I could see was the red moire in the shadows of her arm skin and around eyes. Used Topaz DeNoise 6 set to overall Strength of 0.14, adjust Shadow 0.37, and adjust Color Red 0.69 to remove – set this layers opacity to 87%. I could paint these old vintage images all day long – really relaxing to do!…..Digital Lady Syd
Hello from a Queen
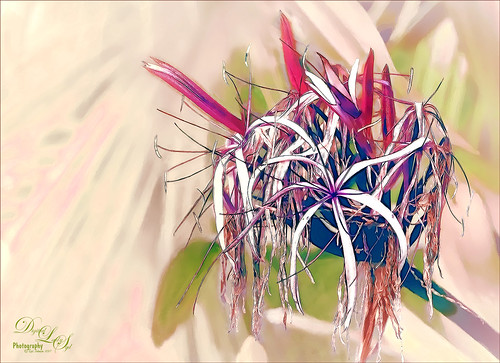
I was updating all my Topaz (see sidebar for website link) plug-ins this morning (many were updated in December 2016) and ended up experimenting with a few. I was using this beautiful Queen Emma Lily bloom, which was a difficult image to remove the distracting green background from the bloom. So I just started applying filters as I was checking update info. Topaz Black and White Effects was used to create an image with some color in it. Then on a stamped layer (CTRL+ALT+SHIFT+E) Topaz Clean’s Cartoon Desaturated preset was used to get a more detailed effect. On a duplicate layer Topaz ReStyle’s Zombie Ziggurat preset was applied. On another duplicate layer Topaz Glow was used. Lots of clean up layers were created to make sure it looks right. I finally found a fabulous Photoshop Pencil – Grut’s P Tin Softy – a new one he recently included in a great collection of 43 pencils. This brush was used to fill in black lines which were missing and adding a little color in little areas. Last step was adding Nik Viveza 2 to even out the background. That was all that was done!…..Digital Lady Syd
Happy New Year
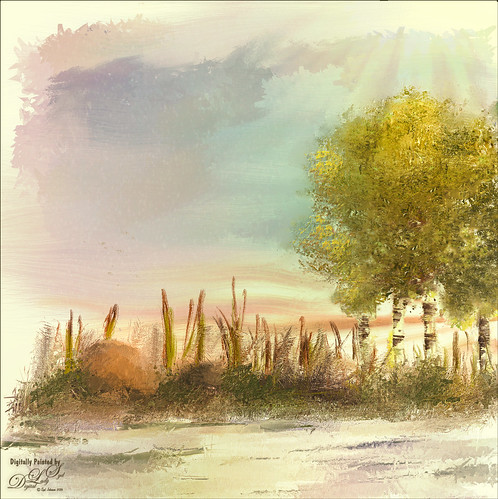
Wishing everyone a very Happy New Year and hope all your days are sunny as above in the coming year! I just created this image in Corel Painter – have not digitally painted in quite a while so it was fun to poen up Corel Painter and see what happened! Original painting used various brushes from Karen Bonaker, Melissa Gallo, John Lowther, and a few of my own. Then it was saved as a PSD file and brought into Photoshop where a few clean up layers were created using the Clone Stamp Tool and some regular brushes to even out the tones. The image was then taken into Topaz (see sidebar for website link) Texture Effects 2 to just give a nice overall effect to pull it all together. Last step, used Nik Viveza 2 to adjust the lighting to my liking. This was so much fun to create. Feels good to paint again!…..Digital Lady Syd
A Wintry Florida Holiday
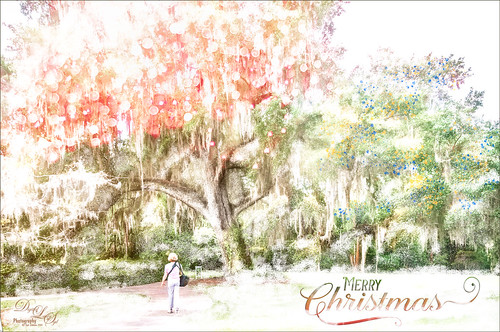
Having some Holiday fun here – spent a long time getting this beautiful entrance to the Henry P. Leu Gardens image to look like it was under the snowy spell of the Northern US. I would go over all the steps in detail, but it would end up pretty long. Just say that lots of layers were used which included: the Liquify Tool, the Clone Stamp Tool, Content-Aware Move, a couple Dodge Curve Adjustment Layers, Corel’s ParticalShop filter, Magic Dust Pretty Actions Brush layer, 100 Silver Lights Photo Overlays 16 and 17, Stroke and Spatter Dual Brush by John Derry layers, Topaz (see sidebar for website link) Impression 2 Chalk Smudge I preset, Alex Ducal’s Sketch Splatter brush layer, Pretty Actions Merry Christmas overlay, Grut’s FX Cloud Gumbo 01a brush layer, Topaz Lens Effect Reflector filter, and Nik Viveza 2 filter. Lots of fun! Have a Merry Christmas and Happy New Year!…..Digital Lady Syd
Red Hibiscus Holiday Cheer!

Thought I would post a little Holiday Cheer with this beautiful Chinese Hibiscus flower. Just had fun doing a little painting and playing to get this image. There was one really handy items that was used with this image – a Watercolor Mockup Template from Edimahendra – a set of wonderful watercolor splashes set up to use in Photoshop file as Smart Objects. I put these layers in a group and then added my own layers on top using different brushes – Magic Dust Pretty Actions Brush, Kyles Real Watercolor Spatter Dense brush, Melissa Gallo’s Scatter Brush, and Grut’s Inky FX Romato Brush. I put one of my Corel Painter textures on top and clipped a Hue/Saturation Adjustment Layer on top with Saturation set to -37. Then in a layer mask, used a soft round brush and painted out some of the texture over parts of the flower. Text layers were added to finish up. Merry Christmas Everyone!…..Digital Lady Syd
Tiger in Snooze Mode
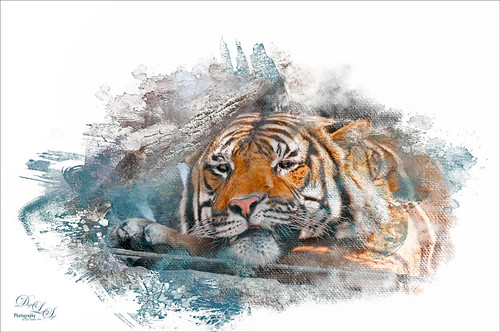
This Sumatran Tiger was trying to get a little snooze at the Jacksonville Zoo. What a cutie – guess he had to keep his eyes open a little just keep up with all the goings-on in his part of the zoo. Since he made an appearance in my 2016 Inexpensive Gifts for the Photoshop Lover on Your List Fun Photoshop Blog, I thought I would cover some of the things done to get this interesting effect. First the fencing in front of his face had to be removed and the very handy Spot Healing Brush worked wonders on this. A stamped layer (CTRL+ALT+SHIFT+E) was then placed on top. Lucis Pro 6.0.9 (no longer available) was applied. On another stamped layer, Topaz (see sidebar for website link) Lens Effects Reflector filter was used to even out only the parts of the face in the shadows. The eyes were brightened using an Exposure Adjustment Layer (see my How To Do a Quick Eye Sharpening In Photoshop blog.) All these tiger layers were grouped. Next Jai Johnson’s Unpredictable Collection Texture 25 was placed underneath this group. It was duplicated and the second one was set to Multiply blend mode at 82% layer opacity. Now, on the group on top, a black layer mask was added (CTRL+I in the mask to make it black). I just painted in white with a rough edged chalk brush the parts of the tiger I wanted to show up. A little of the free Nik Viveza 2 was added, and a canvas texture set to Soft Light blend mode at 42% layer opacity was placed on top. Love the effect of these textures by Jai…..Digital Lady Syd
A Bird Christmas Tree
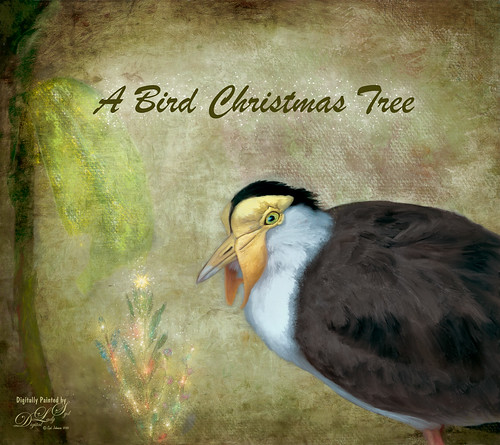
This bird is a Masked Lapwing that was photographed at the Palm Beach Zoo. I decided I needed to practice some painting so I picked this funny guy who sort of waltzed into my shot. Since the background was not too exciting, I decided to give him a little more holiday spirit by both painting and adding several filters. This image uses a lot of different filters and textures. The background texture is from Kim Klassen called Papertrio Paper and Paste (not sure it is still available but she has some beautiful textures) – applied twice, the second time set to Hard Light at 49% layer opacity. Topaz (see sidebar for website link) ReMask was used to select the bird and put him on his own layer – then used the Mixers to paint him. Used Grut’s MI Sues Hedge brush to soften and get the pretty edging between the brown and white feathers and am finding this to be a very useful mixer! Also used one of Fay Sirkis’s hair blenders. Have to find the right brushes to paint these guys! French Kiss (see sidebar for website link) Myrica Gale png was used for the plant – color was painted on a layer underneath it to add some colors. On a stamped layer (CTRL+ALT+SHIFT+E) Topaz Impression 2 was opened and Cezanne 2 preset was applied but masked out the bird to retain my painting strokes. On another stamped layer Topaz ReStyle’s Emerald preset was applied. Set the opacity to 69%. Corel’s Partical Shop was opened and used the Flame brush to paint a little color in the tree leaf and used Cluster brush to add some lights to the plant. Then used the Star brush to create the bright star on top and added a little color in by turning off the Glow and painting a little on the branches. Its Eraser brush was used to soften the effect a little. (See my Intro to Corel ParticleShop Brushes for Photoshop blog.) Back in PS, this layer looked pretty bright so lowered the opacity. Magic Dust Pretty Actions Brush was used to add a little white snow effect on tree and underneath text. Added some texture and clean up was done to finish up……Digital Lady Syd
Purring Tiger
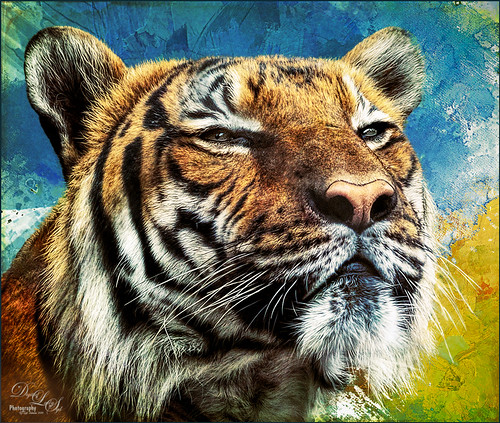
This image is of a Malaysian Tiger at the Palm Beach Zoo – I think he was actually purring – I sort of connected with him. I tried a couple different plug-ins on this guy. Started with Topaz (see sidebar for website link) Clarity, then Topaz Clean’s Cartoon preset where a black layer mask was added and just the whiskers were painted back to give the sharp effect. First time I have used this plug-in so it was really good to see the results. Used PS’s Select and Mask panel and then followed up with a Defringe of 1 px to get rid of the gray edging. Used two of Jai Johnson’s new Unpredictable Textures for the interesting painted look behind him. On a stamped layer (CTRL+ALT+SHIFT+E) and applied Topaz Texture Effects 2 – one of Blake Rudis’s from a while ago (check out his videos on Topaz Labs). On another stamped layer Nik Viveza 2 was applied and that was it. It has a bit of an engraved feeling to it and was a lot of fun to try…..Digital Lady Syd
Bird of Paradise
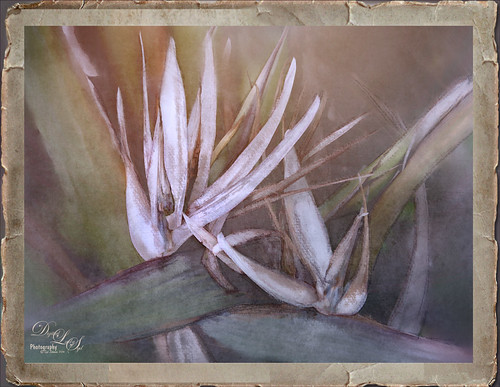
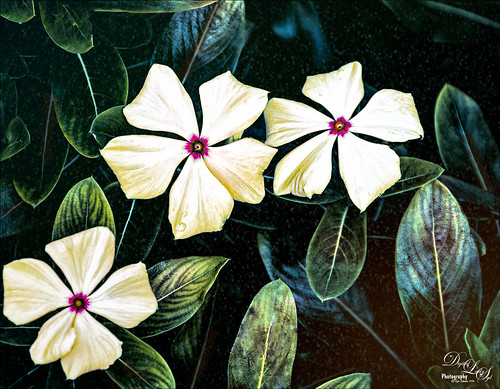
This beautiful white flowers in a Bird of Paradise in my front yard was fun to post-process. Used Topaz (see sidebar for website link) Clarity to sharpen overall, and Topaz Simplify with the Simplify Size slider set to 0.17 which removed some of the bad spots on the leaves. Painted on the flower stems and stalks to further remove bad areas and add a little texture to them. Used the Corel ParticleShop plug-in to remove the background area using Blend brush and the Blender Tool. This plug-in can be very handy! On a stamped layer (CTRL+ALT+SHIFT+E) Topaz Texture Effects 2 was used – used Fall Foliage Foggy Morning (downloaded from the Topaz Community) with a few adjustments to the Basic Adjustments section. In the Texture section, masked the texture off the focal point with the Brush tab set to a Strength of 0.66. Did some clean up and added the free Nik Viveza 2 to enhance the focal point. Added Sarah Gardner’s Frame Collection Paper Frame 05 on top that is a free download. That is all that was done for this nice vintage effect!…..Digital Lady Syd
Flowers Enjoying the Day
These cute little flowers are Crepe Jasmine, I believe, and are growing in my front yard. Not a whole lot post-processing on this image. Topaz (see sidebar for website link) Clarity was used to sharpen up the overall image. On a duplicate layer Lucis Pro (unfortunately no longer available) was set to Enhance (R161/G169/B67). Duplicated the layer again and applied Topaz Texture Effects’ Winter Wilderness preset. On yet another duplicated layer, Nik Viveza 2 (now free) was applied to darken the corners slightly and sharpen the focal point at the center of the flowers. Finally, a New Layer was opened on top. Used a soft round brush to paint with black at a very low opacity to reduce the brightness of the stems of the flowers and leaves. Applying the Lucis Pro plug-in gave the very well defined effect on the leaves and flowers. This image was a lot of fun to do!…..Digital Lady Syd
Feeling Fancy
Thought I would do another image to show what the Corel ParticleShop brushes can do for an image. Here is a little gray heron recently taken sitting on my porch screen (see link to original image). The Exclusive Pack of brushes was used to create this image – these come with the plug-in when it is purchased. Here are the brushes that were used in this image: used the Fabric brush and painted out the fancy wings – Size 73/Opa 52; used Hair to add in more bluish lines in the wings – Size 120/Opa 100/Value Variability 5/Min Length 25; used the Wild Grain to some texture to sky used bluish tones – Size 75/Opa7/Count 15/Grain 55; used Cluster to add some little flecks in the head feathers Size 73/Opa 67 with yellow/white flecks and no Glow; used Fur to add some yellow cast on the light side of the bird; used Lightwaver to add the feathers on his breast; and used Fur to adjust the yellow over the breast areas. On a layer above Topaz (see sidebar for website link) Texture Effects 2 was applied with a few adjustments. That was about it! Love this regal bird!…..Digital Lady Syd
Happy Thanksgiving!

Happy Thanksgiving to all my US friends celebrating the holiday today!
This was a really quick image to create – just used one of 2 Lil Owls Workshop textures for the background (see sidebar for website link). On New Layers above: Selected a Snow Brush to add a little holiday feel; added some brush strokes using a leafy floral clip art that was turned into a brush and a Bevel and Emboss layer style added to the layer; used Grut’s Inky Leaks FX Il Romato brush (one of my favorite in this great set) to paint over the stalks for some nice detail; and a chunky brush to add in different colors. On a stamped layer above (CTRL+ALT+SHIFT+E), Topaz (see sidebar for website link) Texture Effects 2 using a Dingy Cream preset was applied. A Stroke, Gradient Overlay and Outer Glow Layer Styles waere added to the text layer. The clip art is from Graphics Fairy and used Stroke, Inner Shadow, and Outer Glow Layer Styles. Fill Color and Pattern Fill Adjustments Layers were clipped to the clip art (ALT+click between the layers to clip)……Digital Lady Syd
The Jumper

Just had some fun taking some pictures at Ohe’o Gulch (also called Seven Sacred Pools) on Hana Highway in Maui, Hawaii, a while back. The original image was much larger with people standing on top and swimming below! Very popular place! Note: people are not encouraged to dive or jump into the water here as it is very hazardous and many fatalities have occurred. Just wanted to see if I could get a nice waterfall effect using an old tip on how to smooth out waterfalls. (See my Smoothing Out Those Waterfalls blog.) Two Motion Blur filters had to be used since the water was falling in slightly different directions. To get the soft look in the rocks, used Topaz (see sidebar for website link) Texture Effects 2 and a preset I created called SJ Soft Pastel Effect which uses a Basic Adjustment (need to set to individual image), Diffusion (Strength 0.57, Softness 0.38, Blur 0.39); Split Tone (Highlight Saturation 0.12, Highlight Hue 0.48, Shadow Saturation 0.07, Shadow Hue 0.70, Balance 0.63, and Opacity 1.00), Vignette (use setting to fit your image), Borders (the second row up from bottom on left; Texture – Soft Grunge light beige/gray vertical lines (middle column, 7th row) – Size 1.00, Opacity 0.63, Blending Mode Saturation, Detail 0.07, Saturation 0.08, Color Strength 0.14, Color 0); and Light Leaks (a gold and yellow disk from upper left (2nd row from bottom and left column), Size 1.05, Blending Mode Color Dodge, Saturation 0.68, Color Strength 0.46, Color 0.45). A little burning around the jumper was the last thing done. This was a pretty neat place to visit!…..Digital Lady Syd
A Guilded Age Bathroom
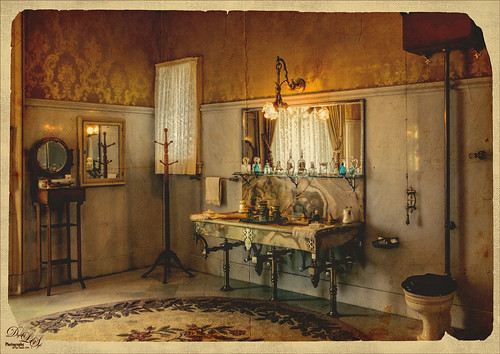
This image was taken at the Flagler Museum (Whitehall) in West Palm Beach, Florida. The image was actually post-processed without the border or vintage effect. Topaz (see sidebar for website link) Clarity, Lucis Pro (no longer available), Topaz ReStyle and Topaz Lens Effects were used to begin the process. I was actually really happy with the results, and then Adobe came out with Photoshop CC2017. If you open a New Document, now a New Document Dialog box opens – select the Photo tab at top and Templates is one of the choices. I scrolled down to Vintage Photo Effects which was downloaded and my image was placed on top. In the template I changed the background layer color and added a grunge overlay set to 47% layer opacity. I also clipped (ALT+click between the layers) a second texture under the Vintage Photo Paper. The Vintage paper texture was set to 47% layer opacity. Last step was to open up the now free Nik Viveza 2 to sharpen up the bottles and detail throughout the pix. The lighting was a little difficult to handle in this image due to the mirrors and the light coming in through a bright window off to the left. Try out Adobe’s free templates if you want a little different look……Digital Lady Syd
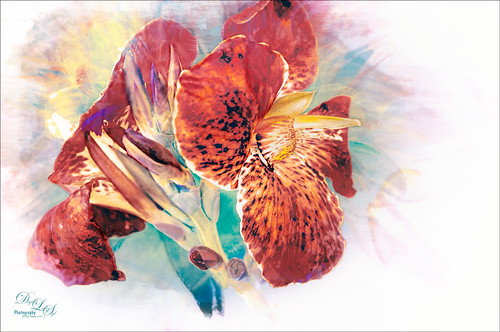
Just a Flower
Had some fun painting this Canna Lily growing in my front yard. Used Topaz (see sidebar for website link) Clarity and ReMask (to select the flower) before adding one of my textures behind it. Then on a New Layer above, just painted the lily using Jack Davis’s Wow C Oil Blender 2 Mixer Brush that can be downloaded from his Facebook page. Topaz ReStyle was used to soften the color a little using a preset called Cotton Cloud set to Luminosity blend mode at 38% layer opacity. Some lines were added on a layer above and the last step was to add some texture using Just Jaimee Summer 2012 Brush Sampler 4 with a Bevel & Emboss layer style. It was set to Pin Light Blend Mode at 64% layer opacity. Last step used Nik Viveza 2 to emphasize the focal point. Pretty simple and lots of fun!…..Digital Lady Syd
Fountain Grass
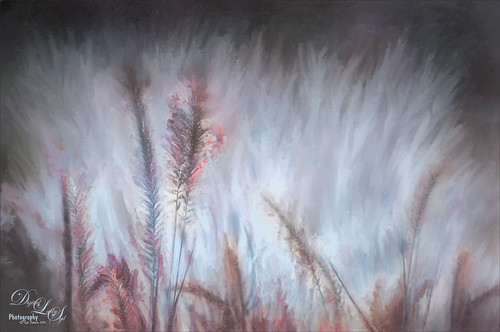
Took this image of fountain grass in my front yard. The original image shows the yard of my neighbor across the street so the first step was to blur the image to get rid of their yard. Used Photoshop’s Blur Gallery set to Iris Blur at Blur of 220 px. Individual stamped layers (CTRL+ALT+SHIFT+E) were created for each of the following filters: Topaz (see sidebar for website link) Black & White Effects was used to give a soft purplish tone, Topaz Clarity was used to sharpened just the foreground stalks, and Topaz Impression (Fine Brush Scumble II preset) was applied and the foreground stems painted back in a mask – then on a New Layer above, the Mixer Brush was used to smooth out the background. On another stamped layer Topaz ReStyle was opened and the Brown and White Pooch preset was used with adjustments – then in a white mask the foreground stem were painted back. Several mixer brush painting layers were added to give the water spray feel. The last step was to use Nik Viveza 2 to give a light vignette effect in the corners. This image was a lot of fun to paint!…..Digital Lady Syd
A Rainbow Tree
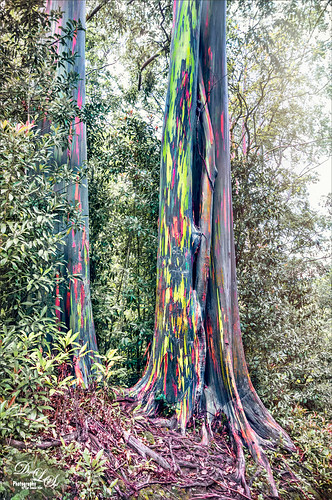
This image is of a beautiful, but unfortunately vandalized, Rainbow Eucalyptus Tree in Maui, Hawaii. Why people would do such a thing is hard to understand! It is a very unusual tree that only grow in frost-free zones. This image a preset in Topaz (see sidebar for website link) Adjust as seen in a Topaz Webinar by by Joel Wolfson called Creative Essential with Topaz Plug-ins Plus the Official Introduction Glow 2. Topaz Glow was used to brighten up the rainbow on the trunk. The last step was using Topaz Texture Effects 2 and the Breaking Down preset. I have never seen this type of tree anywhere else!…..Digital Lady Syd
BFF’s!

These two guys are from different places – not BFF’s at all – the larger elephant is from that wonderful object program called PixelSquid (see my How To Use the PixelSquid Add-on In Photoshop blog), and the other is from an image I took of the elephant at the Jacksonville Zoo. Just a few steps here: the plants are from brushes created mainly from my favorite plant brushes by Frostbo Brush Grass Set2 with a Bevel and Emboss added to it; both elephants were worked on using Lucis Pro (no long available); Topaz (see sidebar for website link) ReStyle was used to get the correct color effect; and the now free Nik Viveza 2 was used to get the correct focus on the elephants. It actually took me several hours to get the effect, but I love the texture…..Digital Lady Syd
Beautiful Flower
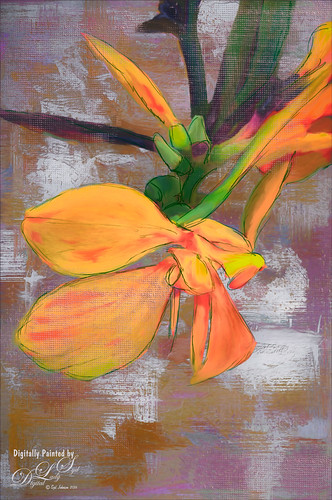
The flower in this image was an orange Canna Lily that grow really well in Florida. Topaz Detail 3 was applied to sharpen the image first in Photoshop. On a stamped layer, the Topaz (see sidebar for website link) Impression 2 preset as created in my Adding a Creative Touch in Topaz Impression 2 was applied, but this time the Coverage was set to 0.12, Coverage Transition 0.03, and Coverage Center X -0.13/Y 0.31. In the Masking section, the Spot Transition was set to 0.93 and Color Aware was set to 0.27 and the effect was placed on the center of the flower. The really bright colorful background could be controlled this way. Next a Black & White Adjustment Layer was added and set to Luminosity blend mode to get the tones correct. (See my How to Use a Black & White Adjustment Layer to See Contrast in an Image for more information on this.) On another stamped layer, Topaz ReStyle was applied a preset that used some colors from a previous image I had processed. (See my How to Use a Topaz ReStyle Trick for Improving Your Image blog to do this.) Two Curves Adjustment Layers were used to apply dodging and burning in the image. (See my How to Use Curves Adjustment Layers to Dodge and Burn an Image blog on how to do this.) On top of those, a Color Lookup Adjustment Layer was applied using the Filmstock_50.3dl filter. A light pink Color Fill Adjustment Layer was placed on top and set to Color blend mode. Last step used the now free Nik Viveza 2 plug-in to draw attention to the focal point. Lots of fun to do!…..Digital Lady Syd
The Beautiful Snowbush
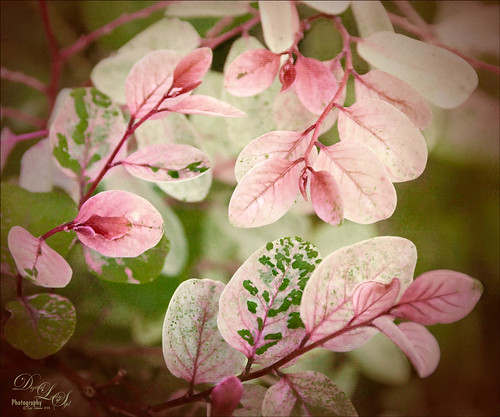
This a beautiful Snowbush growing in my front yard. I just love the colors and patterns in the leaves of this bush. Very simple post-processing here. Duplicated the layer and used Lucis Pro (no longer available) to sharpen the image. A black layer mask was added and just the leaves in the focal point were painted back. One of my Photoshop textures was applied on top (see my Get Rid of That Color! blog that used the same texture and free brush links). A Hue/Saturation Adjustment Layer was clipped (ALT+click between layers to clip) and set to a pinkish color. The texture layer was set to Soft Light blend mode at 68% layer opacity. Topaz (see sidebar for website link) Lens Effects’s Rusty Edges Vignette was applied. A Black & White Adjustment Layer was added on top using a Luminosity blend mode and the sliders were adjusted to get a nice color effect; then it was set to 64% layer opacity. It still needed a little more sharpening – I wanted a more depth in the image so Topaz Detail 3 was opened on a stamped layer on top (CTRL+ALT+SHIFT+E), and the Interior Detail I preset was applied – it looked over the top but there was just the right amount of sharpening in some places. A black layer mask was applied and just those areas that needed were painted back in white. I believe it did add that extra depth that really makes the image…..Digital Lady Syd
Vintage Pottery and Glassware
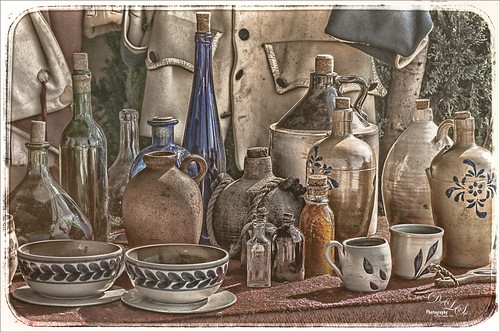
This image was taken at a Native American Festival of a pottery and glassware display. Since the items are so vintage, I decided to a add a vintage feel to the image. After doing some Basic Panel corrections in Lightroom, the image was duplicated in Photoshop and Lucis Pro 6.0.9 (no long available) was used to sharpen the image. A stamped layer (CTRL+ALT+SHIFT+E) was added on top the free Nik Analog Efex Pro plug-in was applied. This filter is really fun to play with and gives some beautiful vintage effects! These filter effects were stacked: Basic Adjustments, Light Leaks, Film Type, Frames, and Levels & Curves which includes a Luminosity curve which is very handy! If you have never used this filter, note that many of the sections allow you to move the effects around within the image. Back in PS, a Red Channel Luminosity Curve Adjustment Layer was created. (See my How to Use a Red Channel to Create a Nice Blended Image Effect blog for more info on this.) On another stamped layer, Nik Viveza 2 was used to emphasize the focal point. It was just slightly too bright for that vintage feel, so a Pattern Fill Adjustment Layer was added using a light cream color pattern set to a Color Blend Mode at 52% layer opacity. That was it! I love the vintage effect!…..Digital Lady Syd
Bird on a Bird Cage
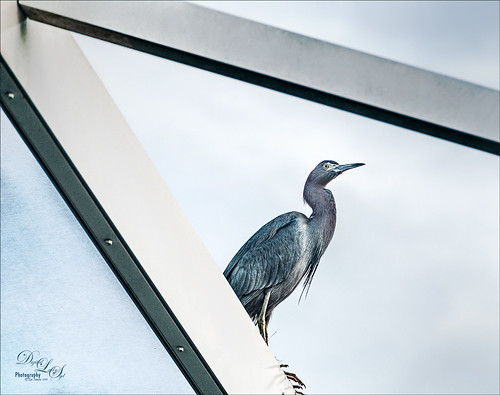
This Little Blue Heron decided to check in on us while we were having dinner on our back porch without electricity after Hurricane Matthew. The screen is blown out there I could get a really nice shot of him. He is a real beauty! Usually I paint these guys, but this time I decided to try out Lucis Pro 6.0.9 (no longer available) on the bird and really liked the results (Enhancement sliders R91/G101/B19 & Assign Original Image Color 5/95). Used the Camera Raw Filter to remove a slight amount of noise the Lucis Pro filter added. On a stamped layer above, Topaz Texture Effects 2 (see sidebar for website link) was applied using the Texture and Vignette filters. The filter mask was used to get the effect correct. Last step was to use the now free Nik Viveza 2 to draw more focus to the face of the bird. That was it. The birds are so pretty around here!…..Digital Lady Syd
Just Being Purple
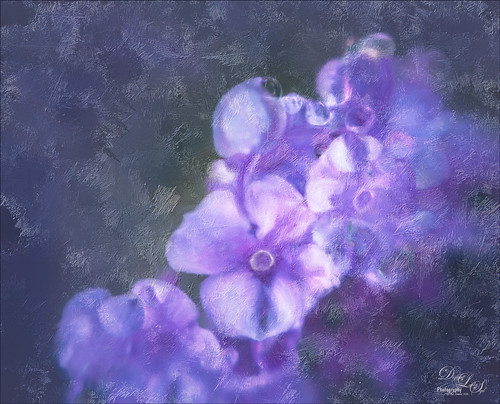
These pretty little purple lantana grown in my front yard and had some fresh water drops on them. Just found out in the reference link that their berries are poisonous and the leaves toxic to animals. It is considered an invasive plant in Florida – all this just to get a few butterflies! Used Lucis Pro (no longer available) to sharpen up the flower edges a little. In the now free Nik Color Efex Pro 4, the Vignette filter and Glamour Glow were used. Lots of petal clean up on separate layers , but what really made this image pop was the Melissa Gallo texture called Snowy Sky set to Linear Light blend mode. This texture gave a really nice icy look which I think goes with purple perfectly!…..Digital Lady Syd
Vintage Car
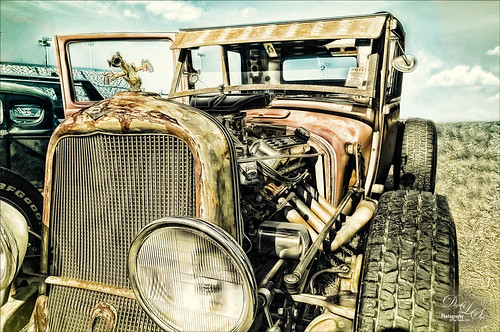
Took this image a while ago at a Turkey Run held in the infield of the Daytona International Speedway (see seats in upper left). Basically just used Lucis Pro (no longer available) set to Detail 65, then opened image in the now free Nik Silver Efex Pro 2 where the High Structure (Smooth) preset was applied. The layer was set to 37% opacity back in PS. Dodged and burned using Curves Adjustment Layers. Used On1 Photo 10 Effects (see sidebar for website link) and stacked these filters: Tone Enhancer, Color Enhancer, Glow, and Split Tone. Topaz (see sidebar for website link) Glow was then applied to a stamped layer above using the Morning Mist preset with some adjustments. It took a while to do this image but it was a lot of fun to try the different combinations of filters!…..Digital Lady Syd


